–Set it and Forget it Chicken Taco Chili

This is a very easy recipe and will cook in the slow cooker on high in 6 hours! So set it and forget it. This is a re-blog from a while ago so if you missed it you get another shot at it and if you already made this recipe here you go again. If you’re looking for something easy to make this week that is also delicious — It’s super yummy served with soft tortillas and rice or keep it simple but use the soft tortillas. Also guacamole and salsa don’t hurt a bit alongside some warm tortillas!

 No muss No Fuss come tonite, all the heavy lifting is done by noon. My kind of cooking.

Slow cookers make for perfect cooking all year round. Nothing better than setting it and forgetting it! Making life easier and less clean up after dinner. I happened to have a package of Taco Seasoning Mix in the house so I used it along with cumin and chili powder. I used dark meat and white meat chicken, you can use whichever chicken you’d like. Just set it and forget it and come home to this delicious meal of chicken . If you don’t own a slow cooker this may be a good time to buy one!

Follow me on Instagram @cookingwithcandi I’ll be looking for you!

Ingredients:

1 small yellow onion , chopped

1 15 oz. can black beans, drained-you don’t have to rinse the organic beans. If you already have them in the house and they’re not organic just rinse them with water and drain.

1 15 oz. can red kidney beans, drained -you don’t have to rinse the organic beans–same instructions as above

1 8 oz. can tomato sauce

10 oz. package frozen corn kernels

2 10 oz. cans diced tomatoes with chilies –available in the Mexican Food aisle in the supermarket

4 oz. can chopped green chili peppers, chopped–also available in the Mexican Food aisle

1 packet Taco Seasoning- *if you don’t like using Taco Seasoning see note below

1 tbsp. cumin

1/2-1 Tbsp. chili powder

Kosher Salt to taste–if using the package of Taco Seasoning you may not need extra salt , wait till 6 hours of cooking are over and taste for salt . I sprinkled a little bit at the end of seasoning to taste.

3 boneless skinless chicken breasts and I added 6 small skinless , boneless chicken thighs and if you cannot find boneless don’t worry because the meat will fall off the bones and you can remove all the bones from the chili before serving.

I don’t know the nutrition information but I have to believe that this is a fairly low-fat , low caloric way to go. I added the dark meat so maybe not as light as you can make it. Enjoy!

*handful of fresh cilantro – chopped if you would like

Directions:

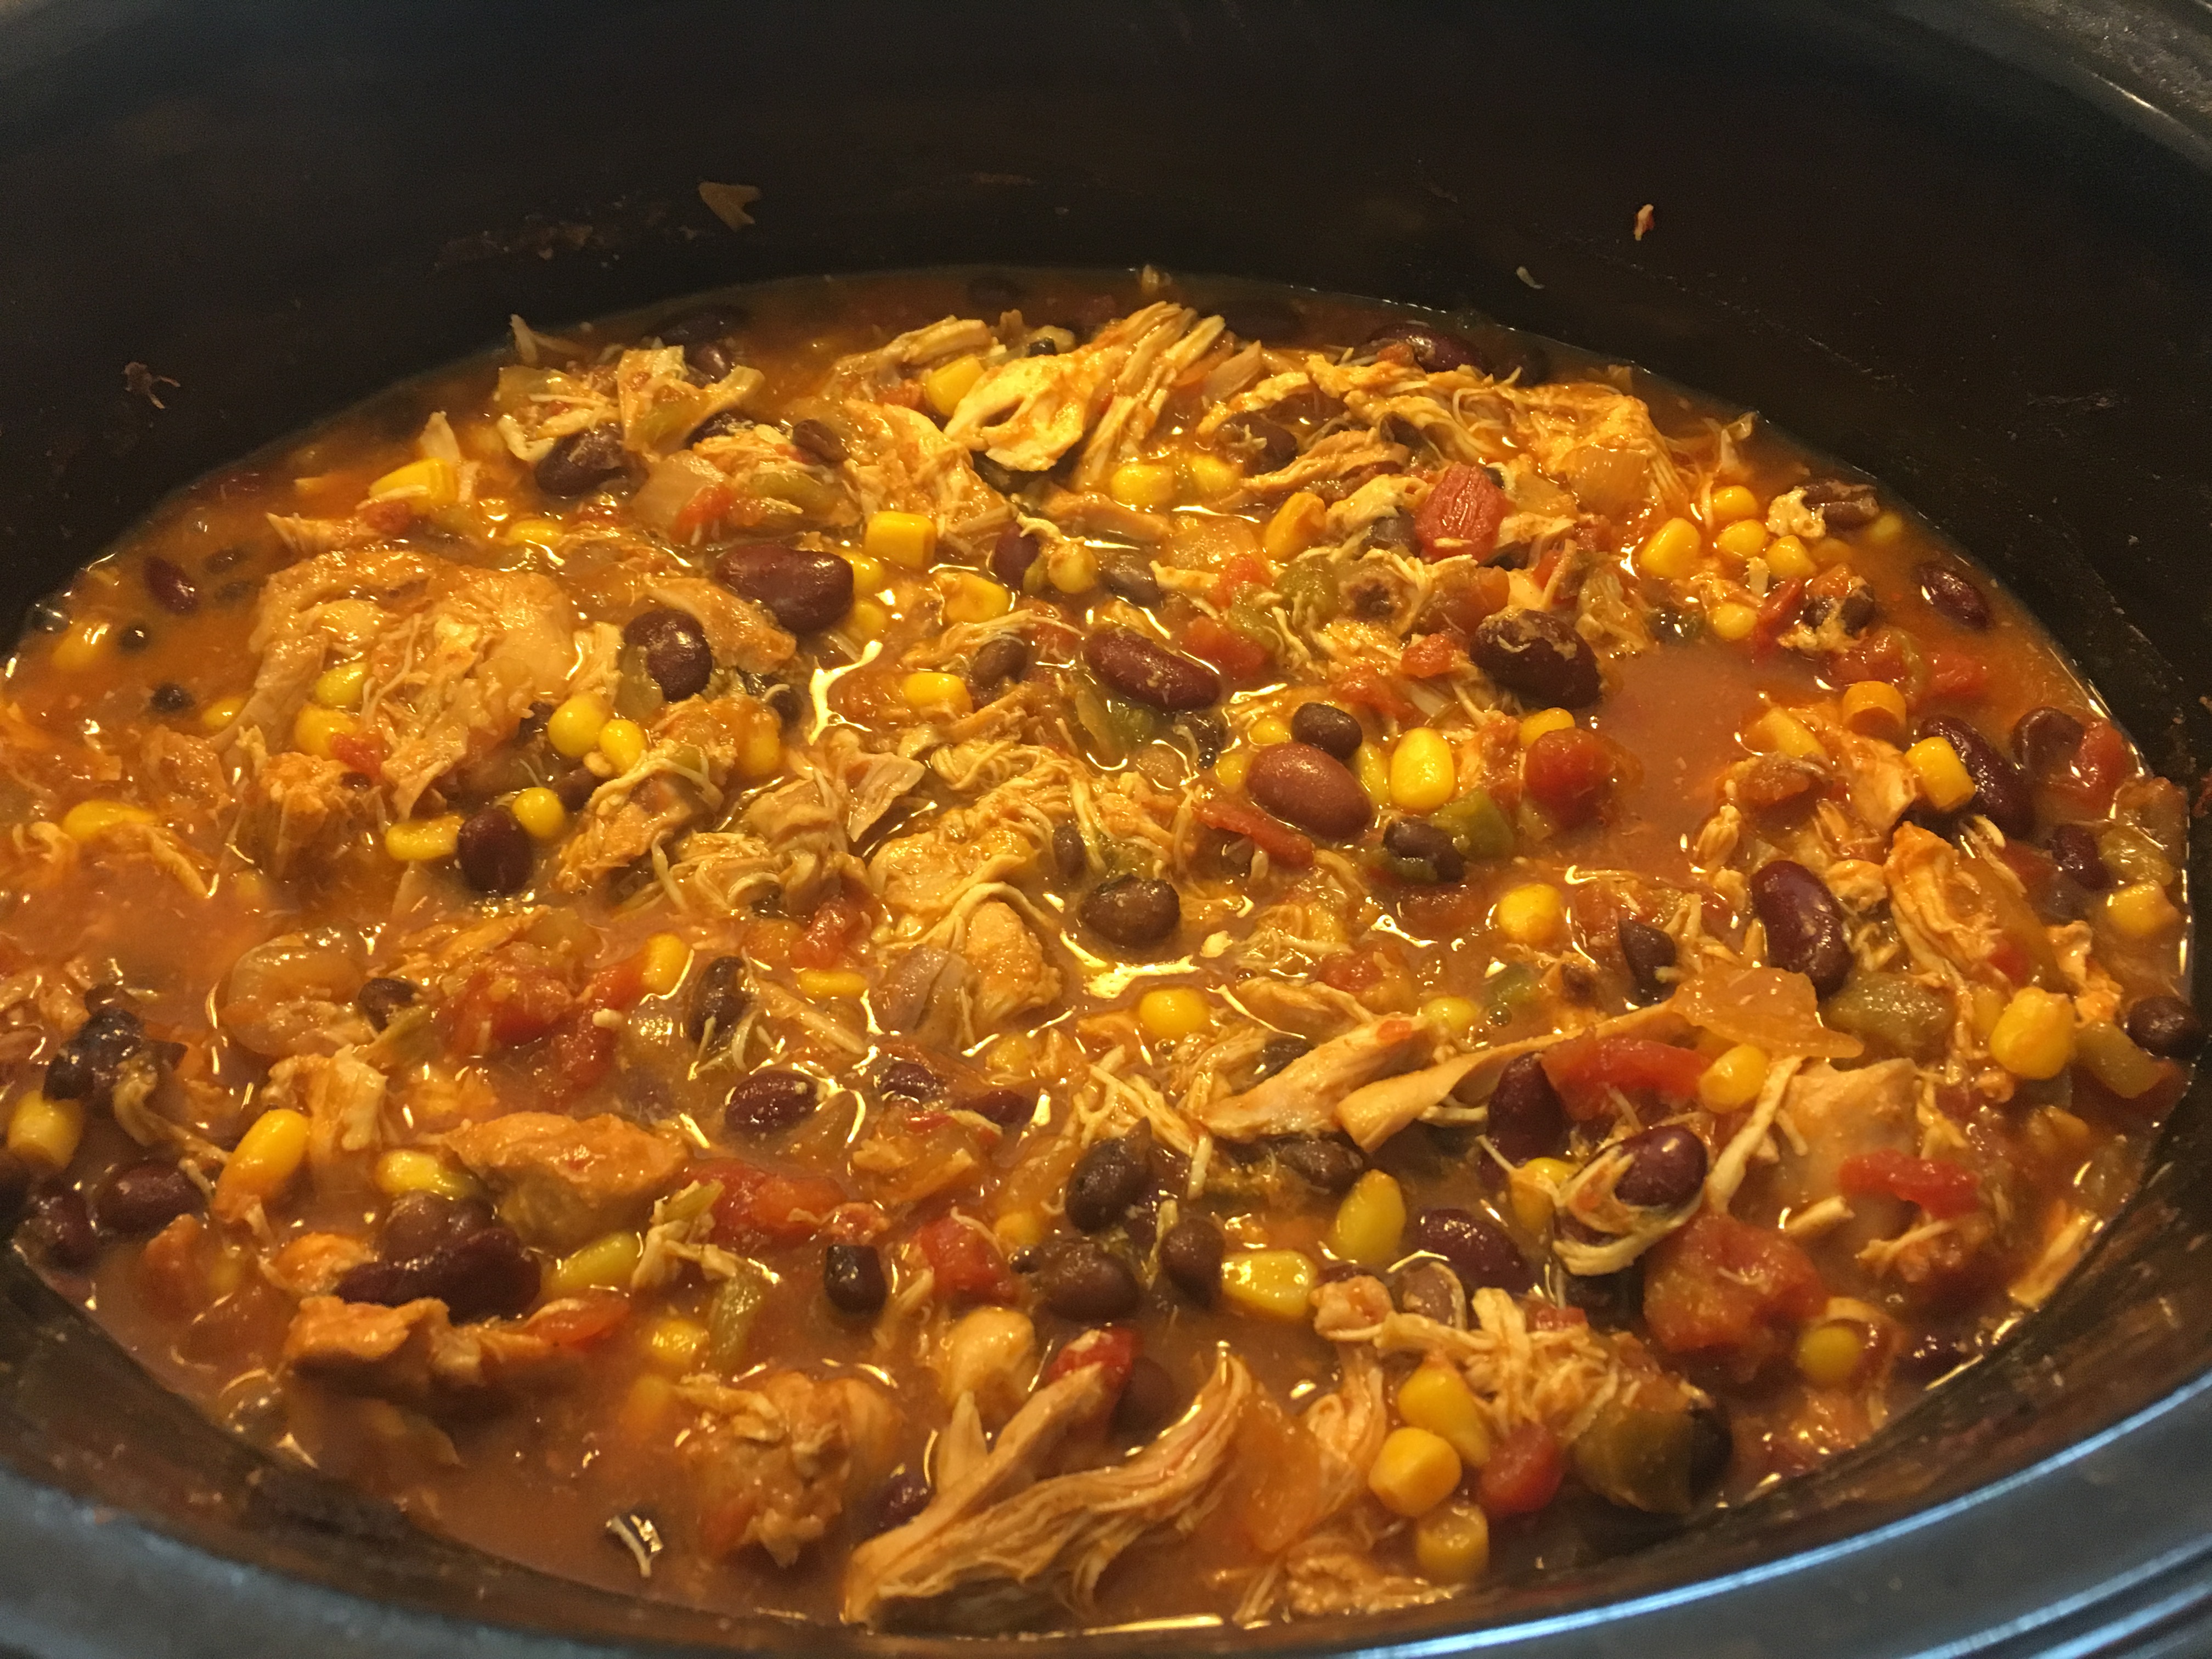
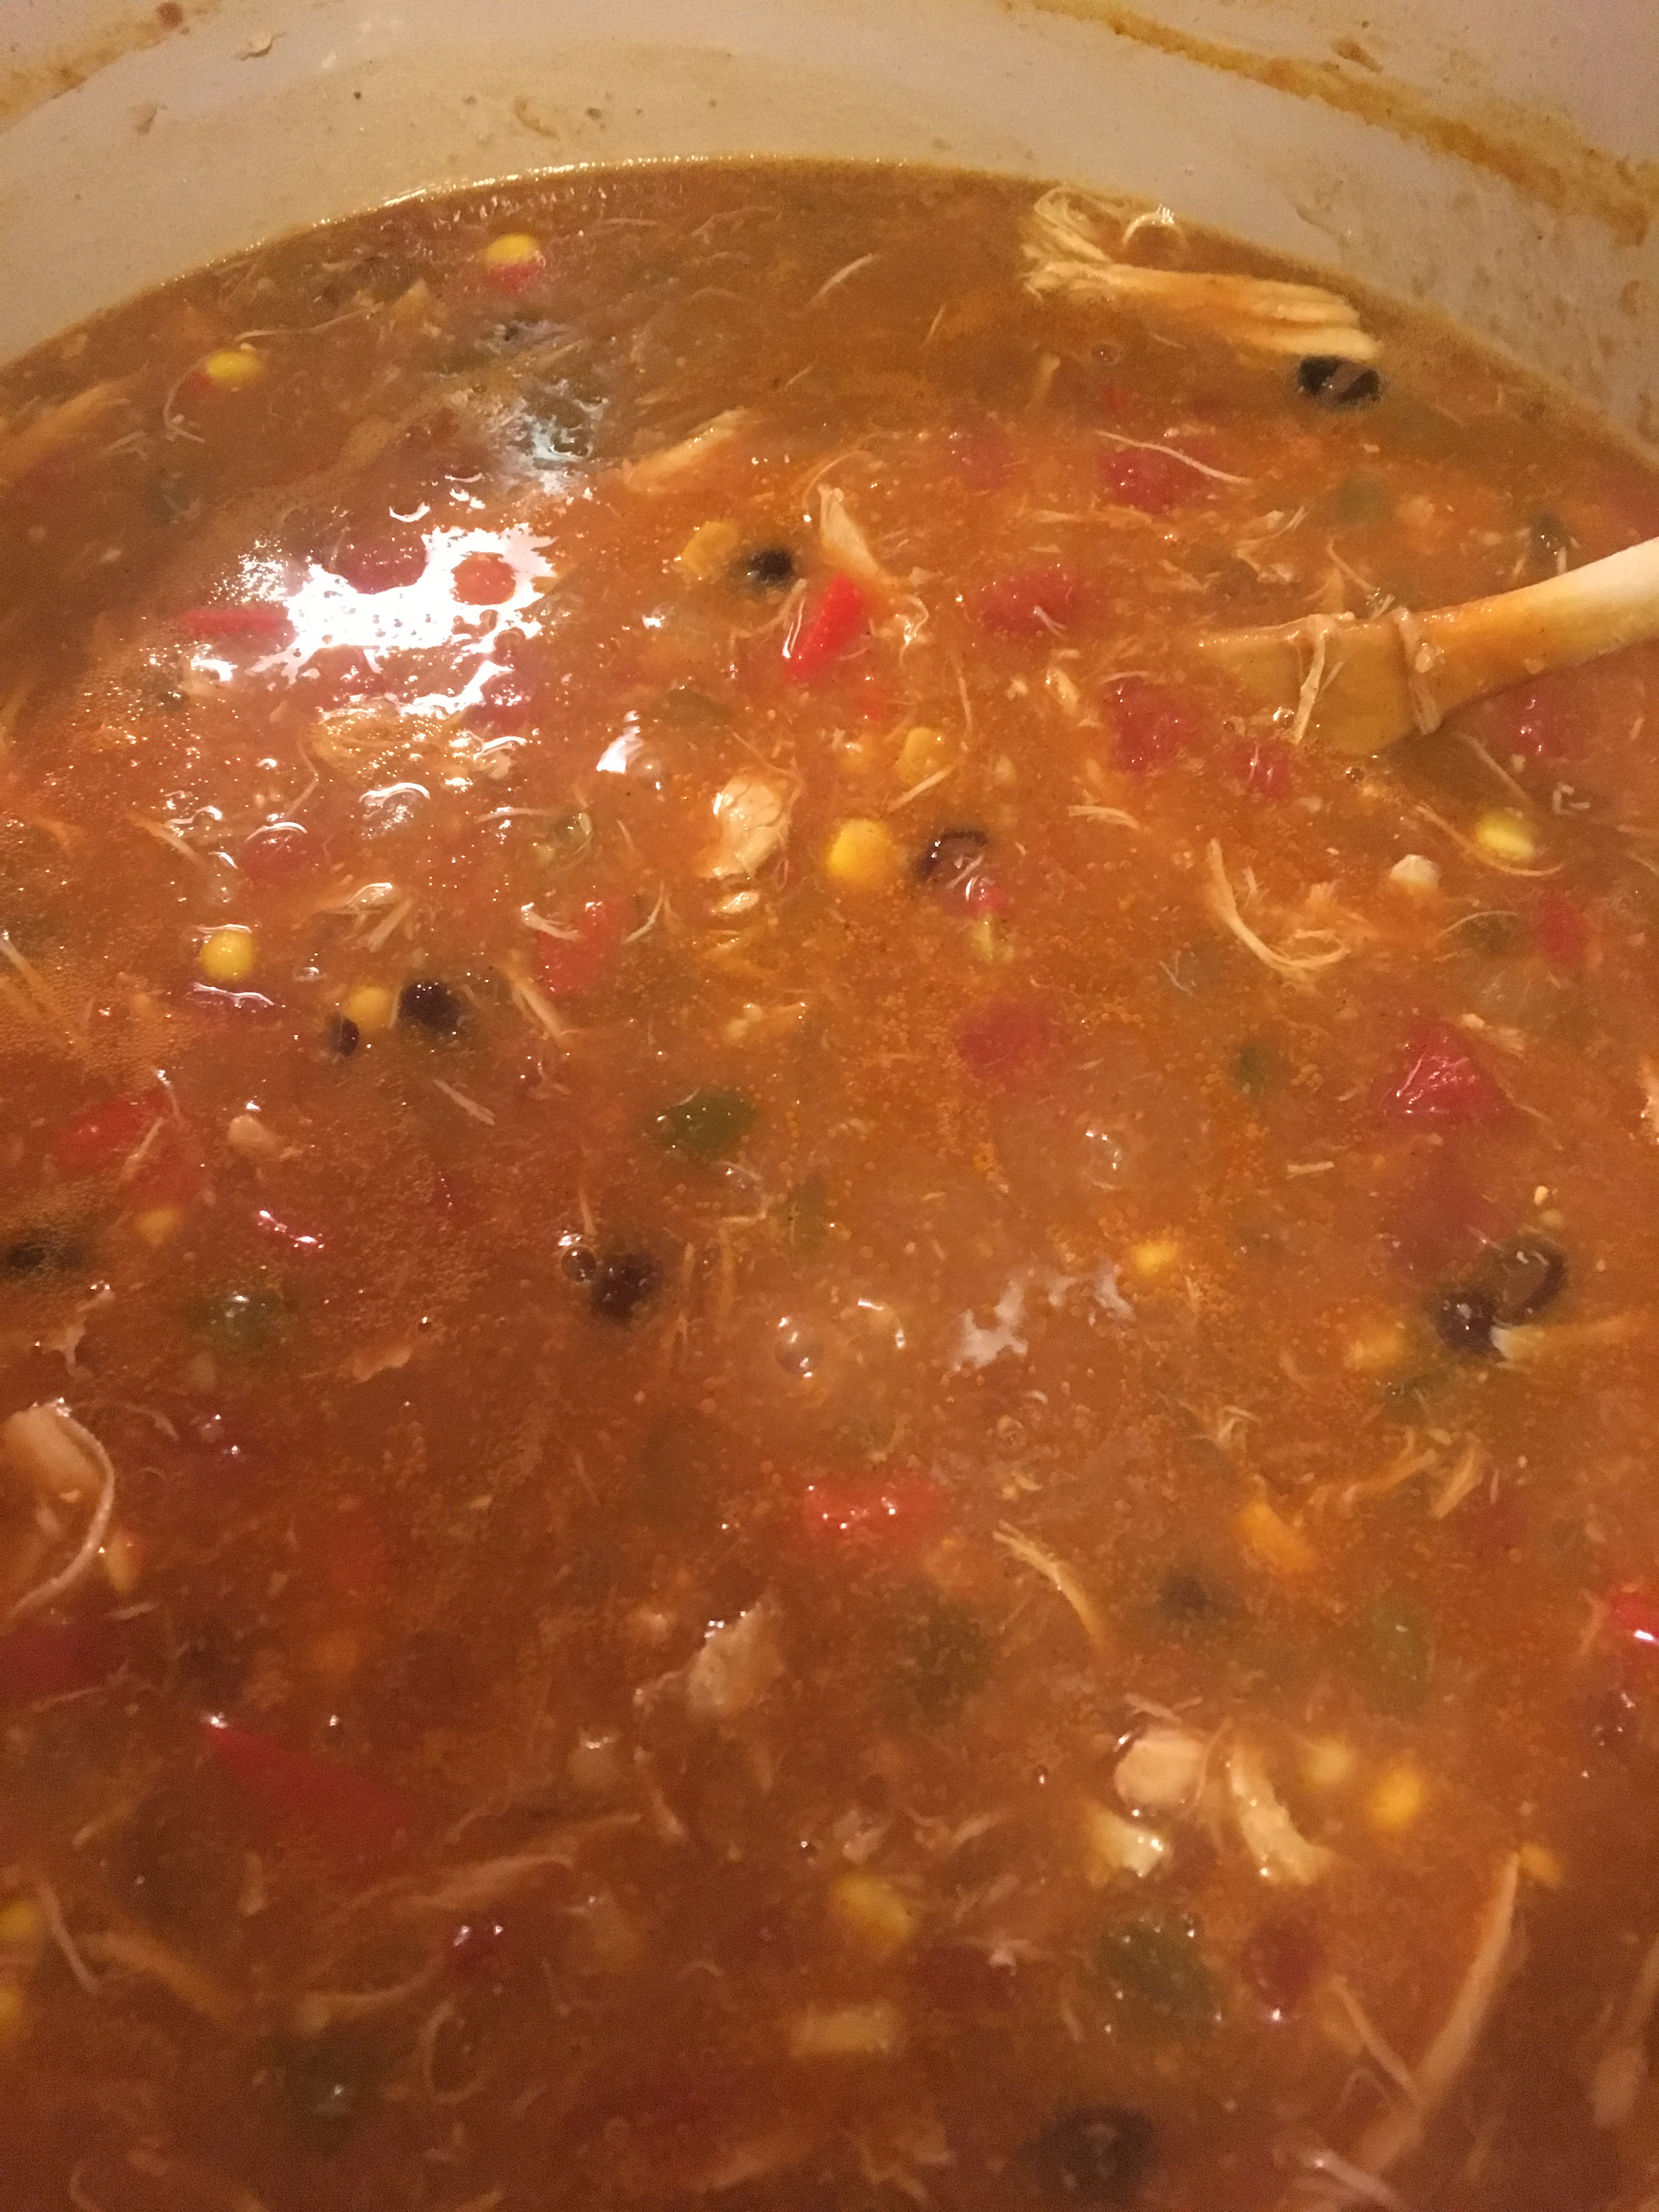
Combine drained beans, onion, chili peppers, corn , tomato sauce, diced tomato, cumin, chili powder and taco seasoning in a slow cooker and mix well.

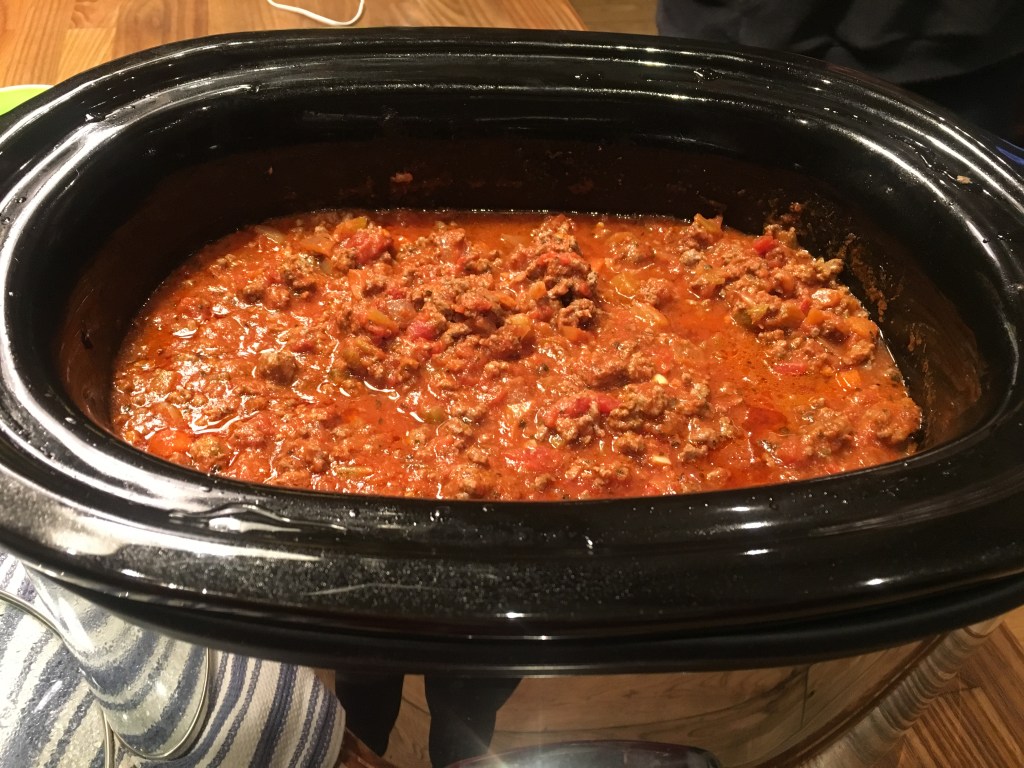
Nestle the chicken in to completely cover and cook either on Low for 8-10 hours or on High for 4-6 hours. I did it on high for 6 hours.

App. 1/2 hour before the cooking was over I thought I would shred the chicken, when I opened the slow cooker and started to stir the chicken it all just fell apart on its own!!! This was so amazing how I didn’t even have to do that. I guess it cooked so long that it just fell apart! This was just perfect and tasted so delicious! If that is not your experience and you only cook for 4 hours you may want to shred the chicken yourself about 1/2 hour before finished. But mine really did shred itself as I stirred it with a wooden spoon.

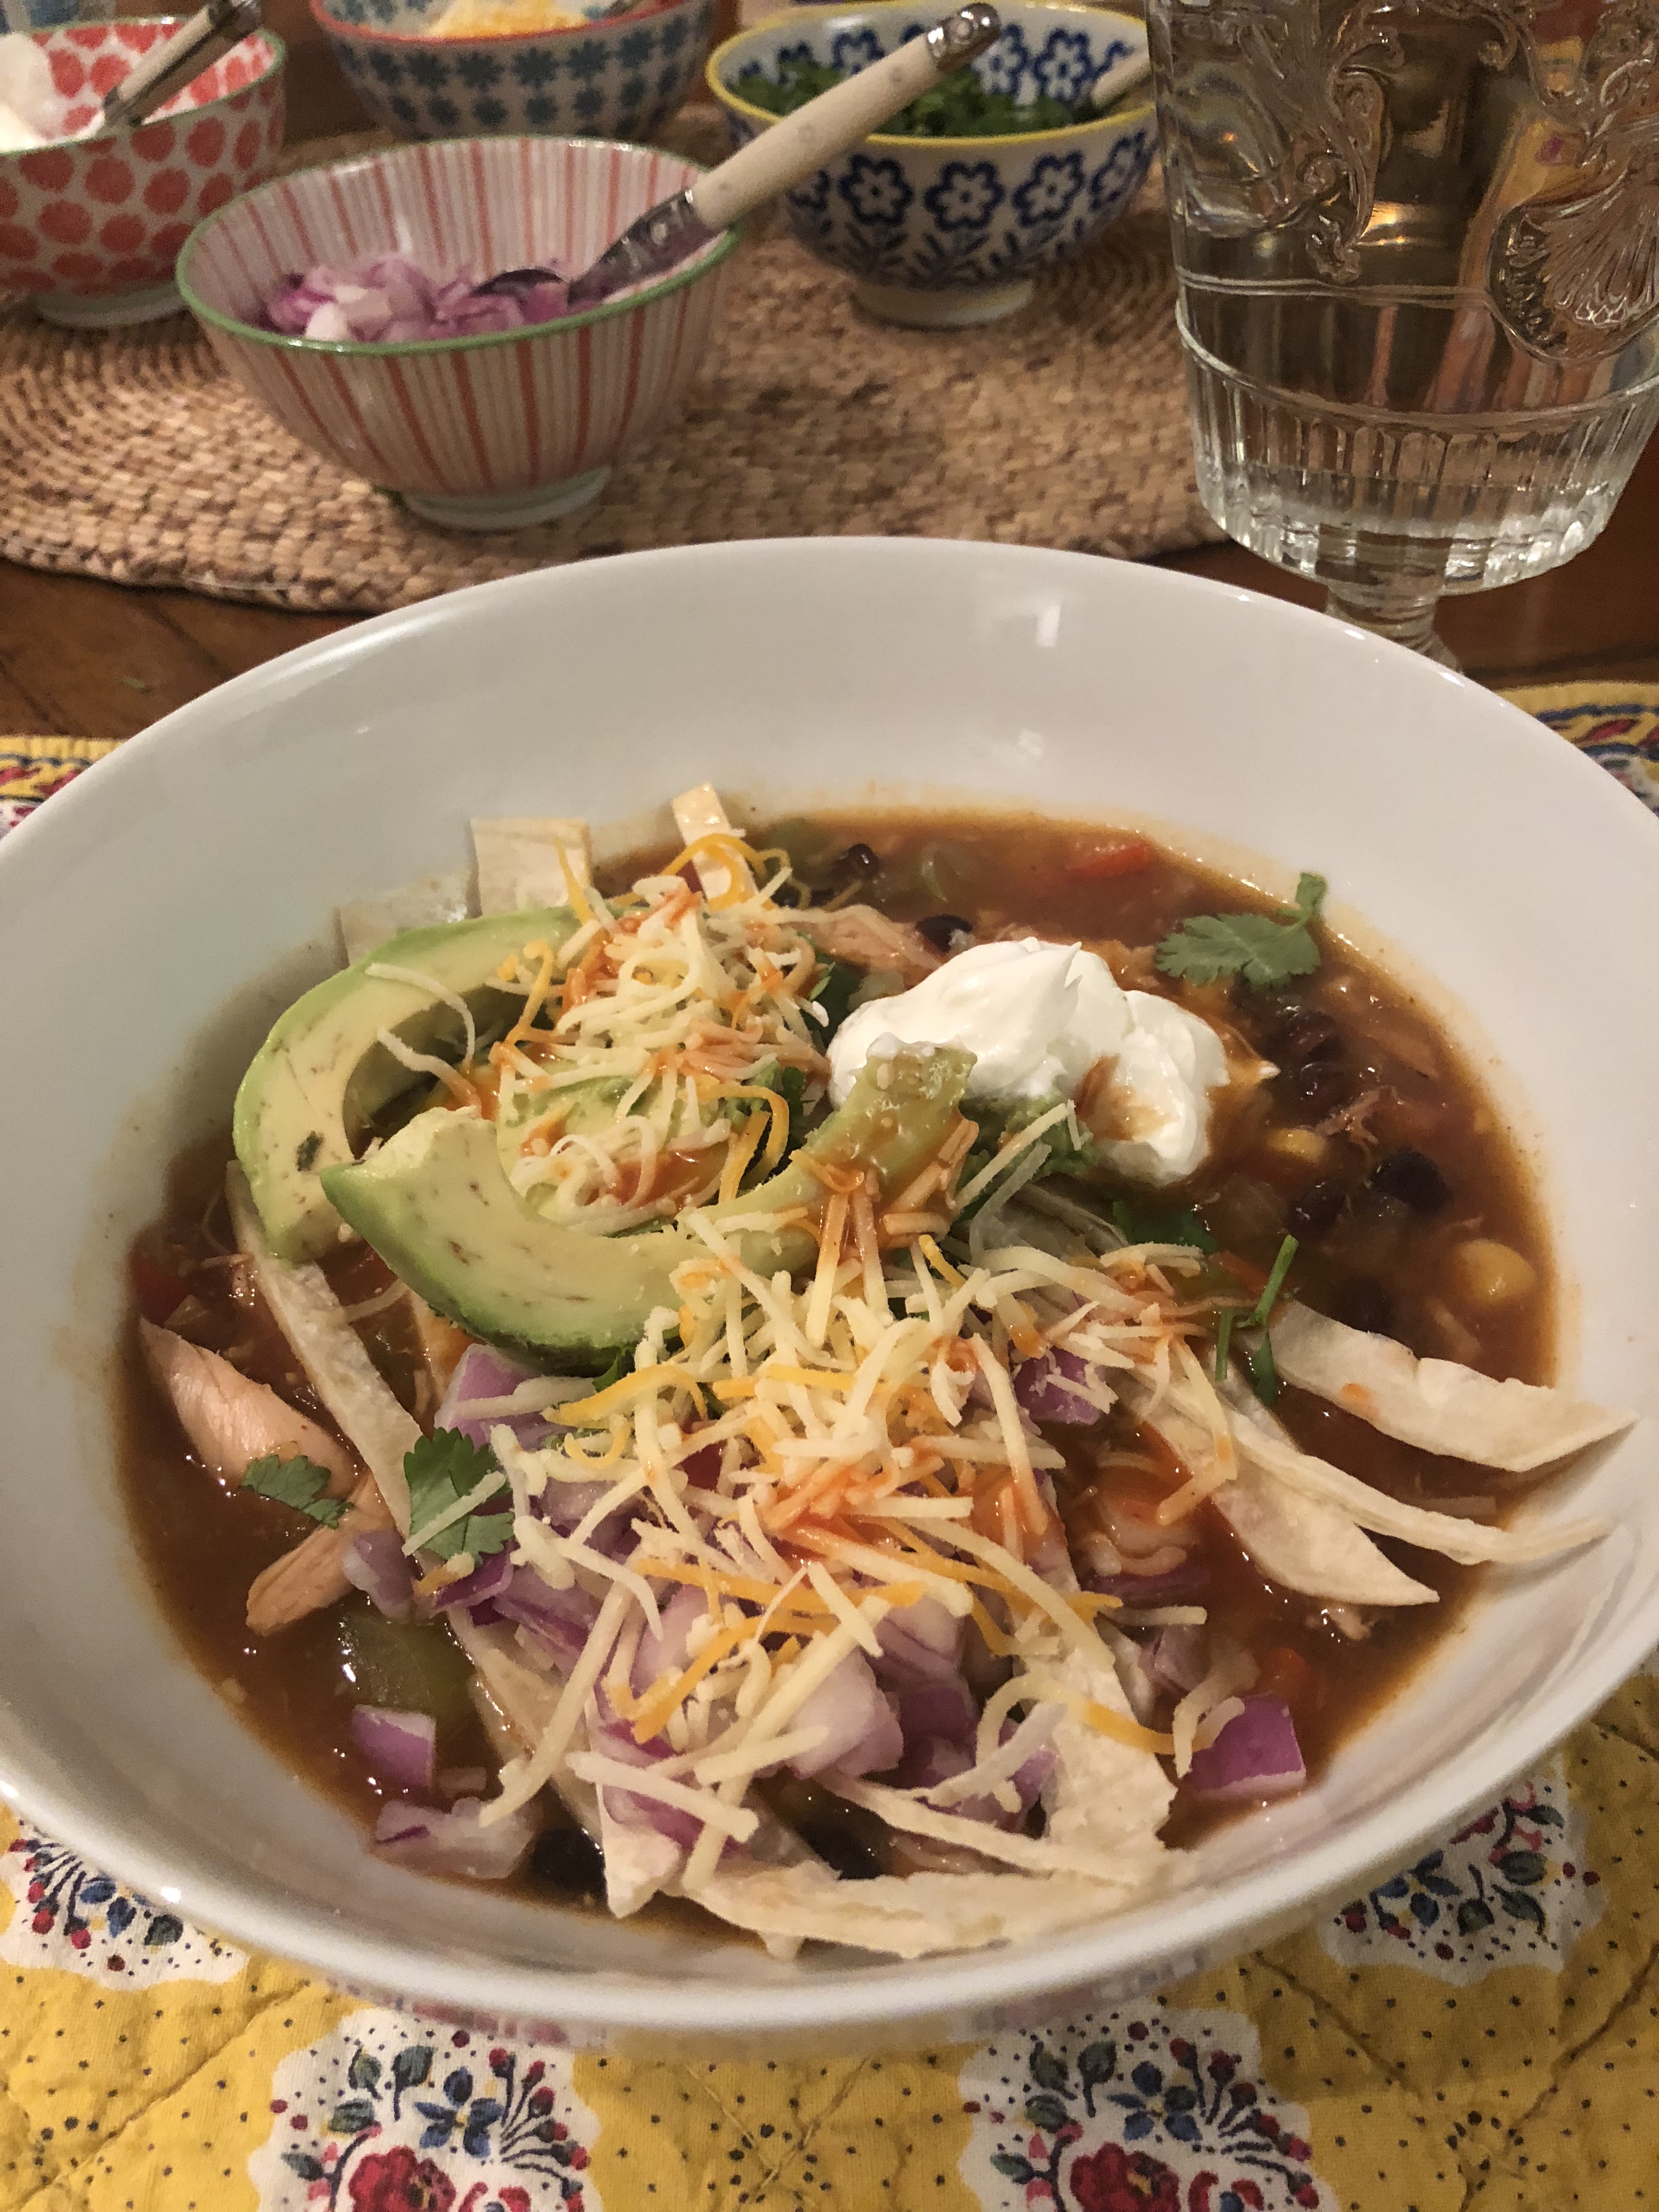
Top with fresh cilantro and your favorite chili toppings! I also serve with soft corn tortillas. You can use crunchy taco shells or whatever you’d like, this is totally optional. And some avocado or some guacamole never hurt anyone!

Yum!!!

*to make your own seasoning follow this

1 1/2 Tbsp. Cumin

1 1/2 Tbsp. Chili Powder

1/4 tsp. Garlic Powder

1/4 tsp. Onion Powder

1/4 tsp. dried oregano

1/2 tsp. paprika

1 teaspoon kosher salt

1/2 tsp. freshly ground black pepper

Chicken Tortilla Soup

img_3215

This soup has always been a favorite of mine and I usually try to order it when it’s offered on a menu. I am a big fan of Mexican Food and have always wanted to try to make my own Chicken Tortilla Soup .This is a super easy version using a store-bought rotisserie chicken and a packet of Taco Seasoning.  Now that the weather has turned super cold it’s a perfect time for heart warming meals. I started cooking soup in the afternoon, prep was pretty quick and I let it simmer for an hour and then turned off stove while we went out. When we got home I turned on the stove and continued cooking soup. I cut up avocado, chopped up some cilantro, put sour cream and cheese into some little bowls and in less than 1/2 hour we were sitting eating this delicious and tasty soup! Joel even ate the avocado!!!!  He loved the soup and it’s very filling. 

I use crispy tortillas if that’s what I have in the house. It is delicious with soft corn tortillas sliced up and added into the soup at the end also. I love when the crunchy chips go soft in the soup with the melted cheese– I could go on and on about this soup. Tonite I used soft tortillas.

If you have the time I suggest making this soup, it is so easy with a prepared chicken or you can make your own chicken .  The prep is about 15 minutes using store-bought chicken and cooking is about 1 1/2 to 2 hours for soup.  I just think soup tastes better the longer it sits. I prefer making it in the early part of the day and letting it sit on the stove for a while.

This is a big soup and will probably serve 6-8 nicely. I have a container in my freezer and 4 of us ate this soup.

Look for my slow cooker version also on my blog.

Enjoy!

Ingredients:

1 Rotisserie Chicken from your favorite supermarket–this is the easiest route unless you have left over chicken or you can make your own 

1 Tablespoon Olive Oil

1 Packet of Taco Seasoning — this is really easy , use whatever brand you like

1 cup diced onion

3 cloves garlic, peeled and minced

1 diced green pepper

1 diced yellow, red or orange pepper

1 10 oz. can  Rotel brand Tomatoes and Green Chiles–just a suggestion

1 can enchilada sauce– green or red ( in Mexican Food section of your supermarket) its a small sized can

1 15 oz. can of whole-kernel corn  – drained

32 ounces Chicken Broth

3 Tablespoons Tomato Paste

4 cups hot water

2 cans Black Beans , drained and rinsed unless they’re organic and then you don’t have to rinse but I always do anyway

*3 Tablespoons Cornmeal –mixed with water ( see instructions)

5 Soft Corn Tortillas (I use the small ones) cut into uniform strips or crunchy tortilla chips–use as many or as little as you like–or skip all together for a lighter version.

Toppings:

*optional and use whatever you like — these are just some suggestions

Sour Cream

Cilantro

Grated Cheese –Monterey Jack is a good choice here or Mexican Blend Grated Cheese

Cut-Up Avocado

Salsa or Pico De Gallo

Diced Red Onion

Diced Fresh Jalapeno

Hot Sauce like Cholula is my favorite go to sauce

Directions:

I took skin off chicken and shredded most of the chicken meat.

Heat 1 Tbsp. Olive Oil in a large Pot –dutch oven is great here (Le Creuset) add onions, peppers, and minced garlic. Stir and begin cooking, then add the packet of Taco Seasonings if it’s very dry and hard to stir you can add a little more olive oil. Add in the shredded chicken and stir it all up.

Pour in Rotel, chicken stock, tomato paste, enchilada sauce, water , black beans and corn. Bring to a boil, then reduce heat to a simmer. Simmer for app. 45 minutes to an hour, uncovered.

*In a little bowl mix 3 cornmeal with a small amount of water , just enough to mix it into a paste like consistency. Pour into the soup, then simmer for an additional 30 minutes at least, I cooked for another hour. I always believe the soup is best when it sits for a long time — this step is optional as I have done it with and without it. It thickens it up which the soup doesn’t really need but it does add some flavor. It’s totally up to you.

Check seasonings, adding more salt if you need it , I added kosher salt because I felt it needed it. Taste has to be your guide but be sure not to undersalt, you don’t want this to be bland. Turn off heat and allow to sit for about 20 minutes.

Five minutes before serving, gently stir in the tortilla strips if you’re using them.

Ladle into bowls, then top with your favorite toppings and there you go! I think the chips/tortillas make this soup along with the cilantro and avocado. Let your taste be your guide here.

Lentil Soup with Sausage and Ditalini

I suppose it’s that time of the year again when we crave warm cozy meals. this is perfect for sunday dinner or any night dinner and it will feed about 6-8 people nicely. freezes perfectly. and served with a beautiful salad and some bread it’s an awesome meal. i make so many soups and will be following up throughout the winter with all of my wonderful soup recipes, but this one is really special. the lentils add a wonderful flavor and texture, the sausage adds a savory spice. i mix hot and sweet sausage but feel free to go all sweet, i also like the sausage to have some fennel in it, i use italian pork sausage. you can obviously substitute with turkey or chicken sausage. so cozy on up to this one, it’s a true keeper. I believe this recipe came from a cookbook byJulia della Croce, who has the most awesome italian recipes. i’ve made a few changes for myself, but maybe you will too. this is filling enough as a meal which is how we eat it alongside some crusty warm bread.

Ingredients:

1/2 lb. (1 1/2 cups) lentils

10 cups chicken broth

1 bay leaf

1 lb. sausage, I used 1/2 sweet and 1/2 spicy italian pork sausage , feel free to use turkey sausage /chicken sausage. I like fennel in my sausage, so the italian ones usually have it. i have made it with turkey and it’s delicious.

3 tablespoons olive oil , You may need a little more after you cook the sausage. (see directions)

6 cloves garlic, chopped

1 onion chopped (yellow)

1 large celery stalk chopped ( leaves included)

1 teaspoon dried thyme

1 16 oz. can plum tomatoes, i use the chopped, peeled and seeded ones, along with the juice.

1/2 cup ditalini or any little pasta

Kosher Salt

Freshly Ground Black Pepper

some flat leaf parsley chopped up (optional)

grated fresh parmesan cheese (optional)

Directions:

pick over the lentils, remove any stones, imperfect ones, etc. wash the lentils in cold water ( I use a colander to pick through) Transfer to a large pot ( my trusty Le Creuset) large dutch oven. Cover the lentils with broth and add the bay leaf. Bring to a boil, then reduce to a simmer immediately. Simmer for about 15 minutes. while the soup is cooking , remove sausage from it’s casing ( butcher can do this for you as well) In a large ample frying pan, put the 2 tablespoons of olive oil and when the olive oil is heated up , put in sausage, and break it up with a wooden spoon. Cook for about 10 minutes. Remove sausage from the pan with a slotted spoon. Leave whatever oil is still in the pan, should be about 1 tablespoon.  I usually add a little more olive oil here about 1 more tablespoon should do it. then  add the garlic, onion, celery, and thyme and saute till vegetables are softened, about 8 minutes. When veggies are softened, return sausage to the pan. in a bowl or measuring cup i take a few ladles of broth out of pot and mix the 3 tablespoons of tomato paste into it. then add to sausage mixture .  add all ingredients into lentil/broth plus can of chopped tomatoes in their juice.  let all ingredients blend together and bring back to a low boil, then simmer for about an hour. before i serve it i return to a boil and add pasta* ( see notes on adding pasta at the bottom) before serving I discard the bay leaf, ladle into soup bowls, add freshly grated parmesan cheese and you’re good to go with a super authentic italian soup. we eat it as a meal alongside salad and some very good warm bread.

  • a little tip I often employ is to cook pasta in a small pot separately from soup and just put in bowl before soup ( cook very al dente) then if I am freezing it or keeping it in the fridge which I often do for lunch the next day . The pasta gets very soft when cooked in the soup and when you freeze it it’s best to freeze without the pasta . You can add pasta when you re-heat it or if you don’t want pasta then you won’t.

*should serve 6- 8 as a meal, with a little left over to freeze

Creamy Butternut Squash Soup (no cream)

This is by far one of my most favorite recipes ever! Super Easy and Super Delicious ! If you’ve been following me since the early days you’ve probably made this recipe by now. It’s perfection in a bowl . I’ve simplified the recipe along the way so that now it is just the way Joel and I like it. it’s pretty easy as long as you buy the squash pre – cut (available in every supermarket, and corner produce store). I just made my first batch of the season, and the squash is sweet and delicious. It tastes so creamy you’ll swear there’s cream in it, but really, there is none.  I love a little freshly grated nutmeg in it too, but you can certainly just sprinkle in a very little bit of already grated nutmeg. I hope your family and friends enjoy this as much as my family does! It’s always on my table for Thanksgiving. A delightful way to start a dinner, or a delicious main dish served alongside  a beautiful salad and bread. This can easily be made vegetarian by substituting vegetable broth for chicken broth which is how I make it on Thanksgiving for Kerri (our daughter) who is a vegetarian.

*This can be made without cream so easily–but if you want a touch of richness you can add a little heavy cream into soup and mix in before serving or a Tbsp. of unsalted butter and swirl it in. Totally not necessary but just saying.

And clearly this recipe can be cut in 1/2 for a smaller group– I usually use 2 packages of squash for 6 servings.

*feel free to put croutons on top or sprinkle some pepitas on top . It’s delicious just the way it is!! and wonderful for lunch the next day and will freeze beautifully and may just need a little broth or water upon heating up.

Follow me on Instagram @cookingwithcandi

Ingredients:

4 pkgs. (approx. 4 lbs.) butternut squash (it’s doesn’t have to be exact)

3 tablespoons olive oil

1 large spanish onion, chopped

8 – 10 cups chicken or vegetable broth

*1 -2 tablespoons unsalted butter (for this serving size, I use 2 but it’s totally optional)

Kosher salt and freshly ground black pepper

*use whole nutmeg – you just grate a little in for flavor. I always tend to use whole, but grated will do. It’s just a touch of it–if I had to guess, I’d say 1/4 teaspoon to 1/2 teaspoon depending on your taste

*if you really want to top it off with a touch of cream you can . Just add a little heavy cream to the soup and blend it right in at the end. Honestly it’s not necessary but it def adds a a layer of richness!

Directions:

In a heavy Le Creuset (or any other ample size large pot), I heat 3 tablespoons of olive oil. When oil is heated, put in onion and about 1/2 tablespoon of kosher salt. Sweat out the onions until they are translucent (approx. 5 – 8 minutes). If you’re using the butter, add it now too. I then add all of the butternut squash and mix the onions, oil and butter as best I can all over the squash. Next, add enough broth to cover the squash (I used approx. 10 cups of chicken broth to cover). I keep the remaining half a box of broth in case I need it later. Return to a low boil, then bring to a simmer. I let it cook a very long time–at least an hour until soft–and then I turn off the heat and let it sit for a while. I like to make it early and let it sit for as long as possible, because the squash gets very soft. Then right before I am about to serve, I use an immersion blender and blend it into a beautiful smooth soup. If you need more broth, add it as you blend. This is also your salt, pepper and nutmeg moment. Season to taste and blend just until smooth. I leave it in the pot until I need it and then gently warm it up. This soup will keep in the fridge for a few days. It can be frozen as well. Upon defrosting you may need to add more broth. Sometimes I serve this soup with beautiful croutons if I can find them in specialty stores, but it is delicious and beautiful on its own, and very good for you! My family loves it , and I hope yours does too.

*should serve 10 – 12 as appetizer

Another Delicious Vinaigrette

This is a delicious variation on many salad dressings that I’ve made over the years . Fooled around with various ingredients and came up with this one. It has dry mustard not dijon which is usually my go-to and you can substitute the 1/2 teaspoon for 1 Tablespoon of Dijon if you’d like. I used it on a fresh salad but I would use on anything, it’s delicious. Will keep for about 7 days in fridge. Would also make a delicious marinade for shrimp, chicken or vegetables. Homemade salad dressing is so delicious and easy you’ll never buy the bottled kind again.

Ingredients:

1 cup Extra Virgin Olive Oil

1/4 cup fresh lemon juice — 2 average lemons should do it

1/4 cup white vinegar of your choice ( I used champagne because that’s what I had)

1 clove garlic, minced

2 tsp. sugar

1 tsp. salt

1/2 tsp. dry mustard

1/2 tsp. onion salt

1/2 tsp. paprika

1/2 tsp. dried oregano

1/8 tsp. dried thyme

Directions:

In a liquid measuring cup or bowl combine all of the ingredients

Whisk until the ingredients are well combined

Use immediately, or refrigerate for future use.

I like making ahead of time if it solidifies in the fridge (olive oil will do that) just let it sit out for a bit and shake it up. I like to use a jar or one of those salad dressing jars as shown in photo

img_4054

Soy Orange Rosemary Chicken

I put this together last night and it was most delicious if I do say so myself and obviously Joel was very happy with this one as well. Served alongside rice and a beautiful Brussels salad which I will post soon as well. In the meantime this is a great weeknight meal or lovely meal if you’re having friends over. I would say 2 lbs. would feed 4-6 depending on your eaters.

This is super-yummy and don’t forget to spoon the sauce over the chicken when you serve it!

Ingredients:

2- 21/2 lbs bone-in skin-on chicken– I used thighs –much tastier but if you insist on breasts cut in 1/2–this time out I made for the 2 of us but used the same amount of sauce for full recipe — the sauce cooks down and you’ll want some for top of chicken

8 ounces orange marmalade , or this time I used Orange Ginger Fruit Spread by Dalfour which had amazing flavor but even apricot preserves will work well here. The Orange flavor just adds a layer of flavor that you can’t get from the apricot and the ginger in the orange really kicked it up a notch. I have also used Apricot Preserves which work out perfectly.

1 1/2 Tablespoons Whole Grain or Stone Ground Mustard ( my favorite is from Maille)

2 Tablespoons Soy Sauce — I used low sodium

2 Tablespoons unsalted butter, melted

1 – 1/12 Tablespoons finely chopped fresh rosemary — if you like a lot of Rosemary add a little more if not a huge fan you probably won’t be making this recipe but use 1 Tablespoon

Kosher Salt and Freshly Ground Black Pepper (app. 1/2 teaspoon)

Directions:

You can marinade over-night but I did it first thing in the morning– you’ll want this to marinade at least 6 hours — this is important

When I get home from supermarket I pat chicken dry and sprinkle all over with kosher salt before I do anything. If I can leave chicken in fridge for a few hours I do and then I take out chicken and continue the prep.

In a glass bowl or any non-reactive bowl combine marmalade, soy sauce, melted butter, rosemary and a few grinds of black pepper. Mix marinade till completely combined then add chicken pieces and coat each piece well. Cover and refrigerate for 6-8 hours or longer whatever is convenient for you. I also put chicken in a gallon sized baggie and squish it around. Completely up to you.

Remove chicken from the fridge and bring to room temperature about 1/2 hour before cooking. Pre-heat oven to 400 degrees. Spray baking dish with cooking spray– or you’ll have a tough time cleaning this one up.

Transfer the chicken to sprayed baking dish and get any and all marinade in the dish as well. I think I used a 13×9 dish. Bake for 45 minutes or until cooked through and browned up on top. Remove from the oven and allow to sit for a few minutes before serving. My oven cooked 4 pieces in 40 minutes so check chicken after 1/2 hour for progress — all ovens vary.

Air Fryer Salmon with Trader Joe’s Vegetable Fried Rice

Fast, convenient and very delicious. I had 2 salmon filets and a bag of Trader Joe’s Vegetable Fried Rice in the freezer. I cooked up the fried rice in a large skillet, air fried the salmon and voila! Sometimes I do it with shrimp, sometimes chicken and you can use tofu. This salmon takes less than 15 minutes to prep and cook — can’t beat that.

This is what I did last night and there wasn’t anything left. Even Joel eats all the vegetables in this fried rice– sort of amazing!

Air Fryer Honey Dijon Salmon:

Ingredients:

2 6 oz. salmon filets

2 Tablespoon dijon mustard

2 Tablespoon honey

2 teaspoon olive oil

1 teaspoon garlic powder

Salt and Pepper

Directions:

Preheat the air fryer for 5 minutes at 400 degrees

In a small bowl , add the honey, dijon, garlic powder, and olive oil, stir to combine

Pat the salmon filets dry with paper towels. Season with salt and pepper.

Spoon the honey glaze over the top of the salmon and rub into all the sides of the salmon to coat. If you’d like you can reserve some glaze — I didn’t but if you’d like to you can.

Place the salmon filets in the air fryer after 5 minute pre heat, skin side down.

Cook at 400 degrees for 7-9 minutes depending on thickness of your filet and how you like it done.

Once cooked I removed the skin, cut up into small pieces and added it to fried rice in the skillet which was on oven on low, everything is cooked so just mixed around a bit and served !! Perfection and pretty healthy for a quick weeknight meal.

*to stretch Trader Joe’s Vegetable Fried Rice you can add extra frozen peas carrots corn whatever you have in freezer.

img_4173-3

*also we love this hot and spicy Japanese BBQ sauce available in many food stores. It’s Bachan’s Japanese BBQ sauce Hot and Spicy, they also make a few others that aren’t hot and spicy.

img_4169
img_4172-2

Slow-Cooker Bolognese

I love my Bolognese recipes which are also on this site. Sometimes I just want to use my slow-cooker so that my meal is ready when I am home at the end of the day. This is what I did and I have to say it came out very tasty. I made all 4 lbs. of ground beef ( you can sub turkey or chicken if you would like) and I had about 4 meals out of this. Perfection! I froze in individual containers for 3 meals after the night we originally ate it. It’s perfect for the cold winter nights ahead of us. File this under cozy comfort foods.


This is what I did.

Ingredients:

4 Tbsp. Olive Oil

4 lbs. ground beef–I prefer the meat with a little fat so if you’re using turkey make sure it’s not 100% fat free because it will be rather dry and tasteless — I did a combo of pork sausage and ground beef –you can use whatever meat you prefer

6 cloves garlic, chopped

4 celery stalks, chopped

2 whole carrots, chopped

2 onions, chopped

Kosher Salt and Freshly Ground Black Pepper

1 6 oz. can tomato paste

1 cup dry red wine

2 cups whole milk

2 28 oz. cans crushed tomatoes

1 Tbsp. dried oregano

1 Tbsp. dried basil

2 teaspoons dried thyme

2 teaspoons red pepper flakes

1/2 teaspoon ground nutmeg

*if you’d like instead of all these dried spices you can use dried italian seasonings which come in a spice jar but I would still add the nutmeg and  red pepper flakes

Grated Parmesan for serving

*Chopped Fresh Basil and Chopped Fresh Parsley for serving if you’d like

Directions:

Heat 2 Tablespoons of the olive oil in a large skillet over medium heat. Add the mirepoix ( carrots, celery and onions) season with salt and pepper and cook until softened and onions are transparent ) app. 10-15 minutes — I stirred in the garlic at the end and then added the tomato paste , stir around and cook for another few minutes. Pour in the red wine. Cook until most of the red wine is evaporated, app. 5 more minutes on a low flame. Pour this into the slow cooker.

Pour the remaining 2 Tbsp. of Olive Oil into the same skillet, add the beef and season with salt and pepper, cook breaking up the beef until it is nicely browned about 15 minutes. Drain off any excess fat. Stir in the milk and continue cooking until it is mostly absorbed by the meat, app. another 5 minutes. Add this to the slow cooker along with the tomatoes and all the dried spices. Add some more salt–taste for salt I was pretty generous with the salt.

Give the pot a good stir , cover and cook on low for 6 hours.

I didn’t have any fat to skim on top because I drained the fat earlier and used 15% fat ground beef. The totally lean beef is a little to dry for my liking but use what ever meat you like. Check the consistency if it is too thick add a little bit of water. If it is too thin, cook for another 30 minutes or so with the cover off.

I have to say mine came out perfectly after 6 hours in the slow cooker. Taste for seasoning and add salt and pepper if you desire. Also a little note about slow-cooker, once the initial cooking process is over my slow cooker goes to warm and will stay on warm for another few hours or so . This is perfect because it will not cook anymore just stay warm. This is what I did.

Serve over pasta with lots of grated Parmesan Cheese and top with fresh basil and fresh parsley if you’d like.

By all means freeze the extra in air-tight containers for another few meals!

Enjoy!

img_4020
img_4015-1

Baked French Toast — all time best for Yom Kippur Break Fast

DSCN4275

DSCN4288

DSCN4283

DSCN4274

DSCN4270

DSCN4302

DSCN4294I posted this recipe back in October 2011 for Yom Kippur break fast and every Break Fast it is on the table, it’s practically a law in our family now! It is truly one of the best French toast recipes I’ve ever made.  I include it every year since my friend Ilene Stern gave it to me. I never have a single piece left. Delicious and decadent, perfect brunch and breakfast food. I almost always include it in my Mother’s Day Brunch as well. Once you’ve made this recipe there is no turning back  your whole family will love it and you’ll have to make it every time.

The only downside is that you must prepare and refrigerate the night before without cooking it, you cannot cook this dish till you’re ready to eat it, the bottom will get hard like a caramel candy would. So cook right before you’re going to serve. Enjoy!

*recipe as is should serve 6- 8 if you have more people make 2 trays!

Yom Kippur begins at sundown on Friday, October 11 and ends at nightfall on Monday,October 12 . It lasts one day.

For those of you who fast — have a good fast.

Ingredients:

1 cup packed light brown sugar

1 stick unsalted butter

2 tbsp. corn syrup ( I use Karo Original light corn syrup)

5 eggs (room temperature please)

1 1/2 cups milk ( you can use low-fat, I use Skim Plus)

1 tbsp. vanilla

1 package of sliced cinnamon bread. ( Pepperidge Farm is fine) if you can get thick slices it’s great , but the thin kind will work just double stack them it will be fine) You probably will use 12 slices of bread per tray. You will have 6 stacks of 2 slices each, 12 slices total, or 6 thick slices of cinnamon bread. If you can’t find just cinnamon bread use raisin cinnamon bread it’s easier to find .

Directions:

Melt butter, add brown sugar and corn syrup and combine well. Spray a 9×13 baking dish, Pyrex works well here. Pour butter mixture into baking dish and arrange bread slices flat in the mixture ( you will double stack the thin sliced bread) Unless the bread is 1″thick you will be doubling the standard sliced bread. Squeeze the bread to fit–it should hold 12 slices ( 6 double stacks), 3 on each side of a 9×13 baking dish.

In a blender mix the eggs, milk and vanilla and pour over the bread slices, covering them completely. Cover and refrigerate overnight. The bread will absorb all the liquid by the morning, so if you need to travel with it will be fine.

Uncover and bake in a preheated 350 degree oven for 30 minutes. Once it’s out of the oven you can dust with powdered sugar, but not necessary. Serve right from the baking dish.

*if you let this sit out too long before serving, the bottom may get hard like a praline candy. It never ever lasts long enough for this to happen at my table.

Easy Fast to all .

Follow me on Instagram @cookingwithcandi

Grandma Sally’s Mandel Bread

photo (2) photo (4) photo (5) photo (6) photo (8) photo (9) photo (11) photo (12) photo (13) Grandma Sally was not my Grandma but she was my friend Joy’s Grandma. Joy is a friend of mine and has been such a great supporter of Cooking with Candi. I know what a good cook she is and she sent me this recipe and was kind enough to share her family’s secret to an awesome mandel bread. She sent it to me a while back and I haven’t been able to test it out until now. I highly recommend this delicious treat for anytime but why not for the New Year? Thanks again Joy for all your support, it is so appreciated and of course to Grandma Sally for this delicious recipe. Perfect for Break Fast during Yom Kippur or a perfectly crunchy dessert for Rosh Hashana or really anytime.

You can make 2 different mandel breads, one with nuts and one with chocolate or just mix them together . If you use them together use a little less nuts and a little less chocolate. If you like you can add the raisins as well . Use whatever you prefer. I used both chocolate and nuts.

If you love biscotti this is almost identical. There are so very many ways to make Mandel Bread but this one  was really worth the effort.  I did make a few tweeks to the actual baking but the ingredients and most of the recipe stayed the same as Grandma Sally’s . I love to dunk these crunchy cookies in tea or coffee. Yum!

P.S. woke up to these sitting in my kitchen and did a little dunking during breakfast with my morning coffee! They are hard to resist. Can be easily frozen. They thaw out rather quickly!!

Happy Healthy New Year from my kitchen to yours.

Ingredients:

2 heaping tablespoons of Crisco vegetable shortening

3/4 cup of sugar

3 eggs–always room temperature for baking unless otherwise stated

1 tsp. vanilla

2 1/2 cups of all-purpose flour

1 tsp. baking powder

2/3 cup of chopped walnuts* optional

2/3 cup of chocolate bits , chocolate chips are fine here , if using alone without nuts you may want a little more . You can always use raisins as well. Whatever you like will work. Raisins and Nuts are great.

For topping:

2 tablespoons granulated sugar and 3/4 teaspoon cinnamon, mix together for a cinnamon/sugar mixture.  Set aside.

Directions:

Cream together the shortening and sugar to mix well and add 3 eggs one at a time and continue beating in electric mixer, add in the vanilla on low speed until creamy. Then add in the dry ingredients, the flour and the baking powder and mix on low speed until just incorporated. ( don’t overmix)  Then stir in chocolate, nuts, and or raisins to the mixture. I took out dough and refrigerated it over night, you don’t have to but I recommend refrigerating dough for at least 1-2 hours. ( I find dough is easier to handle and holds together better) I had a time constraint and that’s why I did overnight, but just do till it gets cold at least.)

To bake cookies:

Preheat the oven to 350 degrees. Line baking sheet with parchment paper or Silpat liners which I swear by ( awesome). Shape the dough into 2 or 3 logs about 2 inches wide ( see photos) making sure logs aren’t too close together because they will spread. So 2″ from edges from each other and 2″ from the edges. I used 2 baking sheets for 3 logs, you can just use 1 for 2 longer ones. If dough is super sticky , dust your hands with a little flour.

Bake for 25-30 minutes at 350 degrees. Now lower the oven to 250 degrees. Let the baked logs cool down for about 15 minutes, then slice them diagonally about every 3/4 inch ( see picture) Flip the cookies on their sides back on baking sheet. Sprinkle 1/2 of the cinnamon-sugar mixture over top of cookies with a spoon. Flip the cookies over and repeat with the remaining cinnamon-sugar mixture. Place the cookies back in the oven ( be certain you turned temp. down to 250 degrees) I cooked for about 45 minutes ,you can cook anywhere from 45 minutes to an hour till they were golden and crisp. Let the cookies cool down, then store in an airtight container.

*cookies will get crunchier as they cool