This is probably one of the oldest recipes on my blog. I remember my Mother making it and always loving it. Along with the baked French toast this is a wonderful break fast and brunch staple. This dish can be assembled ahead of time, kept in the refrigerator and baked right before eating. This is a keeper and a tradition in our house. Always delicious and the ultimate in comfort food. You can buy almost any of the frozen blintzes, homemade ones are great but it doesn’t really make that big of a difference with this recipe. This is super easy with excellent results.
Unfortunately my photos of this are not so great so unable to post them. I do have a post on Instagram with a photo however . Not a good photo of it but next time I make I will take much better pics.
Good easy Fast for those who do — Good Yontif
Ingredients:
6 blintzes ( you can use cheese or fruit filled, whichever you like) . Depending on how many people I’m feeding, I usually make 1 fruit and 1 cheese tray. Blintzes can be found frozen in many supermarkets or specialty stores.
2 eggs
1/4 cup sugar
1/8 unsalted butter or margarine –that’s 1/8 or 1 Tablespoon of butter
3/4 cup sour cream (lite is fine)
1 tsp. vanilla
Dash of cinnamon
Directions:
Preheat oven to 350 degrees.
Melt butter or margarine in saucepan. Spray baking dish with Pam Spray. Mix remaining ingredients in a bowl together. Place frozen blintzes in baking dish. I usually use 9×13 size baking dish but anything close to that will work. You can double the recipe, in which case you’ll obviously need a larger baking dish. You need room for the blintzes to expand a little and for the egg mixture (custard) to rise around it. Don’t spread it too thin.
Pour the melted butter on top of the frozen blintzes, followed by the sour cream mixture.
Bake at 350 degrees for approximately 30-40 minutes. Let it sit for a few minutes out of the oven before cutting into it.
I posted this recipe back in October 2011 for Yom Kippur break fast and every Break Fast it is on the table, it’s practically a law in our family now! It is truly one of the best French toast recipes I’ve ever made. I include it every year since my friend Ilene Stern gave it to me. I never have a single piece left. Delicious and decadent, perfect brunch and breakfast food. I almost always include it in my Mother’s Day Brunch as well. Once you’ve made this recipe there is no turning back your whole family will love it and you’ll have to make it every time.
The only downside is that you must prepare and refrigerate the night before without cooking it, you cannot cook this dish till you’re ready to eat it, the bottom will get hard like a caramel candy would. So cook right before you’re going to serve. Enjoy!
*recipe as is should serve 6- 8 if you have more people make 2 trays!
Yom Kippur begins at sundown on Sunday September 20 and ends at sundown Monday September 21 2026.
For those of you who fast — have a good fast.
Ingredients:
1 cup packed light brown sugar
1 stick unsalted butter
2 tbsp. corn syrup ( I use Karo Original light corn syrup)
5 eggs (room temperature please)
1 1/2 cups milk ( you can use low-fat, I use Skim Plus)
1 tbsp. vanilla
1 package of sliced cinnamon bread. ( Pepperidge Farm is fine) if you can get thick slices it’s great , but the thin kind will work just double stack them it will be fine) You probably will use 12 slices of bread per tray. You will have 6 stacks of 2 slices each, 12 slices total, or 6 thick slices of cinnamon bread. If you can’t find just cinnamon bread use raisin cinnamon bread it’s easier to find .
Directions:
Melt butter, add brown sugar and corn syrup and combine well. Spray a 9×13 baking dish, Pyrex works well here. Pour butter mixture into baking dish and arrange bread slices flat in the mixture ( you will double stack the thin sliced bread) Unless the bread is 1″thick you will be doubling the standard sliced bread. Squeeze the bread to fit–it should hold 12 slices ( 6 double stacks), 3 on each side of a 9×13 baking dish.
In a blender mix the eggs, milk and vanilla and pour over the bread slices, covering them completely. Cover and refrigerate overnight. The bread will absorb all the liquid by the morning, so if you need to travel with it will be fine.
Uncover and bake in a preheated 350 degree oven for 30 minutes. Once it’s out of the oven you can dust with powdered sugar, but not necessary. Serve right from the baking dish.
*if you let this sit out too long before serving, the bottom may get hard like a praline candy. It never ever lasts long enough for this to happen at my table.
Brisket can definitely be an intimidating thing to make. I once made it as a young cook, and it was perfectly inedible. Back then, I couldn’t believe how long it took to cook, but it does take very long. Now I usually make it in the slow cooker which is an awesome way to go but this time I used my trusty Le Creuset, which worked out beautifully. A lot of people have some pretty awesome brisket recipes and I welcome you to send me yours. This really couldn’t be any easier and it’s super tasty. This original recipe came from my friend, Michele (with a few comments from Karyn too.) I did change a few things to the original recipe, but not a lot and I thank Michele for the recipe.
INGREDIENTS:
4 lb. brisket (I didn’t need larger but you can adjust this recipe for whatever size brisket you use)
Lawry’s seasoned salt available in the spice aisle
2 large Spanish onions (Karyn uses Vidalia, which is also good), sliced thickly
2 cans of tomato sauce , I used the 16 oz. size. You can also use the 1 can of 28 oz. size. It depends on you and how much sauce you like.
2 tbsp. brown sugar (this is my addition. It doesn’t really change the flavor so much as cut the salt a bit)
DIRECTIONS:
Preheat oven to 350 degrees.
I sprinkled Lawry’s seasoned salt on both sides of the brisket (generously) then seared it in the Le Creuset pot with a little vegetable oil–probably about a tablespoon. (After the meat was seared, it shrunk to fit perfectly in my pot but I don’t think that a larger brisket would have fit.) Next, I added the tomato sauce and onions, covered the pot and put it in the oven. I cooked it for a total of 3 hours. I checked on it after each hour, which probably wasn’t even necessary. I then let it cool, off of the heat, for about an hour. Next, I sliced it with an electric knife, which came out beautifully. The meat was soft, but not falling apart at all. I then added the brown sugar to the gravy, put the brisket in a container with the gravy and froze it. I’ll take it out the night before I serve. Karyn pulses her gravy with an immersion blender. I didn’t do this but I think it makes for a good suggestion. In fact, I might still do it next time I make this recipe. I’ll let you know. Thanks again Michele and Karyn!
I also use an electric knife to cut my brisket –I find it works best (worth the investment and a rather inexpensive one at that–you’ll have it for years)
Apples are the kind of fruit we eat all year round. They are always in the fridge and if they don’t get eaten, I feel guilty that they’re just sitting there and going to go bad. I saw this recipe on Smitten Kitchen and decided to make it. I would make it and freeze it, so if you’re interested in doing so this cake freezes well. You’ll need a tube pan. You don’t need an electric mixer, so it’s pretty easy on the special equipment. Use those leftover apples–don’t let them go bad. No butter in this recipe, lots of sugar though. My house smelled divine.
I also love this recipe for the Jewish Holidays which are just around the corner…..just saying.
*you can see in photos that I use a melon baller to get the pits out of the middle of the apple. I prefer this technique over the corer thing which never really works for me. The melon baller works perfectly: first cut apple in half, then scoop out just the pits.
Thanks to Smitten Kitchen again for a wonderful recipe.
6 apples (I used what I had in the house: a combo of Granny Smith and Honey Crisp. Good old Macintosh will work, too.)
1 tablespoon cinnamon
5 tablespoons sugar
2 3/4 cups flour, sifted
1 tablespoon baking powder
1 teaspoon salt
1 cup vegetable oil
2 cups sugar
1/4 cup orange juice (try to use fresh but if not, Tropicana will do)
2 1/2 teaspoons vanilla
4 eggs
1 cup walnuts, chopped (this is optional; I didn’t use them this time out)
Directions:
Preheat oven to 350 degrees. Grease a tube pan. Peel, core, and chop apples into chunks. Toss with cinnamon and sugar and set aside (I sprayed with a baking spray. There’s no need to add any butter here.)
Stir together flour, baking powder, and salt in a large bowl. In a separate bowl, whisk together oil, orange juice, sugar and vanilla. This mixture will be rather thick. Mix wet ingredients into the dry ones, then add eggs, one at a time. Scrape down the bowl to make sure all ingredients are incorporated. Use a rubber spatula to get it all out of the bowl.
Pour 1/2 the batter into prepared tube pan. Spread 1/2 the apples over this. Pour the remaining batter over the apples and arrange the remaining apples on top. Use your eye to halve batter and apples (don’t worry if it’s not perfectly halved.) Bake for about 90 minutes, or until a cake tester (or toothpick) comes out clean. I would check cake after 1 hour 20 minutes. I baked for the full 90 minutes; it’s a rather thick cake.
I’ve tried so many noodle puddings, but keep coming back to the same old , same old. they’ve been passed down in so many different incarnations. i don’t even know what the original one is anymore. this is my most favorite. also a perfect break fast food for Yom Kippur. It can and should be made ahead of time, it will hold together better.
Ingredients:
1 lb. noodles ( i use extra wide egg noodles, you’ll need a bag and 1/4 app. just eyeball it)
1 cup sugar
6 eggs ( I use extra large and at room temp. just make sure they are not right out of fridge) they work much better when they are not right out of fridge in baking.
1 tbsp. vanilla
1 stick unsalted sweet butter(melted)
6 oz. cream cheese (softened at room temp)
1 1/2 cups milk ( I use skim plus) would not use regular skim milk
2 cups apricot nectar (available in most supermarkets) in the juice section
Topping:
1/2 jar of apricot preserves –approximately
1 1/2 cup cornflake crumbs
2 tsp. cinnamon
1/2 cup sugar
1 stick butter melted
Directions:
Cook noodles and drain very well. Mix 6 beaten eggs with the tablespoon of vanilla in one bowl. in another bowl melt 1 stick sweet butter(unsalted)softened cream cheese, and milk. add the apricot nectar . mix all ingredients together and put in large pyrex type baking dish. mix topping ingredients together, put on top of noodle pudding. cook at 350 degrees for one hour. i usually cook this ahead of time, cook for 1/2 hour and then freeze it till i am ready to use, take out of fridge bring to room temperature and bake it for another hour till brown on top and cooked through. noodle puddings are best if you let it sit a while (at least 15 minutes before serving) they hold together better that way. can be served at room temperature.
this is an old recipe of mine that I’ve played around with and it makes a perfect side dish anytime of the year. not too difficult to make , takes a little playing around but pretty easy . I used Manischewitz egg noodles in a toasted barley shape this time. you can use pearl barley which is available in almost every supermarket out there. i have to say this product worked very well. Not exactly Mushroom and Barley?? but barley shape egg noodles
Great for Rosh Hashana and actually any other time for dinner as well. It’s delicious!
Ingredients:
1/4 cup butter or margarine
1 3/4 cup Pearl Barley or any kind you can find ( I used Manischewitz egg noodles in a toasted barley shape) it doesn’t have to be toasted it can just be regular barley shape noodles. I love to use this product , it’s usually found in kosher section.
1 lb. fresh mushrooms sliced
1/2 spanish onion chopped
2 – 3 cups chicken stock
1 tablespoon vegetable oil
Kosher Salt
Freshly Ground Black Pepper
Directions:
I use a very little bit of vegetable oil ( maybe 1 tablespoon) and saute onions, then mushrooms till cooked down. I salt and pepper generously here. I remove the mushroom/onion mixture from saute pan, wipe the pan clean with a paper towel . melt butter or margarine in pan, brown the barley/noodles for about 4 – 5 minutes, move it around as you brown it. in the meantime transfer mushroom/ onion mixture to a 9 x 13 baking dish (spray with pam) when barley/noodles is browned place in dish with mushrooms and onions and mix well. add 2 cups of chicken broth. cover with aluminum foil, and bake in oven covered at 350 degrees for app. 45 minutes. remove from oven, and add a little broth, depending on how dry it is, i would say i added about 1/2 cup , you may need to add more, add the 1/2 cup and mix well and see if you need more, not too watery, keep it dryer. cover, and i put it back in oven for 10 to 15 minutes. taste for salt and pepper. and there it is. very delicious.
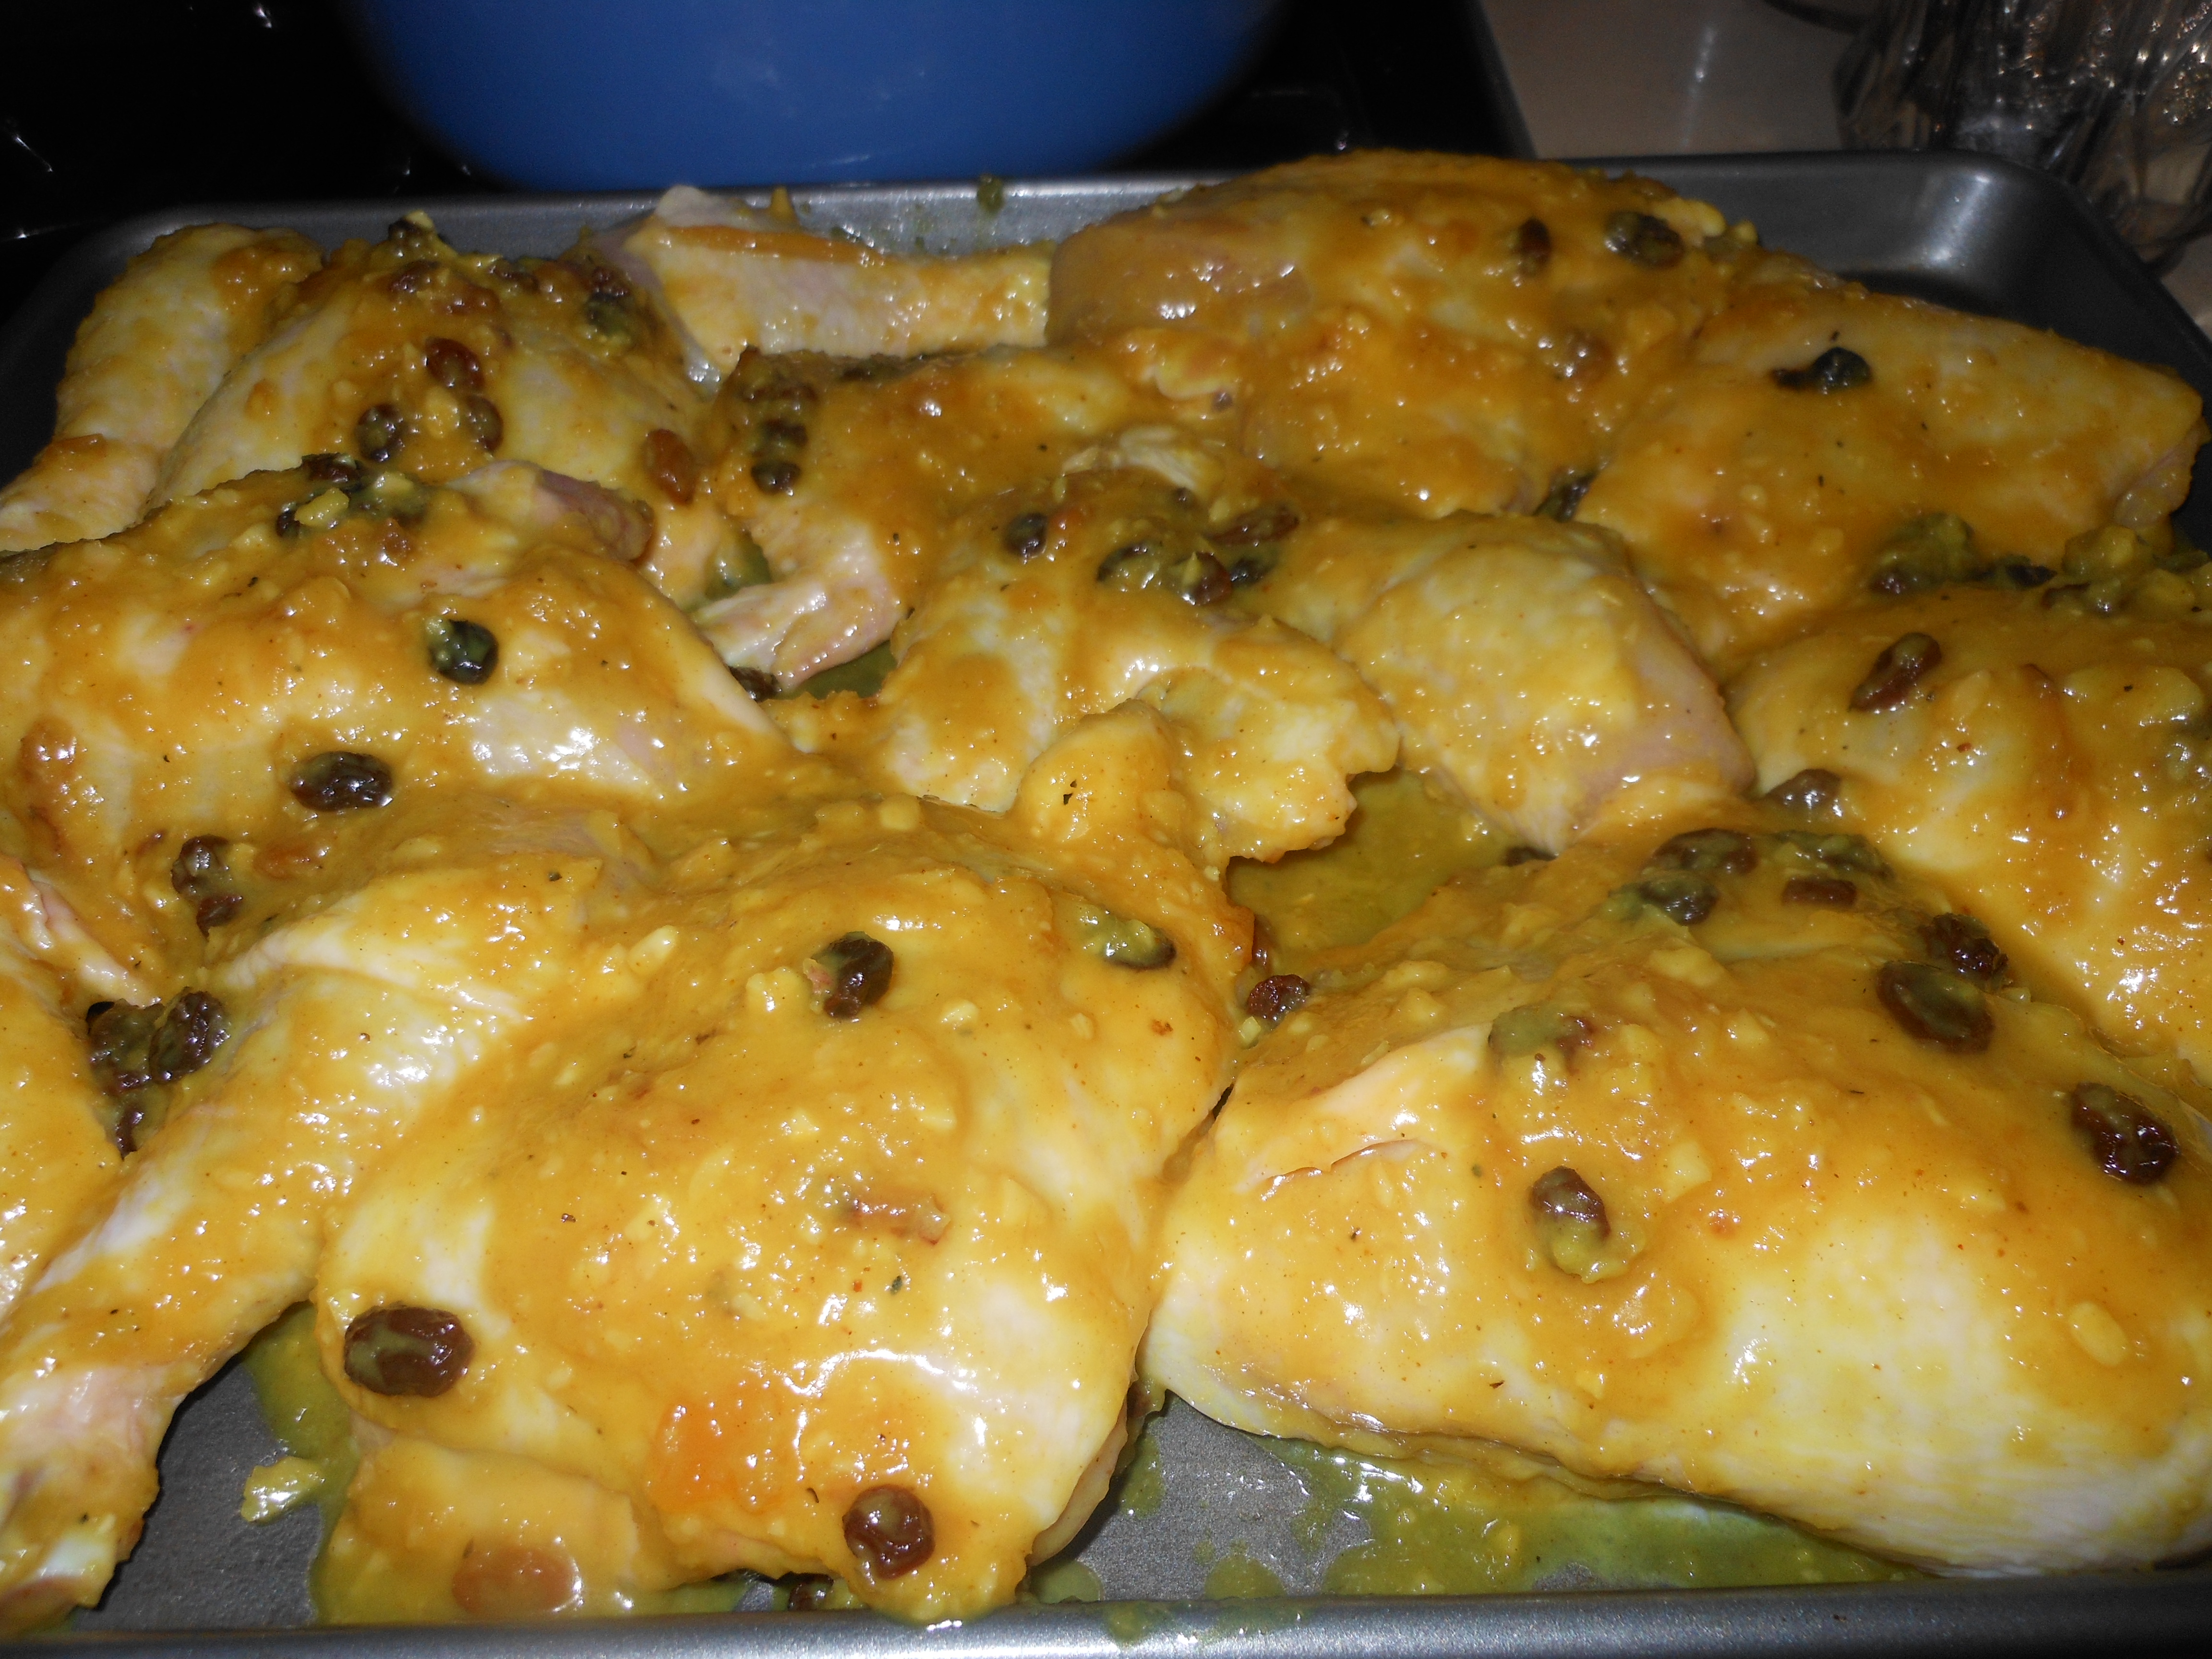
This recipe was actually given to me by my daughter Jennifer. She has made it numerous times. always to raves from the family. It is a delicious chicken dish and it perfect for the Jewish new year and for Passover. It’s sweet and savory and has a wonderful blend of flavors.
Remember to pay attention to cooking directions as you will not be preheating oven!!!!!!
Obviously this recipe can be cut in 1/2 for a smaller group.
Ingredients:
1 stick butter or margarine
1/2 cup minced yellow onion
2 large cloves garlic, minced
1/4 cup Dijon Mustard
1/2 cup mild honey
1 teaspoon kosher salt
a rounded teaspoon curry powder
2 tablespoons peach or mango chutney ( available in most supermarkets)
small handful of dried currants or chopped dark raisins
2 roasting chickens cut up in 8’s or you can cut recipe in 1/2 and use 1 chicken and 1 roasting pan
Directions:
you will need 2 shallow baking sheets with 1 inch rims ( you may be able to get it on 1 large sheet)Spray baking sheets well with cooking spray.
to make sauce:
Melt butter/margarine in a heavy 2 quart saucepan over medium heat. while it is bubbling, saute onion and garlic until softened, about 3 – 5 minutes. add remaining ingredients except for chicken and stir until well combined. heat until warm throughout and set aside to cool slightly.
to prepeare chicken:
I would spray each baking sheet with pam cooking spray first
Rinse and pat chicken dry . (each piece) dip each piece in honey mixture, coating chicken completely. lay chicken pieces ( skin side up) on baking sheets. spoon any remaining sauce over chicken.
To Bake Chicken:
place chicken in a cold oven, turn heat to 400 degrees and bake for one hour. if you are using 2 baking sheets , roast in the upper and lower thirds of the oven and switch shelf positions 1/2 way through the cooking time.
to serve:
Transfer chicken to a warmed serving platter and serve . this chicken is good hot, at room temp. and cold out of fridge the next day.
*if you cannot find peach or mango chutney ( I found it at Whole Foods) Stonewall Kitchen Brand , you can use Peach Jam, Apricot Jam, etc. Probably Saucy Susan would work. Use your imagination and don’t kill yourself trying to find the chutney. I think the chutney would give it a bit more kick, and cut the sweet, but either one will be fine.
This is truly traditional Jewish comfort food made with buckwheat grains and bowtie noodles. I love it and grew up eating it and try to make it a few times a year. It is super easy and super tasty. If you’ve never made it why not start now. It’s a wonderful side dish to any meal and it can be vegetarian for all of those who need some extra vegetarian dishes on their tables just substitute vegetable broth for chicken broth.
Kasha comes in a box. There are different types of Kasha and almost all will work. I use medium or coarse granulation. Wolff’s brand is really wonderful so look for it and for this recipe I follow the directions on the Wolff’s box of Kasha.
If you’re looking for an easy side dish to put together now is the time to look at this great recipe. This is also our go to the night before Yom Kippur. It’s tradition and delicious and comforting all at the same time.
Also perfect for Rosh Hashana.
*Wolff’s Brand Kasha is always available on Amazon
1 white/yellow onion thinly sliced or you can use chopped onions , entirely up to you.
app. 2 tablespoons vegetable oil you may need a little more and may want a bit more to drizzle at the end plus more — probably 1/4 cup in total
Kosher Salt and Freshly Ground Black Pepper–to taste
*1 small box button mushrooms sliced 8 ounce box — mushrooms are totally optional but sometimes I feel like they add a little something
1 cup kasha, medium or coarse granulation– I use Wolffs Kasha and follow instructions on the box which I have written below
1 egg for kasha as per instructions on the box
2 cups chicken or vegetable broth as per box instructions
Directions:
Cook the pasta according to directions on box for al dente.
Saute’ the onions in vegetable oil , salt and pepper until they just start to soften, about 5 minutes. I use a medium size frying pan large enough to add in the pasta, and make sure you have a tight fitting lid.
Add the mushrooms and sauté until they start to soften as well, a few more minutes , set aside. Place mushrooms and onions in a bowl and you’ll use same frying pan to cook kasha.
Coat the kasha in a slightly beaten egg. You’ll just place kasha in a bowl and put beaten egg on grains. This will help the grains not to stick to themselves while you are cooking them. Make sure the grains are completely coated with egg. Put the kasha in the same frying pan, set over a fairly high heat. Flatten, stir, and break up the egg-coated kasha with a fork or wooden spoon for a few minutes till toasted and the egg has dried on the kasha and kernels are brown and mostly separate. Kasha instructions for cooking are usually on the box as well. Then I pour in the broth that I am using, a little margarine/butter is OK as well ( app. 2 Tbsp) bring to a boil, cover tightly, lower flame to simmer and cook for 10 minutes till kasha is fluffy–these are the directions on the box that I follow .
Add back in the mushrooms and onions and combine with chicken broth. Cook box of Bow Tie Pasta according to directions on box al dente.
Bring to a boil and cook over low heat covered tightly. Check on it after 10 minutes or so to make sure the kernels are tender and the liquid has absorbed. If not, cover and continue steaming for another few minutes till all liquid is absorbed.
Adjust seasoning with more salt and pepper if you’d like, mix in cooked pasta, and if you’d like drizzle a little more oil on it. I like to do it all in a large enough frying pan to hold pasta . You can always mix in pasta in a large bowl separately. I like it in frying pan on stove top till I serve it. You can always make ahead and heat up in oven at 350 degrees in a pyrex dish, you’ll most likely need to add a little oil if you do so.
*Wolff’s Kasha has directions for cooking kasha on the box. It’s pretty much the same , I just add in the mushrooms and onions for more flavor.
Brisket can definitely be an intimidating thing to make. I once made it as a young cook, and it was perfectly inedible. Back then, I couldn’t believe how long it took to cook, but it does take very long. Now I usually make it in the slow cooker which is an awesome way to go but this time I used my trusty Le Creuset, which worked out beautifully. A lot of people have some pretty awesome brisket recipes and I welcome you to send me yours. This really couldn’t be any easier and it’s super tasty. This original recipe came from my friend, Michele (with a few comments from Karyn too.) I did change a few things to the original recipe, but not a lot and I thank Michele for the recipe.
INGREDIENTS:
4 lb. brisket (I didn’t need larger but you can adjust this recipe for whatever size brisket you use)
Lawry’s seasoned salt available in the spice aisle
2 large Spanish onions (Karyn uses Vidalia, which is also good), sliced thickly
2 cans of tomato sauce , I used the 16 oz. size. You can also use the 1 can of 28 oz. size. It depends on you and how much sauce you like.
2 tbsp. brown sugar (this is my addition. It doesn’t really change the flavor so much as cut the salt a bit)
DIRECTIONS:
Preheat oven to 350 degrees.
I sprinkled Lawry’s seasoned salt on both sides of the brisket (generously) then seared it in the Le Creuset pot with a little vegetable oil–probably about a tablespoon. (After the meat was seared, it shrunk to fit perfectly in my pot but I don’t think that a larger brisket would have fit.) Next, I added the tomato sauce and onions, covered the pot and put it in the oven. I cooked it for a total of 3 hours. I checked on it after each hour, which probably wasn’t even necessary. I then let it cool, off of the heat, for about an hour. Next, I sliced it with an electric knife, which came out beautifully. The meat was soft, but not falling apart at all. I then added the brown sugar to the gravy, put the brisket in a container with the gravy and froze it. I’ll take it out the night before I serve. Karyn pulses her gravy with an immersion blender. I didn’t do this but I think it makes for a good suggestion. In fact, I might still do it next time I make this recipe. I’ll let you know. Thanks again Michele and Karyn!
I also use an electric knife to cut my brisket –I find it works best (worth the investment and a rather inexpensive one at that–you’ll have it for years)
This is most definitely a “must have” Passover recipe. It has been a winning no no recipe ever since my friend Audrey gave it to me many years ago. This one is probably one of the most favorite Passover staples. Recipes are funny in that -they tend to spread out to a wide group of people and people start passing them down to their people and so forth and so on and before you know it no one remembers where the original recipe came from , they just remember that it was on their Passover table and they can’t imagine a Seder dinner without it. Enjoy this one; it is sweet and makes for a delicious side dish with poultry or beef. This has always been a crowd pleaser. I know, the amount of eggs is obscene on this holiday! This one has 7 eggs in it!!!!!
Make this part of your Passover tradition, you’ll be happy you did.
Follow me on Instagram @cookingwithcandi and please DM me or email me any questions or comments — I look forward to hearing from all of you. Happy Cooking from my kitchen to yours .
as I said I have never froze this particular recipe but I would cook 1/2 way so it’s in a more solid form and then wrap well and freeze. If you’re lucky enough to have an extra freezer and can freeze in the original baking dish even better.
Ingredients:
1 box matzoh farfel (I think it’s in a canister now) you will need 16 ounces of the farfel
2 15 oz. cans sliced peaches
7 eggs
2 cups sugar
1 tsp. salt
2 sticks margarine, melted
2 tsp. vanilla
4 cups hot water
Directions:
Preheat oven to 350 degrees.
Place dry farfel in a bowl, then pour hot water over it. Let stand until absorbed.
In a separate bowl, combine eggs, syrup from peaches, salt, sugar, margarine, and vanilla. Add farfel and combine well. In a well sprayed 9 x 12 baking dish, pour 1/2 the mixture, then arrange a layer of peaches on top. Add remaining mixture on top, then top with remaining peaches. Sprinkle with just a bit of cinnamon if you’d like. Bake for 1 hour at 350 degrees. Serve hot out of oven, or room temp. It is quite delicious at room temperature, if you don’t have the room in your oven, and it makes for a pretty awesome leftover.
Can be assembled, cooked 1/2 way through, then cooked the rest of the way through on the day of the holiday.




 I posted