Easy Chicken Soup with Orzo and Lemon

photo 4 (24) photo 5 (27)photo 2 (33)
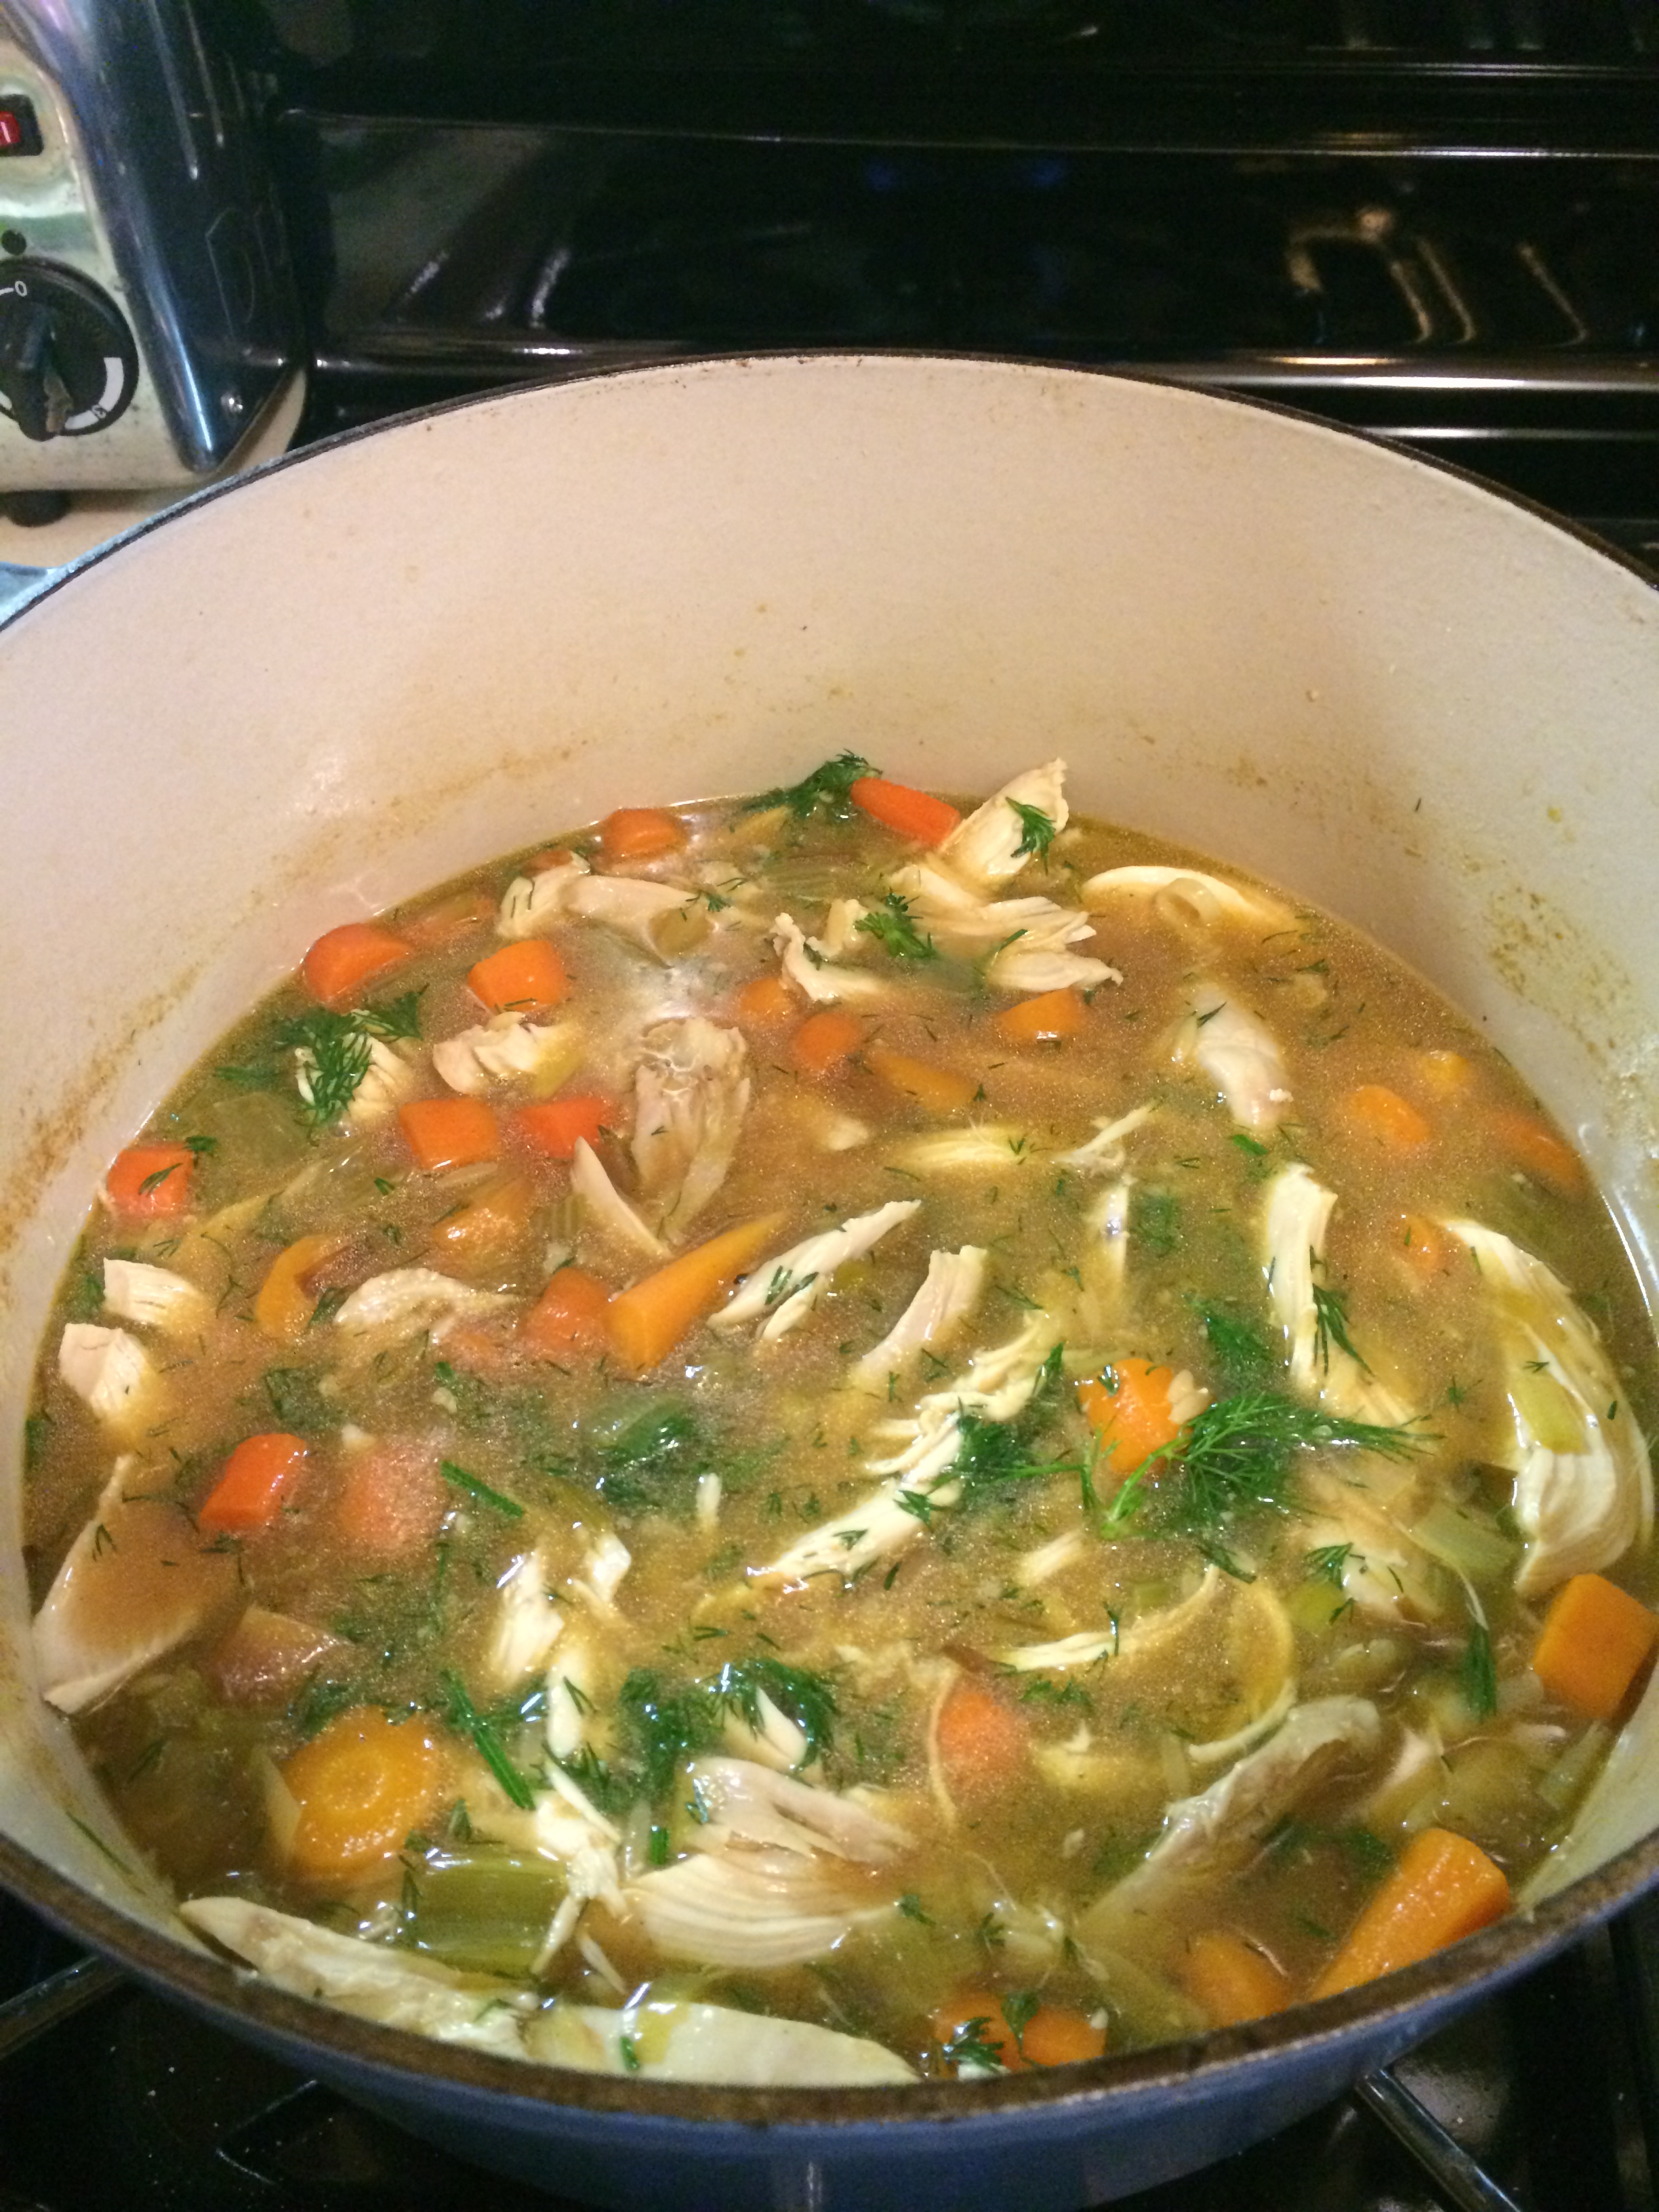
I literally started this soup at 5 p.m. and app. one hour later I was eating it.  Now that’s always a good thing in my book. Usually I slow cook my broth etc. and it takes hours ( Homemade Chicken Soup ) but this time there was no time, I wasn’t feeling great and wanted that homemade flavor without all the work . You can certainly cook your own chicken if it works out for you time wise. This would also be perfect with leftover chicken. I bought a rotisserie chicken and this is what I did. For those of you who saw it on Instagram and Facebook–this one’s for you. One more little thing, the fresh dill is the secret ingredient and gives it that wonderful layer of flavor, don’t skip it. I also squeezed fresh lemon into each bowl of soup , this added yet another wonderful layer of flavor to this soup. This is also a fairly low-calorie soup because whole soup is made with only 1/2 cup of orzo and it was plenty. I used these vegetables this time but feel free to add parsnips, mushrooms, kale or any other veggies you like.
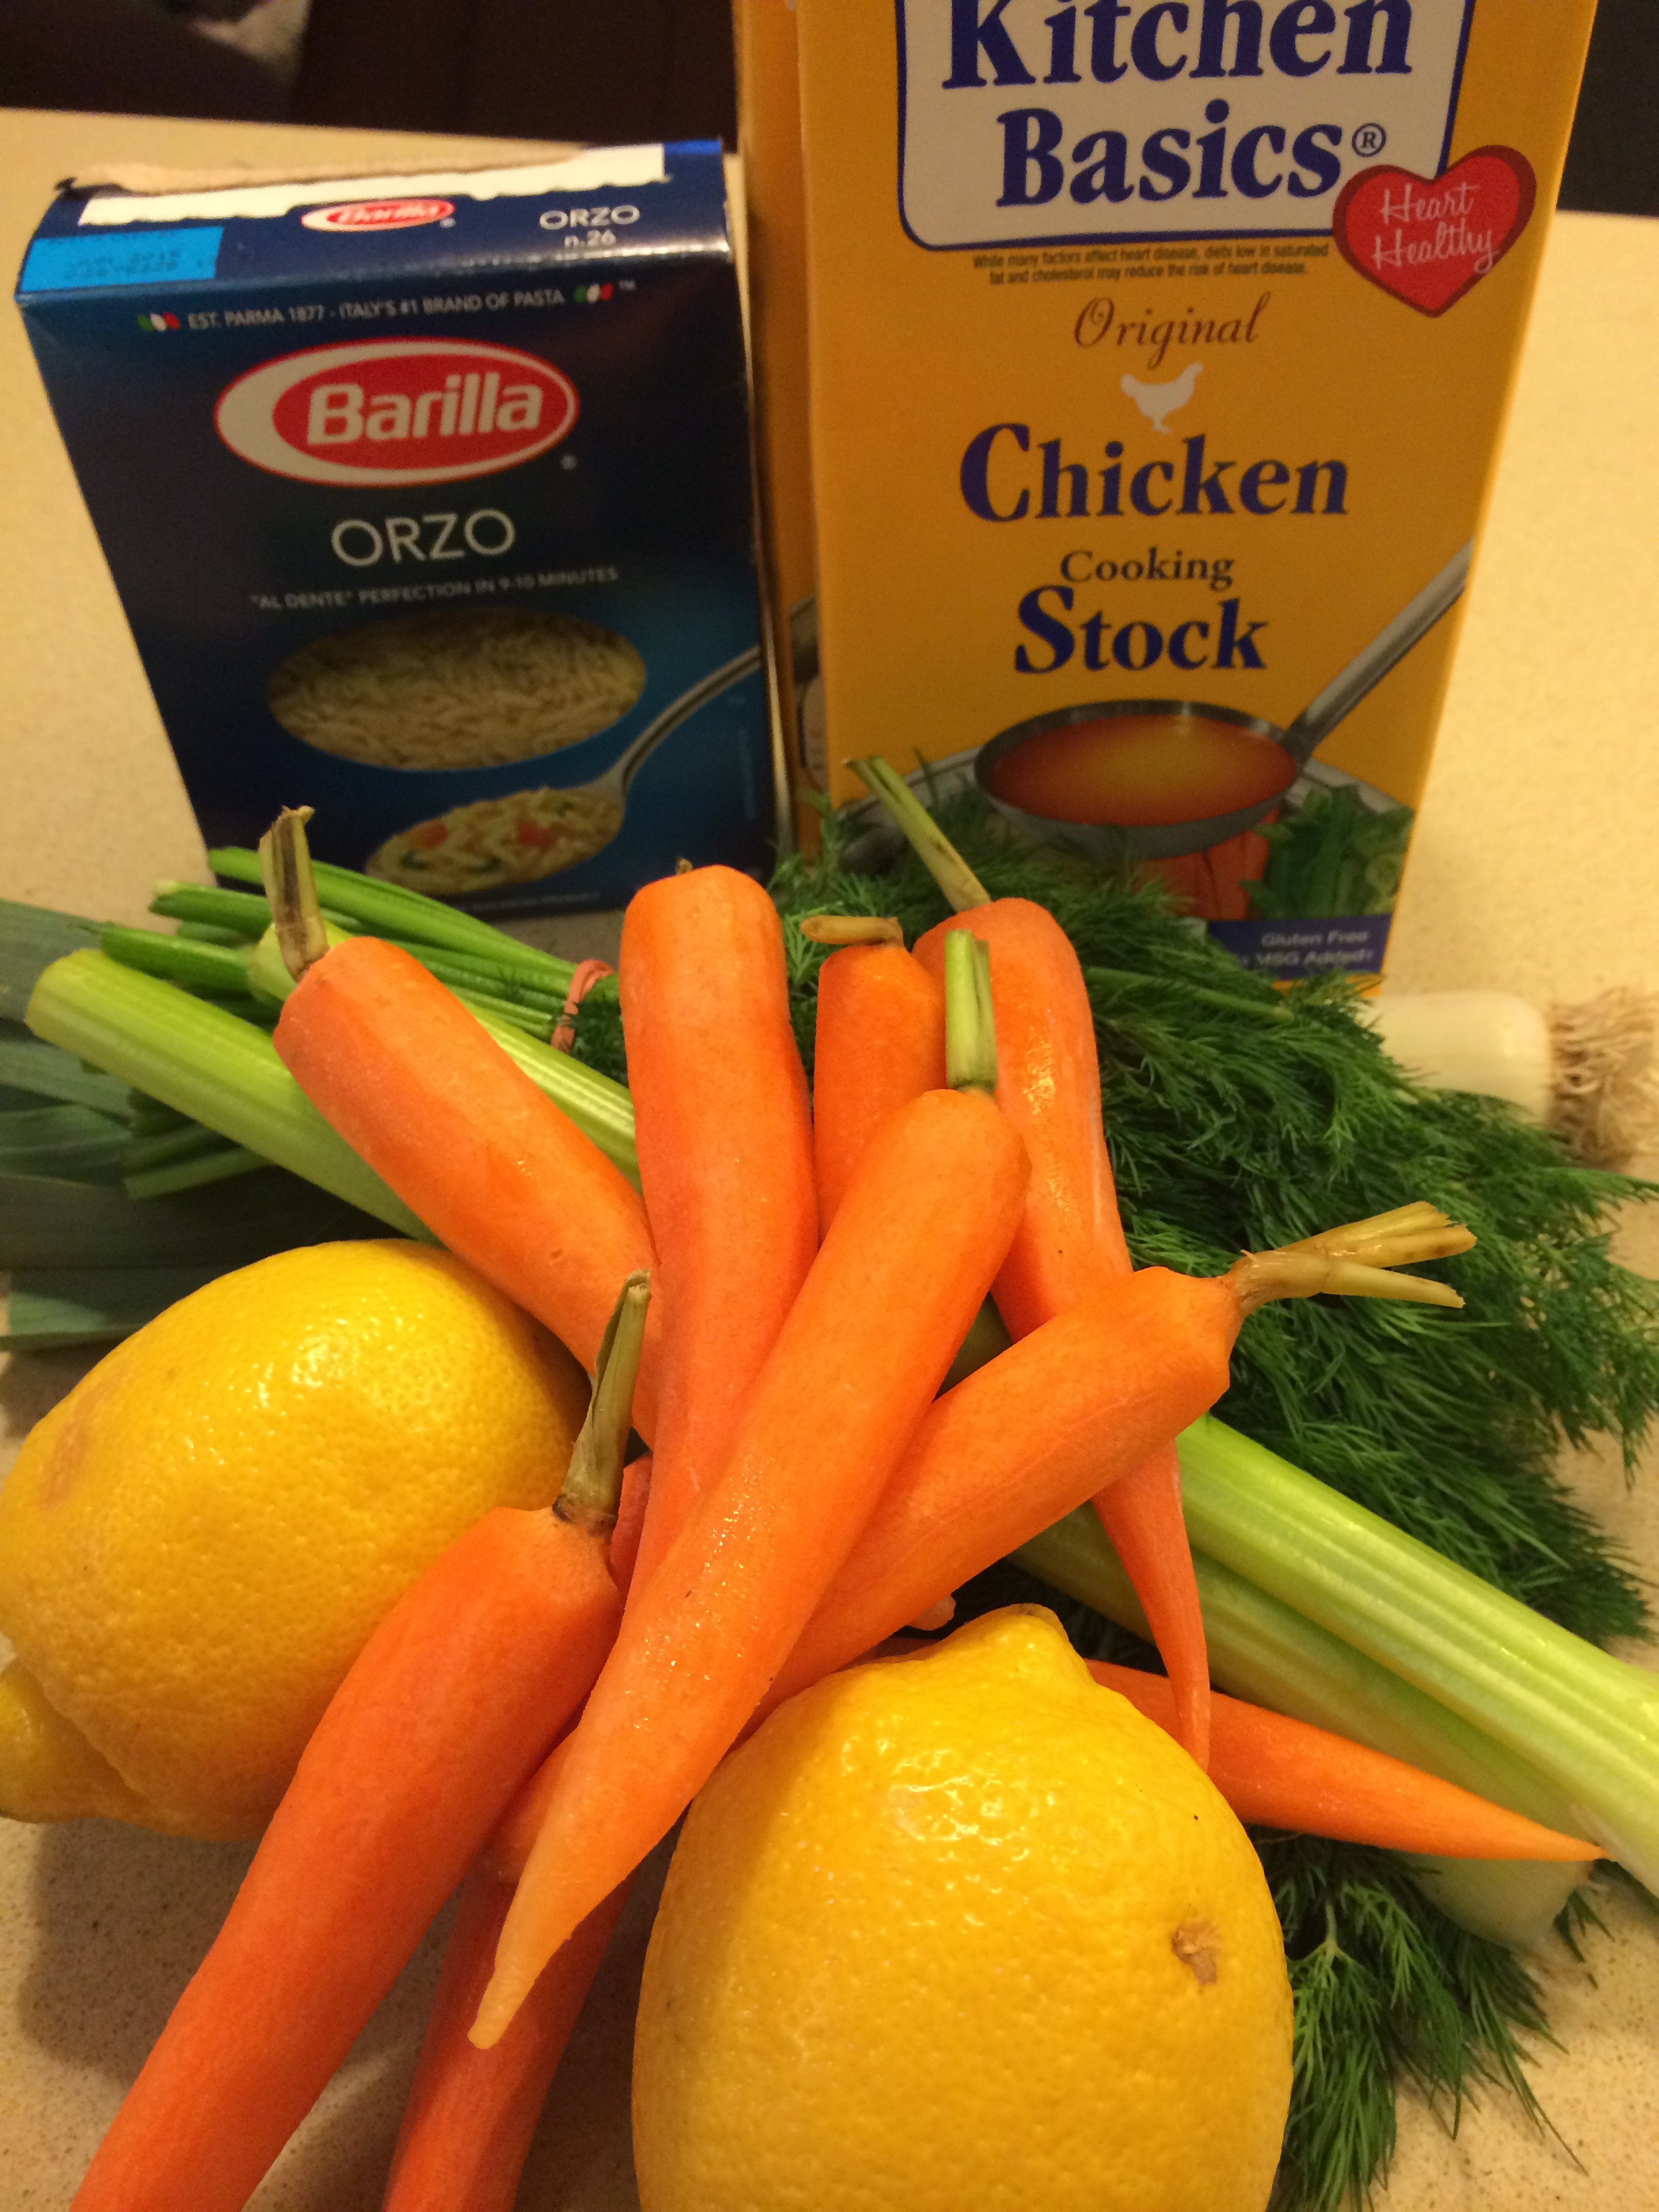
Ingredients:

1 Rotisserie Chicken, skin removed and shredded .

1 tablespoon olive oil

1 leek, white and pale green parts only, halved lengthwise, then sliced crosswise about 1/2″ thick

2 stalks celery, sliced into 1/2″ thick slices (app.)

2 large carrots cut into 1/2″ rounds. I found beautiful organic baby carrots and used them, it’s about 2 large carrots but feel free to use a little more or less.

1/2 cup of orzo

6 – 8 cups chicken broth, if you have homemade broth/stock good for you and use it. If not the box ones are awesome. Low-Sodium is good here if you’re concerned about the salt.

Kosher Salt and Freshly Ground Black Pepper

app. 1/4 cup of chopped fresh dill

*Lemon halves for serving

Directions:

Heat olive oil in a large heavy pot over medium heat. Add the leek, celery and carrots. Cook veggies, stirring often, until vegetables are soft, 10-15 minutes. I threw a little salt and pepper in to vegetables during this period, you can taste for salt and pepper again.

Add 6 cups of chicken broth and bring to a boil. Then lower to a simmer for about 20 minutes, just till carrots are soft.

After about 20 minutes, I added 1/2 cup of orzo and cooked for 8- 10 minutes. Taste for Salt and Pepper.

I then added the shredded chicken and dill and I also added a bit more of the chicken stock at this point since broth cooked down a bit.  I heated soup a bit more and served with lemon halves, squeezing a bit of lemon into each bowl of chicken soup before serving.

Shelly’s Pumpkin Ginger Muffins – I love Pumpkin

My friend Shelly who is an excellent cook and baker gave this recipe to me back in 2012.  I wanted to try them because I love all things Pumpkin and ’tis the season. I was leaving Colorado for the season and  planned on freezing these delicious beauties so they would be here when we return. Shelly said that she freezes them, then takes them out for breakfast individually by putting the frozen muffin in the microwave  or toaster oven. A little butter and jam don’t hurt either. The list of ingredients may seem daunting. I had to shop for a few of the items, but don’t let this stop you because these are fairly healthy and a perfect brunch/breakfast item, or good for just mid-afternoon tea. They contain fiber and aren’t cloyingly sweet. I love ginger and I love pumpkin. If you don’t like the ginger spice you can cut down or eliminate the crystallized ginger. Wow, pumpkin and ginger. What more can I say? Thanks so much Shelly for your contribution.

Ingredients:

1 cup all-purpose flour

2 cups whole wheat flour

2 1/2 cups wheat bran

approx. 1/3 cup of crystallized ginger (very small pieces), available in Whole Foods and most supermarkets

2 tsp. baking soda

4 tsp. pumpkin pie spice

2 tsp. ground ginger

1/2 tsp. salt

2 cups packed brown sugar

1 15 ounce can pumpkin (not pumpkin pie filling- be careful)

2/3 cup buttermilk

2/3 cup canola oil

1/2 cup molasses

2 tsp. vanilla extract

4 large eggs (room temperature please)

raw sugar to sprinkle on top

Muffin cups (the paper kind are perfect)

Directions:

Preheat oven to 400 degrees .

Combine flour, whole wheat flour, wheat bran, pumpkin pie spice, baking soda, ginger powder and salt in a large bowl. Stir well to combine, then make a well in the center.

Combine brown sugar, canned pumpkin, buttermilk, canola oil, molasses, vanilla and eggs, and whisk it all together until well combined. Add this mixture into the flour mixture and stir well until moist. Mix in the crystallized ginger.

Coat muffin tins with baking spray. I use a 12 muffin tin. Spoon mixture into cups. I used a large tablespoon and just dropped in. (See picture.) Sprinkle raw sugar on  top of muffins before baking (use as much or as little as you like).

Bake for about 16 minutes or until cake tester comes out clean. Mine baked for 17 minutes. Let cool down and remove from pan onto wire rack. If you have no wire rack just a baking sheet will do.

Enjoy! These are delicious and pretty nutritious. Serving size should make about 24 muffins.

Creamy Butternut Squash Soup (no cream)

I decided to re-post this amazing soup as it is one of my most favorite recipes and one of my most popular recipes. So very easy to make with pre-cut butternut squash readily available almost everywhere now. If you’d like a little different flavor you can roast the squash first.

It’s definitely fall and my first soup of the season  is almost always butternut squash soup. I’ve simplified the recipe along the way so that now it is just the way Joel and I like it. it’s pretty easy as long as you buy the squash pre – cut (available in every supermarket, and corner produce store). I just made my first batch of the season, and the squash is sweet and delicious. I always add a little butter to it, but you can totally leave it out. It tastes so creamy you’ll swear there’s cream in it, but really, there is none.  I love a little freshly grated nutmeg in it too, but you can certainly just sprinkle in a very little bit of grated nutmeg.  I hope your family and friends enjoy this as much as my family does! It’s always on my table for Thanksgiving. A delightful way to start a dinner, or a delicious main dish served alongside  a beautiful salad and bread. This can easily be made vegetarian by substituting chicken broth for vegetable broth, which is how I make it on Thanksgiving for our daughter Kerri , who is a vegetarian.

Ingredients:

4 pkgs. (approx. 4 lbs.) butternut squash (it’s doesn’t have to be exact)

3 tablespoons olive oil

1 large spanish onion, chopped

8 – 10 cups chicken or vegetable broth

*1 -2 tablespoons unsalted butter (for this serving size, I use 2 but it’s totally optional)

Kosher salt and freshly ground black pepper

*use whole nutmeg – you just grate a little in for flavor. I always tend to use whole, but grated will do. It’s just a touch of it–if I had to guess, I’d say 1/4 teaspoon to 1/2 teaspoon depending on your taste

Directions:

In a heavy bottomed Le Creuset (or any other ample size large pot), I heat 3 tablespoons of olive oil. When oil is heated, put in onion and about 1/2 tablespoon of kosher salt. Sweat out the onions until they are translucent (approx. 5 – 8 minutes). If you’re using the butter, add it now too. I then add all of the butternut squash and mix the onions, oil and butter as best I can all over the squash. Next, add enough broth to cover the squash (I used approx. 10 cups of chicken broth to cover). I keep the remaining half a box of broth in case I need it later. Return to a low boil, then bring to a simmer. I let it cook a very long time–at least an hour until soft–and then I turn off the heat and let it sit for a while. I like to make it early and let it sit for as long as possible, because the squash gets very soft. Then right before I am about to serve, I use an immersion blender and blend it into a beautiful smooth soup. If you need more broth, add it as you blend. This is also your salt, pepper and nutmeg moment. Season to taste and blend just until smooth. I leave it in the pot until I need it and then gently warm it up. This soup will keep in the fridge for a few days. It can be frozen as well. Upon defrosting you may need to add more broth. Sometimes I serve this soup with beautiful croutons if I can find them in specialty stores, but it is delicious and beautiful on its own, and very good for you! My family loves it , and I hope yours does too.

*should serve 10 – 12 as appetizer

Pumpkin Walnut Bread (no butter)

I just love pumpkin and I can’t stop posting about it. Pumpkin Season is here.  I love baking this bread because the smell in the house is beyond. I usually serve pumpkin bread and a banana bread in my bread basket on Thanksgiving. It’s hard to believe that there is no butter in this moist, delicious bread. I make both of these way ahead of time, because they freeze so well. You can even double the recipe if you have two loaf pans, and eat one now and tuck one away for another day like Thanksgiving. It’s a nice thing to bring to someone’s house as a gift as well if you’re so inspired.  This recipe will make one perfect loaf.

*this bread freezes beautifully for up to 8 weeks. Double wrap it in plastic and put in a resealable plastic freezer bag, and put the date on it. Defrost, still wrapped in the plastic to avoid condensation on the bread, at least 2 hours before serving. I take out of freezer the night before I’ll be using it.

Ingredients:

2 cups all-purpose flour (I sift)

3/4 teaspoon baking soda

1/2 teaspoon ground cinnamon

1/4 teaspoon allspice

1/4 teaspoon ground cloves

1/4 teaspoon ground ginger

1/4 teaspoon salt

2 large eggs, room temperature

1/3 cup water

1 1/2 cups sugar

1 cup canned pumpkin (not pumpkin pie filling)

1/2 cup canola oil

1 teaspoon pure vanilla extract

1 cup chopped walnuts (obviously this is optional)

You will need a 9 x 5 inch loaf pan, parchment paper, large bowl, medium bowl, whisk, silicone or rubber spatula.

Directions:

Preheat the oven to 350 degrees and position oven rack in the center of oven.

Lightly coat the loaf pan with melted butter and dust with flour, or spray with Pam. I line my loaf with a piece of parchment paper that extends one inch beyond the edge of the pan (this makes it easy to life the bread out. It is optional , just make sure you grease pan in one way or another first. If you’re not comfortable working with parchment paper, skip it. I like it but it can be tricky in a loaf pan. Just grease well, or give it a good spray.)

In a large bowl, sift the flour. Then, whisk together the flour, baking soda, cinnamon, allspice, cloves, ginger, and salt until thoroughly blended. In a medium bowl, whisk together the eggs and the water. Add the sugar and blend well. Add the pumpkin puree, vegetable oil, and vanilla extract and blend well. Add the pumpkin moisture to the dry ingredients and whisk until well blended and smooth. Add the walnuts and stir until they are well distributed. Use a spatula to scrape the batter into the prepared loaf pan.

Bake for 55 – 65 minutes, until the bread is firm to the touch and a toothpick or cake tester comes out clean from the center of loaf.  I let it cool for about 10 minutes, then I turn it out onto a rack to cool completely. I don’t freeze it until it is completely cool.

Pumpkin Spice Bundt Cake – I love Pumpkin

It’s pumpkin time again! and I am clearly obsessed  with pumpkins. This is a pretty easy  to make bundt cake. Perfect for Thanksgiving or any time. You can make it ahead of time and freeze for another, or make two. While you’re making the mess anyway, you might as well bake two, and freeze one. Got this one from Gourmet Magazine. Just saying while I’m not a big raw cookie dough person I am a very big batter person and this batter was pretty delicious right out of the bowl!

Ingredients:

1 1/2 sticks (3/4 cup) unsalted butter, softened, plus additional for greasing bundt pan (or spray with Pam) I buttered this time

2 1/4 cups all-purpose flour, plus additional for dusting the pan

2 teaspoons baking powder

1 teaspoon cinnamon

3/4 teaspoon ground allspice

1/2 teaspoon salt

1 1/4 cups canned solid-pack pumpkin (from a 15 ounce can; not pie filling)

3/4 cup well-shaken buttermilk

1 teaspoon vanilla

1 1/4 cups granulated sugar

3 large eggs (room temp. is always best for baking)

Icing:

2 tablespoons plus 2 teaspoons well shaken buttermilk

1 1/2 cups confectioners sugar

You will need a 10-inch nonstick bundt pan (3 quart)

Directions:

Put oven rack in middle position and preheat oven to 350 degrees. Butter/spray bundt pan generously then dust with flour and knockout excess flour.

Whisk together flour ( 2 1/4 cups) , baking powder, baking soda, cinnamon, allspice, and salt in a bowl. Whisk together pumpkin, 3/4 cup buttermilk and vanilla in another bowl.

Beat butter ( 1 1/2 sticks) and granulated sugar in a large bowl with an electric mixer at medium-high speed until pale and fluffy, 3 – 5 minutes, then add eggs and beat another minute. Reduce speed to low and add flour and pumpkin mixtures alternately in batches, beginning and ending with flour mixture and mixing until batter is just smooth.

Spoon batter into pan, smoothing top, then bake until a cake tester or wooden pick inserted into center of cake comes out clean, 45 – 50 minutes. Cool cake on a rack for about 30 minutes, then invert cake , mine slid right out onto rack. I completely cooled cake for a few hours before I iced it. You can ice while cake is still warm however. I would let it sit for at least 1 hour before I iced though. It came out perfectly. Icing will get hard on the cake and be very white, it’s a beautiful presentation.

Icing:

While the cake is cooling, whisk together buttermilk and confectioner’s sugar until smooth. Drizzle icing over warm cake, then cool cake completely. Icing will harden slightly.

Cake can be made 3 days ahead and kept in an airtight container, I would ice it when I planned on serving it.

Pumpkin Soup – Happy Fall

Fall is here, and time to make soups, and hearty meals. Heartwarming and comforting is what comes to mind. This pumpkin soup is all of that–warm,sweet  and savory all at the same time. It contains cream; and I do use heavy cream, you can probably substitute skim milk and let me know how that works out. I figure there are 8 servings and only 1/2 cup of cream in the total so it’s not too too terrible. You can also substitute vegetable broth for chicken broth for a vegetarian style soup. It’s a smooth delicious soup, and served with a nice green salad and some crusty bread, it’s awesome! Happy Fall.

Ingredients:

6 cups chicken / vegetable stock ( either one)

1 1/2 teaspoons kosher salt

4 cups ( 2 cans) pumpkin puree ( not pie filling – be careful)

1 medium yellow onion chopped

1/2 teaspoon dried thyme ( you can use fresh )

1 clove garlic, minced

1/2 cup heavy cream

1/3 cup maple syrup

5 whole black peppercorns, or a few grinds of the pepper mill

1 tablespoon olive oil

Directions:

Heat up 1 tablespoon olive oil in a nice deep soup pot ( Le Creuset) add chopped onion and saute till translucent, add garlic and 1 1/2 teaspoons salt. When onion is translucent add stock, pumpkin, thyme, maple syrup and peppercorns. Bring to a boil, reduce heat and simmer on low flame for at least 30 minutes uncovered.

With an immersion blender, ( if no immersion blender a regular blender or food processor will do, but then you need to do in batches of 1 cup at a time and let it cool down a bit)

Blend till well combined, and simmer for another 30 minutes, uncovered. Taste for salt, the peppercorns get ground up and taste wonderful but you may want to add more pepper. Stir in heavy cream and stir well. Pour into soup bowls and enjoy!

You may want to sprinkle some fried onion rings on top. If I am pressed for time I take the onion rings right from the container ( French’s ) makes the best type and add to the soup for a little more flavor and crunch. Not too much just a taste. Of course a great crusty bread with butter and a delicious hard cheese needs nothing else but the soup.

Apricot Honey-Mustard Chicken

IMG_8816

Apricot Preserves (13 ounce size jar) is fine or 12 oz. Honey and delicious Dijon Mustard from Maille

IMG_8831 (2)

straight out of the oven–why you will want to have sprayed baking dish with cooking spray

IMG_8833

Delicious Apricot Honey Mustard Chicken

This is a simple, quick to assemble and delicious chicken recipe.  We prefer chicken thighs because we think they are tastier. I am sure this would be delicious over chicken breasts as well. If making chicken breasts the cooking times could vary. This whole dish from start to finish was just under an hour!!!! Now that’s a recipe I can get behind. Hope you enjoy it as much as we did. This could also be a delicious addition to any Holiday Table.

The basting is important. So set your clock to go off every 10 minutes . Whole chicken dish should cook  in 1/2 hour to 40 minutes so that’s 3- 4 basting times. I cooked for about 38 minutes. Use a spoon to baste.

8 chicken thighs will serve 4 people–I made 5 but wanted to check amounts of ingredients so I used full on amounts of sauce which worked out fine and made for easier basting and enough sauce for serving. This recipe will be perfect with 8 average size thighs.

Enjoy!

Ingredients:

6-8 chicken thighs (check that they aren’t very small) average to large size thighs

Kosher Salt and Freshly Ground Black Pepper  -*see variation on spices below

1 12oz. jar of Apricot Preserves or Jam ( 13 oz. is OK) some jars are 12 oz. and that’s fine as well

2 Tablespoons Honey

2 Tablespoons Dijon Mustard ( heaping)

*for a variation on this recipe sprinkle paprika, salt, pepper, and curry powder first and then add other ingredients

Directions:

Preheat oven to 425 degrees.

Rinse chicken thighs and pat dry. Transfer to a sprayed baking dish ( cooking spray) Season chicken generously with kosher salt and freshly ground black pepper on both sides. Set aside.

Bring jam, honey, and mustard mixture to a low boil in a small saucepan over medium heat. Once it starts to boil reduce heat to medium-low or just low. Simmer until sauce thickens and gets reduced by about half, app. 15 minutes. Spoon apricot mixture over chicken thighs in baking dish, spread with spoon to coat evenly.

Bake chicken , basting with sauce from bottom of dish every 10 minutes. Cook until juices run clear when chicken is pricked with a fork. Anywhere from 30 – 40 minutes depending on the size of your chicken thighs. If your chicken doesn’t get that browned up you can always put it under the broiler to crisp up for a few minutes. Just keep an eye on it if you do this.

Break-the-Fast Food – Blintz Souffle

Here we go again…another holiday to cook for. Most of breaking the fast is taking in bagels, fish, etc. Easy to do. But I still try to make a few dishes and this recipe is an oldie but a goodie. I have been making this recipe since 1975 and it never gets old.  This dish can be assembled ahead of time, kept in the refrigerator and baked right before eating. This is a keeper and a tradition in my house. Always delicious. You can buy almost any of the frozen blintzes. Some stores have homemade ones, but it doesn’t really make that big of a difference with this recipe. Enjoy! This is super easy, with excellent results.

INGREDIENTS:

6 blintzes (you can use cheese or fruit-filled, whichever you like. Depending on how many people I’m feeding, I usually make 1 fruit and 1 cheese tray)

2 eggs

1/4 cup sugar

1 tbsp. unsalted butter or margarine

3/4 cup sour cream (lite is fine but I wouldn’t use fat-free)

1 tsp. vanilla

Dash of cinnamon

DIRECTIONS:

Preheat oven to 350 degrees.

Melt butter or margarine in saucepan. Spray baking dish with Pam spray (Original). Mix remaining ingredients in a bowl together. Place frozen blintzes in baking dish. I usually use a 9×13 size dish but anything close to that will work. You can double the recipe, in which case you’d obviously need a larger baking dish (you need room for the blintzes to expand a little and for the egg mixture to rise around it. Don’t spread it too thin.) Pour the melted butter on top of the frozen blintzes, followed by the sour cream mixture. Bake at 350 degrees for approx. 30-40 minutes. Let it sit for a few minutes out of the oven before cutting into it.

Baked French Toast — all time best

DSCN4275

DSCN4288

DSCN4283

DSCN4274

DSCN4270

DSCN4302

DSCN4294I posted this originally back in October 2011 for Yom Kippur break fast. It is truly one of the best French toast recipes I’ve ever made.  I include it every year since my friend Ilene Stern gave it to me. I never have a single piece left. Delicious and decadent, perfect brunch and breakfast food. I almost always include it in my Mother’s Day Brunch as well. Once you’ve made this recipe there is no turning back, your whole family will love it and you’ll have to make it every time.

The only downside is that you must prepare and refrigerate the night before without cooking it, you cannot cook this dish till you’re ready to eat it, the bottom will get hard like a caramel candy would. So cook right before you’re going to serve. Enjoy!

*recipe as is should serve 6- 8 if you have more people make 2 trays!

Ingredients:

1 cup packed light brown sugar

1 stick unsalted butter

2 tbsp. corn syrup ( I use Karo Original light corn syrup)

5 eggs (room temperature please)

1 1/2 cups milk ( you can use low-fat, I use Skim Plus)

1 tbsp. vanilla

1 package of sliced cinnamon bread. ( Pepperidge Farm is fine) if you can get thick slices it’s great , but the thin kind will work just double stack them it will be fine) You probably will use 12 slices of bread per tray. You will have 6 stacks of 2 slices each, 12 slices total, or 6 thick slices of cinnamon bread. If you can’t find just cinnamon bread use raisin cinnamon bread it’s easier to find .

Directions:

Melt butter, add brown sugar and corn syrup and combine well. Spray a 9×13 baking dish, Pyrex works well here. Pour butter mixture into baking dish and arrange bread slices flat in the mixture ( you will double stack the thin sliced bread) Unless the bread is 1″thick you will be doubling the standard sliced bread. Squeeze the bread to fit–it should hold 12 slices ( 6 double stacks), 3 on each side of a 9×13 baking dish.

In a blender mix the eggs, milk and vanilla and pour over the bread slices, covering them completely. Cover and refrigerate overnight. The bread will absorb all the liquid by the morning, so if you need to travel with it will be fine.

Uncover and bake in a preheated 350 degree oven for 30 minutes. Once it’s out of the oven you can dust with powdered sugar, but not necessary. Serve right from the baking dish.

*if you let this sit out too long before serving, the bottom may get hard like a praline candy. It never ever lasts long enough for this to happen at my table.

Look at my original recipe post on October 5 2011. More Break Fast: the all-time best Baked French Toast, I swear.

Slow Cooked Brisket–Super Easy

Featured Image -- 8316I am always on the look-out for a brisket recipe and it seems like everyone is always asking me for a good brisket recipe. This past New Years my friends and I were making dinner and wanted something we could do quickly that wouldn’t require a lot of prepping etc. My friend Susan gave me this recipe for a slow cooker brisket and I actually put it in the slow cooker Tuesday night before New Years. We came home from dinner and I cut up the onions , seared the brisket and got it all together in about 1/2 hour and put it in the slow cooker by midnight! When I woke up in the morning the house smelled amazing and the brisket had cooked for a full 8 hours! I then took the whole insert with cover and refrigerated it till later that day when I would remove any and all congealed fat that had naturally gathered in the pot. I highly recommend doing it ahead of time so that you can remove any unwanted fat from the brisket. You can even do it a week ahead and freeze the brisket, or a few days ahead whichever works best for you. The recipe is from the website Kitchn and Susan had already made it so I knew it would be good. So easy and so good.

This is such a wonderful recipe I highly recommend for the Jewish Holidays or any time you’re in the mood for good comfort food.

I also recommend an electric knife as it is the best tool for slicing a brisket thinly and getting the most out of the meat. I love my electric knife and it is great for cutting all roasts. Ingredients are simple and you probably have most of them in the house already.

*If you are freezing it, you can slice up and then put it in the freezer. Take out of freezer and re-heat the way I did.

* a 4 lb. Brisket with side dishes should serve 6 people

www.kitchn.com original title Slow-Cooked Brisket and Onion

Ingredients:

3 1/2 to 4 lb. Brisket

1 tablespoon olive oil

app. 2 large onions, sliced into half moons (not too thinly)

Kosher Salt and Freshly Ground Black Pepper

6 cloves garlic , minced

2 cups beef broth

2 Tablespoons Worcestershire Sauce

1 Tablespoon Soy Sauce ( reduced sodium is fine here)

Directions:

Heat a deep sauté pan or cast iron skillet over medium heat with the 1 tablespoon olive oil. Add the onions and cook on medium-low to medium heat, stirring frequently for app. 20 minutes or until the onions have caramelized lightly. This means that the onions will lightly brown up and completely wilt.

Remove brisket from its packaging and pat it dry. While the onions cook if you have another large skillet or sauté pan heat it up over medium-high heat and turn on your vent or fan. Sear the brisket until a golden brown crust appears on both sides of the meat. Remove and place in a slow-cooker insert fatty side up.  I would spray the insert with cooking spray first. If you don’t want to dirty  2 pans wait till the onions are cooked and then just add brisket to that pot to sear.

Sprinkle the minced garlic over the meat. Pile the sautéed onions on top and around the meat. Mix the broth, Worcestershire Sauce and soy sauce and pour into the slow-cooker insert.

Cover and cook in the slow cooker on LOW for 6-8 hours or until the brisket is very tender. I did 8 hours because it depends on the size and shape of your brisket. This brisket was about 4 lbs. and pretty thick in spots.

Now the thing about cooking ahead was that I could refrigerate it right in the insert . The next day I removed from refrigerator mid afternoon and scraped off the congealed fat.

To reheat: First I slice the brisket if I haven’t already done so. Heat the oven to 300 degrees. Transfer the brisket and all the juices to a baking dish and cover tightly with a lid or two layers of aluminum foil. Warm in the oven for at least an hour till brisket is completely warmed through. Of course the timing will depend greatly on the size and shape of the brisket; once it’s sliced it will re-heat faster which is why I always do so.

If you don’t have a slow cooker and don’t want to buy one you can cook in the oven instead. You’ll need a dutch oven ( Le Creuset type) with a lid. Or a baking dish covered  very tightly with foil. Follow instructions as above but cook in the oven at 325 degrees for about 4 hours for a 4 lb. brisket. You may need to cook longer depending on the size and shape of your brisket.

Cooking Time varies for how you prefer your brisket. If you want a more formal presentation you’ll probably stay within the 8 hours . If you like it shredded and more like pulled beef you may want to increase cooking time by another hour. We sliced it after 8 hours and then re-heated it and it was perfect! Sorry I didn’t take more pictures.

IMG_6380