Applesauce and Raisin Cake – an Homage to the Bundt Queen

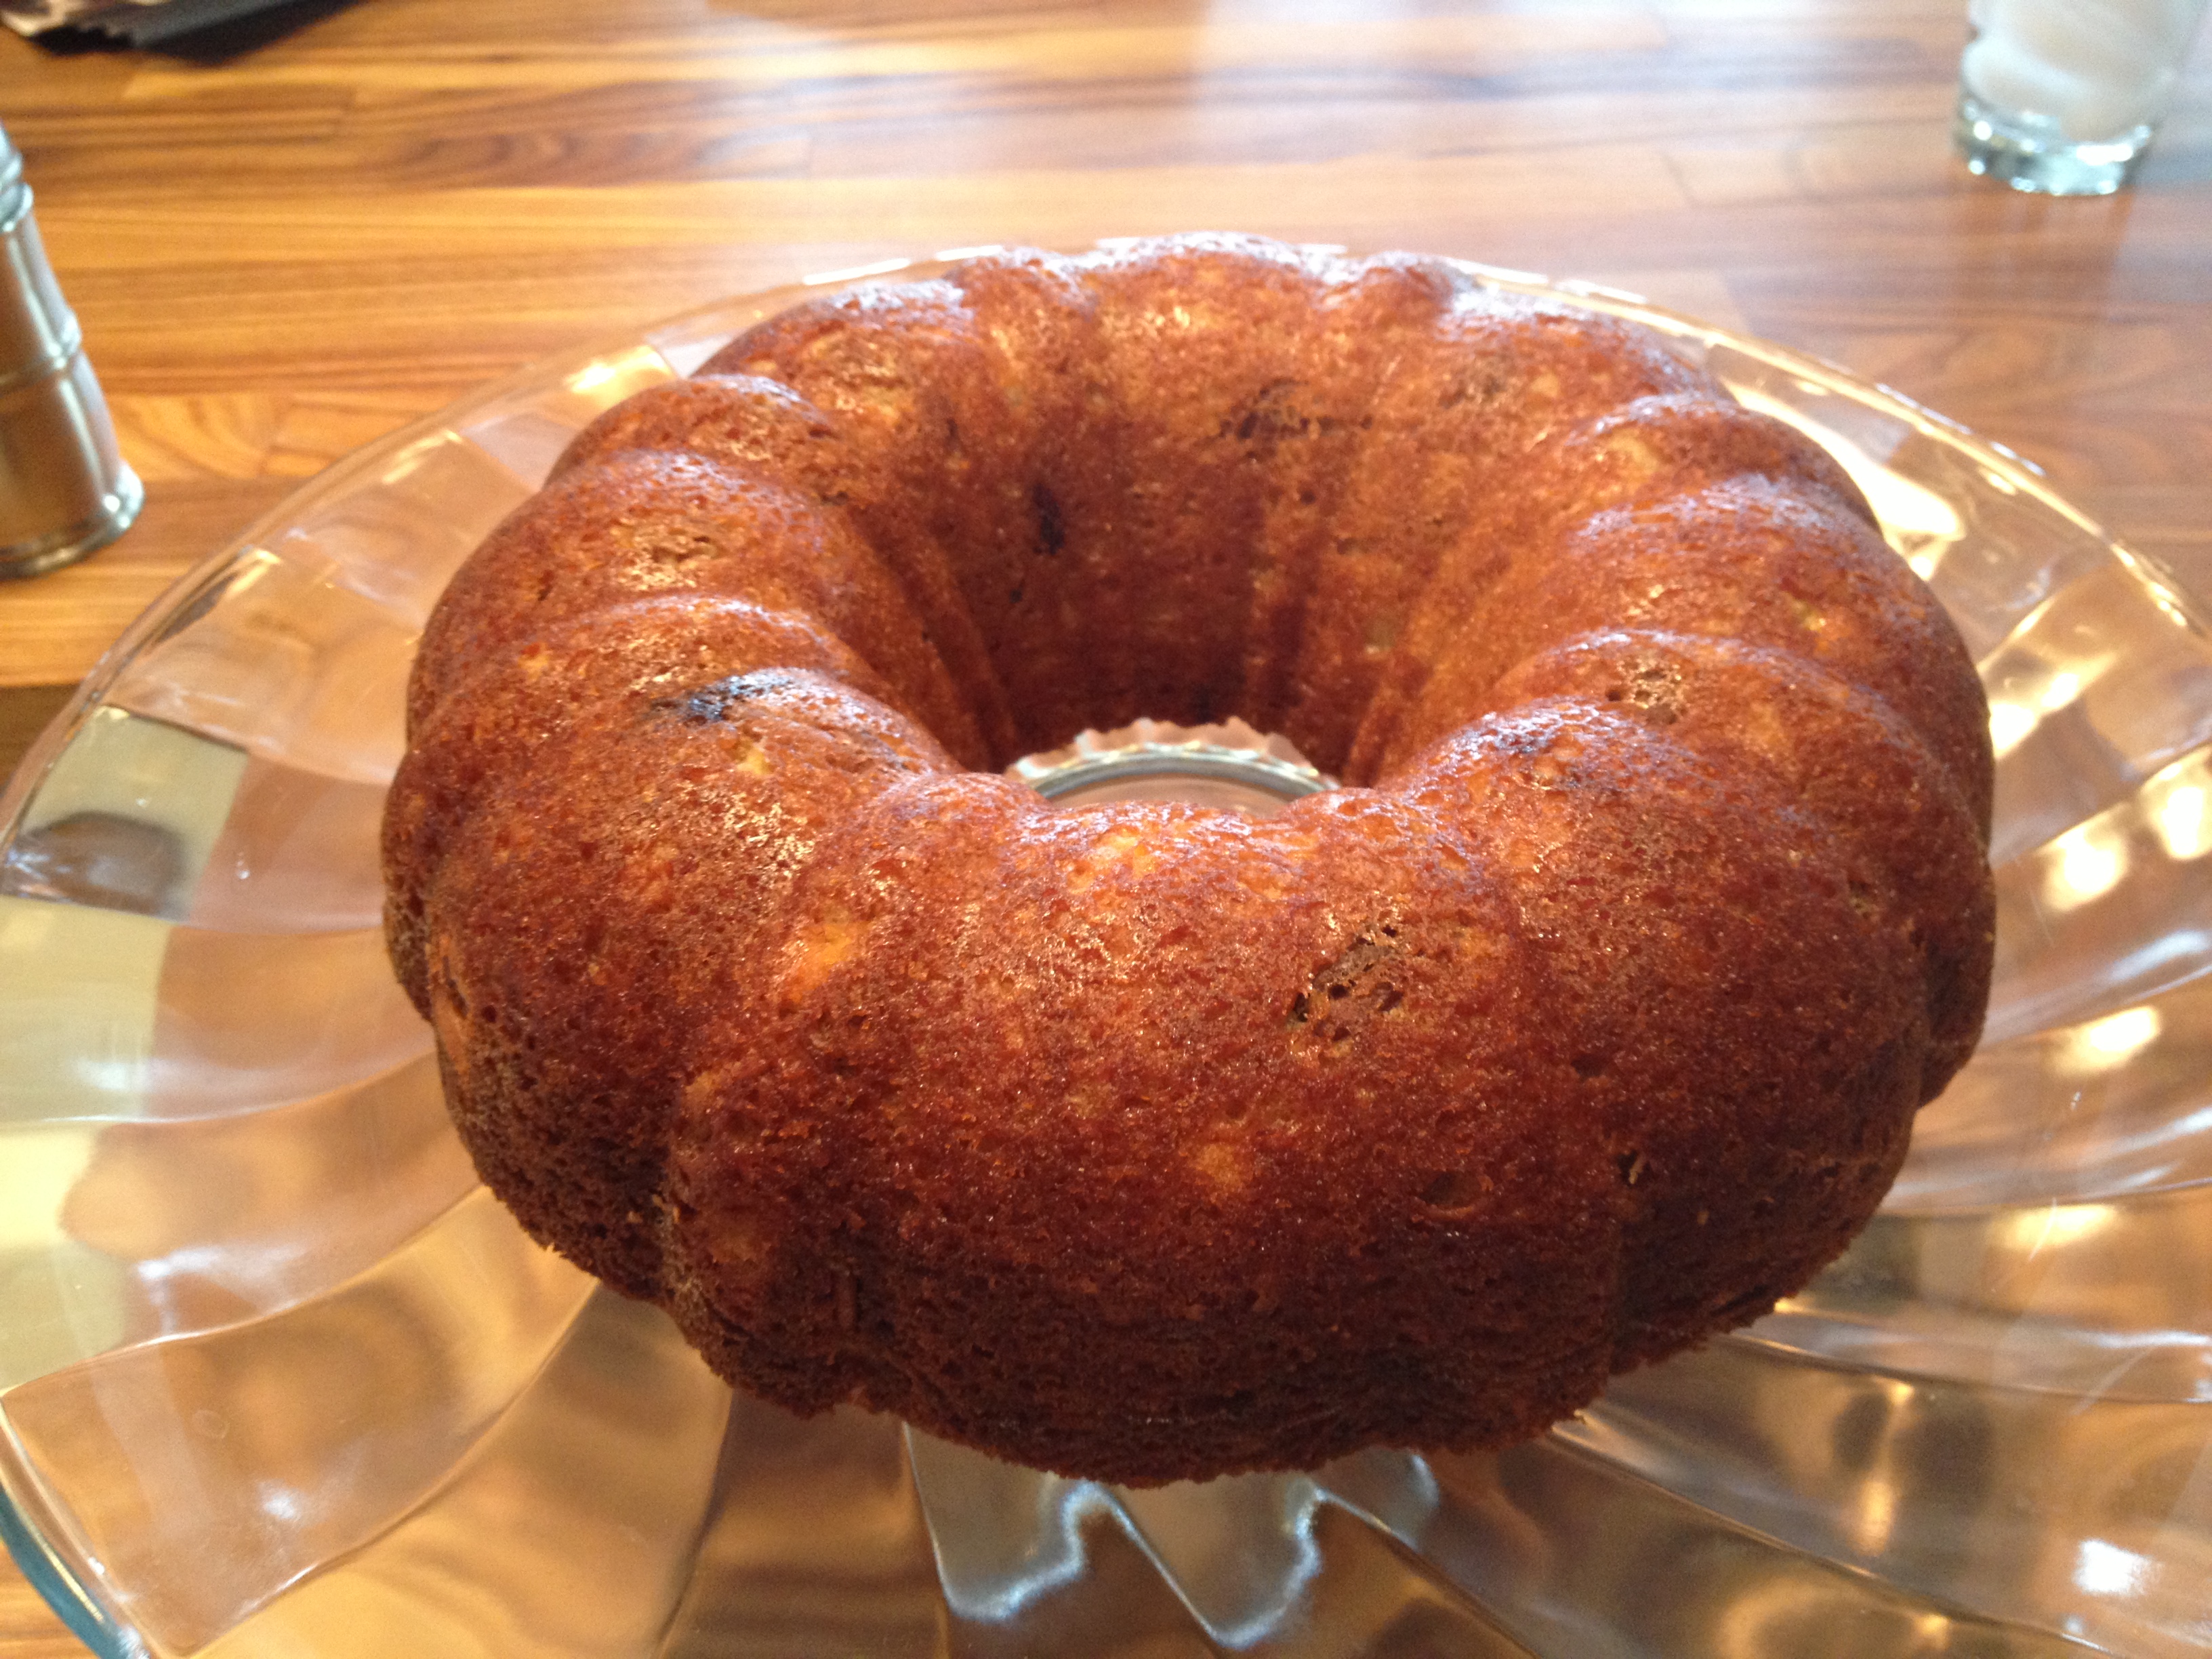
I always call my friend Susan the Queen of the Bundt Cake. It certainly seems to be her calling, as she is always coming up with new and delicious Bundt Cakes for all of us to try. I just hope I do her justice in trying to duplicate it. She made this cake for everyone last New Years  and I have been wanting to try it ever since.  I had to change one of the ingredients because I bought chunky applesauce instead of plain applesauce. Of course, if you’re so inclined you can make your own applesauce (I wasn’t so inclined today!).  The original recipe hails from The Silver Palate, and I have to say this is one cookbook you don’t want to be without. There are so very many wonderful recipes in it. This cake has a slightly spicy flavoring, and is just so darn good. I am very happy to report that this cake came out awesome! Super Delicious with the chunky applesauce. Very moist and delicious, cooked perfectly at 1 hour and 10 minutes. Thanks Suki and the Silver Palate!

This cake can be a wonderful addition to your holiday table, applesauce and raisins just so perfect for Rosh Hashana.

Ingredients:

1 cup (2 sticks) unsalted butter, plus a little extra for greasing the pan (Butter should be at room temperature.  I woke up early and didn’t have time to let it sit so I just put it in microwave to soften for 15 seconds.)

*if baking for the Jewish Holidays and don’t want to use butter you can use margarine

3 cups all-purpose flour

2 cups sugar

2 eggs (at room temperature)

2 cups applesauce (I used Chunky because probably didn’t have reading glasses in market and grabbed it.)

1 teaspoon vanilla extract

1 teaspoon ground cinnamon

1/2 teaspoon ground nutmeg, or 1 teaspoon freshly grated

2 teaspoons baking soda

1 cup raisins

Lemon/Orange Icing ingredients:

1 cup confectioner’s sugar

1/2 teaspoon ground cinnamon

1 1/2 tablespoons fresh lemon juice

1 1/2 tablespoons fresh orange juice

Directions:

Preheat oven to 350 degrees.

In a mixing bowl (electric mixer), cream together the butter and sugar until light and fluffy. Add the eggs, one at a time, beating well after each addition. Stir in the applesauce and vanilla.

Sift the flour, cinnamon, nutmeg and baking soda together then add to applesauce mixture. Next, sprinkle in the raisins, and blend gently but thoroughly.

Pour the batter into the tube pan and set on a rack in the center of the oven. Bake until a cake tester inserted into the cake comes out clean. 1 hour and 10 – 15 minutes. I cooked it 1 hour and 10 minutes.

Cool in the pan for at least 15 minutes (I will leave it all day as I go out hiking, and turn it over when it is completely cool when I return.)  When it is completely cool, I will make the icing and drizzle over the top. A little trick is to poke little holes in the cake (on top, with cake tester or toothpick) and pour icing over the cake and it will go into cake and infuse some of the lemon/orange directly into cake.

Instructions for icing:

Sift the confectioner’s sugar and cinnamon into a small bowl.

Dribble in the juices, stirring constantly until the icing is smooth. Drizzle over completely cooled cake.

*should be enough icing for 1 Applesauce Raisin Cake

A Savory Noodle Kugel

I saw this recipe in the NY Times Food Section a few weeks ago. It is from Joan Nathan who I trust implicitly and she adapted it from “Regard Thy Table” a recipe book compiled by The Sisterhood of The Larchmont Temple from 1950. I am going to give this a shot since I always make sweet kugels this one looks like a nice change.

Ingredients:

8 ounces medium egg noodles

1 1/2 cups cottage cheese or farmer cheese *cottage cheese with curds, not creamed or whipped

1 1/2 cups sour cream

1/2 medium onion, finely minced ( Spanish type onion)

1 Tablespoon Worcestershire Sauce ( secret ingredient)

Dash of Tabasco ( other secret ingredient)

1 teaspoon salt, and more to taste

Freshly ground black pepper , to taste

2 Tablespoons grated Parmesan

1/4 cup chives, sliced

Directions:

Heat oven to 350 degrees. Spray a 2 – 2 1/2 quart casserole or gratin dish. You can use butter or use a baking spray whichever you prefer.

Bring a pot of water to a boil, add the noodles and cook until al dente, about 7 minutes. Drain the noodles, put in a medium bowl, and toss with cottage cheese or farmer cheese, sour cream , onion, garlic, Worcestershire Sauce, Tabasco and salt and pepper.

Spoon into the prepared dish and sprinkle with Parmesan and chives. Bake until golden and crusty on top, 35 – 40 minutes till golden.

Don’t Let the Apples Go Bad Cake

Apples are the kind of fruit we eat all year round. They are always in the fridge and if they don’t get eaten, I  feel guilty that they’re just sitting there and going to go bad.  I saw this recipe on Smitten Kitchen and decided since we were leaving for Colorado and I was not ditching perfectly good apples, I would make it and freeze it for when we come back.  (The cake would freeze well…the apples, not so much.) You’ll need a tube pan. You don’t need an electric mixer, so it’s pretty easy on the special equipment. Use those leftover apples–dont’ let them go bad. No butter in this recipe, lots of sugar though.  My house smelled divine.

*you can see in photos that I use a melon baller to get the pits out of the middle of the apple. I prefer this technique over the corer thingys which never really work. The melon baller works perfectly: first cut apple in half, then scoop out just the pits.

Ingredients:

6 apples (I used what I had in the house: a combo of Granny Smith and Honey Crisp. Good old Macintosh will work, too.)

1 tablespoon cinnamon

5 tablespoons sugar

2 3/4 cups flour, sifted

1 tablespoon baking powder

1 teaspoon salt

1 cup vegetable oil

2 cups sugar

1/4 cup orange juice (try to use fresh but if not, Tropicana will do)

2 1/2 teaspoons vanilla

4 eggs

1 cup walnuts, chopped (this is optional; I didn’t use them this time out)

Directions:

Preheat oven to 350 degrees. Grease a tube pan. Peel, core, and chop apples into chunks. Toss with cinnamon and sugar and set aside (I sprayed with a baking spray. There’s no need to add any butter here.)

Stir together flour, baking powder, and salt in a large bowl. In a separate bowl, whisk together oil, orange juice, sugar and vanilla. This mixture will be rather thick.  Mix wet ingredients into the dry ones, then add eggs, one at a time. Scrape down the bowl to make sure all ingredients are incorporated. Use a rubber spatula to get it all out of the bowl.

Pour 1/2 the batter into prepared tube pan. Spread 1/2 the apples over this. Pour the remaining batter over the apples and arrange the remaining apples on top. Use your eye to halve  batter and apples (don’t worry if it’s not perfectly halved.) Bake for about 90 minutes, or until a cake tester (or toothpick) comes out clean. I would check cake after 1 hour 20 minutes. I baked for the full 90 minutes; it’s a rather thick cake.

Recipes for Jewish New Year–Rosh Hashana

Finished Product Apple Cake

Finished Product Apple Cake

photo 1 (3)

Un-Stuffed Cabbage

DSCN2648DSCN4230DSCN2642DSCN4225DSCN4234photo (2)DSCN4230Summer is the most easy-going time of the year and then along comes the Jewish holidays right on the heels of Labor Day and just like that it is over. Before you know it,  it’s Thanksgiving! Oh well here we go again, for those of you who have been reading my blog you may have made a lot of these recipes. I am going to post a few new ones. I am sort of a traditionalist when it comes to holidays and my family always looks forward to the same things. If I introduce a new recipe it’s always hold your breath time and what was wrong with the old one looks on everyone’s face.  Final decisions haven’t been made but I know that there are some things I’d never leave out. Here is a list of suggestions and by all means cruise through my blog and see if there is anything else to your liking. These are just a list of suggestions. I will be posting a few new ones this week, so be on the lookout. Rosh Hashana recipes are tagged Rosh Hashana if you are trying to look them up on my blog. I may sneak in a recipe or two this week if I can get in the time. So sad summer is over but it’s time to move on .

For those who celebrate have a very Happy Healthy New Year!

Homemade Chicken Soup with not so Homemade Matzo Balls ( even though this is for Passover we eat it a lot on Rosh Hashana)

Happy New Year Brisket

Unstuffed Cabbage–a great alternative to meatballs

Chicken Marbella

Honey Roasted Chicken

Old School Meatballs

A Noodle Pudding from Ellen

Another Noodle Pudding from Marcy *kosher non dairy

Noodle Pudding with Apricot Nectar–probably one of the all time best kugels ever

Noodle Pudding from Julie

Mushroom Barley

Kasha Varnishkes

Grandma Millie’s Cauliflower

Applesauce and Raisin Cake

Don’t let the Apples go Bad Cake

Julie’s Honey Cake

Plum Torte

My farewell to Norah Ephron- her Tzimmes

Rosemary Grilled Chicken

photo (3) photo (2)photo

photo 4 (2)

photo 2

photo 2 (2)Sometimes you just want a “no recipe” recipe. This is more of a throw it together when you don’t know what to cook kind of thing. I was in Whole Foods and was looking for inspiration saw some Rosemary in the Herbs section and headed over to the butcher. I asked the butcher ( and this is important here) to remove back bone and cut whole chicken in 1/2. You can butterfly but I find that chickens cut in half are easier to manage. All you need is olive oil, kosher (coarse salt) and freshly ground black pepper and there you have it. I grilled mine outdoors but you could even do it in the oven if you had to. It cooks in about 20 – 25 minutes and it is delicious. I marinate it for about an hour before I cook it. I served it with fresh heirloom tomatoes and fresh mozzarella, just a perfect summer meal.

Ingredients:

1 whole chicken–back bone removed and split in half

Kosher Salt –sea salt any coarse salt–be generous because chicken needs it

Freshly Ground Black Pepper just because it’s s much better tasting

Fresh Rosemary–about a tablespoon chopped–or a little more , it really needs the flavoring so be generous with the seasonings

Directions:

About an hour before I am going to cook it, I take chicken out of fridge. I pat it dry with some paper towels. Then I take a little olive oil at a time and brush all over the outside of each 1/2 of chicken. I  generously sprinkle kosher salt, pepper and chopped rosemary. Using my clean hands I rub the chicken all over. Let it sit for about an hour at room temperature before cooking.

I heat up grill on high. Place chicken on grill skin side down and lower grill temperature a little bit. I set the timer for five minutes and then flip them over. Cook on the other side for about 10 minutes and then cook for about 5 minutes on the skin side,  20 minutes is usually good , cut into thigh for clear juice to run. If you need a bit more time put back on but watch it. Dry over done chicken is not OK.

Perfect Dinner served with grilled local corn, mozzarella and tomatoes and some roasted sweet potatoes.

Summer Peach Salad with Tomatoes and Mozzarella

It’s the end of the Summer and the Palisade Peaches are still here in Colorado along with the most beautiful heirloom tomatoes. It’s a no-brainer salad going on here made with the freshest of ingredients. Fresh Mozzarella is readily available almost everywhere now and grab some fresh basil while you’re at it. This salad worked out well with a few easy ingredients and it packed some super delicious flavor. Hurry to your farmers market or produce store to grab some of these beauties before they’re gone .

*this recipe should serve 2- 4 but can easily be doubled for more

Ingredients:

1 pint of cherry tomatoes ( I grabbed some heirloom cherry tomatoes)

1 large peach or 2 small (Palisade Peaches here in Colorado have been amazing)

4 ounces fresh mozzarella

1 shallot

some fresh basil–throw in about 8 pieces and add more or less depending on your own particular taste

1 1/2 Tablespoon Extra-Virgin Olive Oil

1/4 teaspoon kosher salt or any flaky salt you like –this is approximate and use as little or as much salt as you like, tomatoes can endure a lot of salt

app. 1/4 teaspoon freshly ground black pepper

Directions:

Rinse off tomatoes and cut in 1/2. Clean and cut the peach in half, remove the pit and cut into bite size pieces. Add tomatoes and peaches to a platter or a bowl. Cut up the mozzarella and add to bowl.

Peel and slice the shallots into thin slivers or rings whichever you prefer. Scatter over tomatoes, add the basil, drizzle the olive oil, salt and pepper and stir gently.

Presentation isIMG_8679 IMG_0586 (2)IMG_8681 IMG_8685 beautiful on a platter as well. Whatever way you do it the taste is phenomenal.

Fresh Basil Pesto

photo 2 (6)

Chicken and Pesto on the Grill

photo 2 (8)

Pasta Pesto

The original recipe for this delicious pesto appeared back in May 2011 on Cooking with Candi.  Yummy Pesto was the title. This is the same recipe from my BFF Suki. I have tried many pesto sauces and this remains my absolute go to favorite. It is super easy and while the basil is abundant you should make it and freeze it. When you freeze the pesto in a container, pour a thin layer of olive oil over the top . I have it frozen for up to 3 months. I use it on chicken, pasta, and it’s wonderful as a spread. This recipe is good for 2 lbs. of pasta usually. So I use 1/2 and freeze the rest if it’s just the 2 of us.

Pesto Chicken on the Grill with Grilled Peppers and Roasted Sweet Potatoes

DSCN3588

Fresh Basil

If you are going to use on chicken , just brush on the chicken sprinkle a tiny bit of  kosher salt on it and  let it marinate for a few hours at least and it can be marinated  overnight in the refrigerator. Take it out of fridge and let it sit at room temp. before putting on the grill. That’s it!

*You’ll need a food processor

Ingredients:

2 cups fresh basil (washed)

1/2 cup romano cheese (grated)

1/2 cup parmesan cheese ( grated)

1/2 cup pignolli nuts or walnuts

1 cup extra virgin olive oil–use a good one

1 – 3 tablespoons of unsalted butter (it’s good if the butter is softened before adding) you can soften in microwave

4 cloves garlic – peeled and whole

freshly ground black pepper–to taste

*kosher salt to taste if you feel you need it after finished making pesto

Directions:

I put all ingredients except for olive oil in the food processor. Give it a few grinds using the blade attachment. Then I slowly add in the olive oil through the top of processor while it’s on. Beautiful green pesto! so easy. Taste for salt and pepper

Cook pasta and drain and add pesto. Done!

S’Mores Baked in the Oven

IMG_8638IMG_8636IMG_8639 IMG_8641 IMG_8642IMG_8634 IMG_8633 IMG_8632Oh Wow!!! what could be better??? truly easy and very little fuss , perfect with the kids and perfect for the adults. Very rich and gooey. Whole thing takes about 40 minutes from start to finish and you can re-heat the sliced bars in the microwave for about 30 seconds if you have some left-over. It’s great for a large group and I would say about 12-15 servings here. Let’s hold on to the last few weeks of summer with this delicious dessert.

For a very traditional s’mores taste eat immediately, I think they tasted a little better after they cooled down for a bit. Whichever way you prefer them –this is a great recipe for a crowd. You can prepare first and then pop in the oven while you are having dinner. Enjoy!

*also I was able to obtain these amazing square marshmallows in the supermarket, if you see them –grab them otherwise just regular old marshmallows will do the trick.

Ingredients:

Crust:

18 graham crackers

1/4 cup granulated sugar

pinch of salt

8 Tablespoons unsalted butter-melted

*parchment paper — I think you’ll want to work with it for this recipe–it can get difficult once they harden to get them out of pan. Clean up was a snap with it.

Topping:

3 extra-large Hershey Bars (or 7 regular-size ones)

24 jumbo marshmallows–look for the large square ones

Directions:

Preheat the oven to 400 degrees. Lightly grease a 9×13 Pyrex type baking pan with cooking spray and then line with parchment paper , allow an extra couple of inches of paper to hang over the edge.

In the food processor bowl, pulse the graham crackers until they are finely ground. Transfer the crumbs to a medium-sized bowl.

Add the sugar and salt to the graham crackers and stir to combine. Add the melted butter and stir until the crumbs are moistened. Pour the crumb mixture into the prepared pan and press into an even layer.

Bake the crust for about 10 minutes or until the edges turn lightly golden. Let the crust cool off completely before adding chocolate. I probably let it sit off heat for about 1/2 hour.

Arrange the chocolate bars (see picture) evenly on the top of cooled crust, I had to remove 1 row of chocolate to fit it in pan and left a little uncovered crumbs around edges. Arrange the marshmallows on top of the chocolate, leaving a little space between each one (see photos) Marshmallows will expand slightly.

Bake until the chocolate is soft and beginning to melt, and the marshmallows are evenly toasted on top. Probably about 10-15 minutes depending on your oven.

I couldn’t wait to eat them but I would suggest letting them cool off for  a little bit, cutting was easier when it cooled down ( after 15-20 minutes) I was able to cleanly cut slices. It’s more like campfire s’mores when you eat them hot out of the oven and certainly messier.

You can re-heat the sliced bars in the microwave for about 20-30 seconds. If you are keeping them , cut them and store individual slices.

Yellow Tomato Gazpacho

Here is a quick easy yellow tomato gazpacho made from beautiful heirloom tomatoes readily available now. I would also suggest looking at my other gazpacho recipe titled “Farm to Table Gazpacho” it is a more traditional take on gazpacho. You can add different ingredients but this is a delicious simple one for you! Enjoy the last days of summer!

cookingwithcandi's avatarCooking with Candi

photo 4 (3)photo 4 (2)I had purchased the most beautiful yellow  tomatoes and figured I would make gazpacho. Gazpacho is by far one of my most favorite summer time soups.  This one is fairly smooth.  Before serving I added  avocado and served with tortilla chips for a wonderful most satisfying meal. This is also super easy and you’ll look like a pro if you just follow these easy directions. You’ll need a decent blender and a few easy to obtain ingredients and you have a wonderful additional to any meal or a nice light lunch. This time I used beautiful yellow tomatoes, you can use any color you’d like and you can use any kind of tomato from the small grape or cherry tomatoes to the larger ones.  The yellow tomatoes with the flecks of jalapeno made a strikingly beautiful soup.photo 2 (3)photo 2I have another recipe titled “Farm to Table Gazpacho” it’s more of a traditional gazpacho! I…

View original post 297 more words

Frozen Lemonade Pie

IMG_8219Just to start out with this disclaimer , this could be the most fattening thing I have ever made. Delicious but wow!!!! What the heck it’s dessert right? Dessert could and should be decadent or else you can have a piece of fruit. Well now that I made my disclaimer on to the good news. It’s quick, super-easy , pretty inexpensive and tastes pretty amazing. Just make certain that your ingredients are very cold and the lemonade comes directly out of the freezer. You can buy a prepared graham cracker crust if you don’t want to bother making one–I give you absolute permission to do so. Just make sure that the whole pie gets eaten because you don’t want this pie hanging out in your freezer–it can get dangerous.

And no baking!!!!!!!

Ingredients:

1 14 ounce can sweetened condensed milk, chilled

1 6 ounce can frozen lemonade concentrate (small can)

12 ounce whipped topping, thawed–I guess you can go light with this but giving all the other ingredients you may as well go full throttle.

1 prepared graham cracker crust (available in the baking aisle of almost every supermarket I know)

Directions:

Beat condensed milk with an electric mixer. Add Lemonade directly from freezer and beat until very thick.

Fold in whipped topping with a spatula until just folded in.

Pour into crust and freeze.

Remove from freezer 1/2 hour prior to serving.

I placed some berries on top or you can use a piece of lemon or lime for decoration.

Enjoy this one!!!!