Un-Stuffed Cabbage

Coming at you with recipes for Rosh Hashana. It’s time to think about the Jewish New Year and this is a perfect combination of sweet and sour deliciousness. Easy to follow recipe and everyone loves it!!! You can make ahead and just heat up the day you’re using it. Happy Cooking.

cookingwithcandi's avatarCooking with Candi

photo 3 (4)photo 2 (2)photo 3 (4)photo 3 (5)photo 4 (3)photo 2I love stuffed cabbage and my Grandmother made the most amazing stuffed cabbage ever . I love stuffed cabbage but do not feel like dealing with the actual stuffing of the cabbage, it is way too labor intensive for me.  I have made several variations of this and found this one to my liking the best. You can play with the ingredients which is what I did . Original recipe is from Kosher by Design and it is perfect for Passover by just leaving out the rice and substituting matzoh meal in its place. Basically this is meatballs in a sweet and sour sauce with cabbage . I doubt very much that Joel would ever eat real “stuffed cabbage” but he liked this. The cabbage cooks down so much that you don’t even realize you’re eating cabbage. I also used 1/2 chicken ground meat and 1/2 beef ground meat , this is entirely up to…

View original post 574 more words

Recipes for Jewish New Year–Rosh Hashana

It’s that time of year again. Let’s start to get ready for the Jewish New Year–Rosh Hashana. Here is a little something to think about and I will posting some new recipes in the next 2 weeks. Get ready…..

cookingwithcandi's avatarCooking with Candi

Finished Product Apple Cake Finished Product Apple Cake

photo 1 (3) Un-Stuffed Cabbage

DSCN2648DSCN4230DSCN2642DSCN4225DSCN4234photo (2)DSCN4230Summer is the most easy-going time of the year and then along comes the Jewish holidays right on the heels of Labor Day and just like that it is over. Before you know it,  it’s Thanksgiving! Oh well here we go again, for those of you who have been reading my blog you may have made a lot of these recipes. I am going to post a few new ones. I am sort of a traditionalist when it comes to holidays and my family always looks forward to the same things. If I introduce a new recipe it’s always hold your breath time and what was wrong with the old one looks on everyone’s face.  Final decisions haven’t been made but I know that there are some things I’d never leave out. Here is a list of suggestions and by all means cruise through my blog and see if…

View original post 128 more words

Summer Crumble — Peach and Blueberries

photo 3 (6)photo 3 (7)photo 2 (6)photo 2 (8)
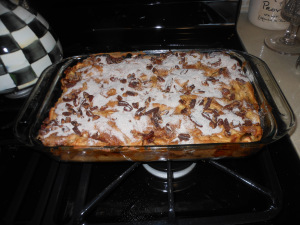
A crumble or a crisp whatever you call it there is no reason not to make this simple delicious dessert. In the summer you have so very many seasonal fruits to choose from and all sorts of delicious combinations. I used peaches and blueberries today because the peaches are amazingly beautiful and I had an abundance of blueberries. Any stone fruit, berries, or pitted cherries will work. In the Fall I make this with apples and pears which is Joel’s favorite of all time. The fruit comes out soft and tender and the crumbly crunchy cap is ever so crisp. Delicious served warm with a scoop of vanilla ice cream.

I used an 8×11 pyrex but any baking dish around that size will work out just fine.

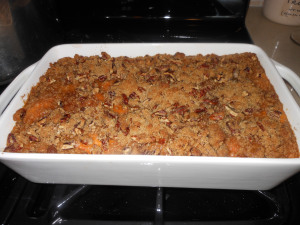
You’ll need a food processor to do the crisp topping this way. You must use cold butter straight out of fridge. I also added a little bit of chopped nuts but this is totally optional.

Plums and Nectarines work just as well. I also sprinkled a dash of cinnamon on the top (just a touch) right before baking , this is also totally optional.

Ingredients:

Fruit Mixture:

app. 8 cups sliced stone fruit, berries or pitted cherries I used peaches which I pitted, peeled and sliced and 1 container of blueberries (6 oz.)

1 cup sugar

2 Tbsp. Corn Starch

1 tsp. finely grated orange zest ( almost a whole orange)

2 Tbsp. of freshly squeezed orange juice from zested orange

pinch of kosher salt

In a large bowl toss fruit, sugar, cornstarch, salt, zest and juice together with a spoon. Set aside. I also sprayed baking dish with Bakers Aid cooking spray which is great stuff.

Preheat oven to 375 degrees.

Crumble Topping:

Ingredients:

3/4 + 1/4 cup of old-fashioned oats separated. 3/4 cup will be used at beginning and 1/4 cup at end.

1/3 cup all-purpose flour

1/4 cup light brown sugar ( firmly packed)

1/2 teaspoon kosher salt

1 stick chilled unsalted butter , straight out of fridge and this is important here. Butter should be diced into small pieces. Cut stick in half then cut into small uniform pieces.

Directions for crumble topping:

In the bowl of food processor with blade , pulse oats, flour, light brown sugar, salt together. Then through the top tube drop in diced cold butter and pulse until no dry spots remain, it takes a few minutes. Transfer to a bowl and add in 1/4 cup old-fashioned oats with your fingers.

Transfer fruit mixture to prepared baking dish, scatter crumble topping over the mixture. I added some chopped nuts and a little cinnamon at this point. Place baking dish on a baking sheet ( sprayed with cooking spray as well) and bake at 375 degrees for at least 50 minutes, check on it. You don’t want to pull it out too soon because you want the crumble to brown perfectly and the fruit will not thicken. You’ll know it’s ready by the color of the crumble topping.

Allow to cool for an hour.

You can heat up before eating at 250 degrees covered for about a 1/2 hour should be enough.

You can freeze this as well. Take out the night before you’ll want it and let it defrost in the refrigerator, the next day take it out and let it come to room temperature before re-heating. I freeze it often and it works out quite well.
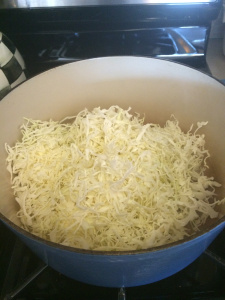
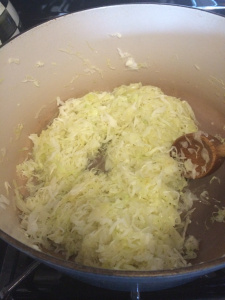
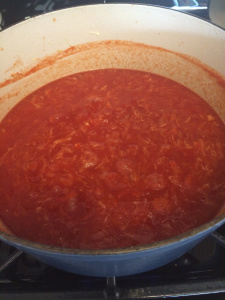
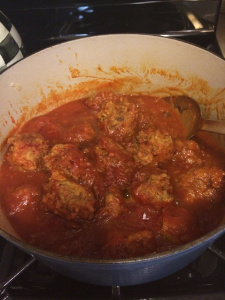


Shrimp and Tomatoes with White Beans and Spinach

This is a delicious nutritious shrimp dish . You can make it with spinach, arugula or kale. Easy to prepare and not a lot of ingredients. Happy Memorial Day ! Enjoy the weekend.

cookingwithcandi's avatarCooking with Candi

photo 4 (14)photo (65)photo 5 (15)photo 1 (30)Today I am posting a recipe that is very close to one I have already posted titled “Tuscan Shrimp with White Beans” it has a few differences and they’re both excellent. Just wanted to let you all know what I did this time. I served as is and the beans are a delicious alternative to pasta. The beans and spinach make it healthy and hearty. Enjoy!

Ingredients:

2 Tablespoons extra-virgin olive oil

app. 2 cups baby spinach ( or arugula)

3 cloves garlic , chopped

1 28 oz. can diced tomatoes

1 15 oz. can cannellini beans, drained and rinsed

1/2 cup dry white wine, I used Pinot Grigio because that’s what I had on hand and open already ( sauvignon blanc would be fine as well)

1 1/2 lbs. large shrimp, peeled and deveined. Ask your local fish store to do this for you.

1/4 tsp. crushed red pepper ( if…

View original post 242 more words

Parmesan Roasted Cauliflower

photo 2 (5)photo 3 (4)photo 4 (4)This side dish is so very easy to prepare and so very tasty.  I love cauliflower and it is readily available throughout the year and is a member of the high fiber food club.  While cauliflower may not be very colorful it is one of the healthiest foods out there. This member of the cabbage group is vitamin-packed , high in anti-oxidants, contains anti-inflammatory benefits, increased blood flow and is low in carbs and fats. Granted I am adding some fat here with the parmesan cheese but the cheese packs a wallop of flavor to this dish.

Cauliflower is also good just roasted with olive oil, salt and pepper, and you can always add some other spices.

No special equipment required here and not a lot of ingredients. Just a nice sharp knife to cut the cauliflower into florets and a large rimmed baking sheet.

Ingredients:

Olive Oil –3 Tablespoons

4 peeled garlic cloves–I like to smash them but I didn’t chop them up

Kosher Salt-to taste

Freshly Ground Black Pepper-to taste

1/4 – 1/2 cup of Grated Parmesan Cheese–depending on the size of the head of cauliflower and how much cheese you like

*1/2 – 1 whole onion sliced depending on how much onion you like, you can totally omit as well

I used a sprinkle of dry thyme but a few sprigs of fresh thyme would also be nice

Directions:

Preheat oven to 425 degrees

Cut head up into florets , try to get them as uniform as possible. The very little ones will burn up.

Put cauliflower on a large rimmed baking sheet add sliced onion if you like, thyme , garlic and olive oil. Season with salt and pepper.

Roast cauliflower for about 30 minutes tossing occasionally, you just don’t want one side to get too burnt, so check in on it. Toss it around so it gets browned and softened.

After the first 1/2 hour if cauliflower is looking a bit browned and softened enough sprinkle with the grated parmesan. 1/2 cup should be fine for a large head of cauliflower. I used 1/2 cup. Toss to combine and cook for another 10 minutes or so.

A-mazing, I think I ate 3/4 of the head of cauliflower myself!


Tomato Time Pasta

photo 2 (3)photo 4 (2)photo 5 (3)Nothing but beautiful tomatoes out there begging to be eaten in a million different ways. Perfect for a “Meatless Monday” dish or any night of the week . There are tons of local tomatoes out there now. At any local farmers market you can pick up pints of these beautiful babies. This is a lovely light pasta.

I had bought 2 pints of those beautiful little cherry tomatoes and right now there are those gorgeous yellow sunburst tomatoes also available.  I wasn’t sure what I would do with them. They varied in size so I knew if I made a sauce some were getting cut and some would stay whole. Nothing ever sounds better than a plate of pasta to me,  nothing.   These beautiful tomatoes are only out for such a limited time you have to get them while the getting is good.  Some of the tomatoes were super small and I left them whole while I halved the larger ones. There are so many variations of this sauce and feel free to improvise. We love it this way. So simple and so delicious.

Follow me on Instagram @cookingwithcandi

Ingredients:

1 lb. spaghetti , I like long spaghetti for this but whatever kind you like is good– I used a whole box but you can use however much you’d like

4 tablespoons extra-virgin olive oil

4 cloves garlic, peeled and minced. If you’d prefer you can slice thinly

1/2 teaspoon crushed red pepper* we like it spicy so if you don’t want it that spicy cut to 1/4, I actually used 1 whole teaspoon and it packed a lot of kick.

2 pints of cherry tomatoes or you can use about 3 cups of chopped fresh tomatoes of any type. I cut the larger tomatoes in 1/2 and I left the little ones whole.

app. 20 leaves of fresh basil, I just cut them up into small slivers

Kosher Salt and Freshly Ground Black Pepper to taste –I used app. 1 teaspoon on tomatoes and added towards the end

freshly grated parmesan at your discretion

Directions:

Cook pasta according to directions on box for al dente. Reserve a cup of pasta water in the event you may need a little more liquid in your sauce. Add 2 tablespoons of salt to cooking water for pasta. The Italians like to say that their pasta water should be like sea water good and salty.

Heat a large sauté pan over medium heat add 4 tablespoons of olive oil and garlic, cook until garlic is golden brown, about 2 minutes. Be careful don’t want to burn this garlic. Add the crushed red pepper now and the tomatoes, and cook over medium heat. I also added some kosher salt (about 1/2 teaspoon to start, you can always add more) and a little freshly ground black pepper. Stir for a while to make sure garlic doesn’t burn and tomatoes start to burst and deflate about 5  minutes. I let the tomatoes simmer in the pan for about 15 minutes. Taste for Salt and Pepper. The longer the tomatoes sit in the oil and cook down on a low simmer the better the sauce will be so if you have a little time let it sit.

Once the spaghetti is cooked and you’ve drained it ( remember to reserve a cup of pasta water).  Add it to the pan with tomatoes and over medium-high heat toss the pasta with the tomatoes well. Add the basil and if you’d like add cheese. I let everyone add their own cheese at the table.

Remove the pan from the heat and plate it up.

Yum! and even more delicious the next day.

Fresh Basil Pesto

photo 2 (6)

Chicken and Pesto on the Grill

photo 2 (8)

Pasta Pesto

The original recipe for this delicious pesto appeared back in May 2011 on Cooking with Candi.  Yummy Pesto was the title. This is the same recipe from my BFF Suki. I have tried many pesto sauces and this remains my absolute go to favorite. It is super easy and while the basil is abundant you should make it and freeze it. When you freeze the pesto in a container, pour a thin layer of olive oil over the top . I have it frozen for up to 3 months. I use it on chicken, pasta, and it’s wonderful as a spread. This recipe is good for 2 lbs. of pasta usually. So I use 1/2 and freeze the rest if it’s just the 2 of us.

Pesto Chicken on the Grill with Grilled Peppers and Roasted Sweet Potatoes

DSCN3588

Fresh Basil

If you are going to use on chicken , just brush on the chicken sprinkle a tiny bit of  kosher salt on it and  let it marinate for a few hours at least and it can be marinated  overnight in the refrigerator. Take it out of fridge and let it sit at room temp. before putting on the grill. That’s it!

*You’ll need a food processor

Ingredients:

2 cups fresh basil (washed)

1/2 cup romano cheese (grated)

1/2 cup parmesan cheese ( grated)

1/2 cup pignolli nuts or walnuts

1 cup extra virgin olive oil–use a good one

1 – 3 tablespoons of unsalted butter (it’s good if the butter is softened before adding) you can soften in microwave

4 cloves garlic – peeled and whole

freshly ground black pepper–to taste

*kosher salt to taste if you feel you need it after finished making pesto

Directions:

I put all ingredients except for olive oil in the food processor. Give it a few grinds using the blade attachment. Then I slowly add in the olive oil through the top of processor while it’s on. Beautiful green pesto! so easy. Taste for salt and pepper

Cook pasta and drain and add pesto. Done!

Banana and Blueberry “Ice Cream” not Ice Cream Frozen Dessert

photo 2

Hummingbirds at sunset in Colorado.

photo 5 (2)


photo 4 photo 3This was a delicious variation of the Banana non ice cream I already posted back on May 29, 2013.  I had bought a lot of bananas and had a giant tub of blueberries so without any milk I made this for my dessert and it tasted so creamy and delicious that it was hard to believe it was not real ice cream.  The natural creamy consistency of bananas makes this taste like real ice cream and yet it’s a delicious frozen treat that’s actually dairy-free.

The only thing is that you have to prep by freezing bananas overnight.

Perfect for little kids. No nuts, No milk, No nothing but fruit and a pinch of salt.

Go for it and you certainly can try and mix it up by using bananas and strawberries, raspberries, etc.

Ingredients:

4 firm ripe bananas, cut into chunks, frozen at least overnight

1 cup blueberries

pinch of kosher salt

Directions:

Remove bananas from freezer and let sit for a few minutes to just soften a bit. Mine were in freezer for a few days and had to soften before I could attempt to puree them, about 5 – 10 minutes.

I used my Cuisinart Food Processor for this.

I pureed the Bananas, Blueberries and salt , scraping down the sides as I went.

Puree till you get a creamy texture.

You can make ahead of time and freeze for about a week. Let it sit before serving because it’s best when it’s creamy.

Super Healthy and low in calories and no fat.

Perfect Summer Food and why not all year round?

Tomato Feta Salad

Got tomatoes??? love feta?? this is a delicious light Greek style salad that is enhanced by using Zahtar which is a dry blend of different spices. It should be available in most specialty type of markets. Go buy some fresh local tomatoes that are all over the place right now. Enjoy the last few weeks of August.

cookingwithcandi's avatarCooking with Candi

I call this “summer salad” but it’s really a wonderful salad any time of year. I love the salty taste of feta with tomatoes, and a wonderful combination of Middle Eastern spices called Zahtar .DSCN3272

Try and find this wonderful blend of spices–it will add wonderful flavor to a very simple meal. I like this salad with avocado because I like everything with avocado. It’s optional, as are the olives. This is a beautiful salad served all year but there is something about it that shouts summer, BBQ, and warm nights. The tomatoes are so beautiful right now, especially the heirlooms in all those beautiful colors go and grab some from your local farmers market or road stand. Excuse the picture, it’s fuzzy but you get the picture. It’s a greek salad without the lettuce. A perfect side dish salad to go with any meal. Beautiful with a piece of grilled…

View original post 215 more words

Happy Birthday Julia Child — French Potato Salad

Happy would be 102 Birthday to Julia Child. She was an inspiration to all of us who love to cook. Here is one of her recipes and you can check out her Salad Nicoise on cookingwithcandi.com as well. Happy Day to all.

cookingwithcandi's avatarCooking with Candi

photo (8)photo (4)photo (2)Every year on August 15 Julia Child comes to mind since it is her birthday and would have been 101st Birthday. She was such a huge influence on all of us who cook and enjoy eating so I try and make one or two of her recipes every year on this day.  This is a most delicious light “very French” potato salad. I am not a huge fan of potatoes swimming in mayonnaise so this was such a welcome treat. It is moderately difficult and that just means there are a few steps involved. It’s worth the effort, her cooking was never effortless but well worth it.

“You don’t have to cook fancy or complicated masterpieces–just good food from fresh ingredients” Julia Child

Ingredients:

1 lb. “boiling” potatoes, all the same size and shape if at all possible

2 tbsp. shallots, finely chopped/minced

Kosher Salt

White Pepper, freshly ground if available, if not use…

View original post 307 more words