Grandma Sally’s Mandel Bread

photo (2) photo (4) photo (5) photo (6) photo (8) photo (9) photo (11) photo (12) photo (13) Grandma Sally was not my Grandma but she was my friend Joy’s Grandma. Joy is a friend of mine and has been such a great supporter of Cooking with Candi. I know what a good cook she is and she sent me this recipe and was kind enough to share her family’s secret to an awesome mandel bread. She sent it to me a while back and I haven’t been able to test it out until now. I highly recommend this delicious treat for anytime but why not for the New Year? Thanks again Joy for all your support, it is so appreciated and of course to Grandma Sally for this delicious recipe. Perfect for Break Fast during Yom Kippur or a perfectly crunchy dessert for Rosh Hashana or really anytime.

You can make 2 different mandel breads, one with nuts and one with chocolate or just mix them together . If you use them together use a little less nuts and a little less chocolate. If you like you can add the raisins as well . Use whatever you prefer. I used both chocolate and nuts.

If you love biscotti this is almost identical. There are so very many ways to make Mandel Bread but this one  was really worth the effort.  I did make a few tweeks to the actual baking but the ingredients and most of the recipe stayed the same as Grandma Sally’s . I love to dunk these crunchy cookies in tea or coffee. Yum!

P.S. woke up to these sitting in my kitchen and did a little dunking during breakfast with my morning coffee! They are hard to resist. Can be easily frozen. They thaw out rather quickly!!

Happy Healthy New Year from my kitchen to yours.

Ingredients:

2 heaping tablespoons of Crisco vegetable shortening

3/4 cup of sugar

3 eggs–always room temperature for baking unless otherwise stated

1 tsp. vanilla

2 1/2 cups of all-purpose flour

1 tsp. baking powder

2/3 cup of chopped walnuts* optional

2/3 cup of chocolate bits , chocolate chips are fine here , if using alone without nuts you may want a little more . You can always use raisins as well. Whatever you like will work. Raisins and Nuts are great.

For topping:

2 tablespoons granulated sugar and 3/4 teaspoon cinnamon, mix together for a cinnamon/sugar mixture.  Set aside.

Directions:

Cream together the shortening and sugar to mix well and add 3 eggs one at a time and continue beating in electric mixer, add in the vanilla on low speed until creamy. Then add in the dry ingredients, the flour and the baking powder and mix on low speed until just incorporated. ( don’t overmix)  Then stir in chocolate, nuts, and or raisins to the mixture. I took out dough and refrigerated it over night, you don’t have to but I recommend refrigerating dough for at least 1-2 hours. ( I find dough is easier to handle and holds together better) I had a time constraint and that’s why I did overnight, but just do till it gets cold at least.)

To bake cookies:

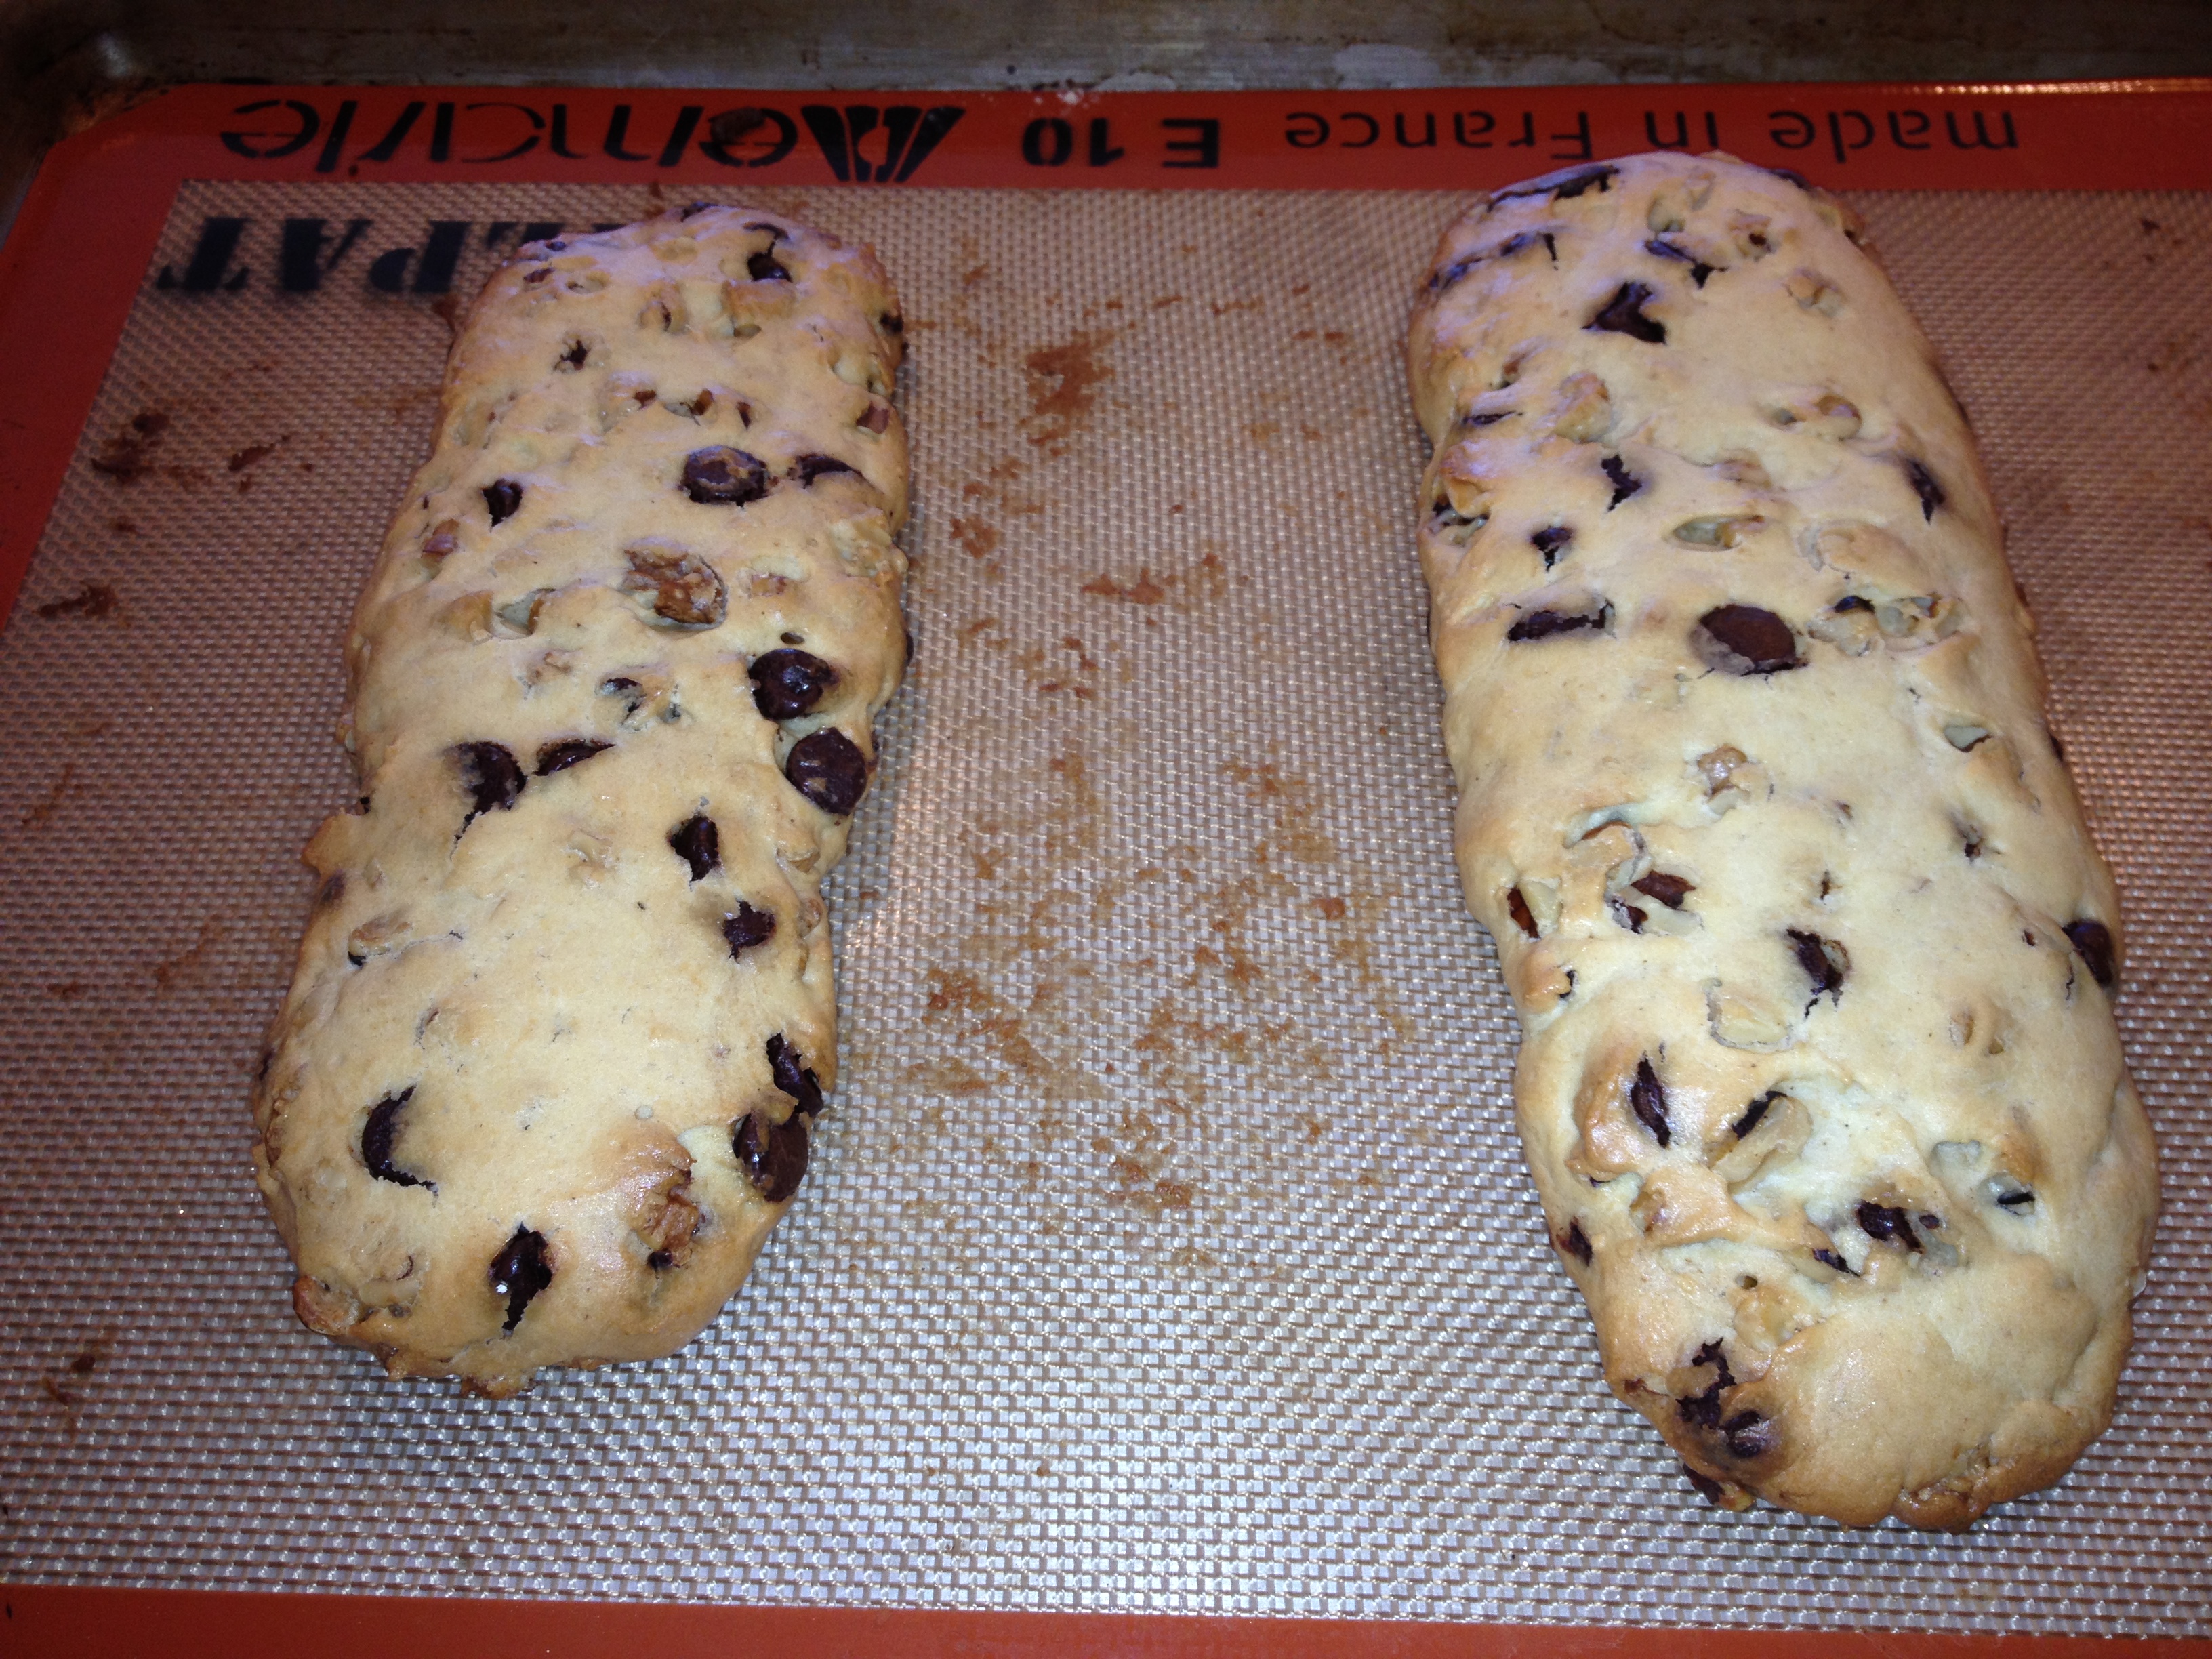
Preheat the oven to 350 degrees. Line baking sheet with parchment paper or Silpat liners which I swear by ( awesome). Shape the dough into 2 or 3 logs about 2 inches wide ( see photos) making sure logs aren’t too close together because they will spread. So 2″ from edges from each other and 2″ from the edges. I used 2 baking sheets for 3 logs, you can just use 1 for 2 longer ones. If dough is super sticky , dust your hands with a little flour.

Bake for 25-30 minutes at 350 degrees. Now lower the oven to 250 degrees. Let the baked logs cool down for about 15 minutes, then slice them diagonally about every 3/4 inch ( see picture) Flip the cookies on their sides back on baking sheet. Sprinkle 1/2 of the cinnamon-sugar mixture over top of cookies with a spoon. Flip the cookies over and repeat with the remaining cinnamon-sugar mixture. Place the cookies back in the oven ( be certain you turned temp. down to 250 degrees) I cooked for about 45 minutes ,you can cook anywhere from 45 minutes to an hour till they were golden and crisp. Let the cookies cool down, then store in an airtight container.

*cookies will get crunchier as they cool

Old School Meatballs (sweet and sour)– perfect for Rosh Hashana

       These meatballs are “old school” but still hold up.  If you’re looking for an easy addition to your menu this could be it.  L’Shana Tova from our house to yours. See notes at the bottom for adding raisins . I like to make these the week of Passover while we’re observing and not eating bread. Perfect addition because they are cooked on stovetop and free up the oven. Can be made ahead and frozen as well.

Sweet and Sour MBalls with Turkey

I have been making this recipe since I got married in 1975. It is really a perfect recipe for holidays or any time. You can use these meatballs with rice or anything like that. They are good for a big crowd when you have poultry and want another main. A lot of you are probably very familiar with this one and have different versions of it. Believe it or not, I still have the very original recipe. I’ve made a few changes to it: I now add my own bread crumbs, which I always make from whole wheat bread but feel free to use store-bought seasoned bread crumbs; If you want you can make these for Passover by substituting matzo meal for bread crumbs.  I also grate in a little onion (spanish); and my mother taught me to grate in a little potato so I always do that, as well. Now and then I’ll use turkey in this recipe too. Otherwise, this is  the original and it’s super easy. I  used turkey this time out, and they came out perfectly.

INGREDIENTS: (This is for one pound but you can definitely double and these freeze beautifully.)

1 lb. ground beef (Whatever kind you like. I sometimes use ground turkey. In 1975, we all ate beef, but today you might want to use ground turkey or ground chicken.

1 egg (room temp. works best)

1/4 cup bread crumbs (if you’re using from the can) I use 3 slices of whole wheat bread crusts removed. (when I doubled I used 5 slices and it was enough)

*For Passover – omit the bread crumbs and replace with matzo meal

Kosher Salt,  app. 1 teaspoon

Freshly ground black pepper to taste (1/4 teaspoon)

1 clove garlic, minced (the original calls for garlic powder but I’ve changed this as well. If you prefer, try 1/4 – 1/2 teaspoon)

1/8 cup warm water (just to moisten it) when you double just add up to 1/4 , I don’t usually use the whole 1/4 cup.

1/4 spanish onion, grated

1/4 potato, grated

1 bottle (12 oz.) Heinz chili sauce

6 oz. grape jelly

Directions:

Mix meat, egg, bread crumbs, salt, pepper, garlic, and water all together. I then grate in the onion and potato too. Next, shape into small balls about 3/4 inches in diameter. Heat the chili sauce and grape jelly until they blend and bring to a low boil. Then drop the raw meatballs into the sauce and simmer, covered, for approx. 45 minutes and don’t touch the meatballs till they actually are cooked , this will give them a chance . I use a sauce pan if only making 1 lb. and I just pile the meatballs in and after 45 minutes I gently stir them.  Again, these can be made ahead and frozen. They are quick, easy, and so good. The larger the pot the more balls you’re able to get in, so a large dutch oven works out best for this.

* serves about 8 – 10

*you can also throw in some raisins if you’d like but throw them in when you put the meatballs in so they cook and plump up. Probably a 1/4 cup per 1 lb. should be fine–just eyeball it.

Mushroom Barley (egg noodles)- Side Dish

cookingwithcandioct7 003this is an old recipe of mine that I’ve played around with and it makes a perfect side dish anytime of the year. not too difficult to make , takes a little playing around but pretty easy . I used Manischewitz egg noodles in a toasted barley shape this time. you can use pearl barley which is available in almost every supermarket out there. i have to say this product worked very well. Not exactly Mushroom and Barley?? but barley shape egg noodles

Great for Rosh Hashana and actually any other time for dinner as well. It’s delicious!

Ingredients:

1/4 cup butter or margarine

1  3/4 cup Pearl Barley or any kind you can find ( I used Manischewitz egg noodles in a toasted barley shape) it doesn’t have to be toasted it can just be regular barley shape noodles. I love to use this product , it’s usually found in kosher section.

1 lb. fresh mushrooms sliced

1/2 spanish onion chopped

2 – 3 cups chicken stock

1 tablespoon vegetable oil

Kosher Salt

Freshly Ground Black Pepper

Directions:

I use a very little bit of vegetable oil ( maybe 1 tablespoon) and saute onions, then mushrooms till cooked down. I salt and pepper generously here. I remove the mushroom/onion mixture from saute pan, wipe the pan clean with a paper towel . melt butter or margarine in pan, brown the barley/noodles for about 4 – 5 minutes, move it around as you brown it. in the meantime transfer mushroom/ onion mixture to a 9 x 13 baking dish (spray with pam) when barley/noodles is browned place in dish with mushrooms and onions and mix well. add 2 cups of chicken broth. cover with aluminum foil, and bake in oven covered at 350 degrees for app. 45 minutes. remove from oven, and add a little broth, depending on how dry it is, i would say i added about 1/2 cup , you may need to add more, add the 1/2 cup and mix well and see if you need more, not too watery, keep it dryer. cover, and i put it back in oven for 10 to 15 minutes. taste for salt and pepper. and there it is. very delicious.

Kasha Varnishkes–Jewish Comfort Food

This is truly traditional Jewish comfort food made with buckwheat grains and bowtie noodles. I love it and grew up eating it and  try to make it a few times a year. It is super easy and super tasty. If you’ve never made it why not start now. It’s a wonderful side dish to any meal and it can be vegetarian for all of those who need some extra vegetarian dishes on their tables just substitute vegetable broth for chicken broth.

Kasha comes in a box. There are different types of Kasha and almost all will work. I use medium or coarse granulation.  Wolff’s brand is really wonderful so look for it and for this recipe I follow the directions on the Wolff’s box of Kasha. 

If you’re looking for an easy side dish to put together now is the time to look at this great recipe. This is also our go to the night before Yom Kippur. It’s tradition and delicious and comforting all at the same time. 

Also perfect for Rosh Hashana. 

*Wolff’s Brand Kasha is always available on Amazon

Ingredients:

1 package bowtie ( farfalle ) noodles (app. 3/4 lb.)

1 white/yellow onion thinly sliced or you can use chopped onions , entirely up to you.

app. 2 tablespoons vegetable oil  you may need a  little more and may want a bit more to drizzle at the end plus more — probably 1/4 cup in total

Kosher Salt and Freshly Ground Black Pepper–to taste

*1 small box button mushrooms sliced 8 ounce box — mushrooms are totally optional but sometimes I feel like they add a little something

1 cup kasha, medium or coarse granulation– I use Wolffs Kasha and follow instructions on the box which I have written below

1 egg for kasha as per instructions on the box

2 cups chicken or vegetable broth as per box instructions

Directions:

Cook the pasta according to directions on box for al dente.

Saute’ the onions in vegetable oil , salt and pepper until they just start to soften, about 5 minutes. I use a medium size frying pan large enough to add in the pasta, and make sure you have a tight fitting lid.

Add the mushrooms and sauté until they start to soften as well, a few more minutes , set aside. Place mushrooms and onions in a bowl and you’ll use same frying pan to cook kasha.

Coat the kasha in a slightly beaten egg. You’ll just place kasha in a bowl and put beaten egg on grains. This will help the grains not to stick to themselves while you are cooking them. Make sure the grains are completely coated with egg.  Put the kasha in the same frying pan, set over a fairly high heat. Flatten, stir, and break up the egg-coated kasha with a fork or wooden spoon for a few minutes till toasted and the egg has dried on the kasha and kernels are brown and mostly separate. Kasha instructions for cooking are usually on the box as well. Then I pour in the broth that I am using, a little margarine/butter is OK as well ( app. 2 Tbsp) bring to a boil, cover tightly, lower flame to simmer and cook for 10 minutes till kasha is fluffy–these are the directions on the box that I follow .

Add back in the mushrooms and onions and combine with chicken broth. Cook box of Bow Tie Pasta according to directions on box al dente.

Bring to a boil and cook over low heat covered tightly. Check on it after 10 minutes or so to make sure the kernels are tender and the liquid has absorbed. If not, cover and continue steaming for another few minutes till all liquid is absorbed.

Adjust seasoning with more salt and pepper if you’d like, mix in cooked pasta, and if you’d like drizzle a little more oil on it. I like to do it all in a large enough frying pan to hold pasta . You can always mix in pasta in a large bowl separately. I like it in frying pan on stove top till I serve it. You can always make ahead and heat up in oven at 350 degrees in a pyrex dish,  you’ll most likely need to add a little oil if you do so.

*Wolff’s Kasha has directions for cooking kasha on the box. It’s pretty much the same , I just add in the mushrooms and onions for more flavor.

*should serve 8 people

Un-Stuffed Cabbage

photo 3 (4)photo 2 (2)photo 3 (4)photo 3 (5)photo 4 (3)photo 2I love stuffed cabbage and my Grandmother made the most amazing stuffed cabbage ever . I love stuffed cabbage but do not feel like dealing with the actual stuffing of the cabbage, it is way too labor intensive for me.  I have made several variations of this and found this one to my liking the best. You can play with the ingredients which is what I did . Original recipe is from Kosher by Design and it is perfect for Passover by just leaving out the rice and substituting matzoh meal in its place. Most perfect for Rosh Hashana and use rice.  Basically this is meatballs in a sweet and sour sauce with cabbage . I doubt very much that Joel would ever eat real “stuffed cabbage” but he liked this. The cabbage cooks down so much that you don’t even realize you’re eating cabbage. I also used 1/2 chicken ground meat and 1/2 beef ground meat , this is entirely up to you. I wouldn’t do all chicken because it might be a bit dry, you can definitely make this with turkey but use dark meat turkey or the balls will also be very dry. You can also make this ahead for the holidays which is always a very good thing and feel free to freeze it.  This is the original recipe adjust amounts for how much you’re making – this recipe is for 3 lbs. if you’re making for less people and only use 2 lbs. of meat you can cut ingredients accordingly.  You’ll want to use a large pot for this recipe. Enjoy!

*for passover substitute matzoh meal for rice

Follow me on Instagram @cookingwithcandi

Ingredients:

Meat

3 lbs. ground meat– I used chicken and beef (dark meat turkey is best here) white meat turkey tends to be very dry. Mixed with beef it’s fine but if using alone you’ll need to use dark meat ground turkey.

2 large eggs, lightly beaten. Use room temperature eggs they work best.*see my post about eggs–a little note on my blog.

3/4 cup uncooked long grain white rice, for Passover use matzoh meal and omit the rice – for Passover if you observe use 1/2 cup Matzoh Meal

1/4 cup water

1 onion finely chopped

Kosher Salt to taste–app. 1/2 to 1 tablespoon

Pepper to taste–app. 10 grinds on a pepper mill, or app. 1/4 of a tablespoon

*garlic powder if you like

Sauce:

2 packages of shredded cabbage, probably about 1 head of cabbage finely shredded, no need to do it when you can buy it pre-shredded (not red cabbage)

1 Tablespoon Vegetable Oil

Kosher Salt to taste ( app. 1/2 tablespoon)

1 1/2 tablespoons Kosher Salt

1 1/2 cups tomato juice

4 8 ounce cans tomato sauce ( or 32 ounces)

1/2 cup brown sugar ( use whichever brown sugar you have in house , it won’t make a difference. Light or Dark, I actually used dark.

1 cup sugar

3 lemons squeezed , I got about 1/2 cup , they were smallish lemons

1/2 cup raisins

Directions:

In a large mixing bowl combine the meat, eggs, water, rice and onions. Season with Salt and Pepper , and if you like garlic powder. Gently mix by hand, and I do mean gently, if you over do it the meat will be like concrete. Set aside.

Heat the oil in a large pot over medium heat. Add the shredded cabbage and about 1/2 tablespoon of kosher salt. Simmer for 10 minutes. Add the tomato juice, tomato sauce, brown sugar, sugar, lemon juice and the raisins. Stir till well combined and continue cooking sauce at simmer setting.

Gently form meatballs out of the meat mixture, I made a rather nice size meatball, not too large and not too small. Make whatever size you’d like. Just do not over-handle the meat because it will cause meat to toughen. Add to cabbage mixture, just drop into the hot sauce and do not stir, you can pile them on top of one another because they will cook down.

I left it to simmer for about 1 1/2 hours . I didn’t touch the meat balls for at least the first 1/2 hour, you’ll want them to cook through and form into nice balls before you stir, so just leave them to cook. After the first 1/2 hour or so you can gently stir and move the meatballs around. They don’t require a lot of stirring around .

This dish brought back memories of my childhood and was a most satisfying main dish.

Happy New Year Brisket is

Brisket can definitely be an intimidating thing to make. I once made it as a young cook, and it was perfectly inedible. Back then, I couldn’t believe how long it took to cook, but it does take very long. Now I usually make it in the slow cooker which is an awesome way to go but this time I used my trusty Le Creuset, which worked out beautifully. A lot of people have some pretty awesome brisket recipes and I welcome you to send me yours. This really couldn’t be any easier and it’s super tasty. This original recipe came from my friend, Michele (with a few comments from Karyn too.) I did change a few things to the original recipe, but not a lot and I thank Michele for the recipe.

INGREDIENTS:

4 lb. brisket (I didn’t need larger but you can adjust this recipe for whatever size brisket you use)

Lawry’s seasoned salt available in the spice aisle

2 large Spanish onions (Karyn uses Vidalia, which is also good), sliced thickly

2 cans of tomato sauce , I used the 16 oz. size. You can also use the 1 can of 28 oz. size. It depends on you and how much sauce you like.

2 tbsp. brown sugar (this is my addition. It doesn’t really change the flavor so much as cut the salt a bit)

DIRECTIONS:

Preheat oven to 350 degrees.

I sprinkled Lawry’s seasoned salt on both sides of the brisket (generously) then seared it in the Le Creuset pot with a little vegetable oil–probably about a tablespoon. (After the meat was seared, it shrunk to fit perfectly in my pot but I don’t think that a larger brisket would have fit.) Next, I added the tomato sauce and onions, covered the pot and put it in the oven. I cooked it for a total of 3 hours. I checked on it after each hour, which probably wasn’t even necessary. I then let it cool, off of the heat, for about an hour. Next, I sliced it with an electric knife, which came out beautifully. The meat was soft, but not falling apart at all. I then added the brown sugar to the gravy, put the brisket in a container with the gravy and froze it. I’ll take it out the night before I serve. Karyn pulses her gravy with an immersion blender. I didn’t do this but I think it makes for a good suggestion. In fact, I might still do it next time I make this recipe.  I’ll let you know. Thanks again Michele and Karyn!

Chicken Marbella–perfect for Holiday Cooking

This recipe is my “go to” chicken. I’ve made it almost every Passover and Rosh Hashana since I found it. many moons ago. The original recipe is from the “Silver Palate” cookbook.  It has been a staple on my holiday table for as far back as I can remember.  It’s really a perfect recipe for any time of the year.  

*the key to this recipe is an overnight marination so don’t skip that and obviously 4 chickens is a lot of chicken depending on how many people you have and what other dishes you have you can cut in 1/2 easily! 

Enjoy! and Happy Passover to all of those who celebrate.

Ingredients:

1/2 cup olive oil

1/2 cup red wine vinegar

1 cup pitted prunes

1/2 cup pitted Spanish green olives (no pimentos)( if you can’t find, just pick out pimentos)

1/2 cup capers with a bit of juice

6 bay leaves

1 head of garlic, peeled and finely pureed(chopped well)app. 10-12 cloves in a head


1/4 cup dried oregano

Kosher salt and freshly ground black pepper, to taste (I start with 1 teaspoon kosher salt, and a few grinds of black pepper.)

4 chickens, cut into eighths (original recipe calls for chickens to be quartered but I find that you get more per person if you do it in eighths.) the chickens are about 2 1/2 lbs. apiece , so it’s about 10 lbs. of chicken . Sometimes I ask the butcher to cut the breasts in 1/2, if they are very large.

1 cup brown sugar

1 cup dry white wine

1/4 cup fresh flat-leaf parsley (finely chopped)

Directions:

Combine the olive oil, vinegar, prunes, olives, capers and their juice, bay leaves, garlic, oregano, and salt and pepper. ( You can combine in a large bowl, but I use a large Ziploc bag.) Add the chicken, then stir or mix around to coat well. Refrigerate overnight.

Preheat oven to 350 degrees.

Take a large shallow baking pan (you may need 2), arrange the chicken in a single layer and spoon the marinade over it evenly. Then sprinkle the chicken pieces with the brown sugar and pour the white wine around them.

Bake, basting frequently with the pan juices until the thigh pieces yield a clear yellow juice (don’t want it pink). It takes anywhere between 50 to 60 minutes to cook. (Test thigh with a fork.)

When you are ready to serve, transfer the chicken with a slotted spoon to serving platter. Moisten with some of the pan juices and sprinkle generously with the parsley. You can pass the remaining juices in a gravy boat.

*should serve 10 or more

* this chicken is delicious cold or at room temperature. If you make ahead and it is in fridge, just remove from fridge, reheat it in the juices, then allow to come to room temperature.

Rosh Hashana 2023

You know that summer is officially over when it’s time to prep for the Jewish Holidays. At least in my house anyway. Time to wind it down and ready myself. The first night of Rosh Hashana is Friday September 15 this year. Yom Kippur starts on Sunday September 24.

It’s still summer and hard to wrap your head around it but before you know it it will be here.

Once again I will write up a list of recipes for you to check out and one by one I will try and post as many as I can for you.

Enjoy your families and have a Happy Healthy New Year from our house to yours. Remember if you have any questions get in touch either through this website or my instagram or facebook — DM me and I will try and get back to you as soon as possible. I will also be posting Rosh Hashana recipes on Cooking with Candi. Check out my instagram for daily posts. I may try and add a few new recipes here but for now this is the tried and true “oldies but goodies” version.

I am on Instagram as Cookingwithcandi and FB — I try and respond promptly . Also you can just ask questions in the comment section of my blog.

Shanah Tovah

Recipes:

Un- stuffed Cabbage — I highly recommend this delicious main dish — pretty simple to make and beats trying to make stuffed cabbage but tastes just as good.

Happy New Year Brisket— Brisket is always a winner and this one never fails

Chicken Marbella— probably one of my most favorite Chicken Holiday Dishes

Honey Roasted Chicken— equally delicious and a little different flavor

Old School Meatballs— yummy Sweet and Sour meatballs sure to please whole family

A Noodle Pudding from Ellen-– another delicious kugel from an old friend and great cook

Another Noodle Pudding from Marcy — this one’s excellent if you’re looking for a kosher non-dairy kugel

Noodle Pudding with Apricot Nectar— probably one of the best kugels of all time

Noodle Pudding from Julie— delicious as well

Mushroom Barley-– check out this delicious side dish — everyone loves this all year round

Kasha Varnishkes— a crowd favorite and an old school recipe — perfect comfort food

Julie’s Honey Cake— another winner from a great cook

Grandma Sally’s Mandel Bread-– also from a friend and a wonderful recip

Applesauce and Raisin Cake — sweet and delicious as your new year should be

Don’t let the Apples go Bad Cake-– simple and delicious perfect for the Jewish New Year

Shrimp Scampi–Classic

IMG_1008

This photo was taken with a Spanish type rice. Any rice , pasta or all by itself — perfection on a plate!

IMG_0556

IMG_0558

Finished Product

IMG_0554

Getting Ready to Cook

This is one of my all time favorite recipes and the easiest, quickest to prepare. Buy shrimp from a reputable fish store or Whole Foods type of market and have them clean and de-vein them. My husband Joel is an ex-seafood guy and he always cleans and de-veins the shrimp. It is a collaborative effort in our house.  Once the shrimp and prep is done this recipe takes all of 15 minutes to cook.

Ingredients are simple and you probably have most of the ingredients in your pantry. Directions are super simple and so easy to follow, you will look like a “super chef” and impress the pants off of everybody!

Perfection on a plate.

Ingredients:

2 Tablespoons unsalted butter

2 Tablespoons olive oil

4 minced garlic cloves

1/2 cup dry white wine–use whatever you have open as long as it’s not too fruity, if you don’t want to use wine use chicken broth or vegetable broth

1 teaspoon kosher salt

Freshly ground black pepper– about 10-12 turns on the pepper mill

1 1/2 lbs. large or extra large shrimp .shelled– we are big fans of Mexican White Shrimp and I used under 10’s which means there are approximately 10 to a pound.

1/2 cup ( app.) chopped fresh Italian parsley

Freshly squeezed juice of half a lemon

*pinch of crushed red pepper flakes

Cooked Pasta or Rice — I used brown rice this time around

Directions:

In a large skillet, melt butter along with olive oil. Add garlic and saute until fragrant , app. 2 mins.

Add wine or broth, salt, red pepper flakes, and black pepper and bring to a simmer.

Let wine reduce by half, app. 3 minutes.

Add shrimp and saute until the shrimp just turn pink, 2-4 mins. on each side depending on their size. Squeeze the lemon over the shrimp, I stirred the shrimp in the sauce one final time and served over brown rice and using a large spoon poured any excess sauce over the shrimp (as much or as little as you’d like) I then sprinkled with a little fresh chopped parsley and Voila!!!!

This shrimp would be delicious served over rice , pasta or all by itself.

Enjoy!

Old Fashioned Lemon Icebox Cake–No Baking at all

IMG_1266

Nothing not to love here, Lemons, cream cheese, heavy cream, lemon curd and did I mention no baking??? So great and fairly easy with simple ingredients. You’ll need either an electric mixer or a hand mixer to whip cream. Nothing beats an electric mixer though with the whisking attachment.

I made it in a 9×13 pan but I think next time I will try to do it in a bowl. It would also be beautiful garnished with fresh lemon slices or berries. We were in a hurry to dig into it so never did get to garnish it.  If you’d like it to look neater when you scoop it out you will have to be more precise with the layering. My cake was very uneven and all the layers and flavors blended together, who cares? it was delicious. If you’d like you can also layer in a trifle type bowl and make a very pretty presentation! Up to you but it was all delish.

This is simple and delicious food if not very rich, but hey it’s dessert! Perfect for a Labor Day BBQ or anytime!

Enjoy Labor Day Weekend !

Visit me on Instagram @cookingwithcandi

Ingredients:

4 ounces cream cheese, softened (just leave it out at room temperature for a while till it’s room temperature and feels squishy and soft)

3 cups heavy cream

1/3 cup confectioners sugar

3 teaspoons lemon zest, plus a little more for garnish

1/2 teaspoon vanilla extract

11 ounces vanilla wafer cookies ( app. 1 1/2 boxes)

10 ounces lemon curd–usually available with the jams and jellies  or baking aisle of most supermarkets. (see photo)

Directions:

Beat the cream cheese in a large bowl with an electric mixer until soft. Add the heavy cream, sugar, lemon zest and vanilla and beat until it just holds stiff peaks. It takes app. 3-6 minutes for peaks to form, be patient.

Spread the bottom of a 9 x 13 inch baking dish with 1/2 cup of the whipped cream. Arrange 1/2 of the cookies on top of the cream, fitting in as many as you can without overlapping.(see photos) Spoon 1/2 of the remaining cream mixture on top and smooth evenly with an offset spatula or if no offset spatula use a butter knife. In spoonfuls , app. every 2 inches, spoon half of the lemon curd onto the cream and then use a butter knife to swirl the curd into the cream. Top with another layer of cookies, followed by the remaining cream. Spoon  the remaining lemon curd and swirl into the cream again with the butter knife. Cover with plastic wrap and refrigerate until the cookies have softened, it should be fine after at least 3 hours and you can make a day ahead and just leave in the fridge!

It would be pretty garnished with some lemon zest , some lemon slices or fresh berries, we were in a rush to eat it so no garnish in my photos. Next time!

*if you use a bowl you’ll just have to figure out the cream to cookie ratio but make sure you follow my steps so it ends up the same.

*another good thing–I actually froze leftovers and when I wanted to eat it , I removed from freezer for about an hour and it was perfect.