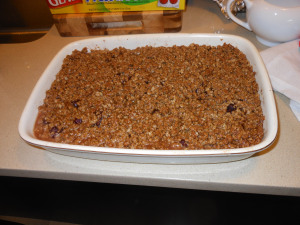
This has to be one of my all time favorite side dishes for Thanksgiving. It really would be great any time of year but for some reason it only gets made for Thanksgiving. It’s super easy and super delicious. My friend Audrey gave this recipe to me many years ago, and it has become a staple on our thanksgiving table ever since. It just wouldn’t be Thanksgiving without it. It is a favorite in our family. Can be doubled easily, just make sure your baking dish is large enough.
Enjoy!
This one is very special and a real winner! and super easy!
Ingredients:
1/2 cup butter (unsalted) 1 stick
1 8 oz. sour cream (lite is OK but not fat-free)
1 8 oz. can sweet corn (drained)
1 8 oz. can creamed corn (not drained)
1 8 oz. pkg. corn muffin mix
2 eggs, lightly beaten
Directions:
Preheat oven to 350 degrees.
Melt butter, mix in beaten eggs, then add the rest of the ingredients.
Pour into glass baking dish (Pyrex is good and I spray it first with a good cooking spray like Pam or Bakers Aid ) 9 x 12 works fine, it’s not a very deep pudding.
It’s Fall and that means it’s soup season and time to cook up some heart-warming soups! Pumpkin Lentil Soup is a delicious, hearty soup that you and your family will love. This is a lovely soup to lead with for Thanksgiving.
This soup can wind up on my Thanksgiving Table if I don’t make my Butternut Squash Soup. It’s hard to get canned pumpkin any other time of year, so I take advantage of it now and pick up a few extra cans and try to make it throughout the winter. Warm, hearty and pretty healthy. And what’s a little butter between friends? You can freeze this ahead of time and take it out for Thanksgiving. For the holiday, it’s always between this and Butternut Squash Soup, and I like that they can both be vegetarian.
*this can be doubled but no need to double the butter (just add a little bit more) I like to use a little butter and a little Olive Oil
Ingredients:
1/2 cup butter (unsalted)– or you can use 1/4 cup unsalted butter and 1/4 cup Olive Oil
2 large onions (spanish) chopped
1/2 cup lentils (if you can find red lentils, buy them because they look beautiful for Thanksgiving and give the soup a lovely orangey color)
5 cups vegetable or chicken stock
1 1/2 cups canned pumpkin (make sure it’s not pumpkin pie filling)
1/8 teaspoon dried thyme
1/8 teaspoon marjoram
Kosher salt and freshly ground black pepper, to taste
Directions:
Melt butter in large stockpot (Le Creuset). Saute the onions until translucent and golden, then stir in the lentils and the stock. Add pumpkin and herbs and salt and pepper. Bring to a boil and then lower it and let it simmer for about 1 1/2 hours.
I use an immersion stick blender to puree it. It becomes rich and creamy. Of course you can leave soup as is without pureeing it at all. And another is to not puree it all the way. If soup is too thick use the broth as needed adding a little bit at a time to reach a good consistency. If you’ve run out of broth you can always add water just always check seasonings after adding liquid.
*soup freezes just fine but you’ll need to add broth/water after you defrost and heat up
It’s that time of year again — Thanksgiving — and I will start posting some of my tried and true recipes for all of you who follow me and for anyone new who is looking for some Thanksgiving inspiration. These recipes can be found on my site @cookingwithcandi. If you put the name of the recipe into the search box the recipe should come up. Alternatively if you google the name of the recipe along with cooking with Candi it should come up. Any problems, questions, ideas , new recipes etc. get in touch with me on Instagram @cookingwithcandi just drop me a line and I promise I will try and get back to you ASAP . I am open to any and all suggestions, questions, etc. You can also email me @cmk55@sopris.net. Or DM me at my Instagram account Cookingwithcandi — and I will get back to you asap.
Happy cooking from my kitchen to yours.
Happy Thanksgiving one and all of you!
Recipes:
Corn Bread Pudding
Easy Peasy Corn Bread –this is an easy peasy corn bread to make for holiday table or any table
Butternut Squash Soup
Pumpkin Lentil Soup
Sweet and Spicy Mixed Nuts– I have 2 different recipes for the nuts and they are both awesome
Shaved Brussels Salad
Brussels and Kale with Mustard Vinaigrette
Brussels Sprouts and Apple Salad
Pumpkin Walnut Bread and Pumpkin Cranberry Bread
Cremini Mushroom Pumpkin Lasagna
Pumpkin Penne Bake — my version of Mac and Cheese for the Holidays
The Ultimate Comfort food –Mac and Cheese (without the pumpkin) just the old fashioned kind
Stuffing that will be on our Table or Cranberry Walnut Stuffing
The chicken may be the main here but gotta say it’s all about this spectacular lemon rice. Rice, chicken, spinach ( and yes Joel didn’t even detect here and ate it up) I went a little lighter on the spinach for fear of spoiling it for him but go with full 2 cups of spinach if you’re family loves it. I chopped it up so it was hard to really see that it even was spinach but you can just chop it up roughly. This would be delicious served with a Greek Salad and the one I would go with is my Maroulosalata salad. Perfect!! and very delicious and I marinaded chicken from about 10 till 5 but if you can do overnight even better and if you can’t do at least an hour. One pan means less clean up which is also an extra added bonus. Enjoy this wonderful meal.
i*should serve 4-6 but for 6 I would add 2 more thighs
*for the chicken marinade
6 chicken thighs ( I only used 4 for the 2 of us) I go to butcher when I can so thighs are meatier if they’re very small make 8
2 tablespoons olive oil
1 tablespoon lemon zest
1/4 cup freshly squeezed lemon juice
1 teaspoon garlic powder
1 teaspoon dried oregano
1 teaspoon dried thyme
1/4 teaspoon paprika
1/2 teaspoon salt and 1/4 teaspoon black pepper
Ingredients:
For Chicken and Rice
2 Tablespoons Olive Oil
1 yellow onion, peeled and diced
2 garlic cloves, peeled and minced
2 cups baby spinach, lightly packed and roughly chopped
1 1/2 cups long grain white rice ( I love Carolina brand)
3 cups chicken stock/broth
1/4 teaspoon salt
1/4 teaspoon black pepper
1/4 teaspoon dried oregano
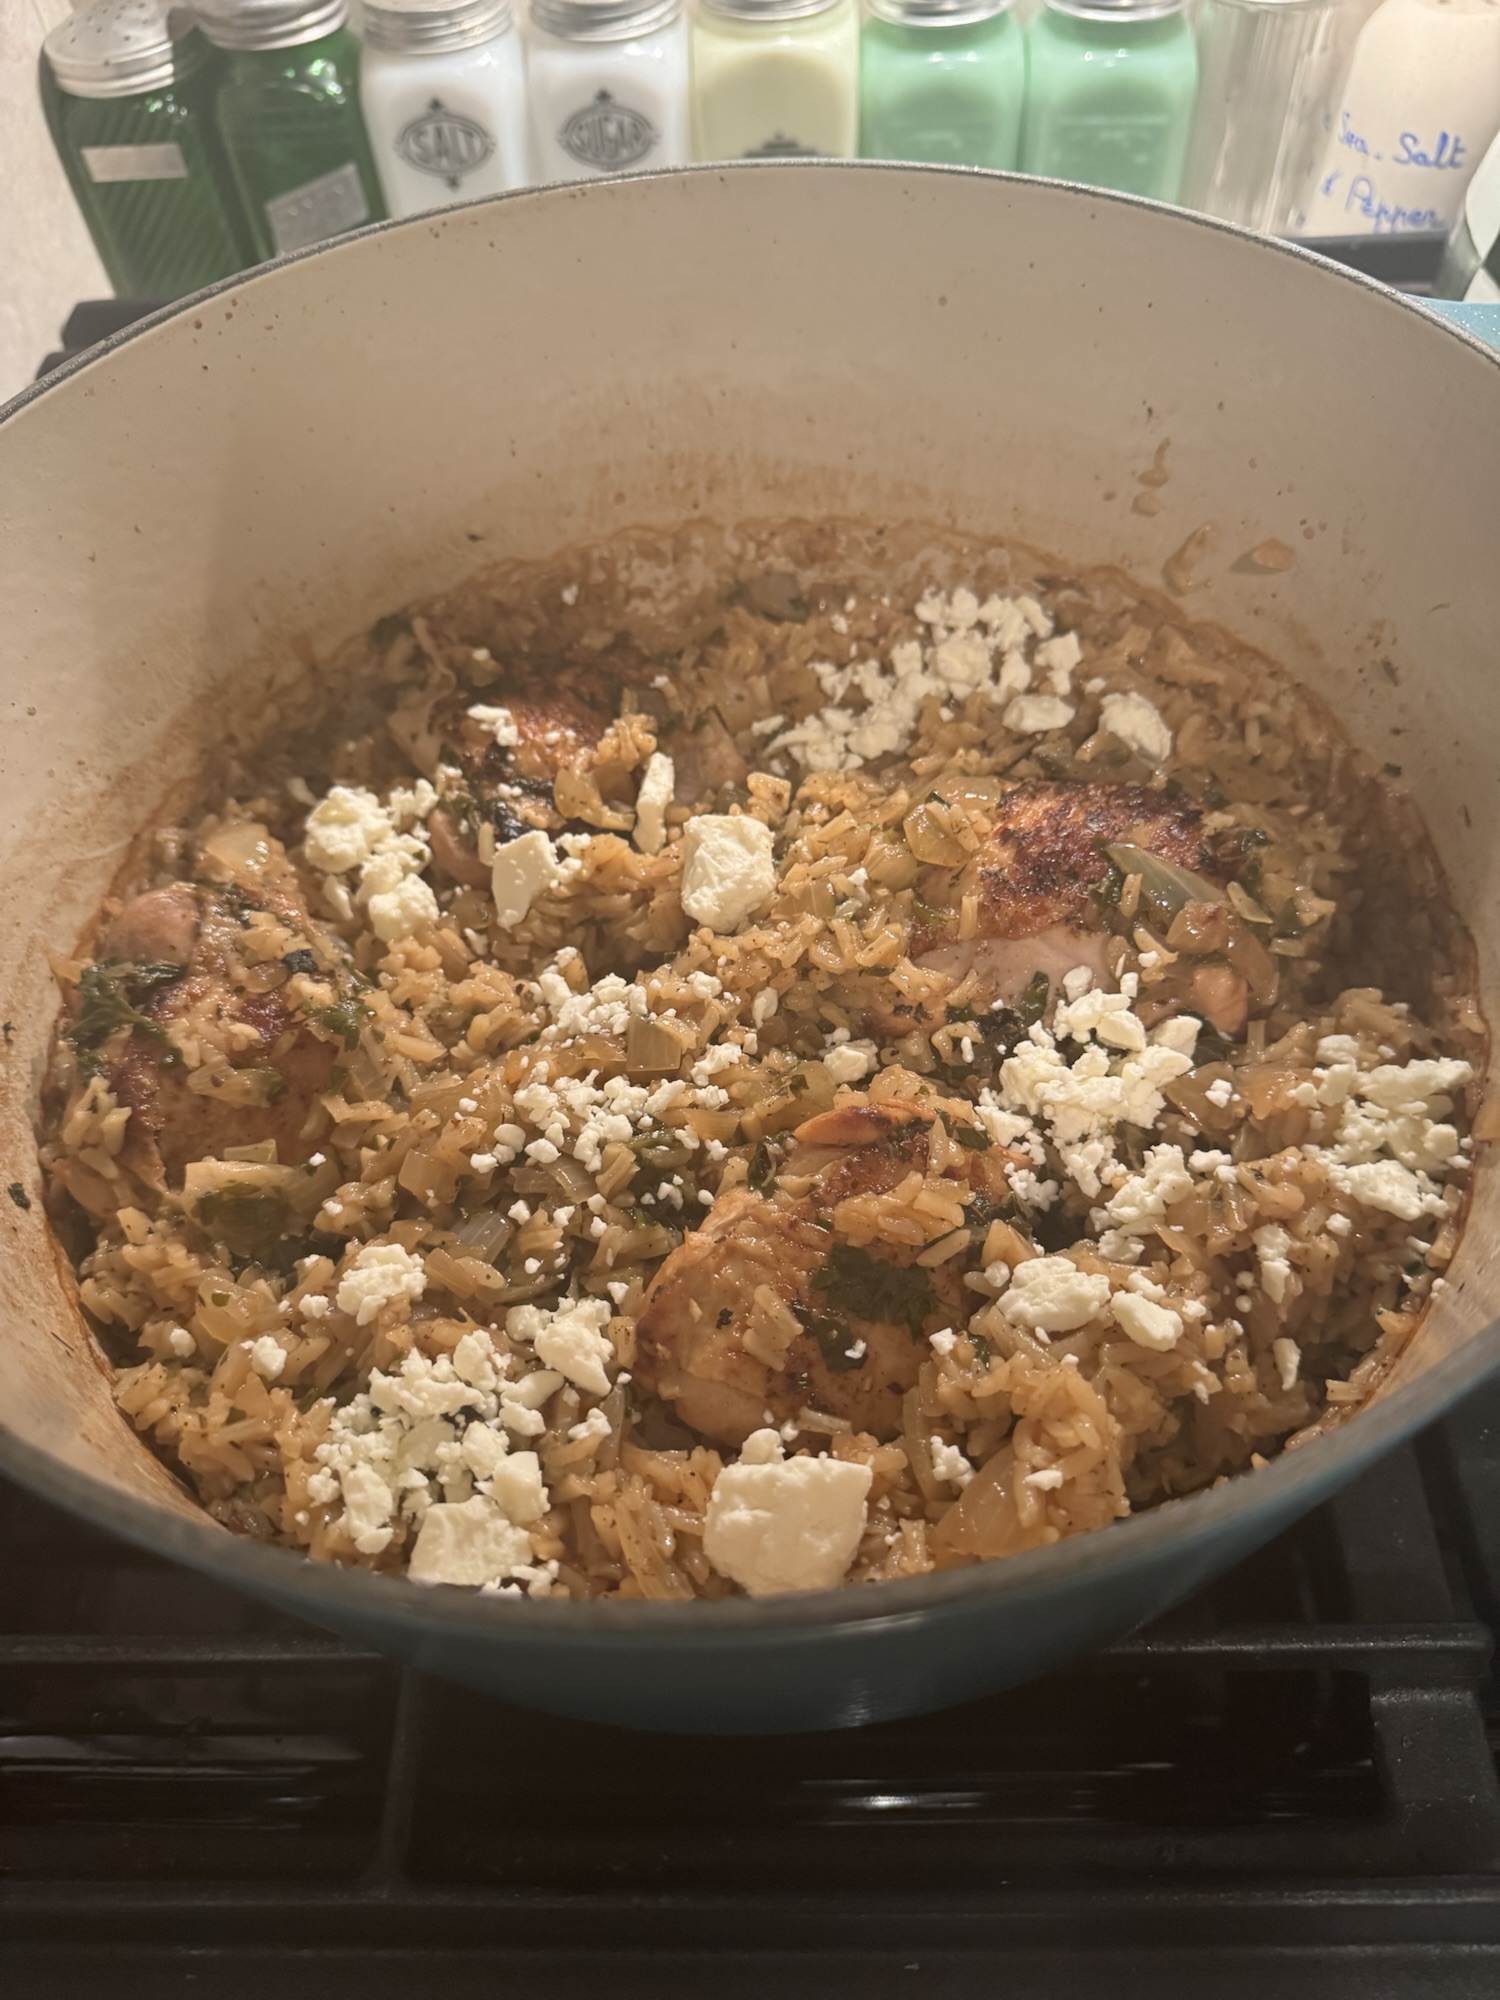
*crumbled feta for end if you’d like or some lemon slices or lemon zest and a little squirt of fresh lemon juice at the end — all of this is optional and up to you. I used crumbled feta at the end ( not too much just a sprinkle) and I used a little fresh lemon juice — you can also add chopped parsley and some lemon slices for a lovely presentation
Place Chicken in a large bowl or in a large resealable plastic bag ( I used plastic bag method)
Add all the marinade ingredients to the chicken ( pat chicken dry first) and toss chicken to coat well. Seal bag or cover bowl and marinate chicken in the fridge for at least an hour and up to 1 day ahead (obvi the longer the better)
Pre-heat oven to 350 degrees , remove chicken from fridge while preheating the oven.
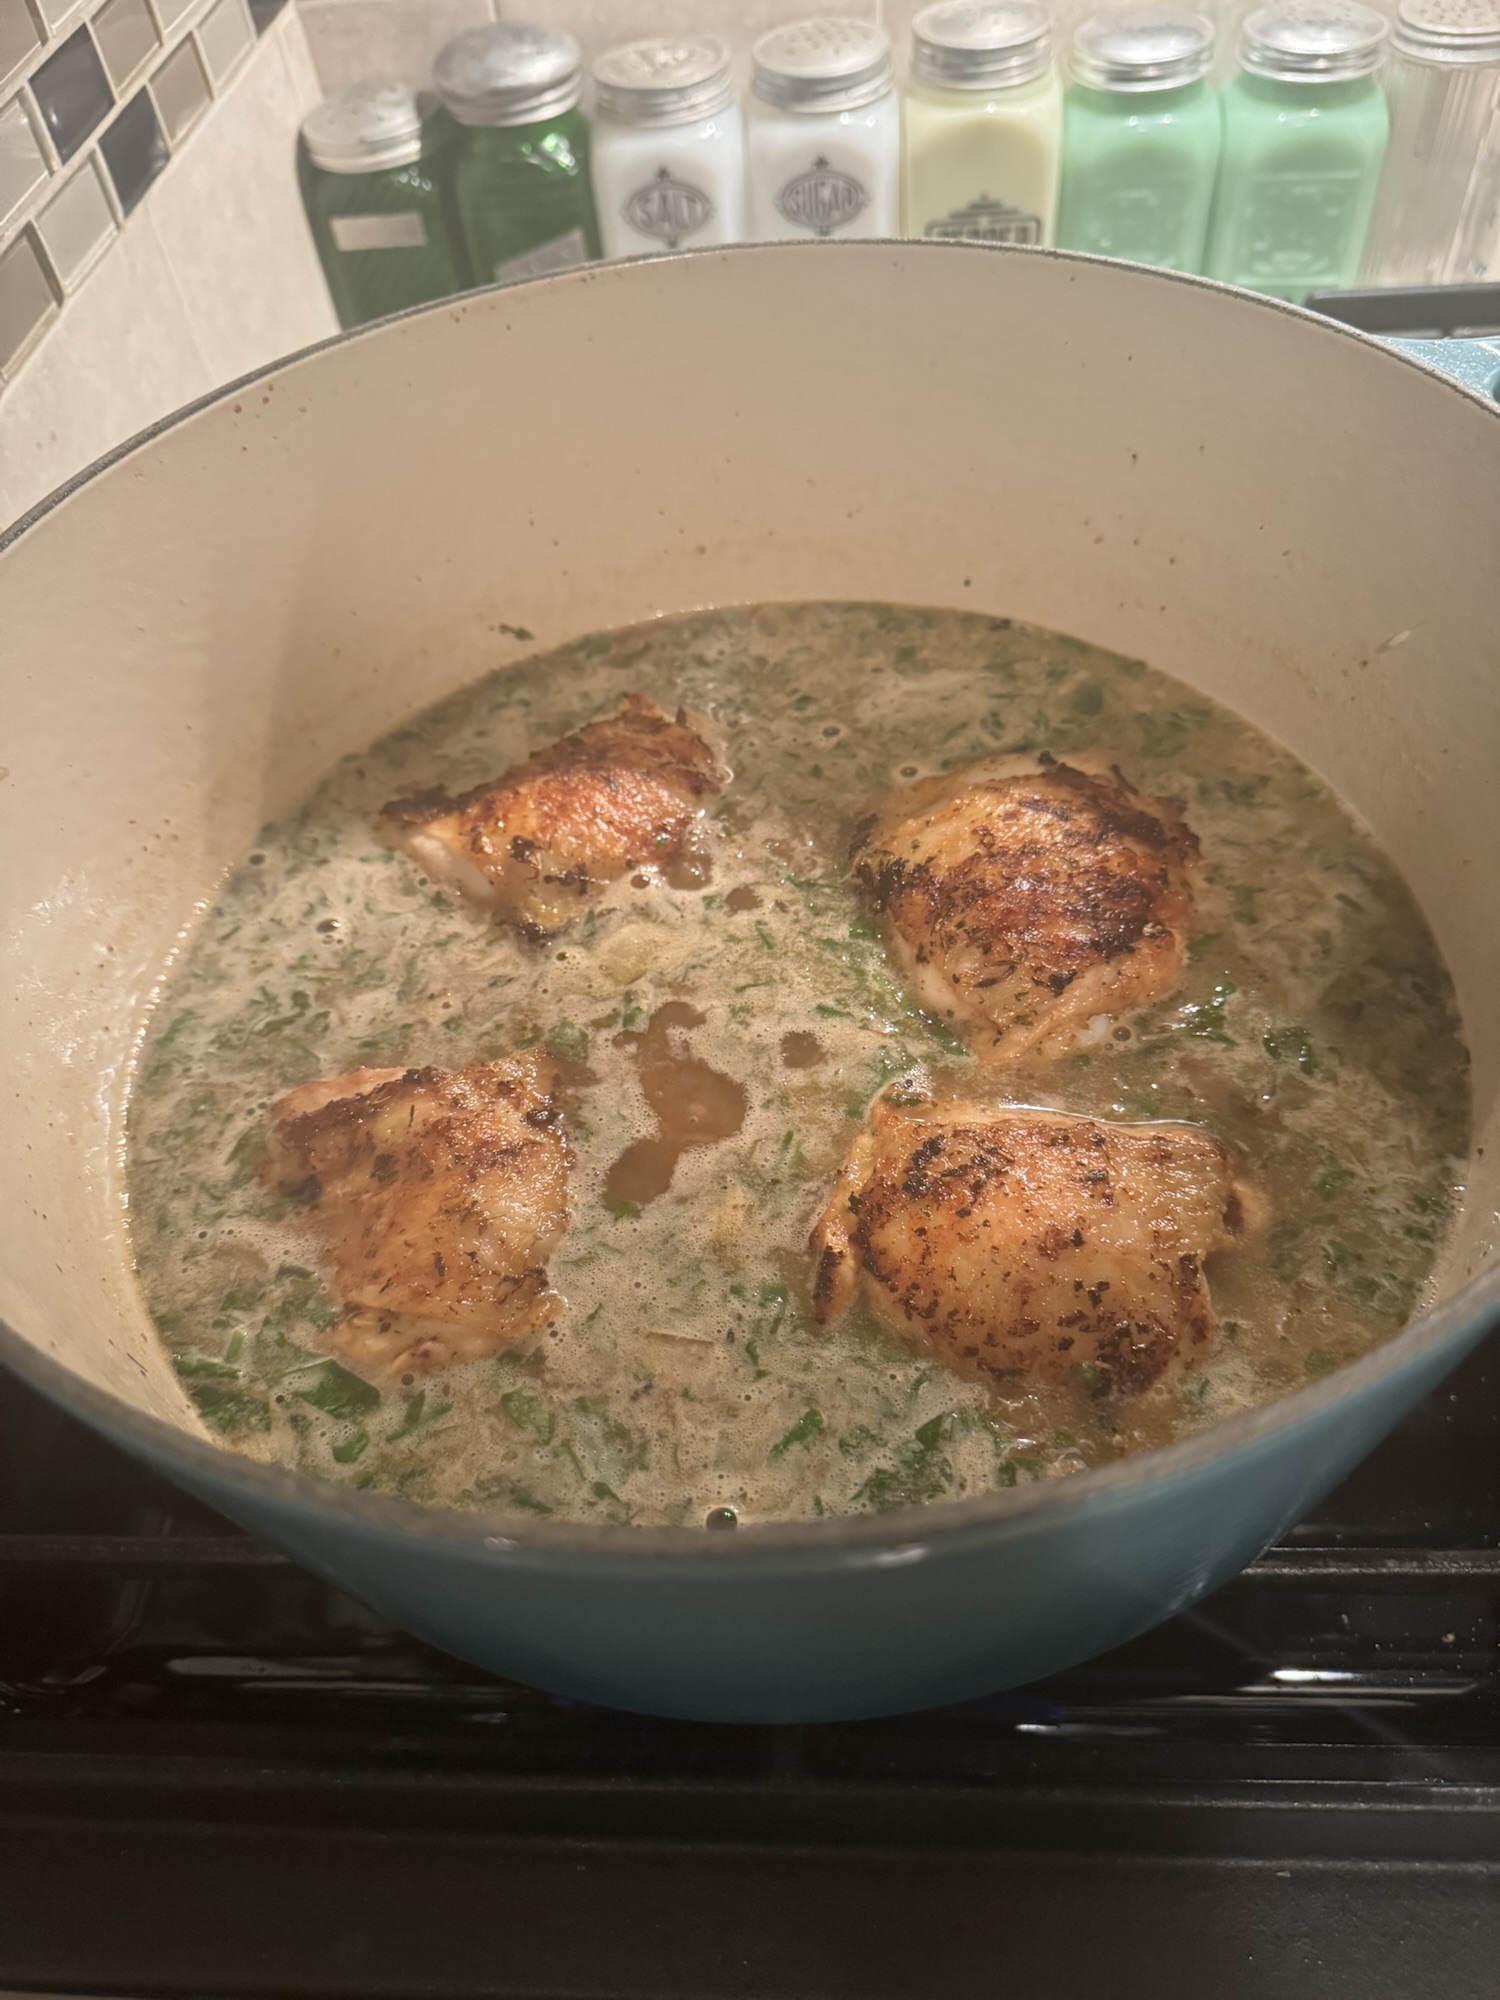
In a large ovenproof pot ( I used my Le Creuset dutch oven) or large skillet that is oven proof heat 2 tablespoons olive oil. When oil is very hot without burning please add chicken thighs skin side down (and reserve the leftover marinade in bowl or bag — you will be adding the liquid to the skillet later) Brown chicken about 5 minutes each side — you’ll be cooking more later this is just to get them golden and crispy. Remove chicken from pot and set aside on a plate.
Add the onions and garlic to skillet and stir cooking for a few minutes or until the onions are very soft and translucent. Adjust the heat a little if needed– don’t burn the onions.
Add the chopped spinach, oregano, salt, pepper, and reserved marinade to the pot. Cook stirring for another minute or so until spinach is wilted
Add the rice to the skillet, and stir well to coat the rice with the pan juices
Pour the chicken stock into the pot and stir well, bring to a simmer or low boil
Arrange chicken thighs on top of the rice, the cover the pot ( if no cover use aluminum foil)and place pot in the pre-heated oven. Bake for 30 minutes.
Remove the lid or foil covering, return the skillet to the oven, and bake until chicken and rice is cooked through, about 8-10 minutes. Feel free to broil for the last couple of minutes if you’re feeling like chicken isn’t crispy enough
Remove from the oven and let chicken and rice rest for 5-10 minutes. Fluff rice so that the spinach and onions that may have settled get evenly distributed. Sprinkle with feta now or extra lemon juice or parsley and lemon slices then serve straight from the pan or dish out onto plates.
This was truly one of the most epic meals! The whole meal in under an hour. While I love a real lasagna I didn’t want to put the whole thing together and deal with it. Once you have the ingredients the prep time is minimal and you aren’t using store bought sauce. You will be making the sauce and it will all cook together in the pan . This can be done a few different ways and I invite you to play around with the ingredients and spices to your own liking. All I can say is Wow! Delicious! Perfect Sunday night dinner . All in one pot is truly a great way to cook, no fuss, no muss and no having to deal with cooking lasagna noodles!!!!!! Yeah!
This can easily be made with ricotta cheese and spinach or any veggies you like. I would even try it with cut up eggplant!
*You’ll need a large oven proof skillet with lid
*perfect for freezing leftovers
Ingredients:
1 to 1/2 Tablespoon Olive Oil–I used 1 1/2 you can start with 1 and add more to onions if you need it
1/2 lb. ground beef ( I used 80/20)
3 Italian sausage links, casings removed ( I used Hot Italian Sausage) use what you like , you can use turkey or chicken sausage as well
1 onion, diced
1 14.5 oz. can diced tomatoes
1 8oz.can tomato sauce
*Italian seasonings , if you have Italian seasonings in a jar that’s great if not use a little dried oregano and dried basil. Italian Seasonings is available in the spice department of all food stores.
*1/2 teaspoon crushed red pepper
App. 1/4 tsp. Kosher Salt and more to taste
2-3 garlic cloves, minced
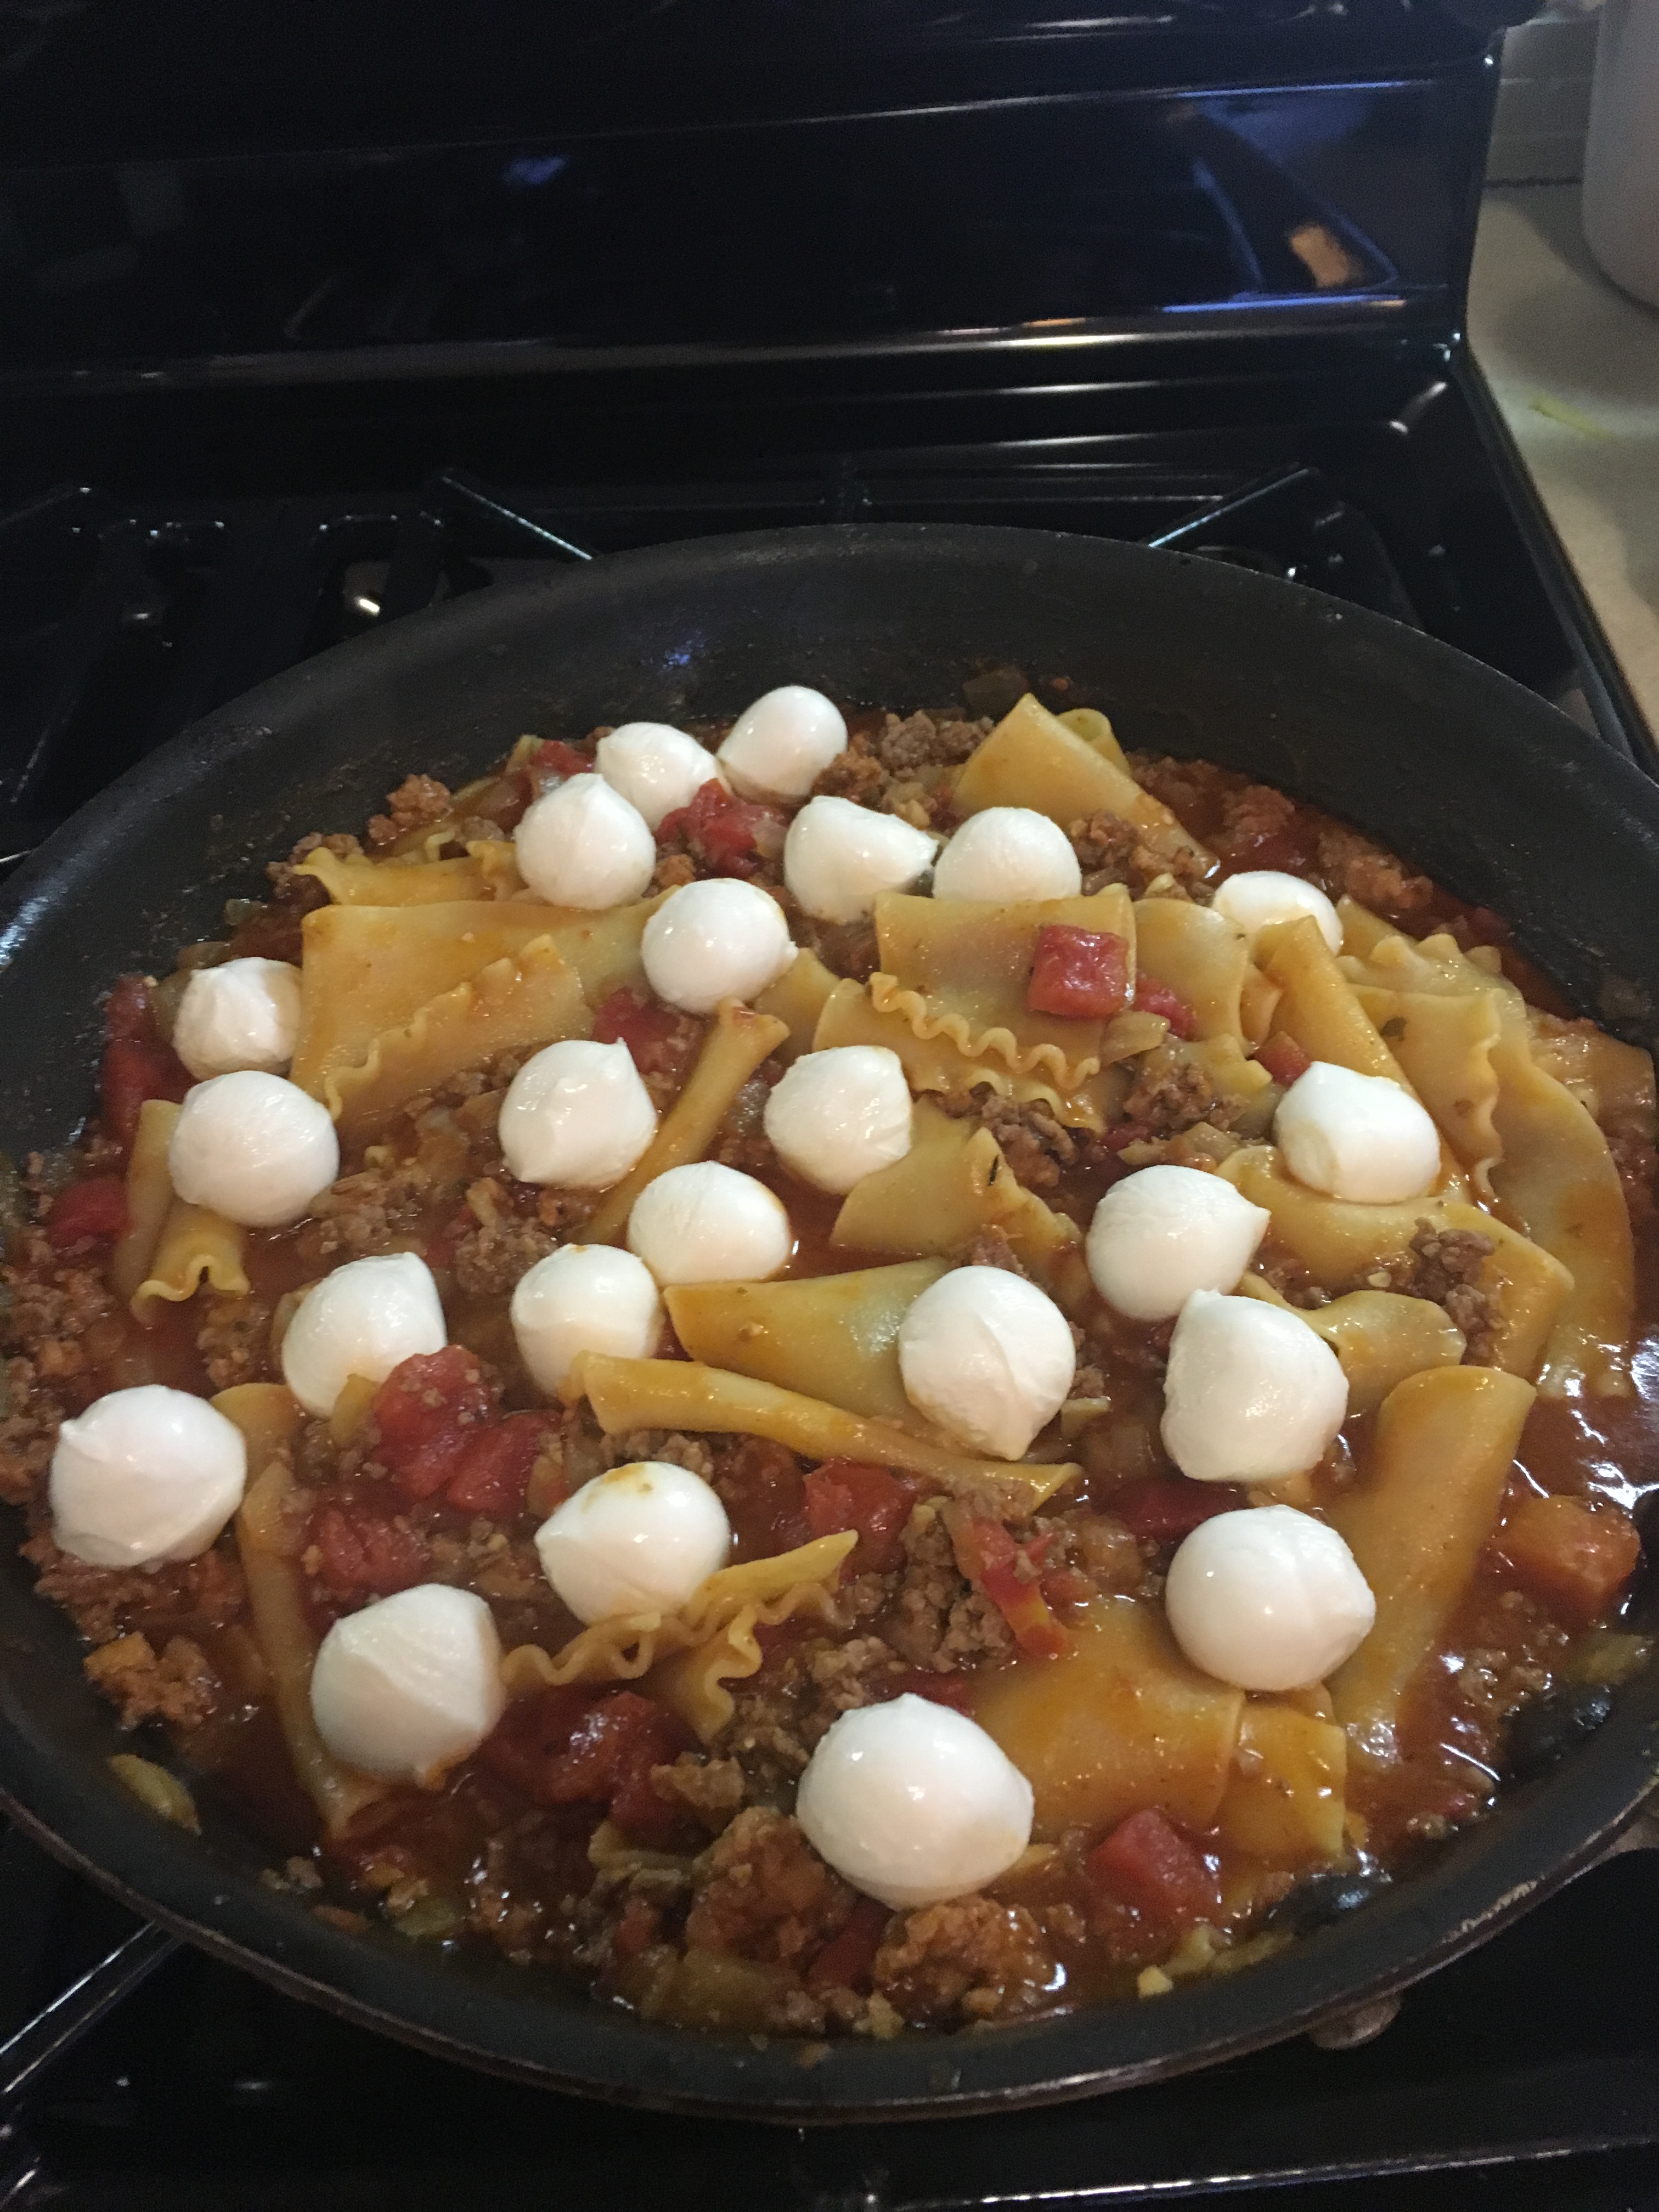
app. 10 lasagna noodles, broken into 1/4’s, if it breaks up differently don’t worry it’s a very loose recipe! 8 ounces Farfalle Pasta also works if you don’t feel like using the lasagna noodles. Un-cooked Noodles!!!!!
8 oz. mozzarella balls ( fresh) I used the small ones this time. Use whatever cheese you like but these worked out beautifully. You can always use shredded mozzarella, or just cut a large ball of mozzarella into small pieces ( as much or as little as you’d like) if using shredded mozzarella, you’ll need about 1 cup
2 cups water
Freshly grated Parmesan Cheese for serving
*you can also use 1 cup Ricotta Cheese for a very cheesy version, I would use this if I was making it with spinach and going veggie.
Directions:
Heat olive oil in a large skillet over medium-high heat. Add onions and cook till translucent, add garlic towards the end of onion process. Add ground beef to the onions, stirring occasionally till browned. I removed with slotted spoon and set aside in a bowl. I then cooked up the sausage making sure to crumble the sausage as it cooked. I then removed sausage to bowl with meat , onions, and garlic and drained all excess fat from pan.
Pre-heat the oven to Broil.
Return meat to pan, add tomato sauce, diced tomatoes, spices, add 1/4 tsp. kosher salt to taste, if you need more add it. Add in the meat mixture and stir, bring to a simmer and add in broken lasagna pieces and 2 cups of water. Bring to a boil; cover, reduce heat and simmer until pasta is cooked through, about 13- 15 minutes for al dente. I stirred it gently a few times just to make certain that the noodles cooked through and didn’t stick together.
Remove from the heat . I placed my Mozzarella on top and placed in oven under broiler for about 5 mins. Check on it because you don’t want it to blacken. All ovens are different, in mine it needed about 6 minutes to just start browning without burning, but you don’t want to burn this up so set timer and keep an eye on it!
Remove from the oven and let it sit out for a few minutes. Plate it up and let everyone add their own parmesan cheese! Enjoy! you will.
Plated up and ready to eat
Finished Product
adding mozzarella before placing under broiler
placing un-cooked noodles into sauce
This would serve 4. It’s tough to double because you would need a super large pan.
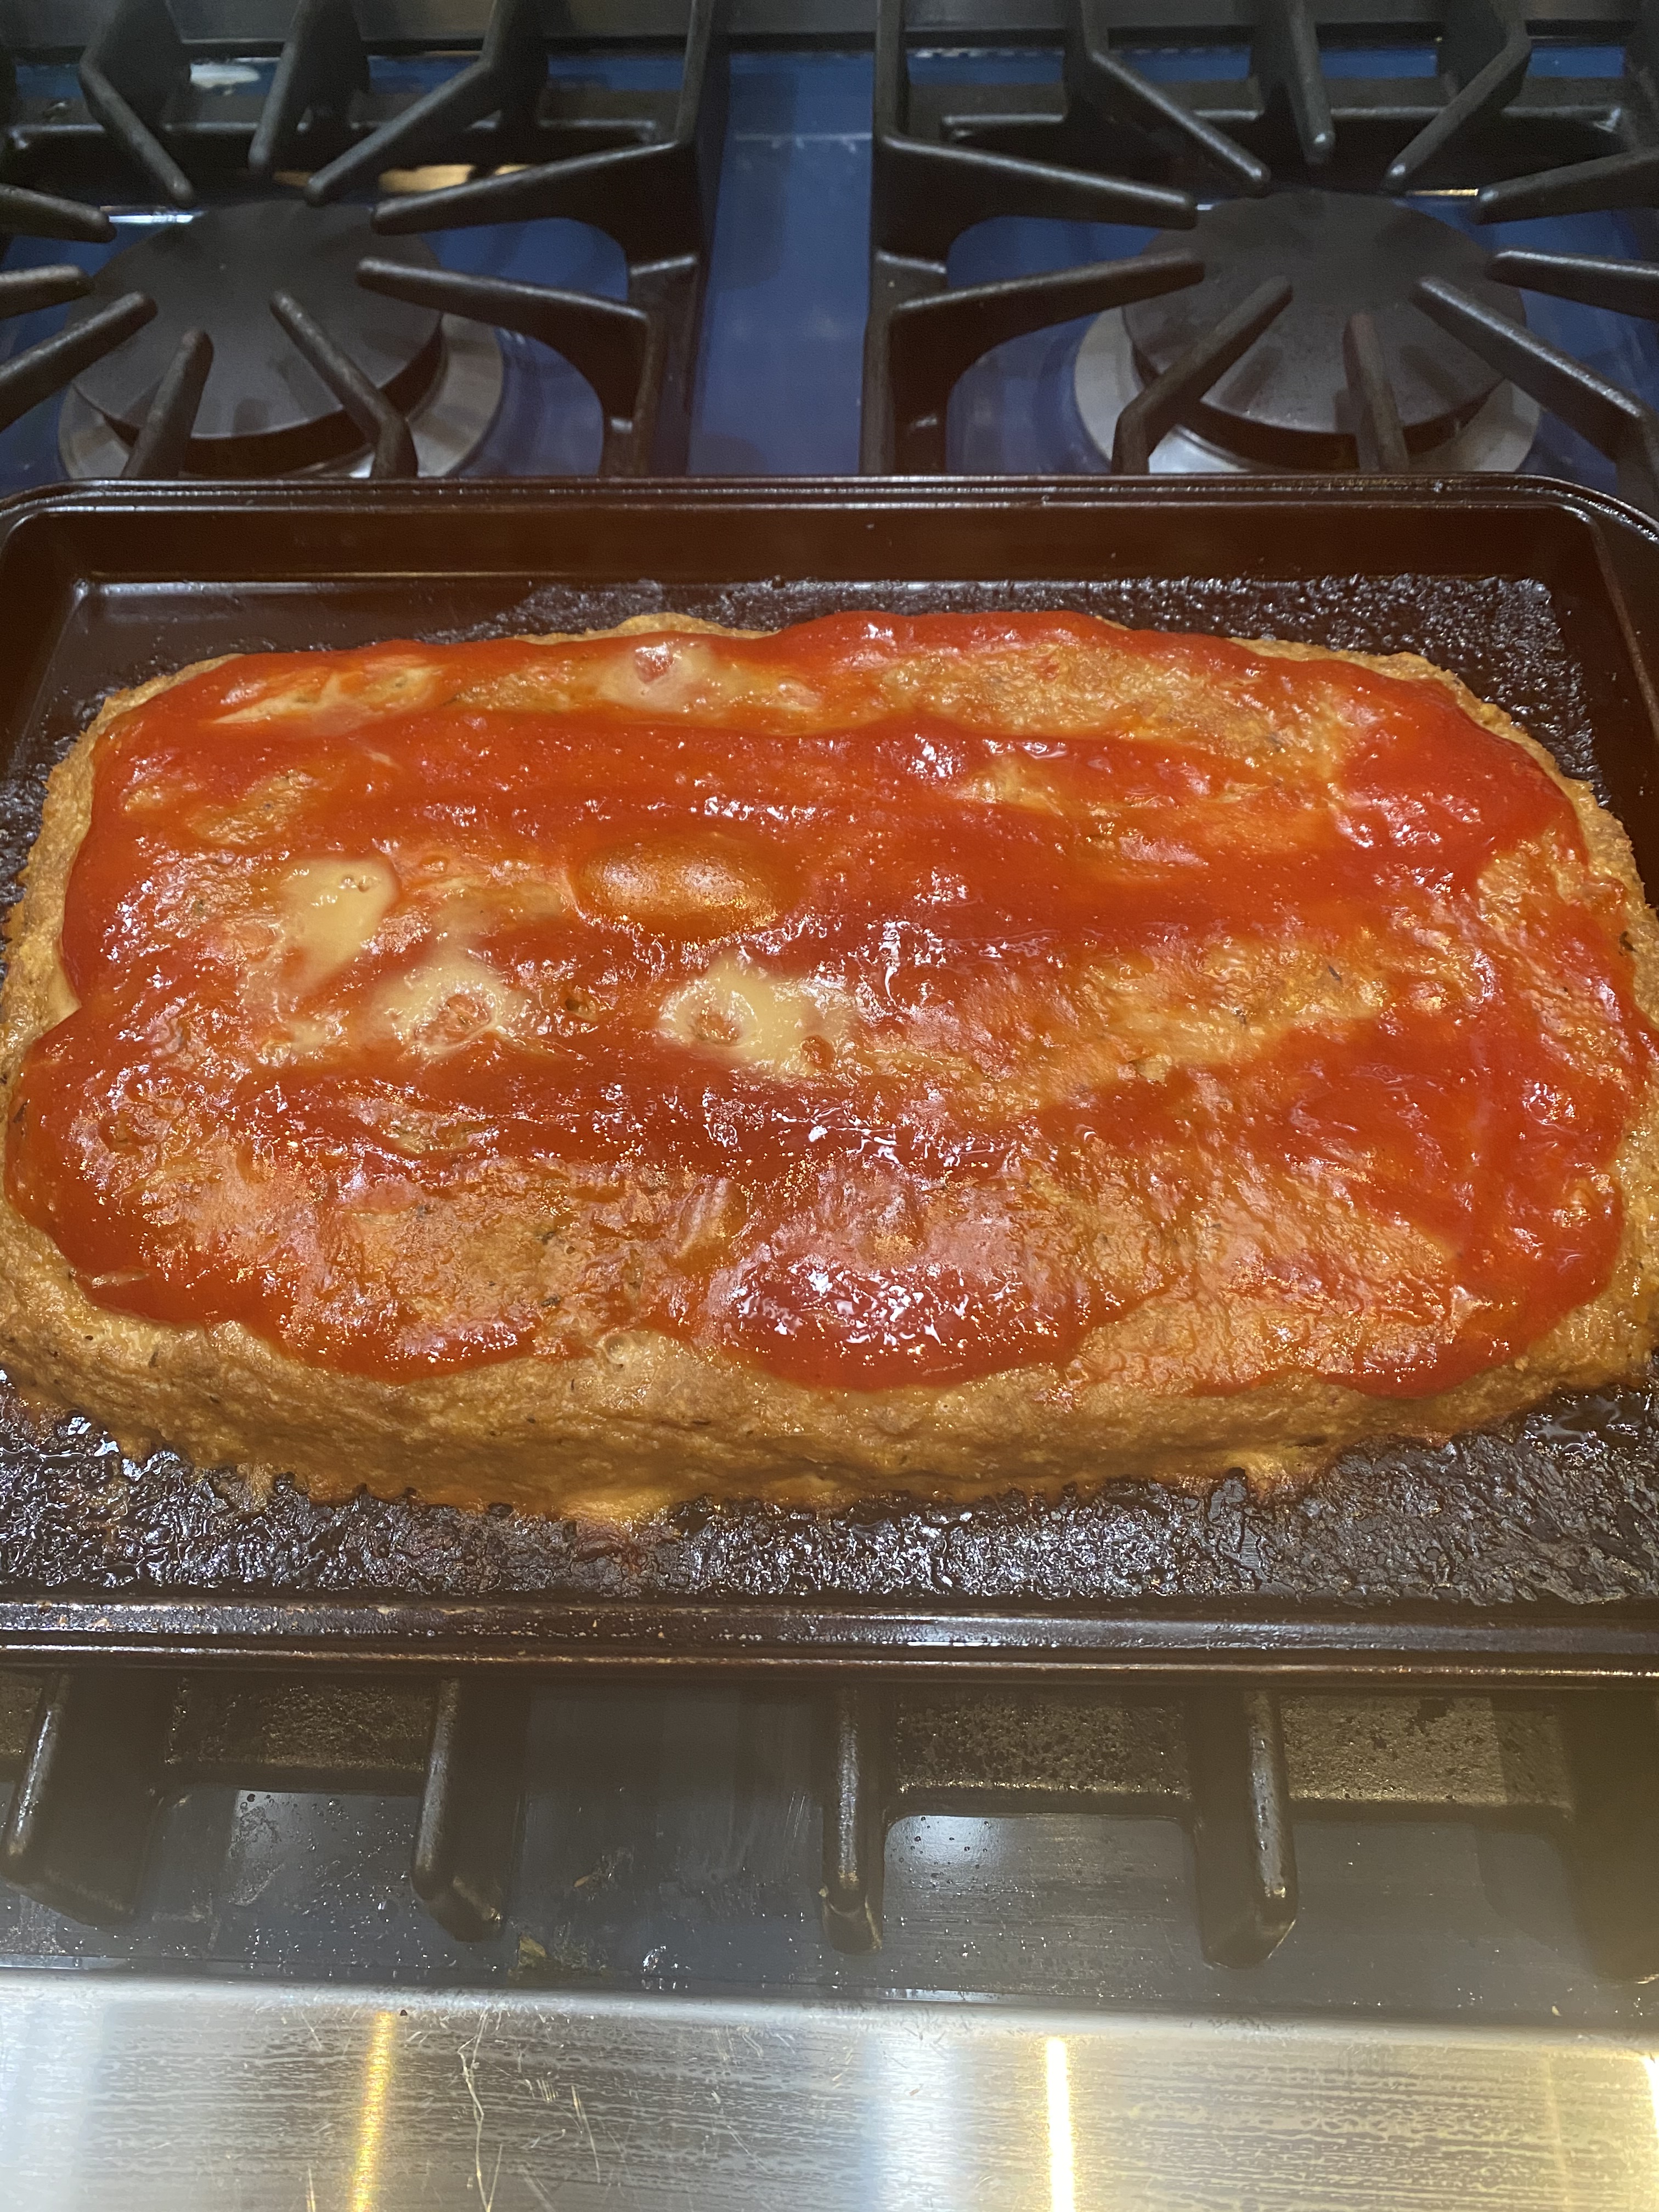
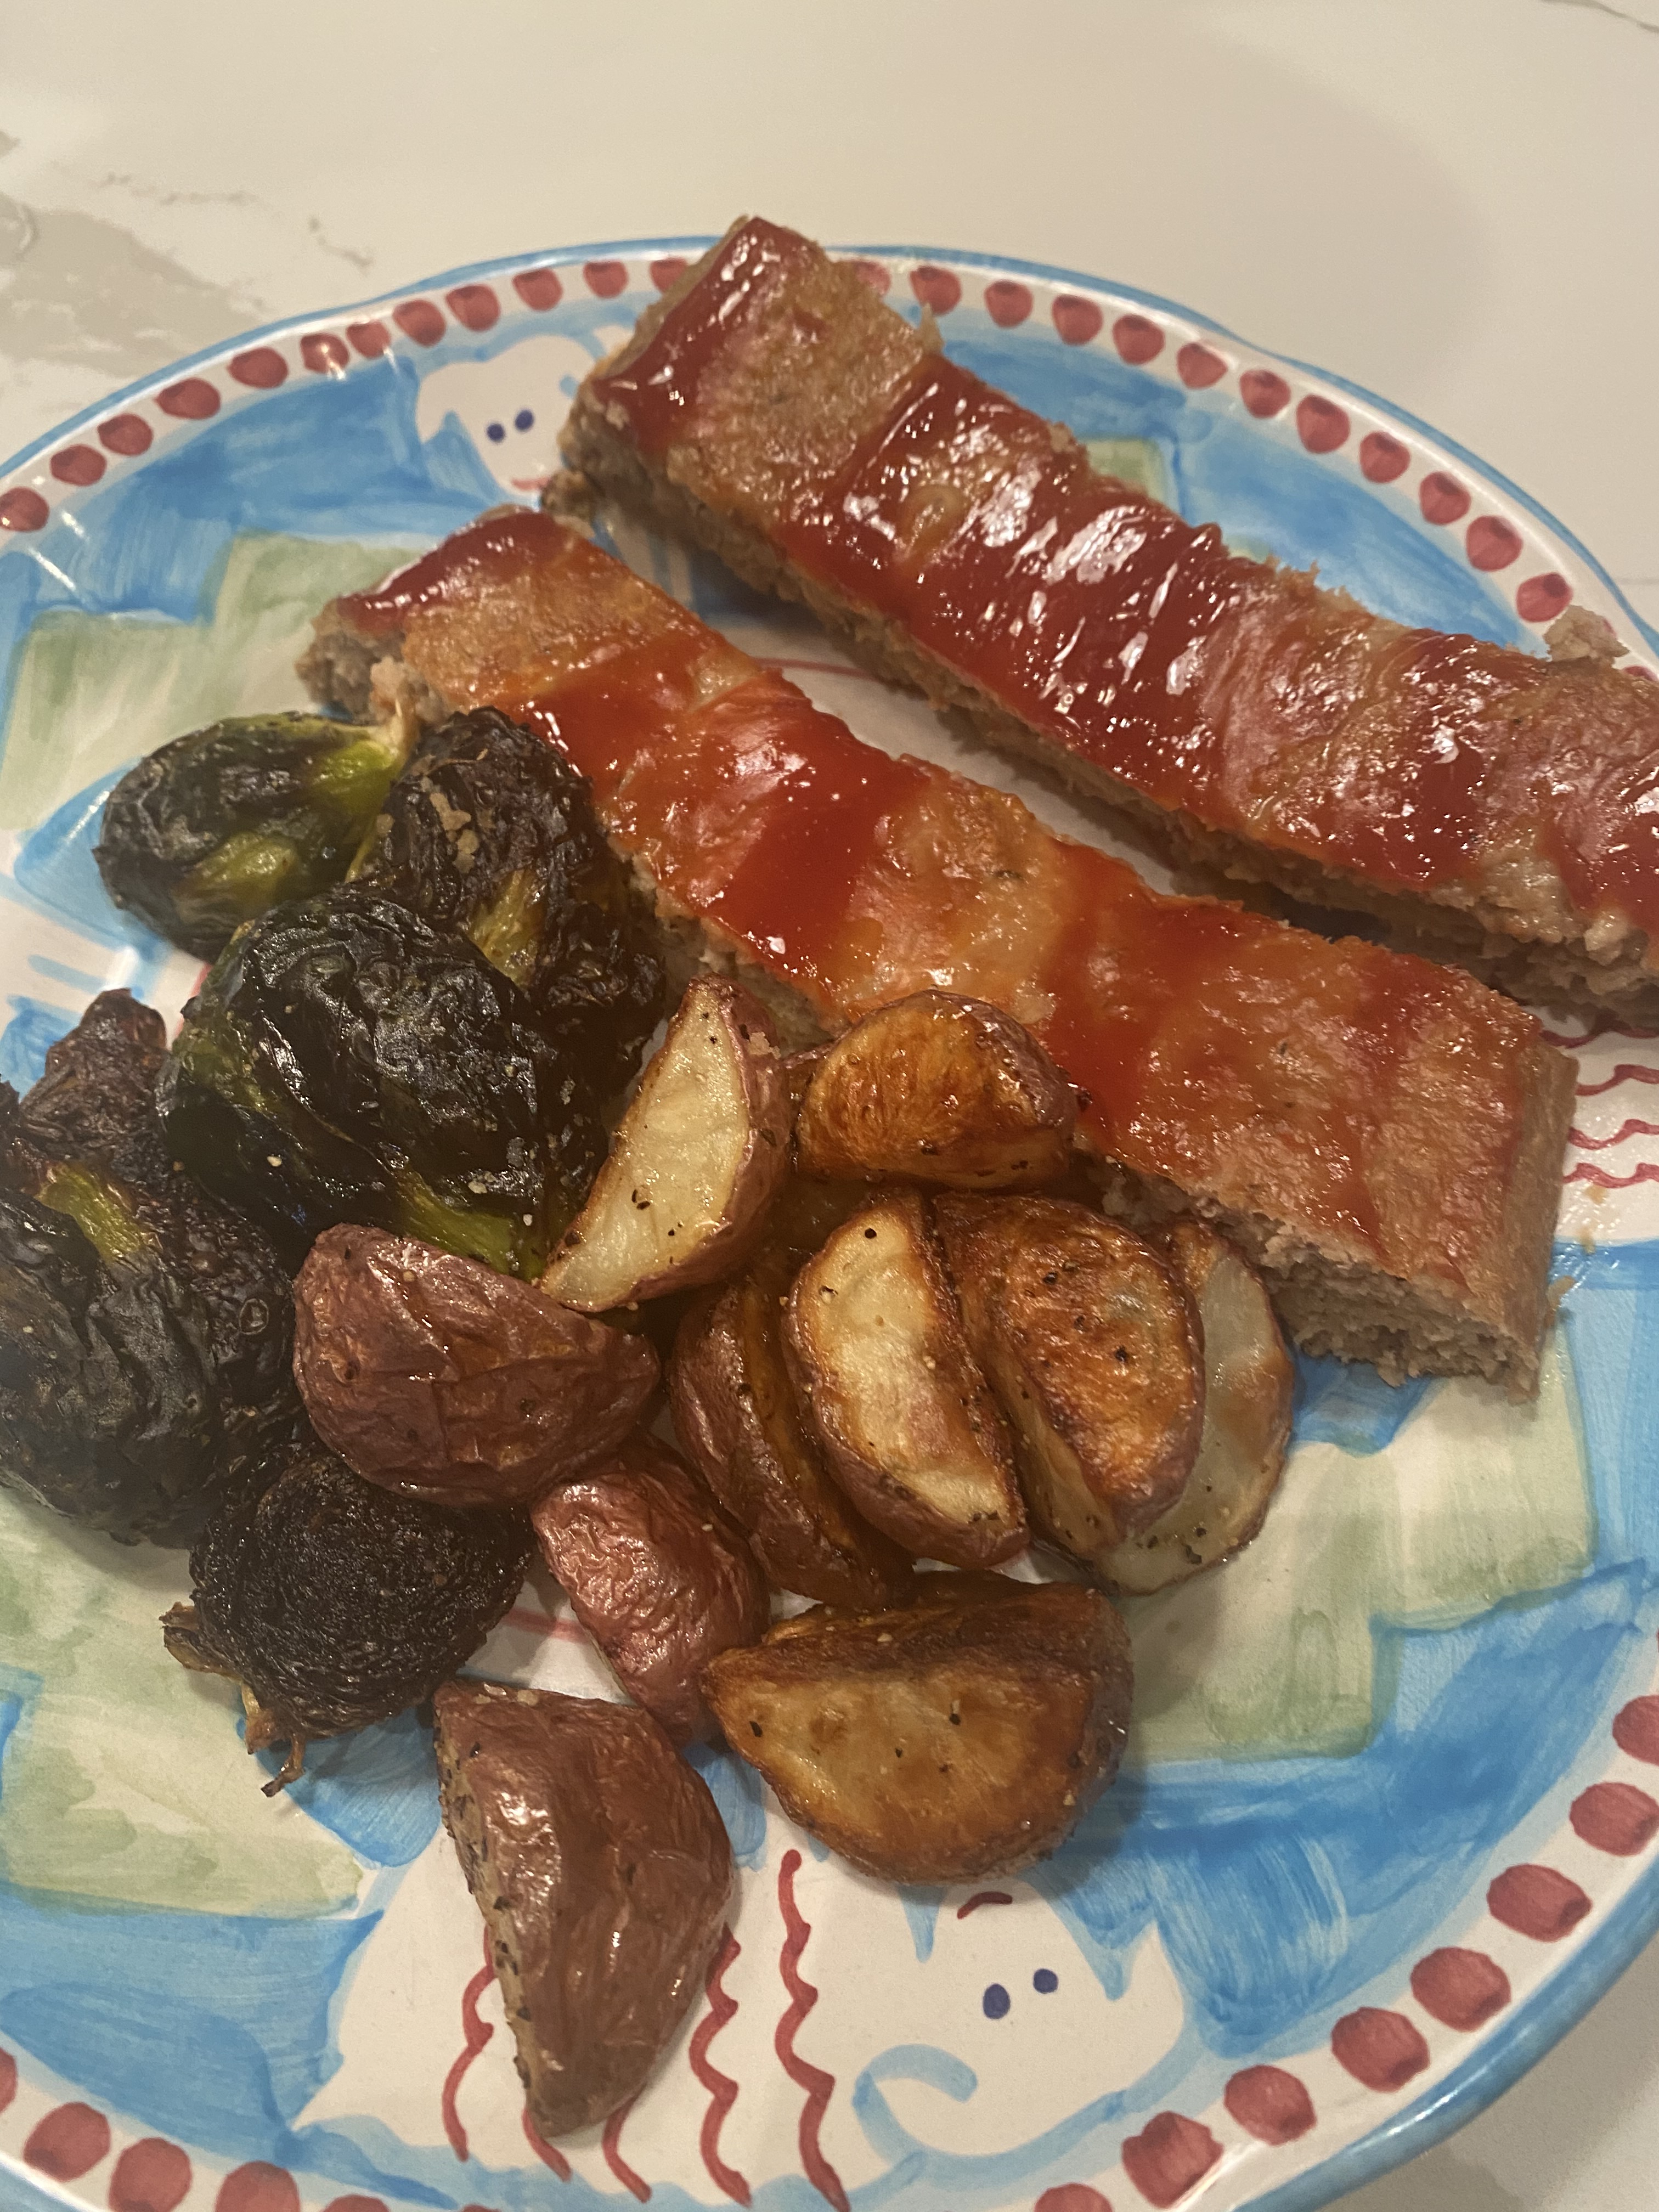
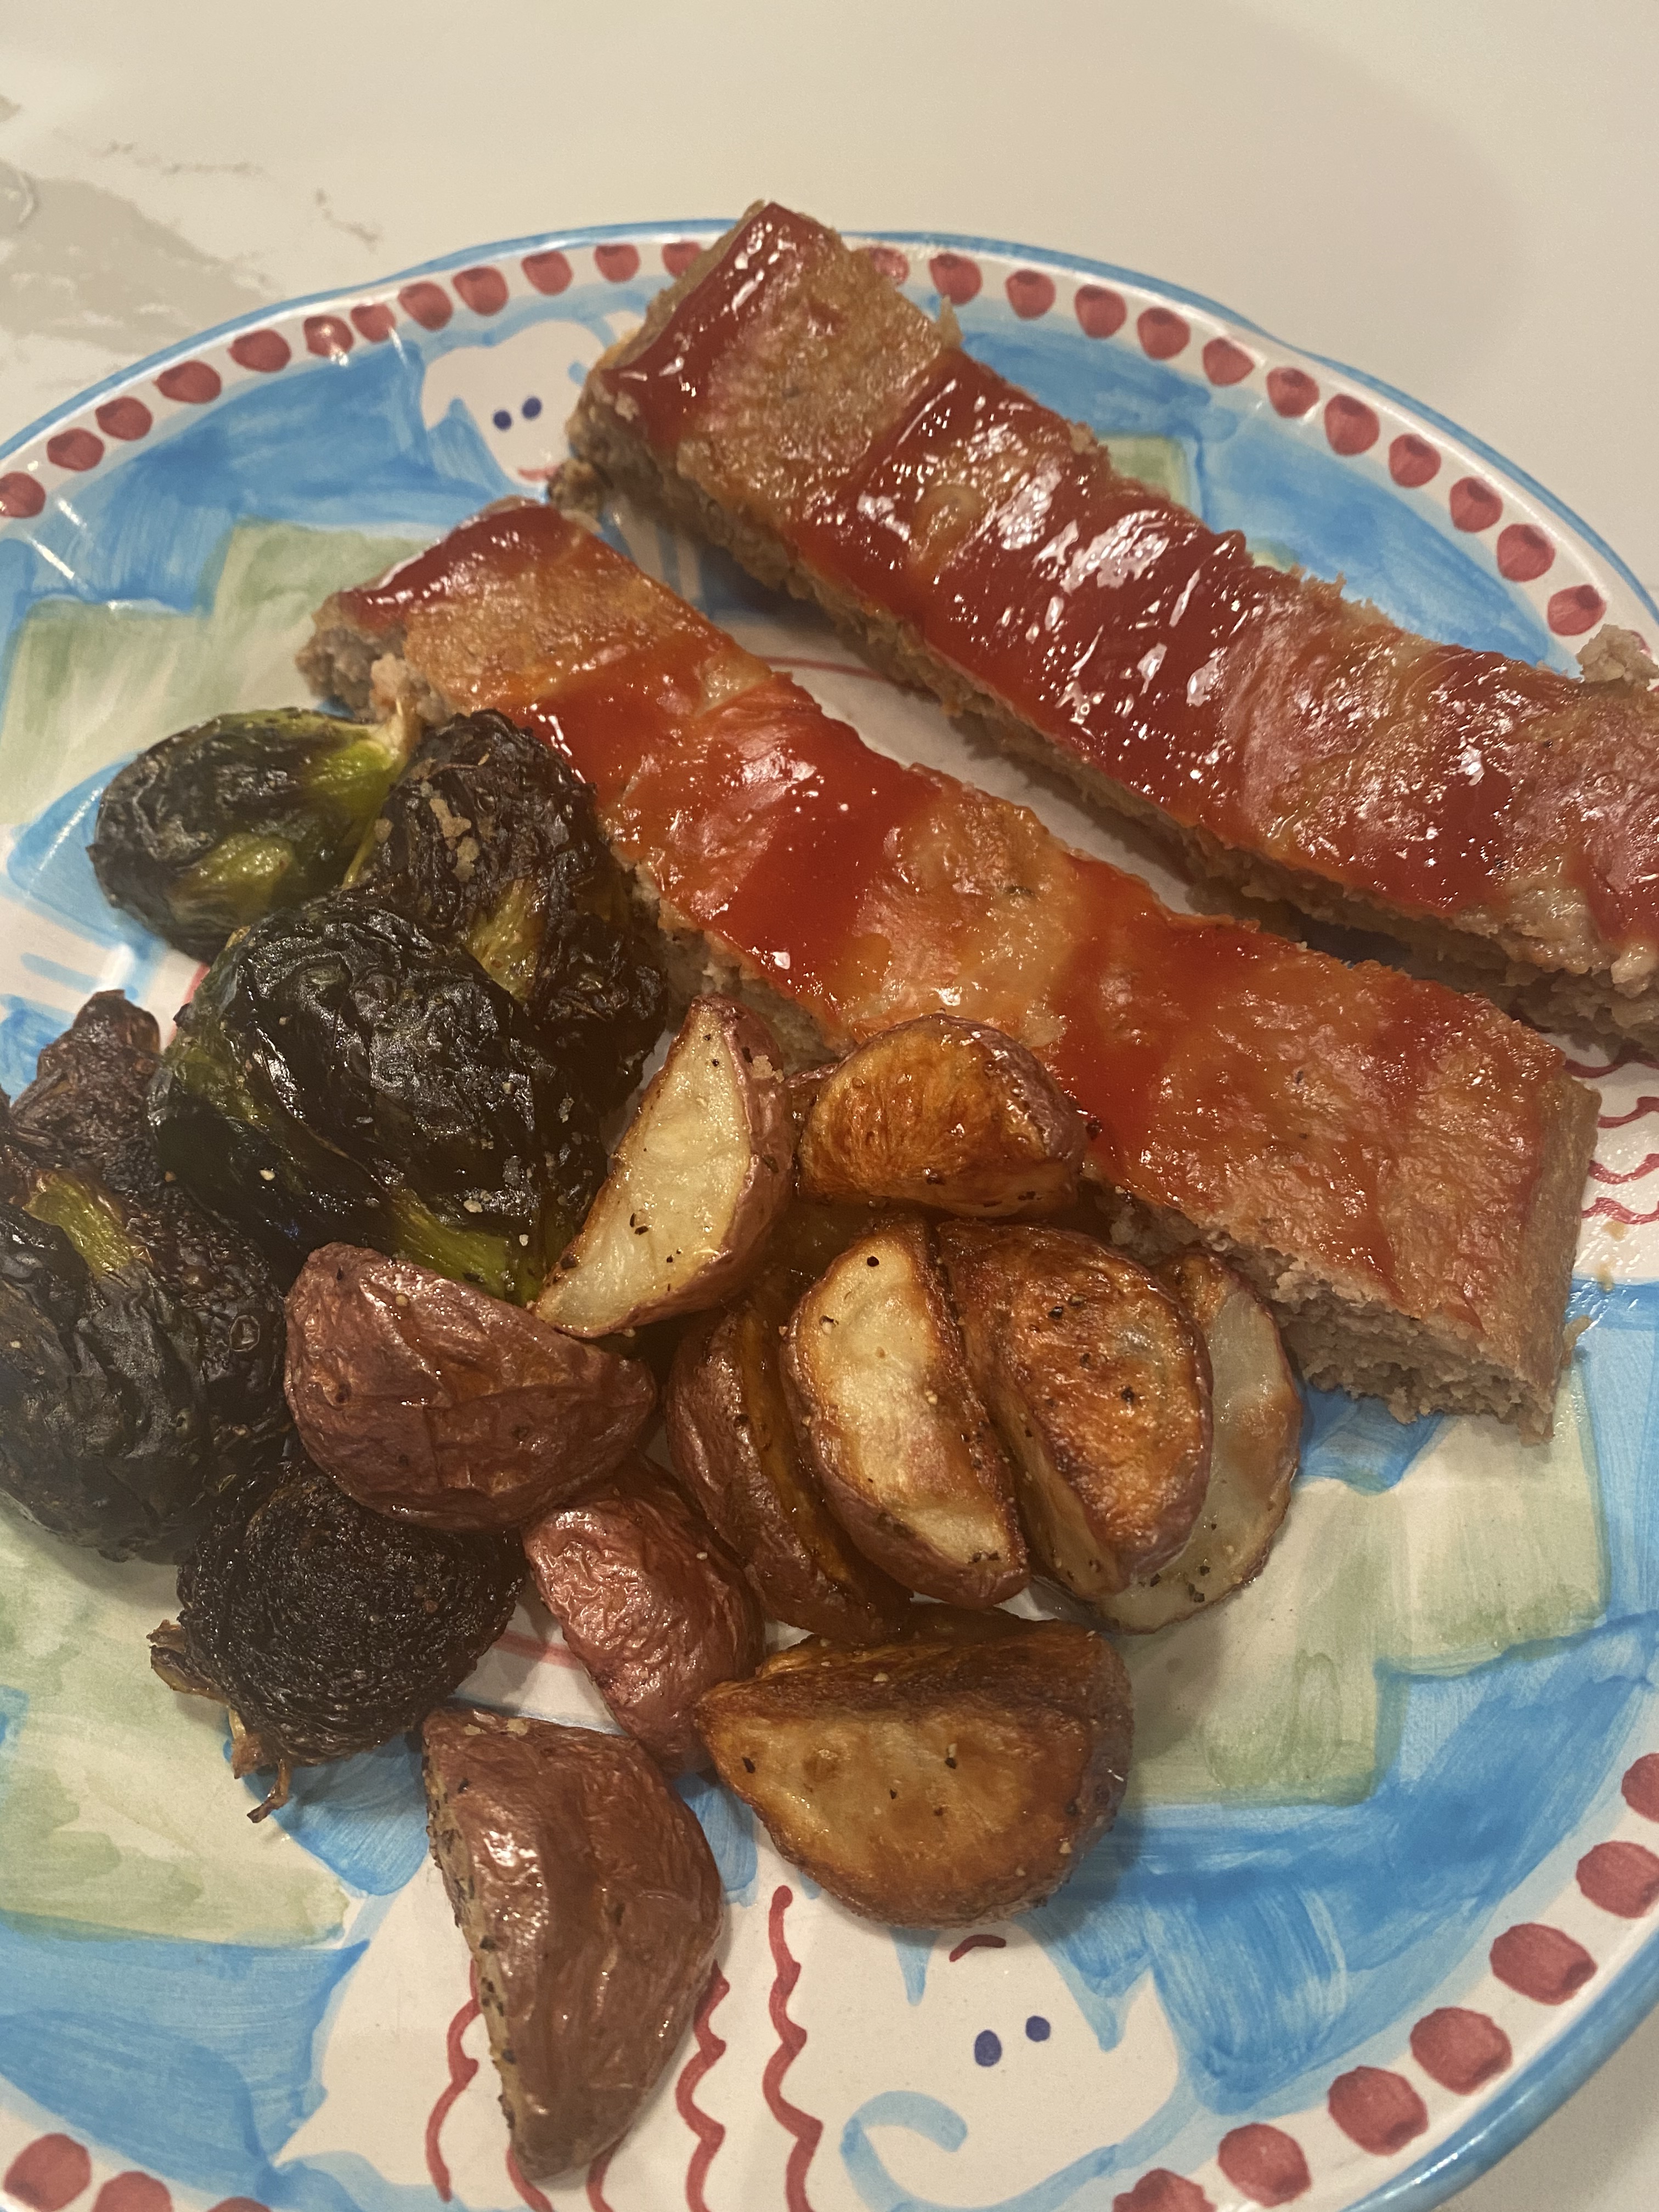
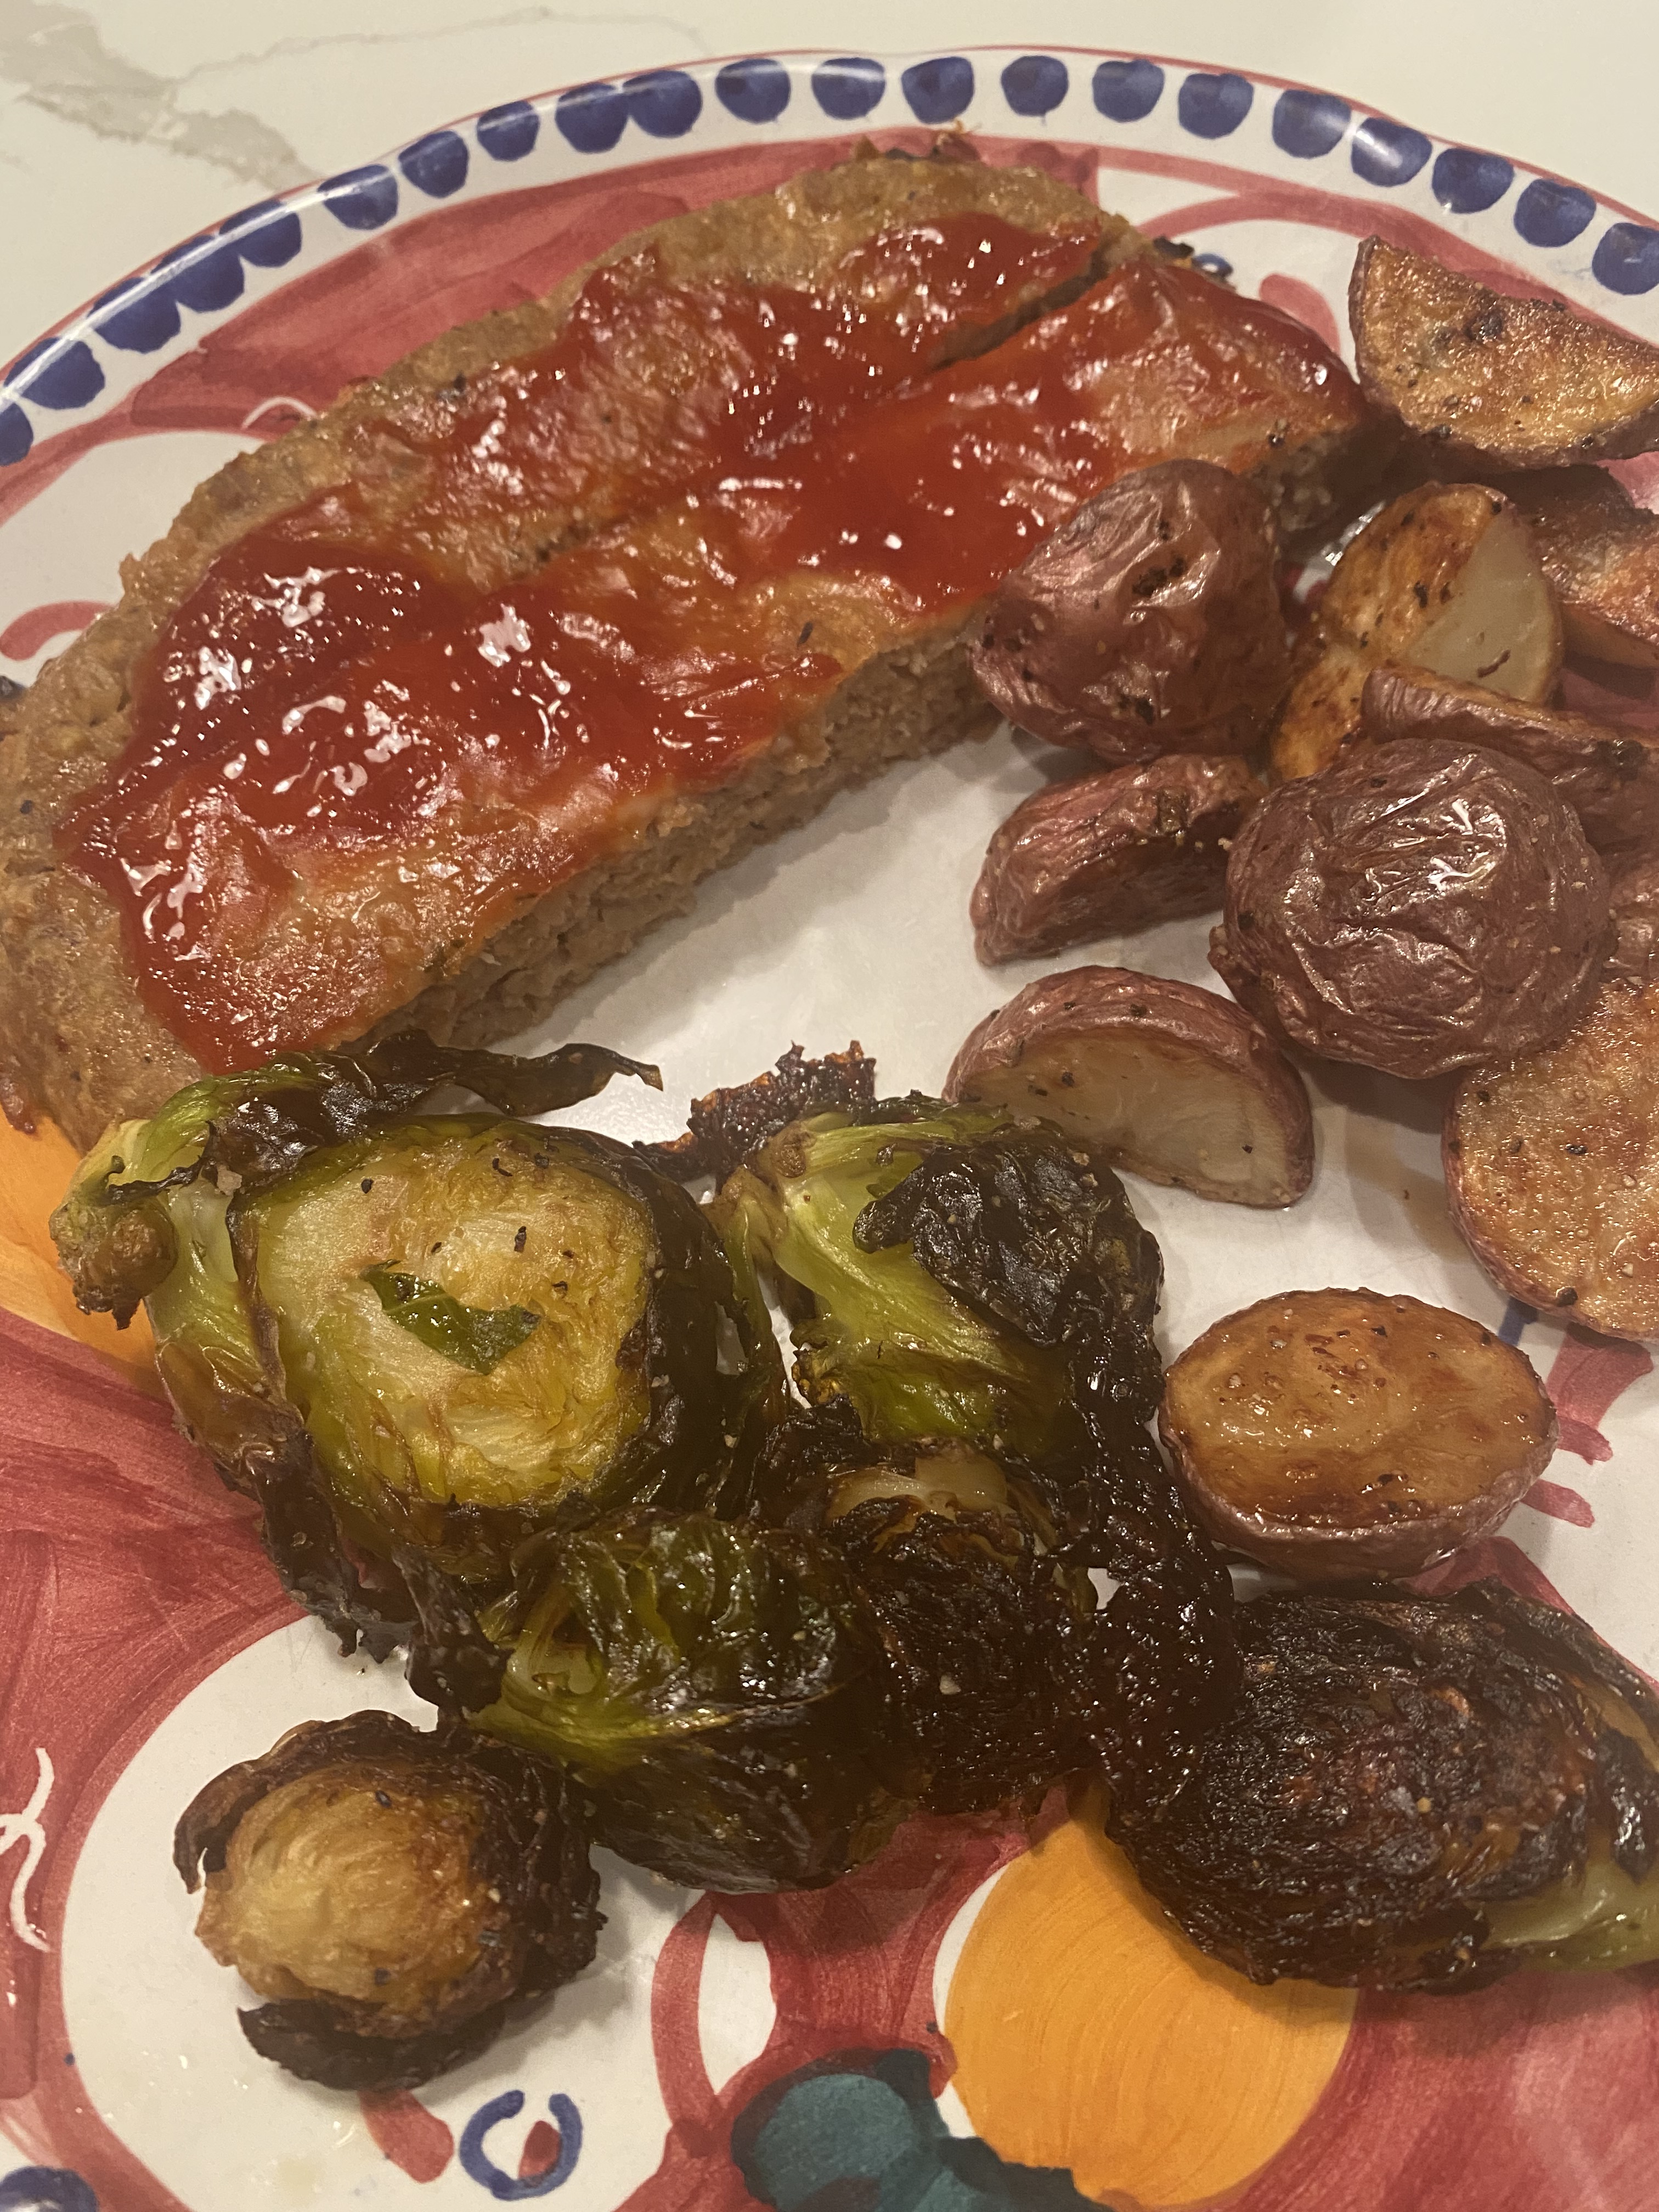
Turkey Meatloaf is definitely one of our family favorites . Perfect for a large family gathering or just the two of you with great left-overs. I love the down home flavor of meatloaf and this one is just delicious.
I cut the recipe in 1/2 for the 2 of us using 2 lbs. of Ground Turkey and 2 eggs and cut everything else in 1/2. I still have enough leftovers the next day and it’s just enough. If you’re making for 4 or more go with the full recipe. I served with roasted (burnt brussels sprouts and roasted red potatoes) and if you do make the whole recipe you can easily freeze the leftover for another night.
Enjoy!
*original recipe from The Barefoot Contessa – Ina Garden
*you will need a meat thermometer to check for doneness
Ingredients:
5 lbs ground turkey— I prefer chopped dark meat as it has a little fat and a lot less dry than white meat turkey. You can find 85% lean which is fine . It’s sometimes hard to find dark meat ground turkey so when I find it I buy it. It just makes for a tastier meat loaf. You can mix dark meat and white meat.
3 cups chopped yellow onions ( app. 2 large onions)
2 tablespoons olive oil
2 teaspoons kosher salt
1 teaspoon freshly ground black pepper
1/2 teaspoon dried thyme
1/3 cup Worcestershire Sauce
3/4 cup chicken stock
1 1/2 teaspoons tomato paste
1 1/2 cups plain dry bread crumbs
3 extra-large eggs, beaten
3/4 cup ketchup/1 tablespoon brown sugar
Directions:
Preheat oven to 325 degrees
In a medium saute pan (frying pan) , over a medium low heat, cook the onions in the olive oil, add salt, pepper, and thyme until translucent app. 10 minutes or so. Don’t brown them. Add the Worcestershire sauce, chicken stock, and tomato paste and mix well. Allow this mixture to cool in frying pan off the heat to room temperature.
In the meantime, combine the turkey, bread crumbs, and eggs in a large bowl and mix well. Then add in the onion mixture when it’s cooled down and incorporate well. Shape into a rectangular loaf on a lightly sprayed sheet pan. When you shape as a loaf , try to make the ends even with the middle or they will dry out. ( I kind of like the ends like that but just saying…) Spread the ketchup/brown sugar evenly on top. Bake for app. 1 1/2 hours until the internal temperature of meatloaf is 160 degrees and the meatloaf is cooked through. Once meatloaf comes out of the oven let it sit for about 5 minutes.
Serve hot, at room temperature and delicious cold the next day.
Chicken Scarpariello could easily be one of my most favorite dishes to order in an Italian Restaurant. The translation is Shoemaker’s chicken and it is a classic Italian-American dish of chicken, sausage, onions and peppers . The flavors are layered and spicy and sweet and this recipe often has potatoes in it but this time I left them out and we didn’t miss them. I made this for 2 people so used only 1 lb. of chicken. Recipe is for 2 – 3 pounds of bone-in skin-on chicken , you can use whatever pieces you like but if you’re using breasts have them cut in 1/2. I also made whole recipe in my Le Creuset Stockpot because I cut recipe for just the two of us. If you make whole recipe you’ll want to transfer to a large roasting pan before putting in the oven. I didn’t because I only used 3 pieces of chicken and 2 sausage links so I kept it all in the Le Creuset dutch oven .
Enjoy this hearty recipe and if I were making potatoes I might just roast some on the side and add in when I serve. Potatoes are totally optional.
Serve with some good bread to soak up this delicious sauce.
This would be a delicious Holiday Meal.
Ingredients:
3 lbs. bone-in , skin-on Chicken I used thighs only this time,, use what you like but keep breasts small and cut in 1/2 and this recipe can be easily cut in 1/2
Kosher salt and freshly ground black pepper ( or coarse black pepper)
2 Tablespoons Olive Oil ( if you’re cooking up chicken and oil disappears add a little at a time)
4 links Italian Sausage — you can use 1/2 mild and 1/2 spicy whatever you’d like
2 large Bell Peppers and if you’re making for more people and transferring to large roasting pan you can use 3 Bell peppers — seeded and cut into thin strips
1 large sweet onion, cut in half lengthwise and sliced
1 teaspoon minced garlic — probably 2 small cloves
4-8 hot vinegar cherry peppers or pepperoncini, left whole If you don’t like hot you can substitute with sweet cherry peppers in vinegar or peppadew peppers in vinegar( I know Trader Joes has these) Use what you like and what you can find.
1/2 cup chicken broth
1/2 cup dry white wine
1/4 cup red wine vinegar
1 Tablespoon dried oregano
Directions:
Pre-heat the oven to 400 degrees. season chicken pieces with kosher salt and pepper. Heat the oil in a large Dutch oven style pot or use a large pot/pan for sautéing . In batches, ( don’t over crowd pot) brown the chicken , skin side down to start, you’ll probably want to sauté for at least 5 minutes or more per side and using tongs check for skin color to be golden brown, this may take longer or shorter and be careful not to burn the oil. I used a medium flame but if it starts to burn lower immediately . Remove the chicken to a plate when finished. Add the sausage to same pot and sauté until brown, about 3 -4 minutes per side. ( they will not be cooked through at this point– just browned. Remove with tongs , cut into 1″ slices and set aside along with chicken.
Now into the same pot sauté the bell peppers, onion and garlic until soft and beginning to brown , probably another 5 minutes or so. I sprinkled a little salt and pepper here while it was sautéing
Return the sausage to pot, add the cherry peppers or pepperoncini, chicken broth , wine, vinegar, oregano . Gently mix together, then transfer everything in the pot ( all liquid as well) to a large roasting pan. ( I always spray first for easy clean-up and easy removal of cooked food) use an olive oil spray if you have it and spray lightly) Nestle the chicken in the vegetables (skin side up) with sausage and roast in the oven until chicken is cooked through and sauce has reduced slightly, probably 30 minutes . If you are halving this recipe for 2 people you can put Le Creuset in the oven which is what I did but for larger amounts use roasting pan.
I served on plate and spooned a little of the sauce on top of chicken and vegetables.
Hope you enjoy as much as we did.
You can test done-ness of chicken with a meat thermometer.
*I prefer using dark meat here but that’s totally up to you
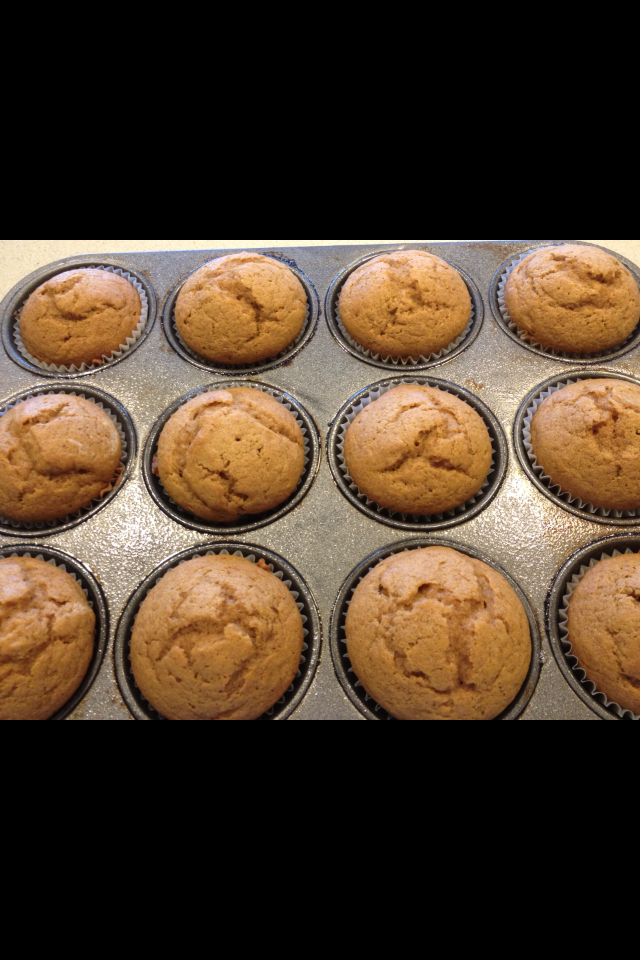
There are a few things I really love to eat. Mostly anything sweet and mostly dessert. Anyone who knows me well knows that I have a sweet tooth. Funny that my name is Candi and I love candy, cookies, cakes and ice cream so very much. I would probably pass on most entrees and just cut to dessert if I had my way . When I was a kid I would gladly trade a sandwich for dessert any day of the week. Some things never change. I’d like to believe that my tastes in dessert have changed a wee bit and that I have a bit more of a sophisticated palate now but not when it comes to candy, I still love junk candy as much as I did when I was 6. However my taste in cake has definitely improved with age. I don’t think I would have enjoyed pumpkin cake as a kid but I really love it now. Anything baked with pumpkin gets high marks in my book and if you put cream cheese frosting on it it’s off the charts. It’s just the right amount of sugar and spice! A most perfect Fall Cake or cupcake. It really is a very easy recipe to follow , I made cupcakes but you can easily make this in a Pyrex 9 x13 inch pan as a sheet cake and frost it and decorate with candy corn or those little candy pumpkins! Nice little treat for those little trick or treaters in your house.
Now you can make these without frosting and just eat like muffins with a little smear of cream cheese which wouldn’t be too bad either.
1 tsp. ground cloves if no ground cloves you can substitute with pumpkin pie spice or nutmeg. I prefer cloves.
1 tsp. salt (regular table salt)
1 cup vegetable oil
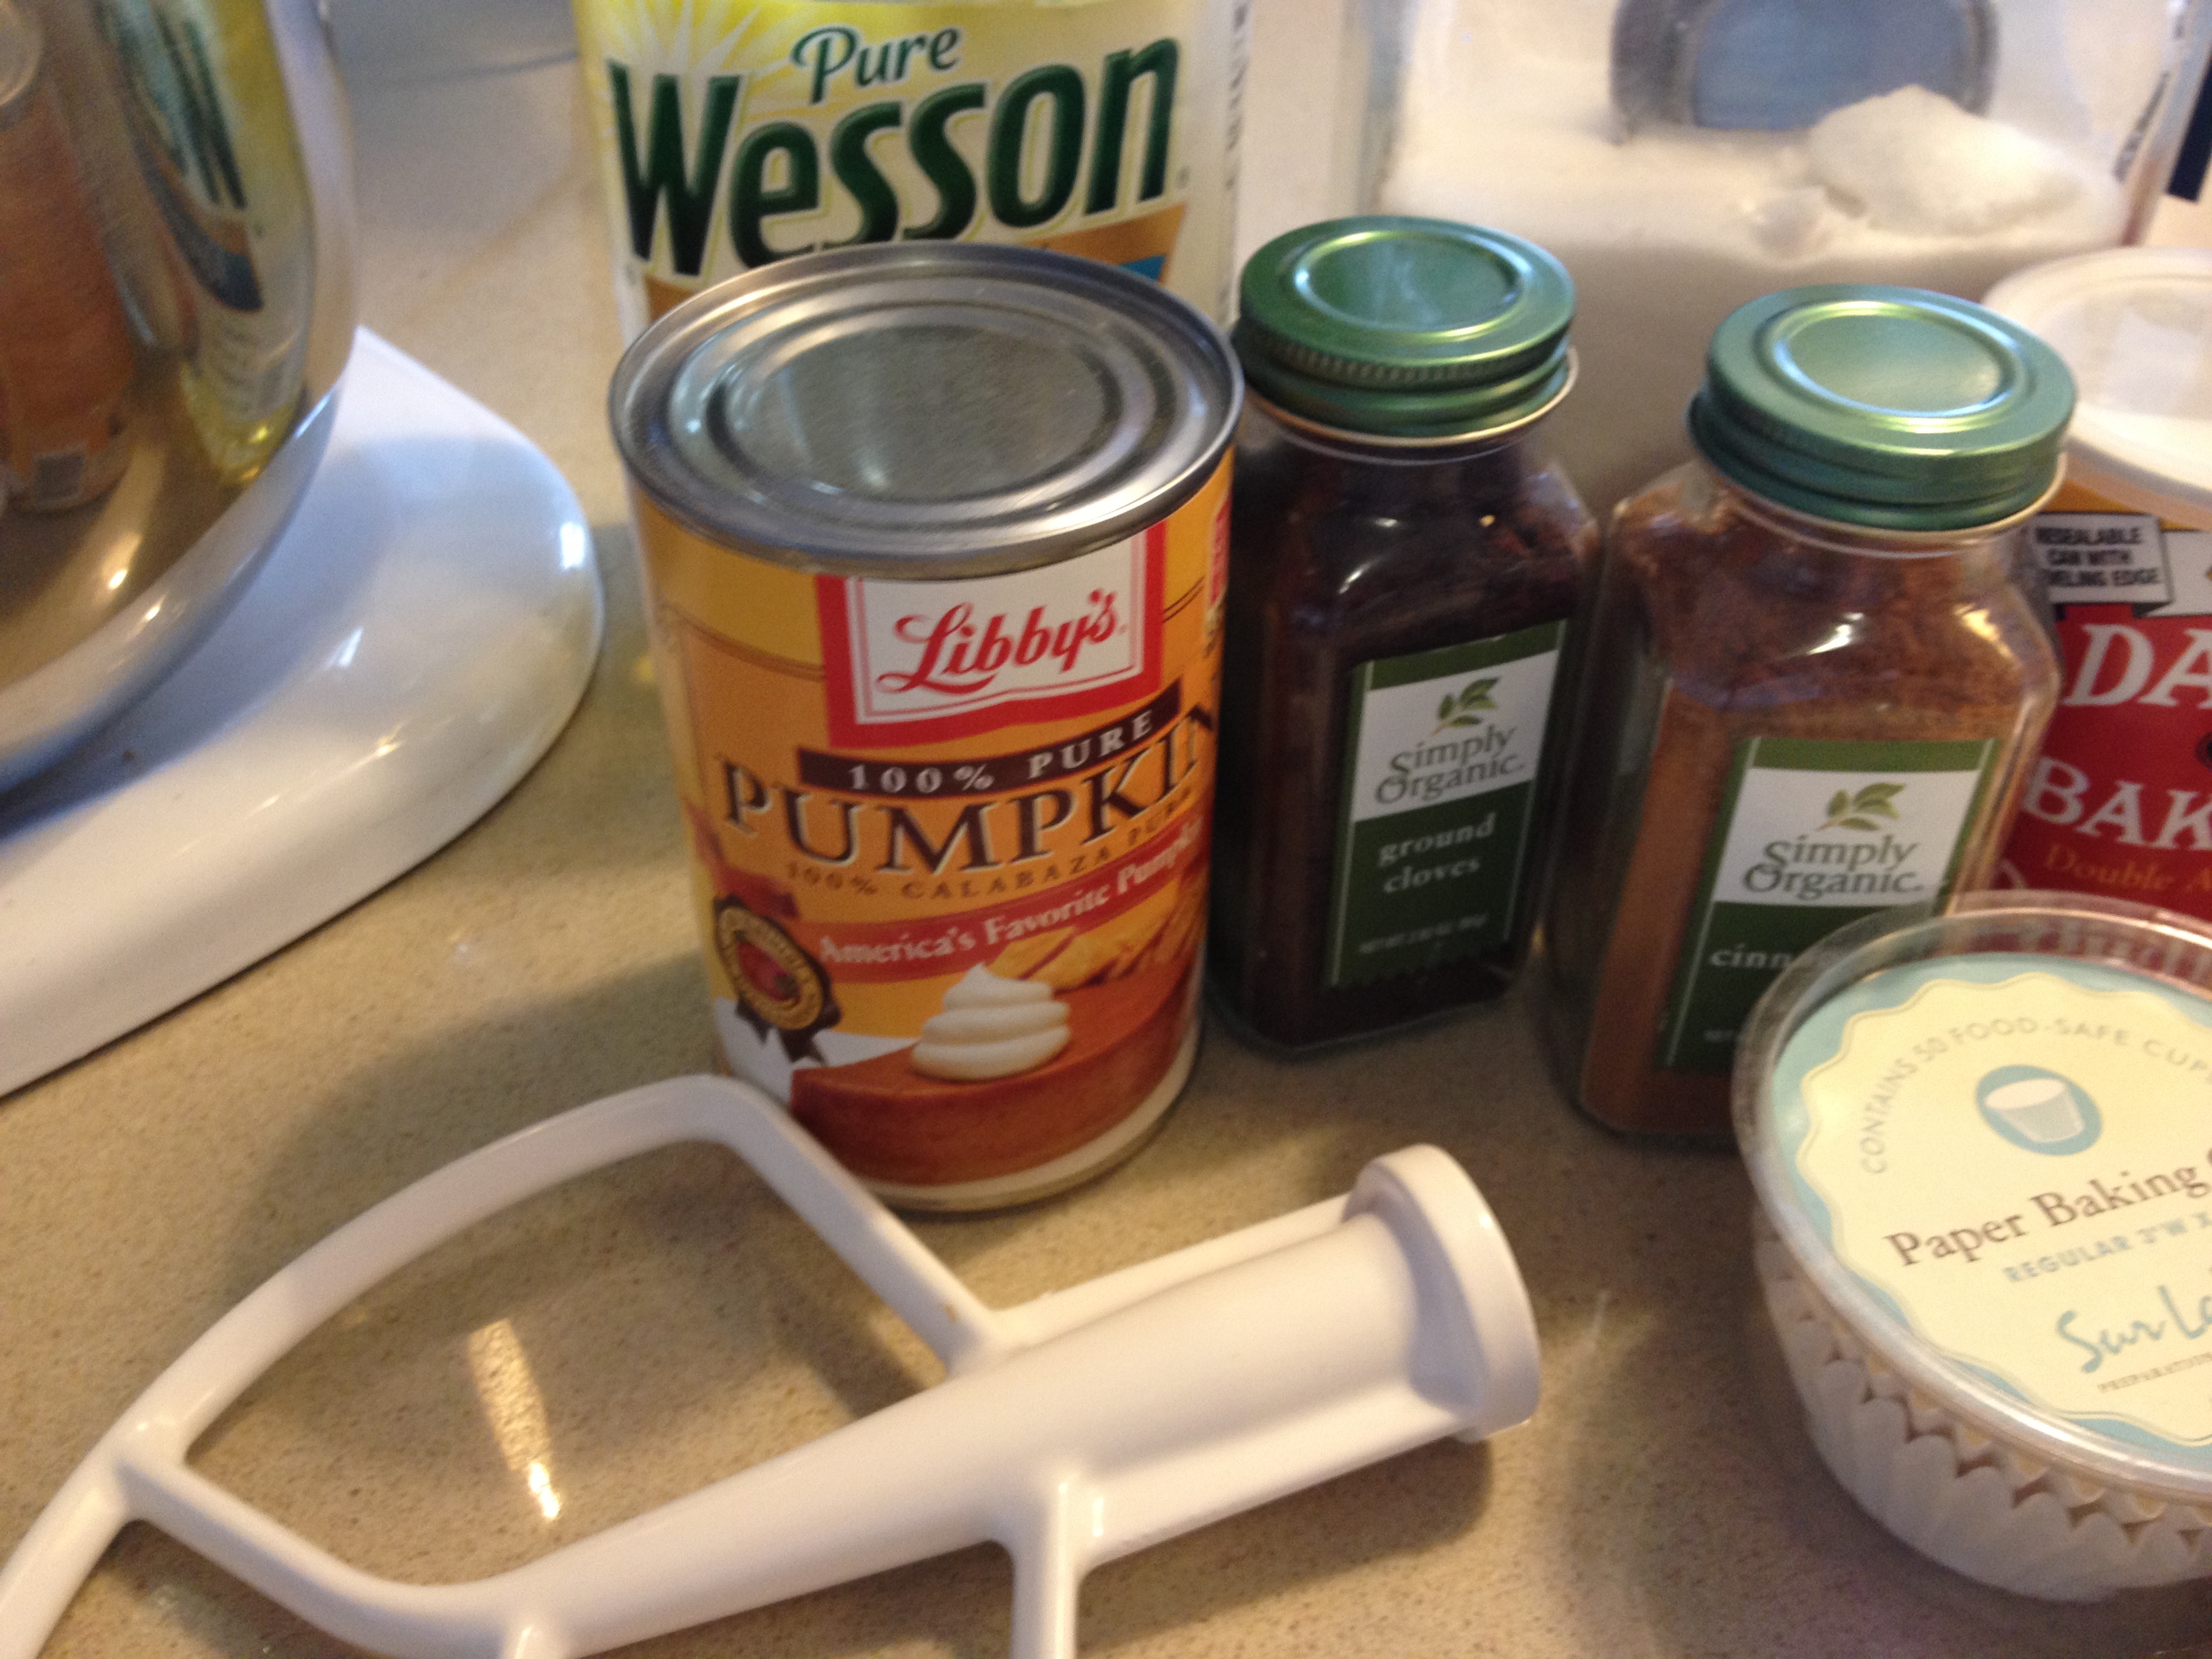
1 can Pumpkin (not pumpkin pie filling) Pure Pumpkin
4 eggs ( room temperature please)
Cream Cheese Frosting:
2 cups of confectioner’s sugar
1/3 cup softened butter ( unsalted)
1 tsp. vanilla extract
4 oz. softened cream cheese ( soften in microwave) not melted just softened or you can leave it out for a bit and it will soften up. I actually used light cream cheese not fat free please. I mean the amount of calories is staggering, but you’re only going to eat 1 cupcake right? how many calories can possibly be in that????? Don’t tell me , I don’t want to know.
1 Tbsp. Milk ( I used skim plus)
Directions:
Preheat the oven to 350 degrees. I mixed all dry ingredients together then mixed in eggs ( one at a time) and can of pumpkin and vegetable oil. Mix till combined, don’t overmix. No need to sift, just put dry ingredients in a bowl first and whisk together with a whisk , get some air in there.
Pour into a greased muffin pan about 3/4 full. I always use little paper liners and bake at 35o degrees for 20 – 30 minutes . Be careful not to over bake so the cake stays moist. I baked for 26 minutes. I started checking on them after 20 minutes.
Allow cupcakes to cool completely before frosting. I made my frosting in my electric mixer while cupcakes were cooling.
Frost Cupcakes / Cake and if you’d like decorate with some of those little Halloween Candies like candy corn or those little pumpkin shaped candies sold this time of year. Enjoy!
*should make about 16 cupcakes , I made 12 and a mini loaf.
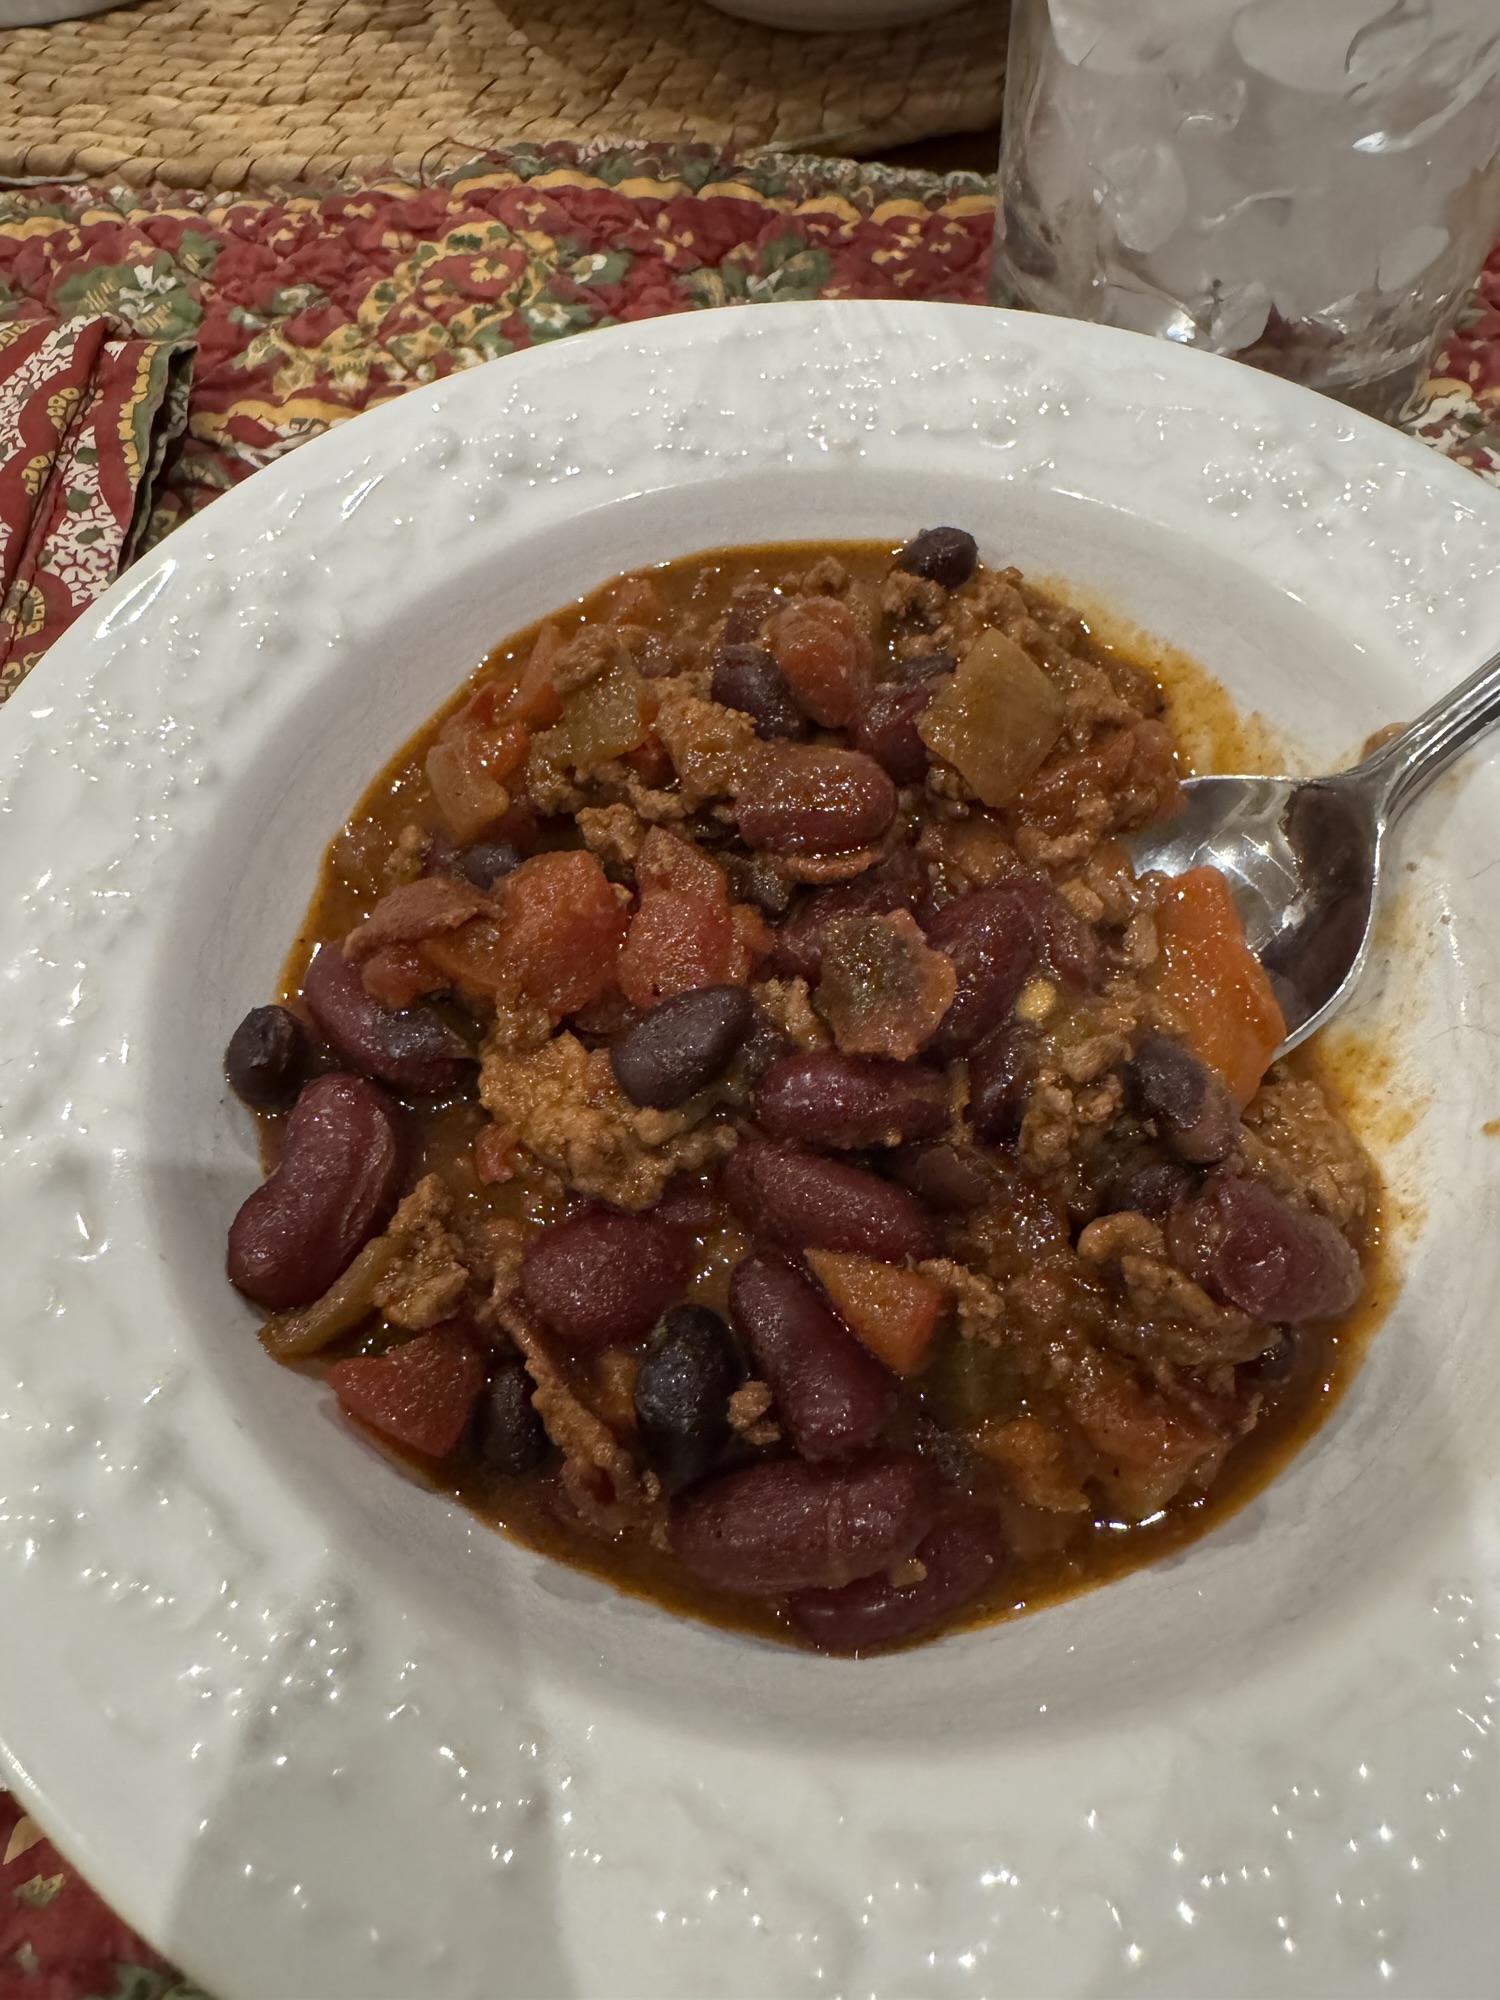
A friend gave me this recipe and it is supposedly an award winning recipe and having made it I can attest to the fact that it is pretty amazing. The secret ingredient is bacon so if you’re not on board with this skip this recipe and head for my other chili recipes. I wouldn’t leave it out. I mean you can if you want but it really changes the flavors . It’s made with ground beef and I’d stick with that for this one as well my Simple Red Chili recipe will work with turkey or beef.
There are also a lot of ingredients but I really really think it’s well worth the effort. I had 90% of the ingredients in the house so it was just a few things I needed. For toppings I went with fresh jalapeño, grated cheddar cheese, sour cream , guacamole and corn chips. You can do whatever toppings you prefer.
The beauty of the recipe is it really only needs to cook for 30 minutes but I did let it simmer for an hour.
It will freeze beautifully .
This recipe will probably feed 5-6 , you can add rice if you’d like.
Original recipe from Samantha Merritt– sugarspun_sam on Instagram
Ingredients:
5 strips uncooked bacon , chopped into small pieces
1 cup yellow onion diced
1 red pepper , diced ( app. 1 cup)
3 cloves of garlic, minced
1 lb. ground beef — any kind you like
1 Tablespoon brown sugar
1 Tablespoon chili powder
1 Tablespoon ancho chili powder
1 1/2 teaspoons smoked paprika
1 teaspoon cumin
1 teaspoon onion powder
3/4 teaspoons ground black pepper
1/2 teaspoon salt
1/8 teaspoon cayenne powder– this will keep it mild if you like more heat increase at your own risk
1 1/4 cup beef broth
1 15 oz. can dark red kidney beans, lightly rinsed and drained
1 15 oz. can black beans, lightly rinsed and drained
14.5 oz can diced fire roasted tomatoes undrained — if you can’t find use tomatoes and chilis (mild) made by Rotel or something similar ( diced tomatoes ) usually in the Mexican Food aisle
1 7 oz. can fire roasted green chilis — again if you can’t find use green chilis ( mild) also found in the Mexican Food aisle
1/4 cup tomato paste
1 Tablespoon Worcestershire Sauce
*plus toppings– sour cream, shredded cheddar cheese, guacamole, avocado, chopped red onions, fresh jalapeño, and corn chips are some you may like
Directions:
I cooked in my large Le Creuset pot , you’ll need a heavy bottomed pan which is deep enough to cook everything in. I used 1 pot ( dutch oven) for all -given all the ingredients it was nice to just cook in 1 pot
Place chopped ( uncooked) bacon in your large pot or Dutch Oven and cook over medium heat until crisp and cooked through. Remove bacon to a paper towel lined plate and drain all but 1 1/2 Tablespoons of grease rendered from the bacon.
Add onion and red pepper and cook until softened , about 5 minutes I like my onion to be translucent
Add minced garlic and cook another minute or so
Add beef, breaking apart with a spatula or wooden spoon as you cook. Once meat is partially browned, add brown sugar, and all the spices and stir well
Add all remaining ingredients, broth, beans, tomatoes, tomato paste, chilis, and Worcestershire sauce and of course your cooked bacon and stir well.
Bring to a boil and cook for about 2 minutes and stir frequently.
Reduce heat and simmer, uncovered, stirring occasionally. Simmer for at least 30 minutes to allow flavors to develop — I allowed it to simmer on a low flame for an hour. I just always do this with sauce and chili.
Serve with preferred toppings and if you’d like to stretch it you can add rice.
Freeze unused portion for up to 3 months– should be perfect you may need some additional beef broth after the freezing process.
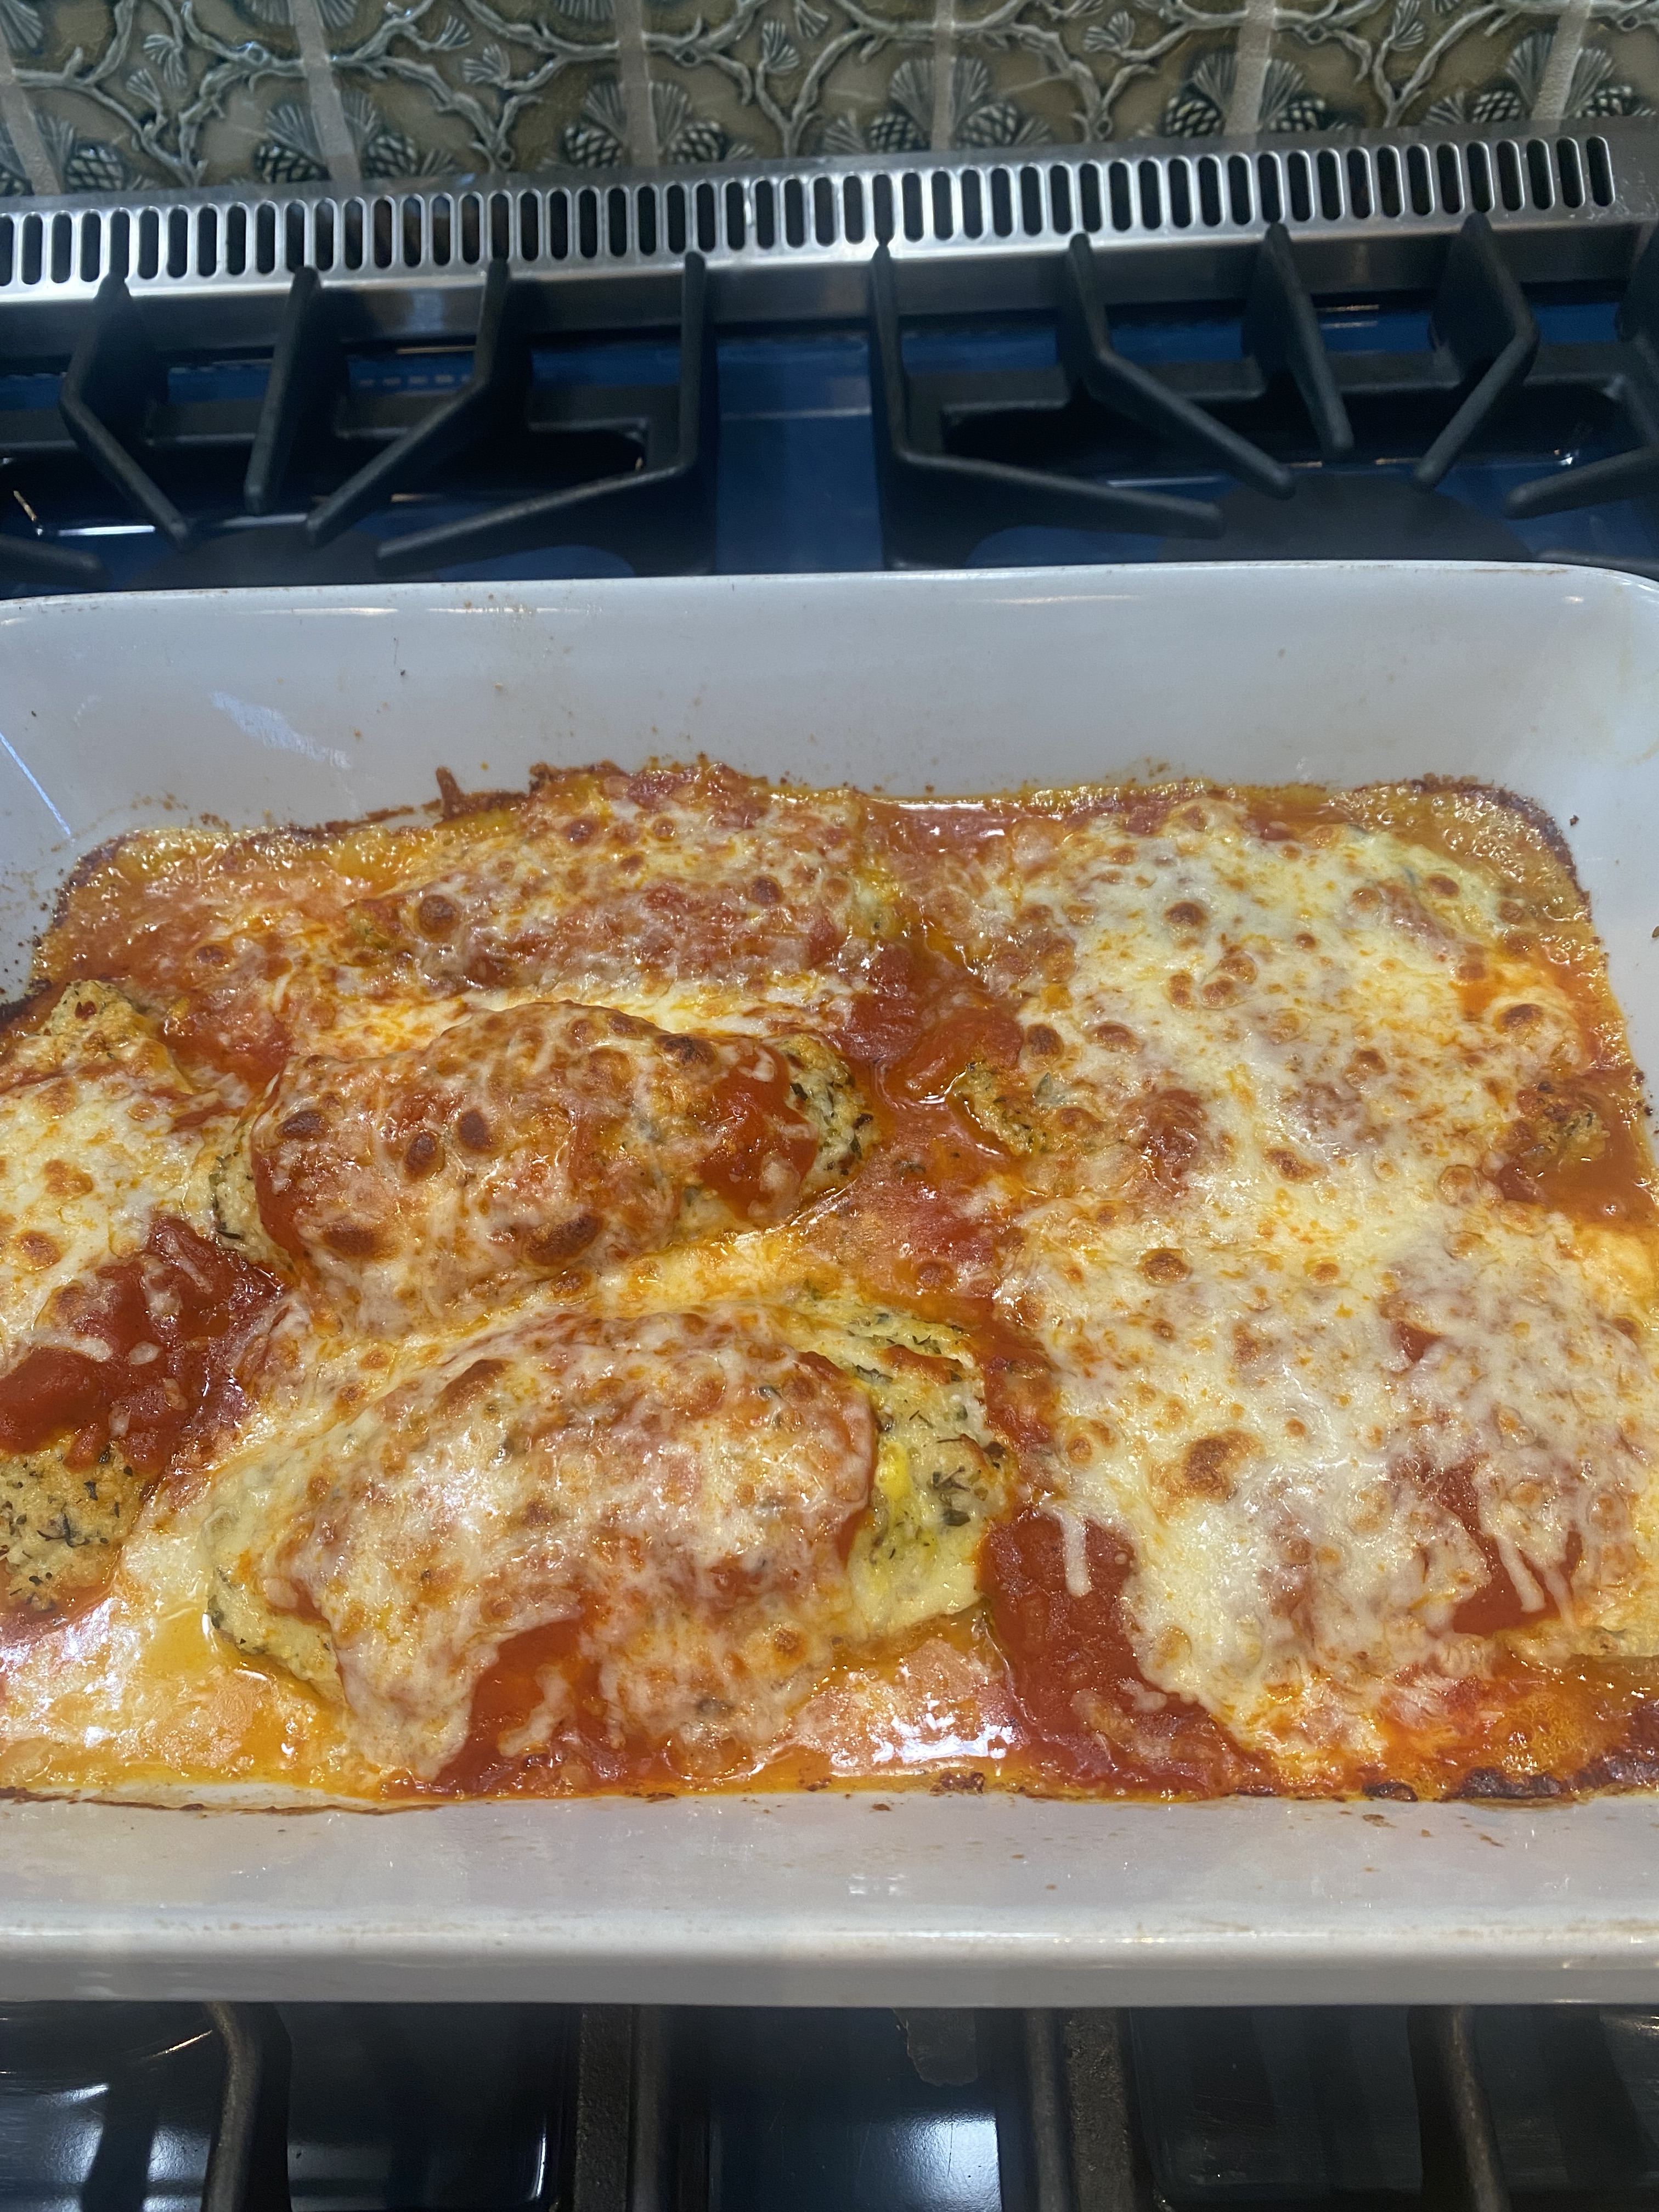
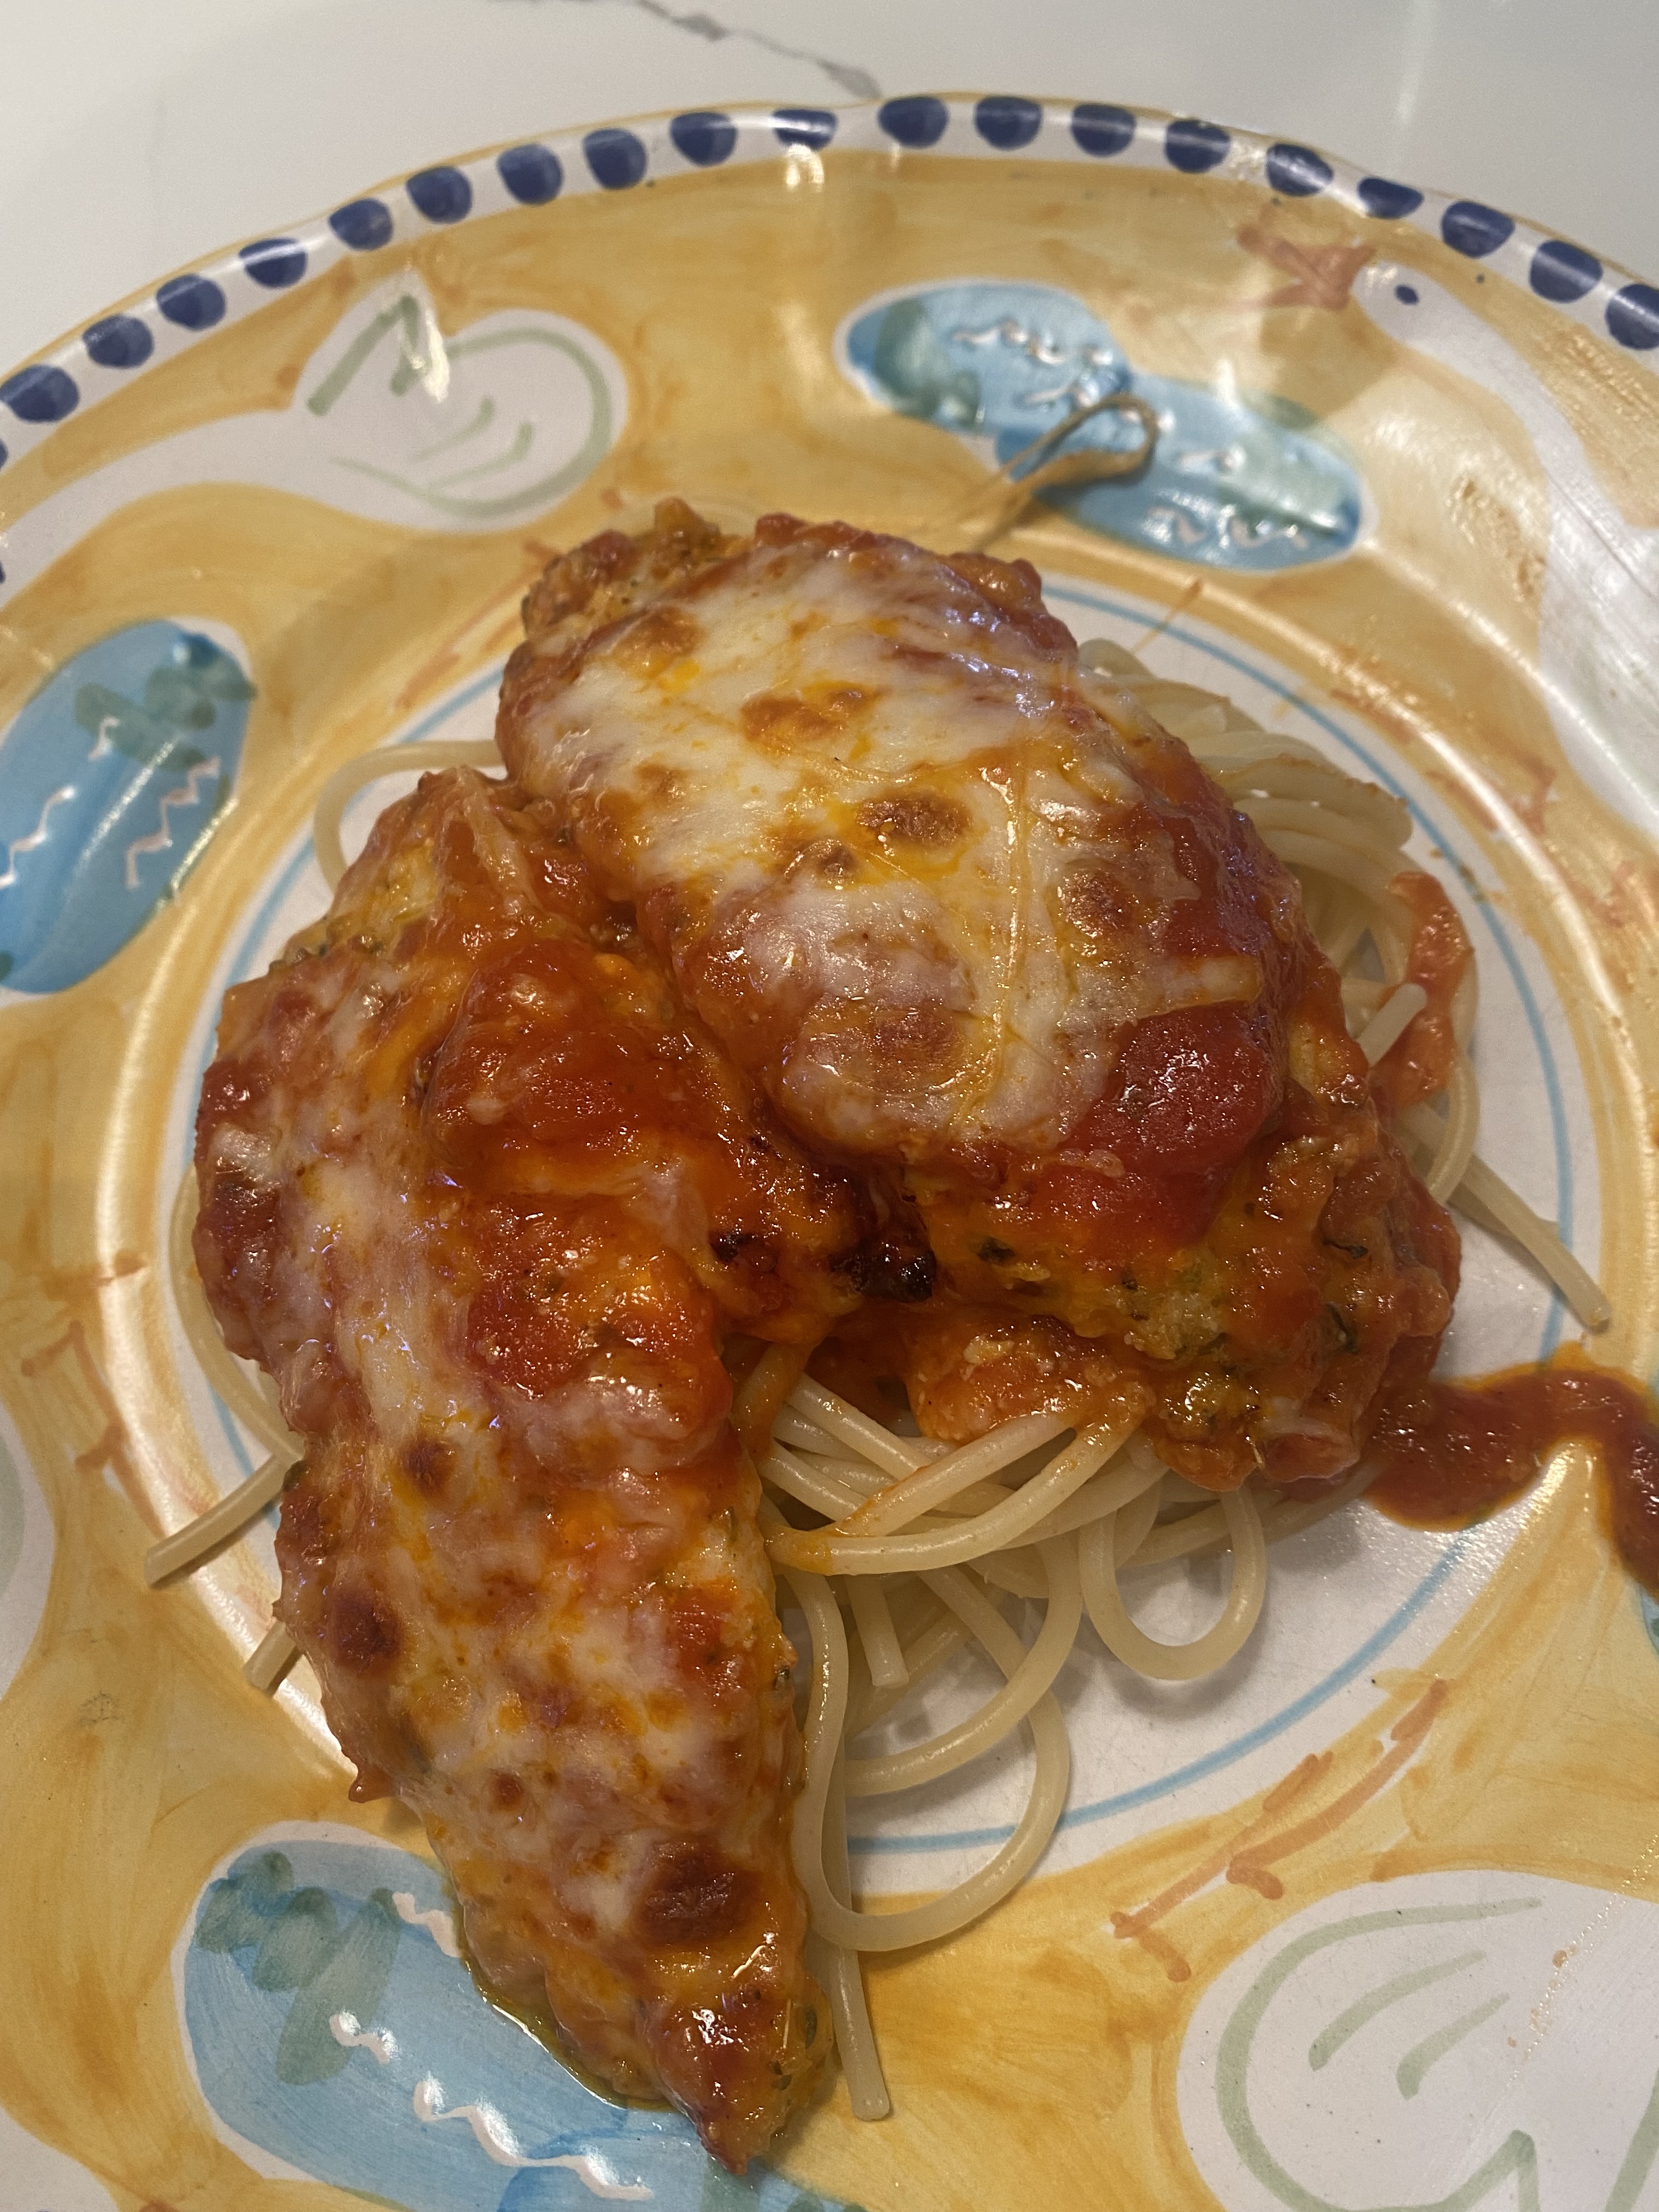
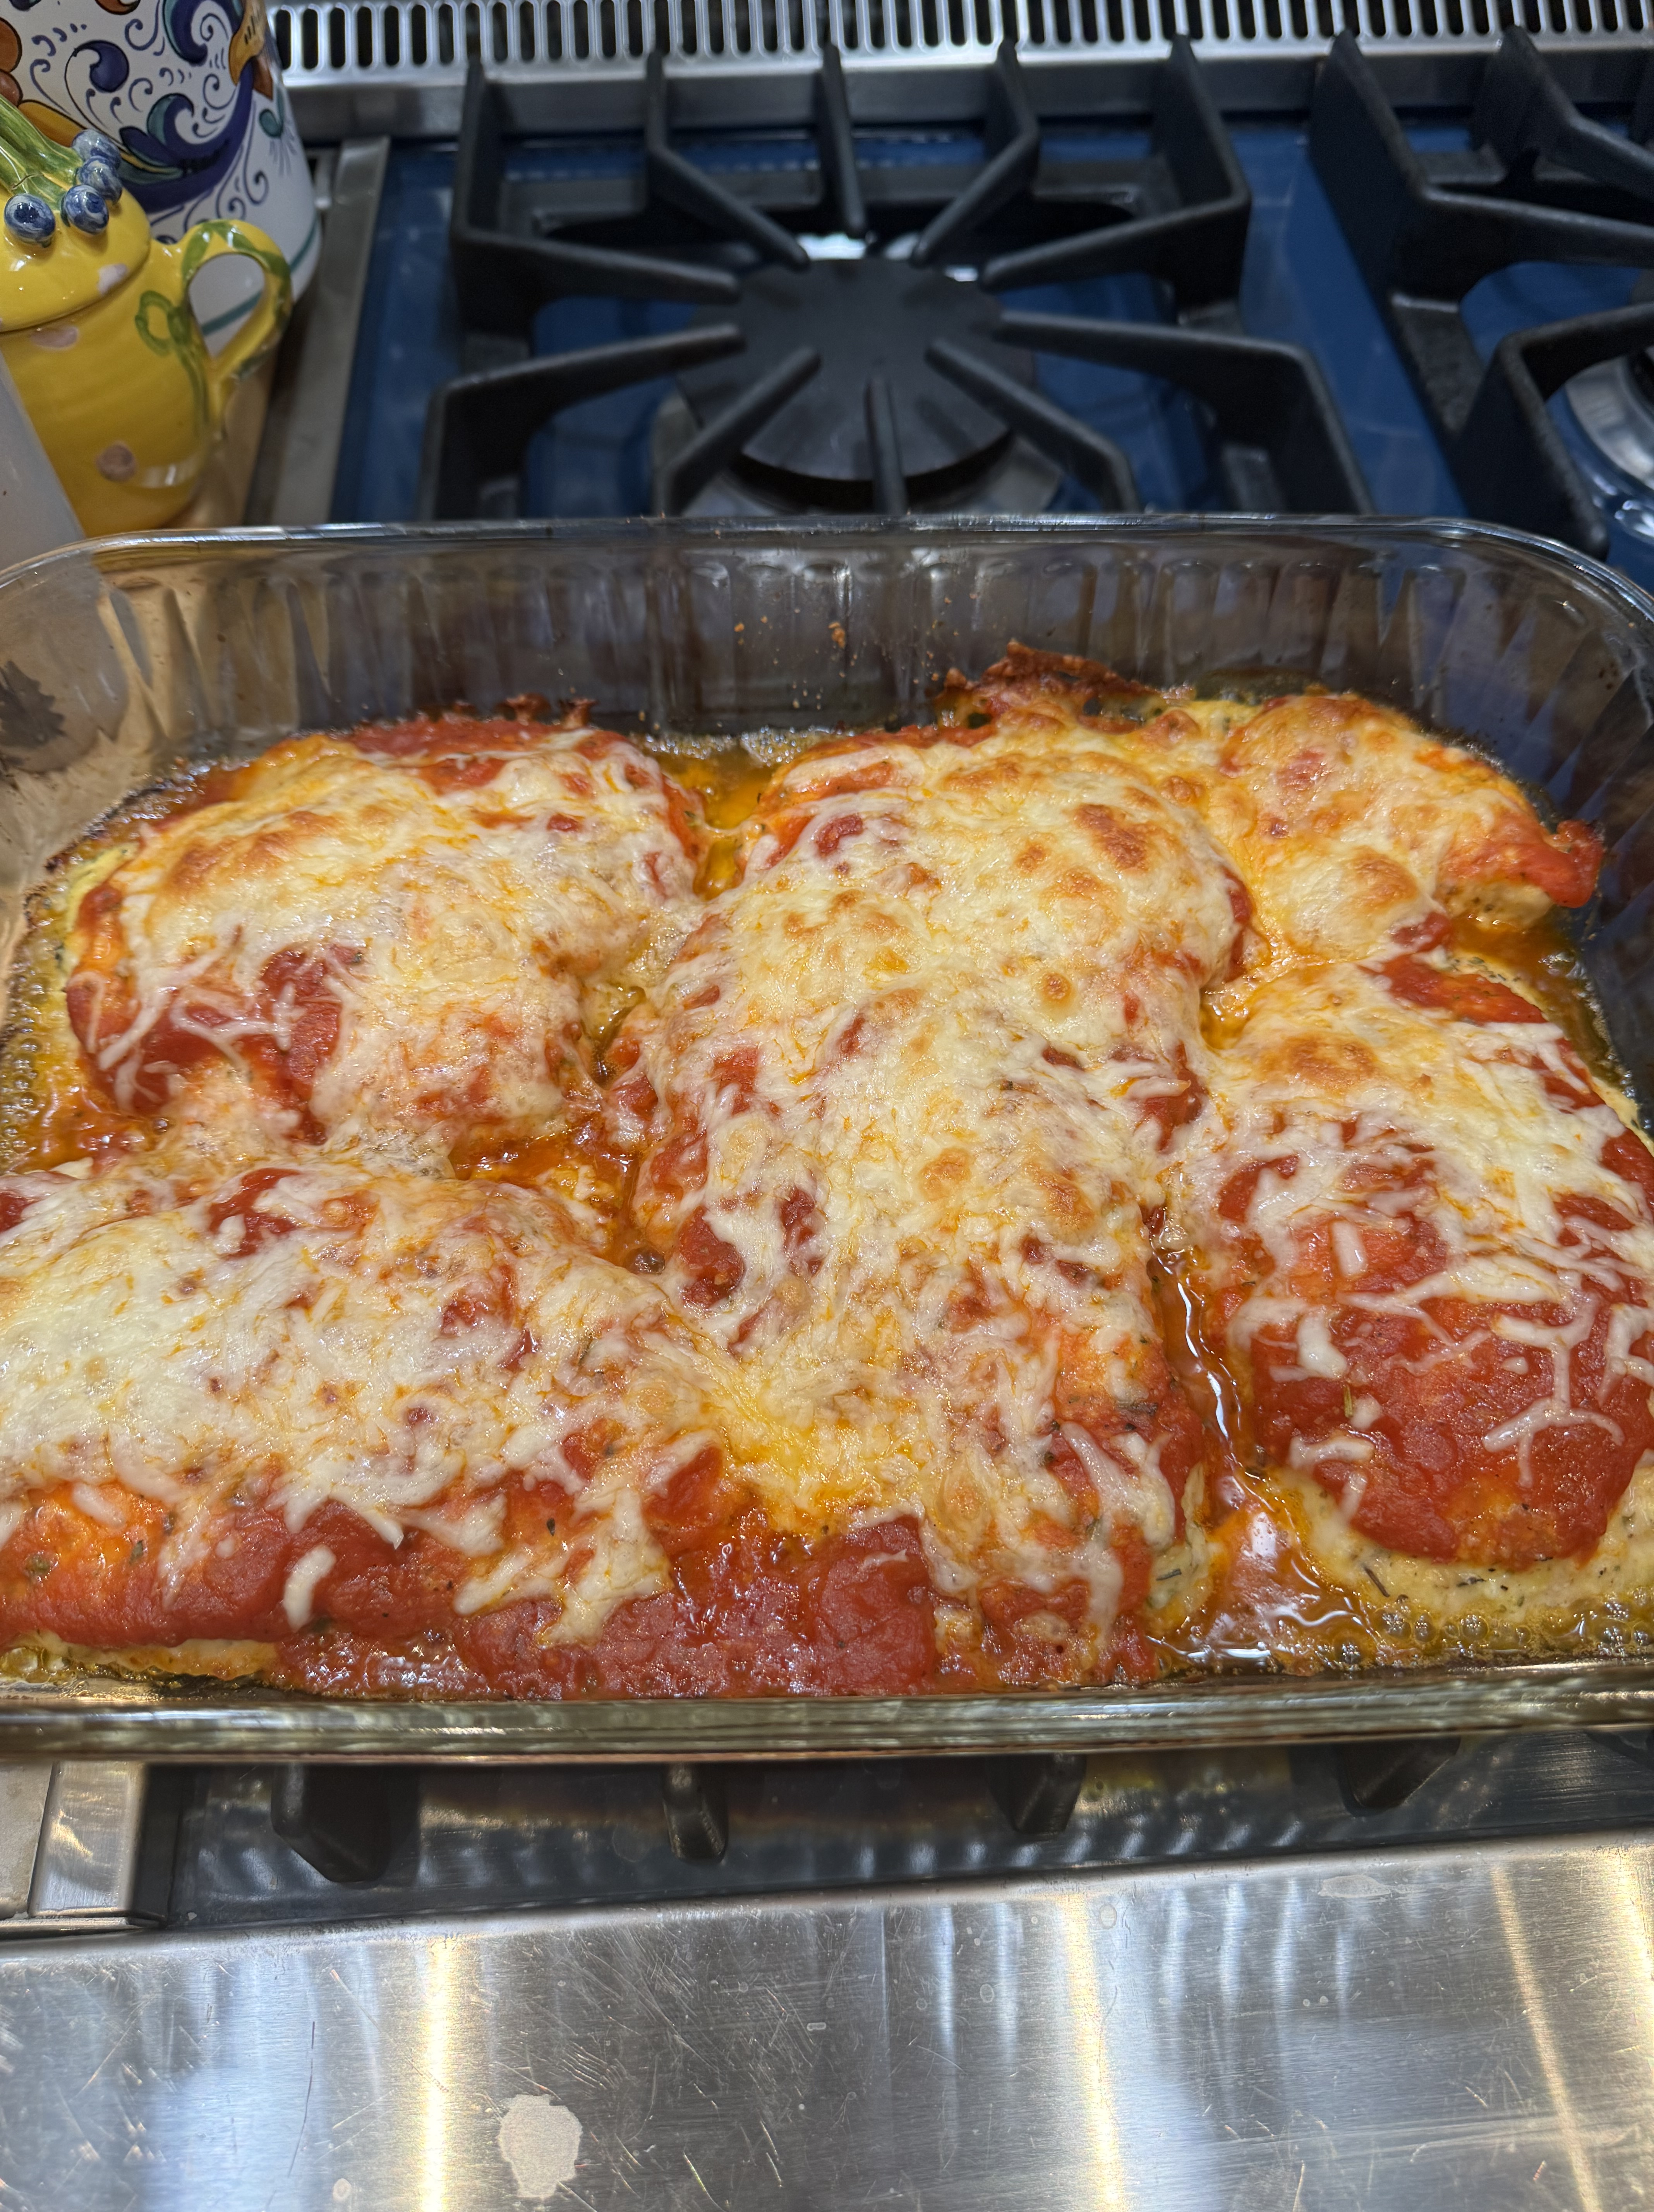
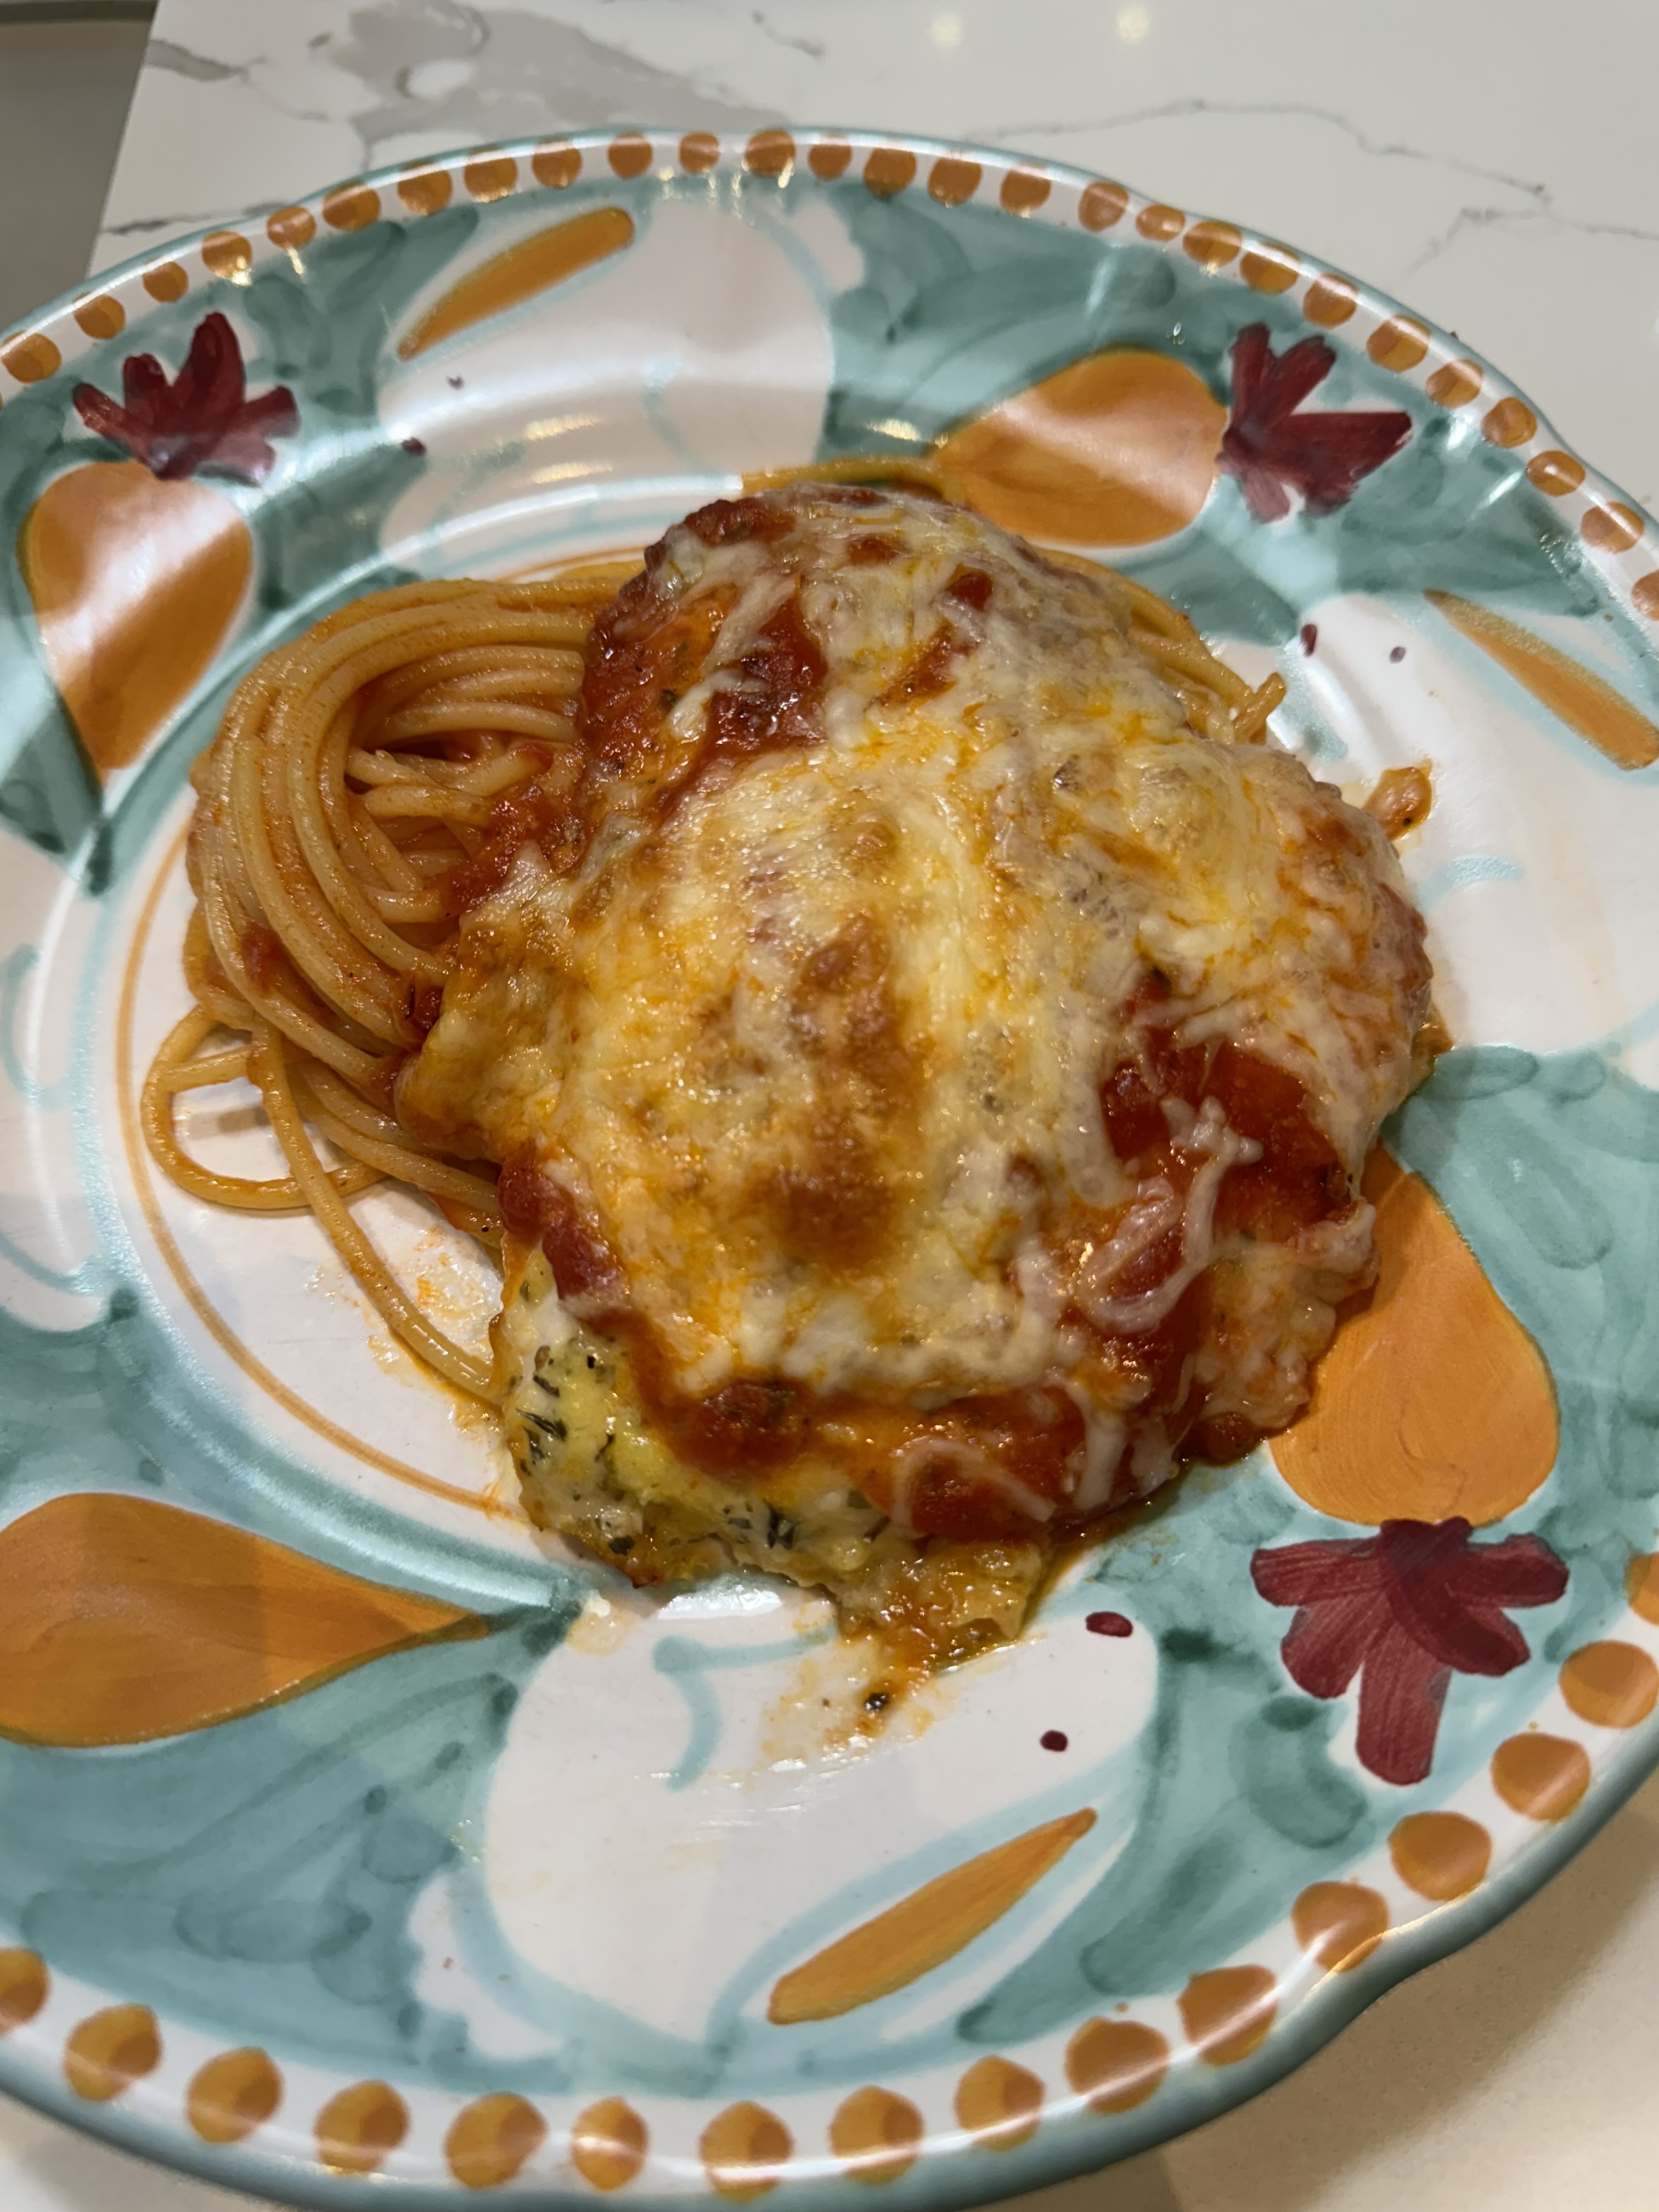
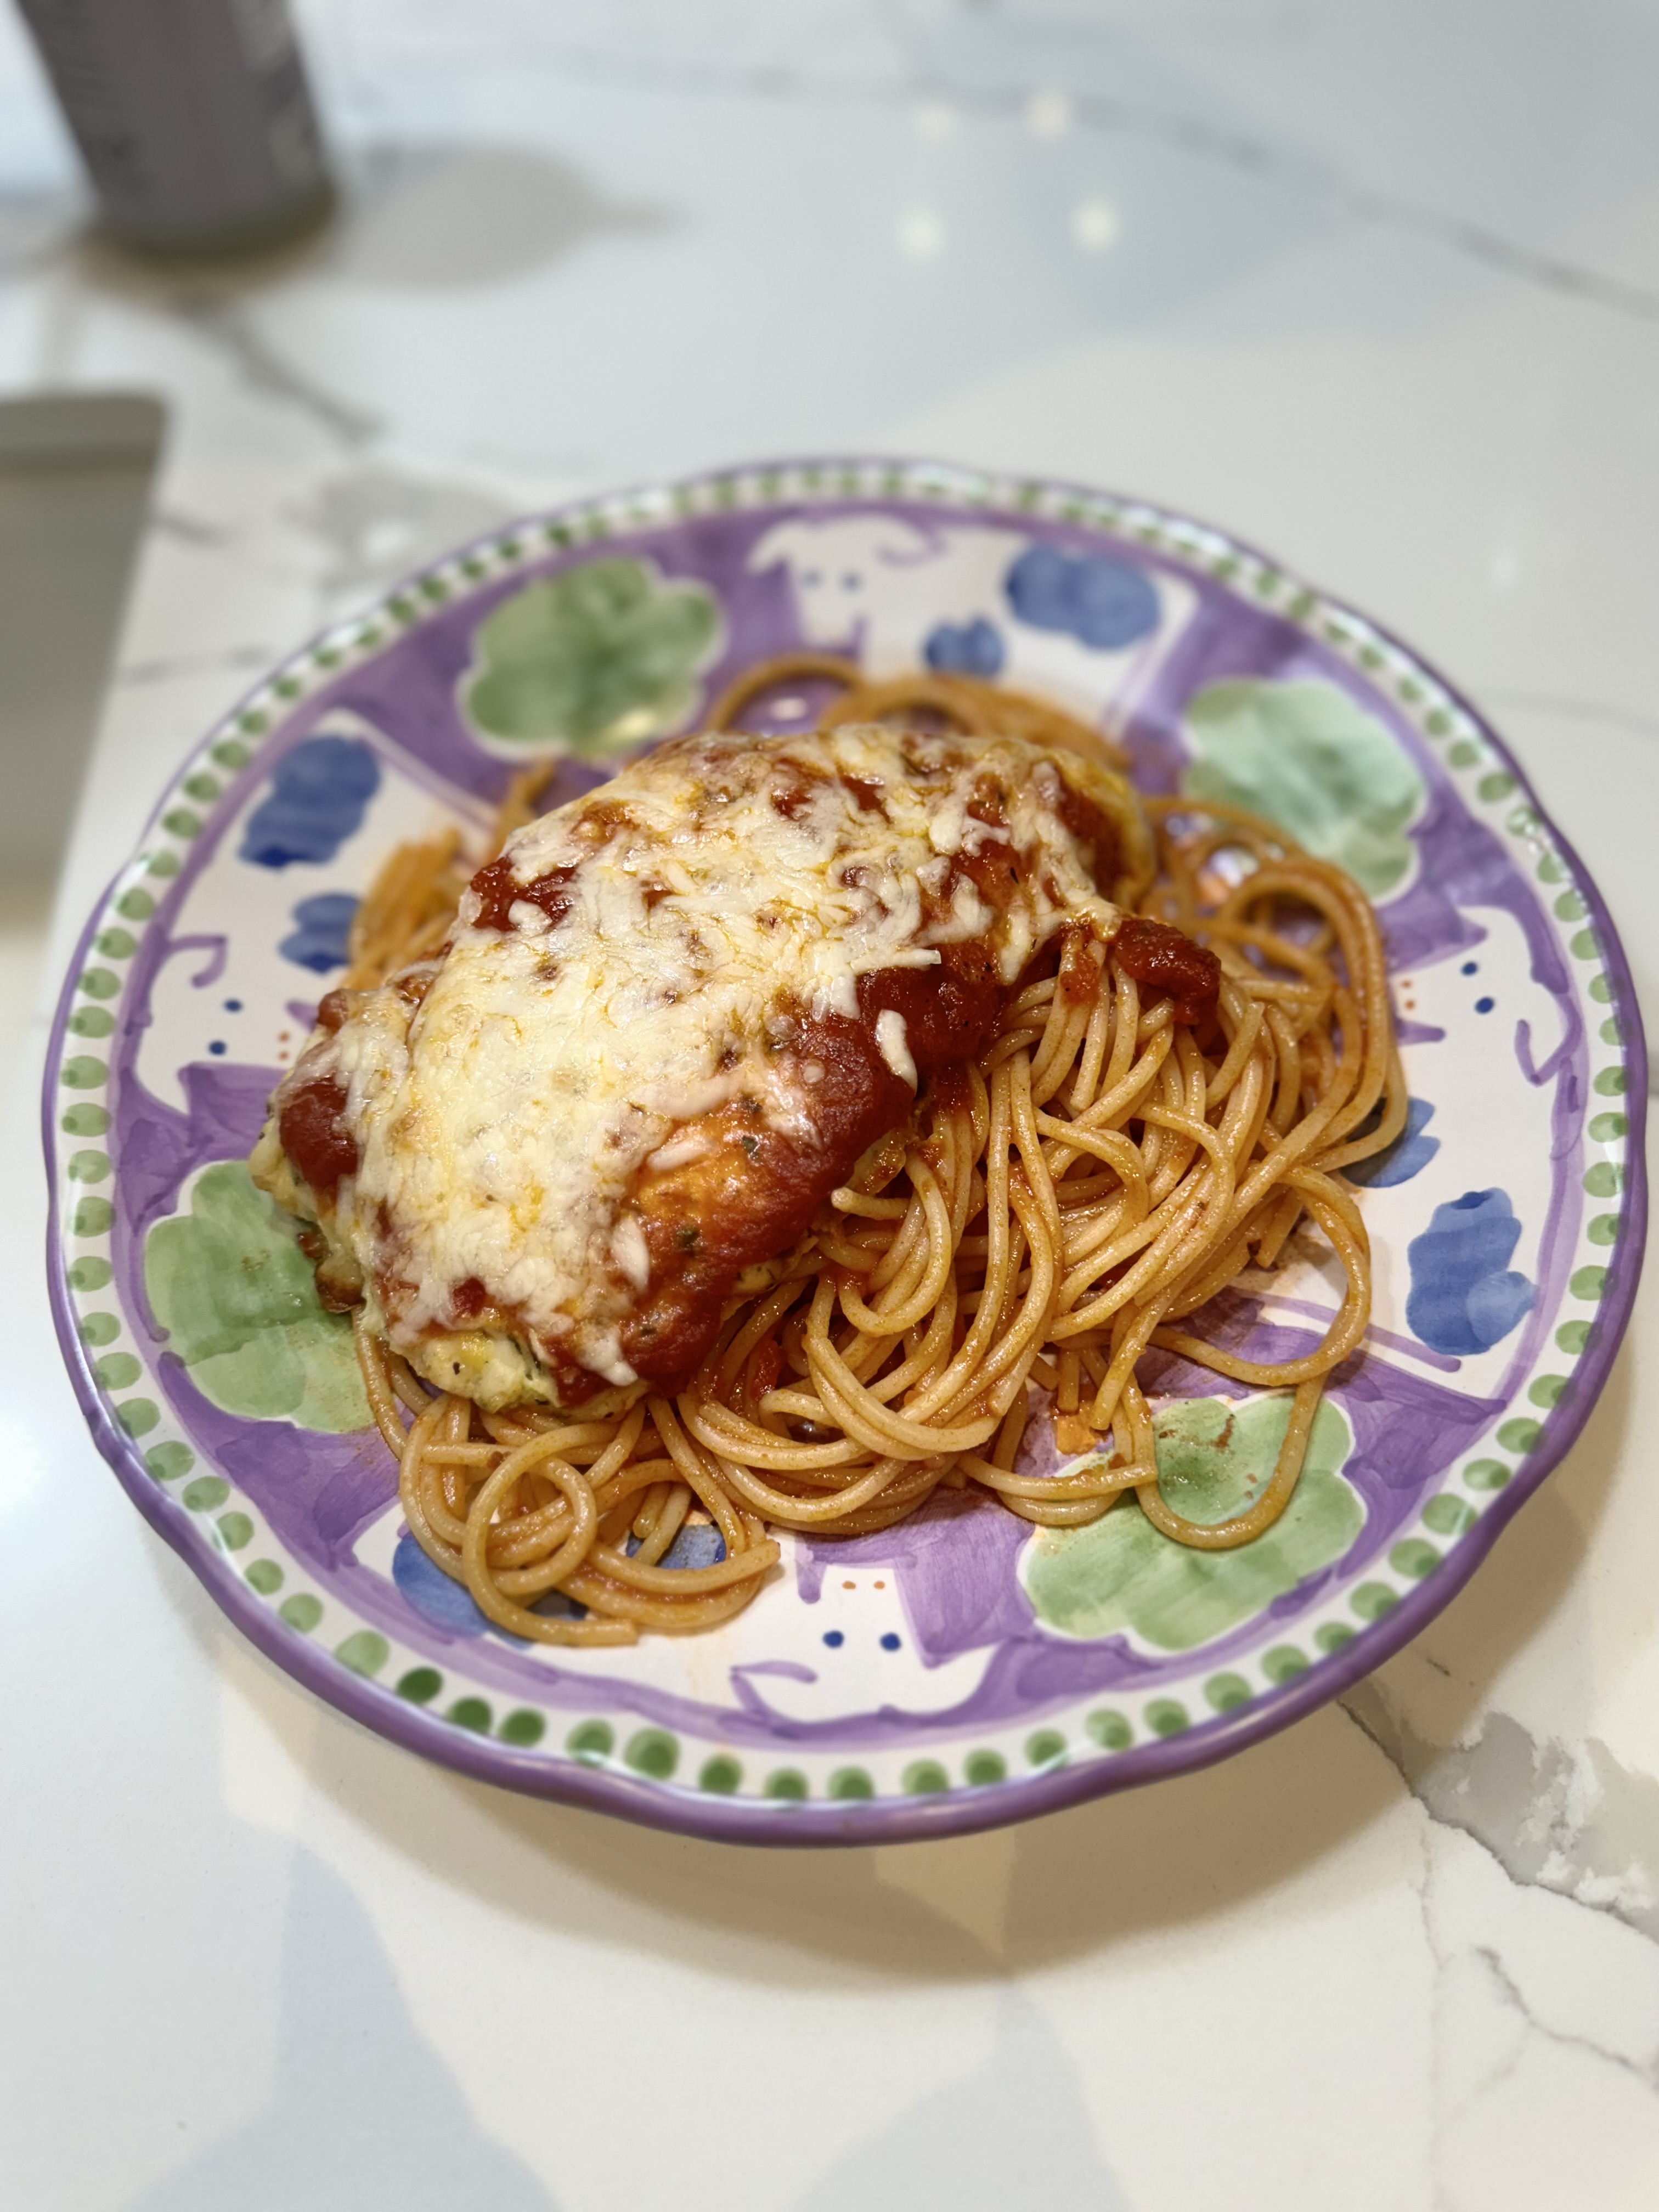
So delicious and so perfect. I used thin chicken breasts to start , if you’re using thicker ones you’ll have to monitor the timing of them a bit more and you can just use a meat thermometer to do so. This really couldn’t be easier and it was super tasty and is a cheese lovers delight. It’s lightened up from traditional breaded and fried chicken parm. *if you’re chicken breasts are too thick you can pound them with a meat mallet to the desired thickness — this is a very useful tool. Just place chicken cutlet between 2 pieces of parchment paper or plastic wrap and pound to desired thickness.
If you’re using 2 lbs I double ingredients
Prep and ingredients are super easy .
This recipe is for 4.
Ingredients:
1 1/2 – 2 pounds of thin chicken breasts — you can use thicker ones –read directions above for pounding chicken breasts
1 egg
3/4 cup grated Parmesan Cheese
1/2 tbsp. garlic powder
1/2 tbsp. onion powder
1 Tablespoon Italian Seasonings — It comes in one jar and is available in most spice sections in supermarkets —
pinch kosher salt
1/4 tbsp. freshly ground black pepper
and because we like a little extra kick I add a sprinkle of crushed red pepper flakes
3/4 -1 cup Jarred Marinara or if you have home made that’s good too . I prefer Raos Arabiata or Marinara for jarred sauce.
Shredded Mozzarella — probably 1/2 cup to 1 cup depending on how much cheese you like — I like a good sprinkle of cheese — see pics.
A little olive oil for drizzle in pan before cooking
Directions:
Pre heat oven to 400 degrees
I used a large baking dish and sprayed with cooking spray and drizzled a bit of olive oil to bottom of pan — just a little
Beat egg in a wide enough bowl for dipping chicken
In a second wide bowl combine the parm cheese and spices and mix
Dip each piece of chicken in the egg and then the cheese, coating both sides. Place in prepared baking dish.
Bake for 20 minutes — since cutlets are thin this should be fine because you’ll be cooking more with sauce and cheese. If thicker cutlets you may need a bit more time.
Top each piece with sauce and shredded mozzarella. ( you can spread a little sauce in between chicken as well . I served over spaghetti and needed a little more sauce so this was enough. If you want you can heat up extra sauce in a small saucepan for spaghetti. Bake for another 10-20 minutes till chicken is 160 degrees when checked with meat thermometer and cheese is melted and bubbly. I like my cheese just slightly browned so you can turn to broil for a minute or so depending on your broiler but be careful you don’t want to burn the whole thing.


 This has to be one of my all time favorite side dishes for Thanksgiving. It really would be great any time of year but for some reason it only gets made for Thanksgiving. It’s super easy and super delicious. My friend Audrey gave this recipe to me many years ago, and it has become a staple on our thanksgiving table ever since. It just wouldn’t be Thanksgiving without it. It is a favorite in our family. Can be doubled easily, just make sure your baking dish is large enough.