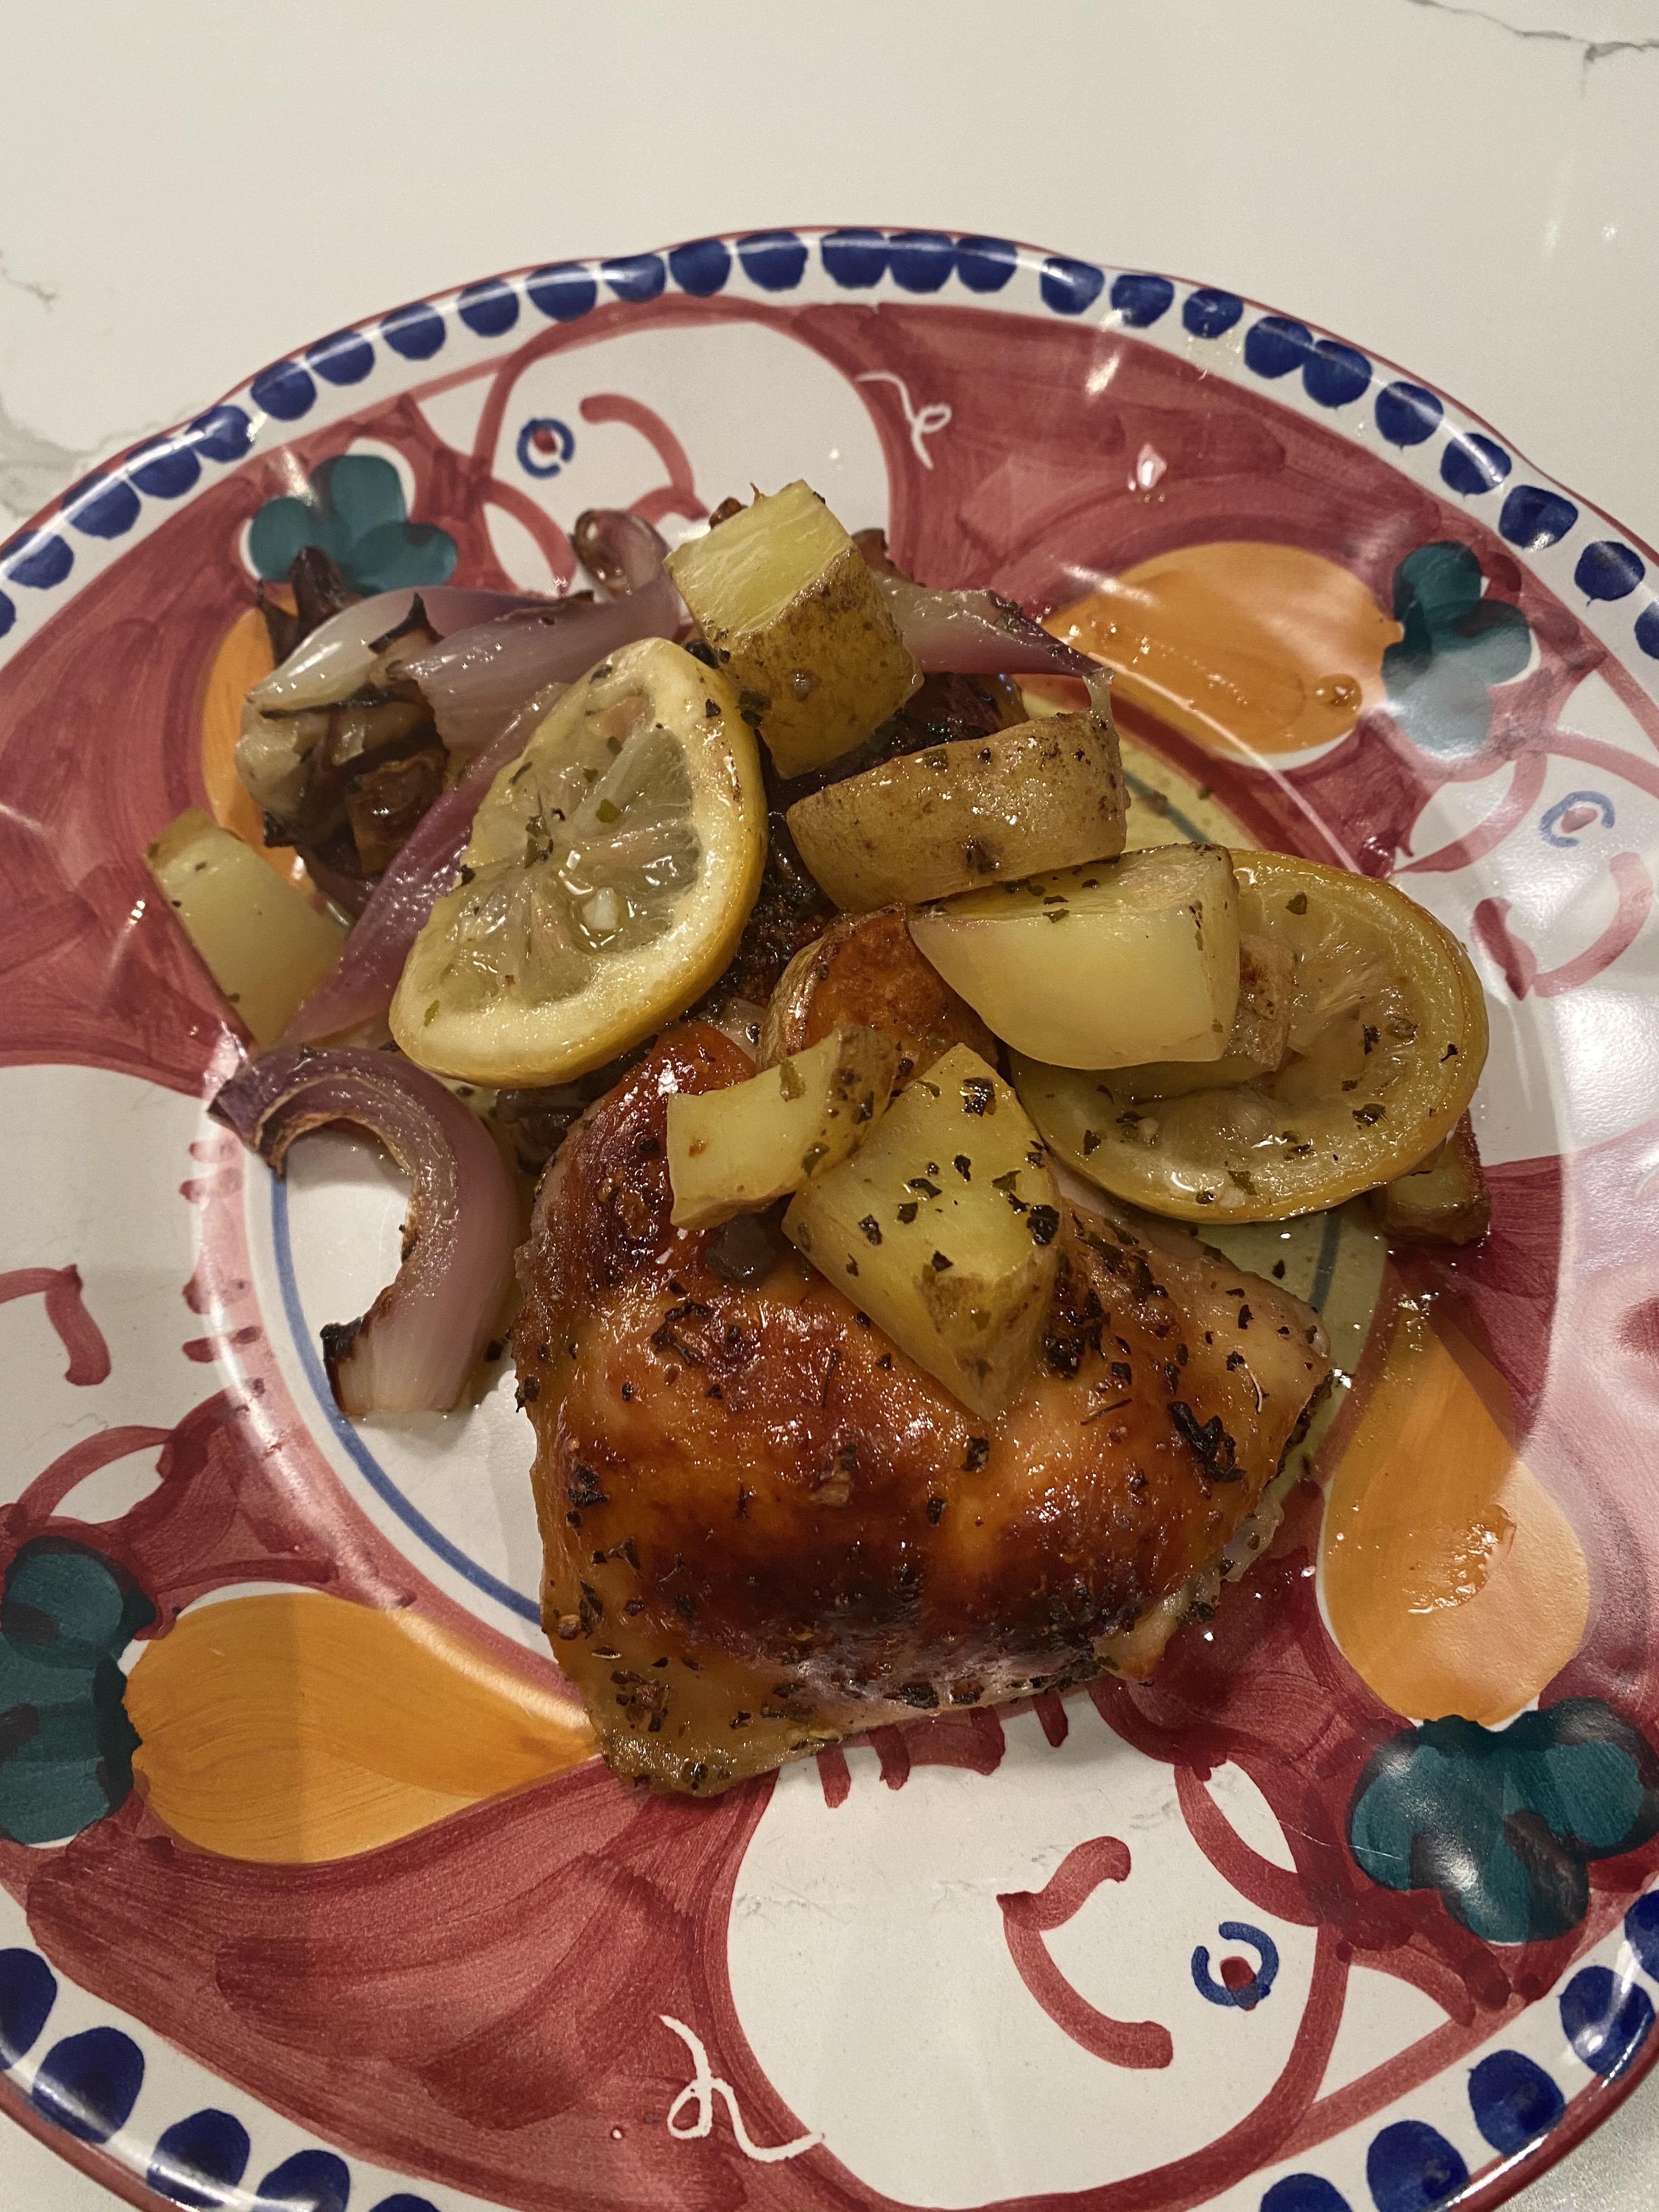
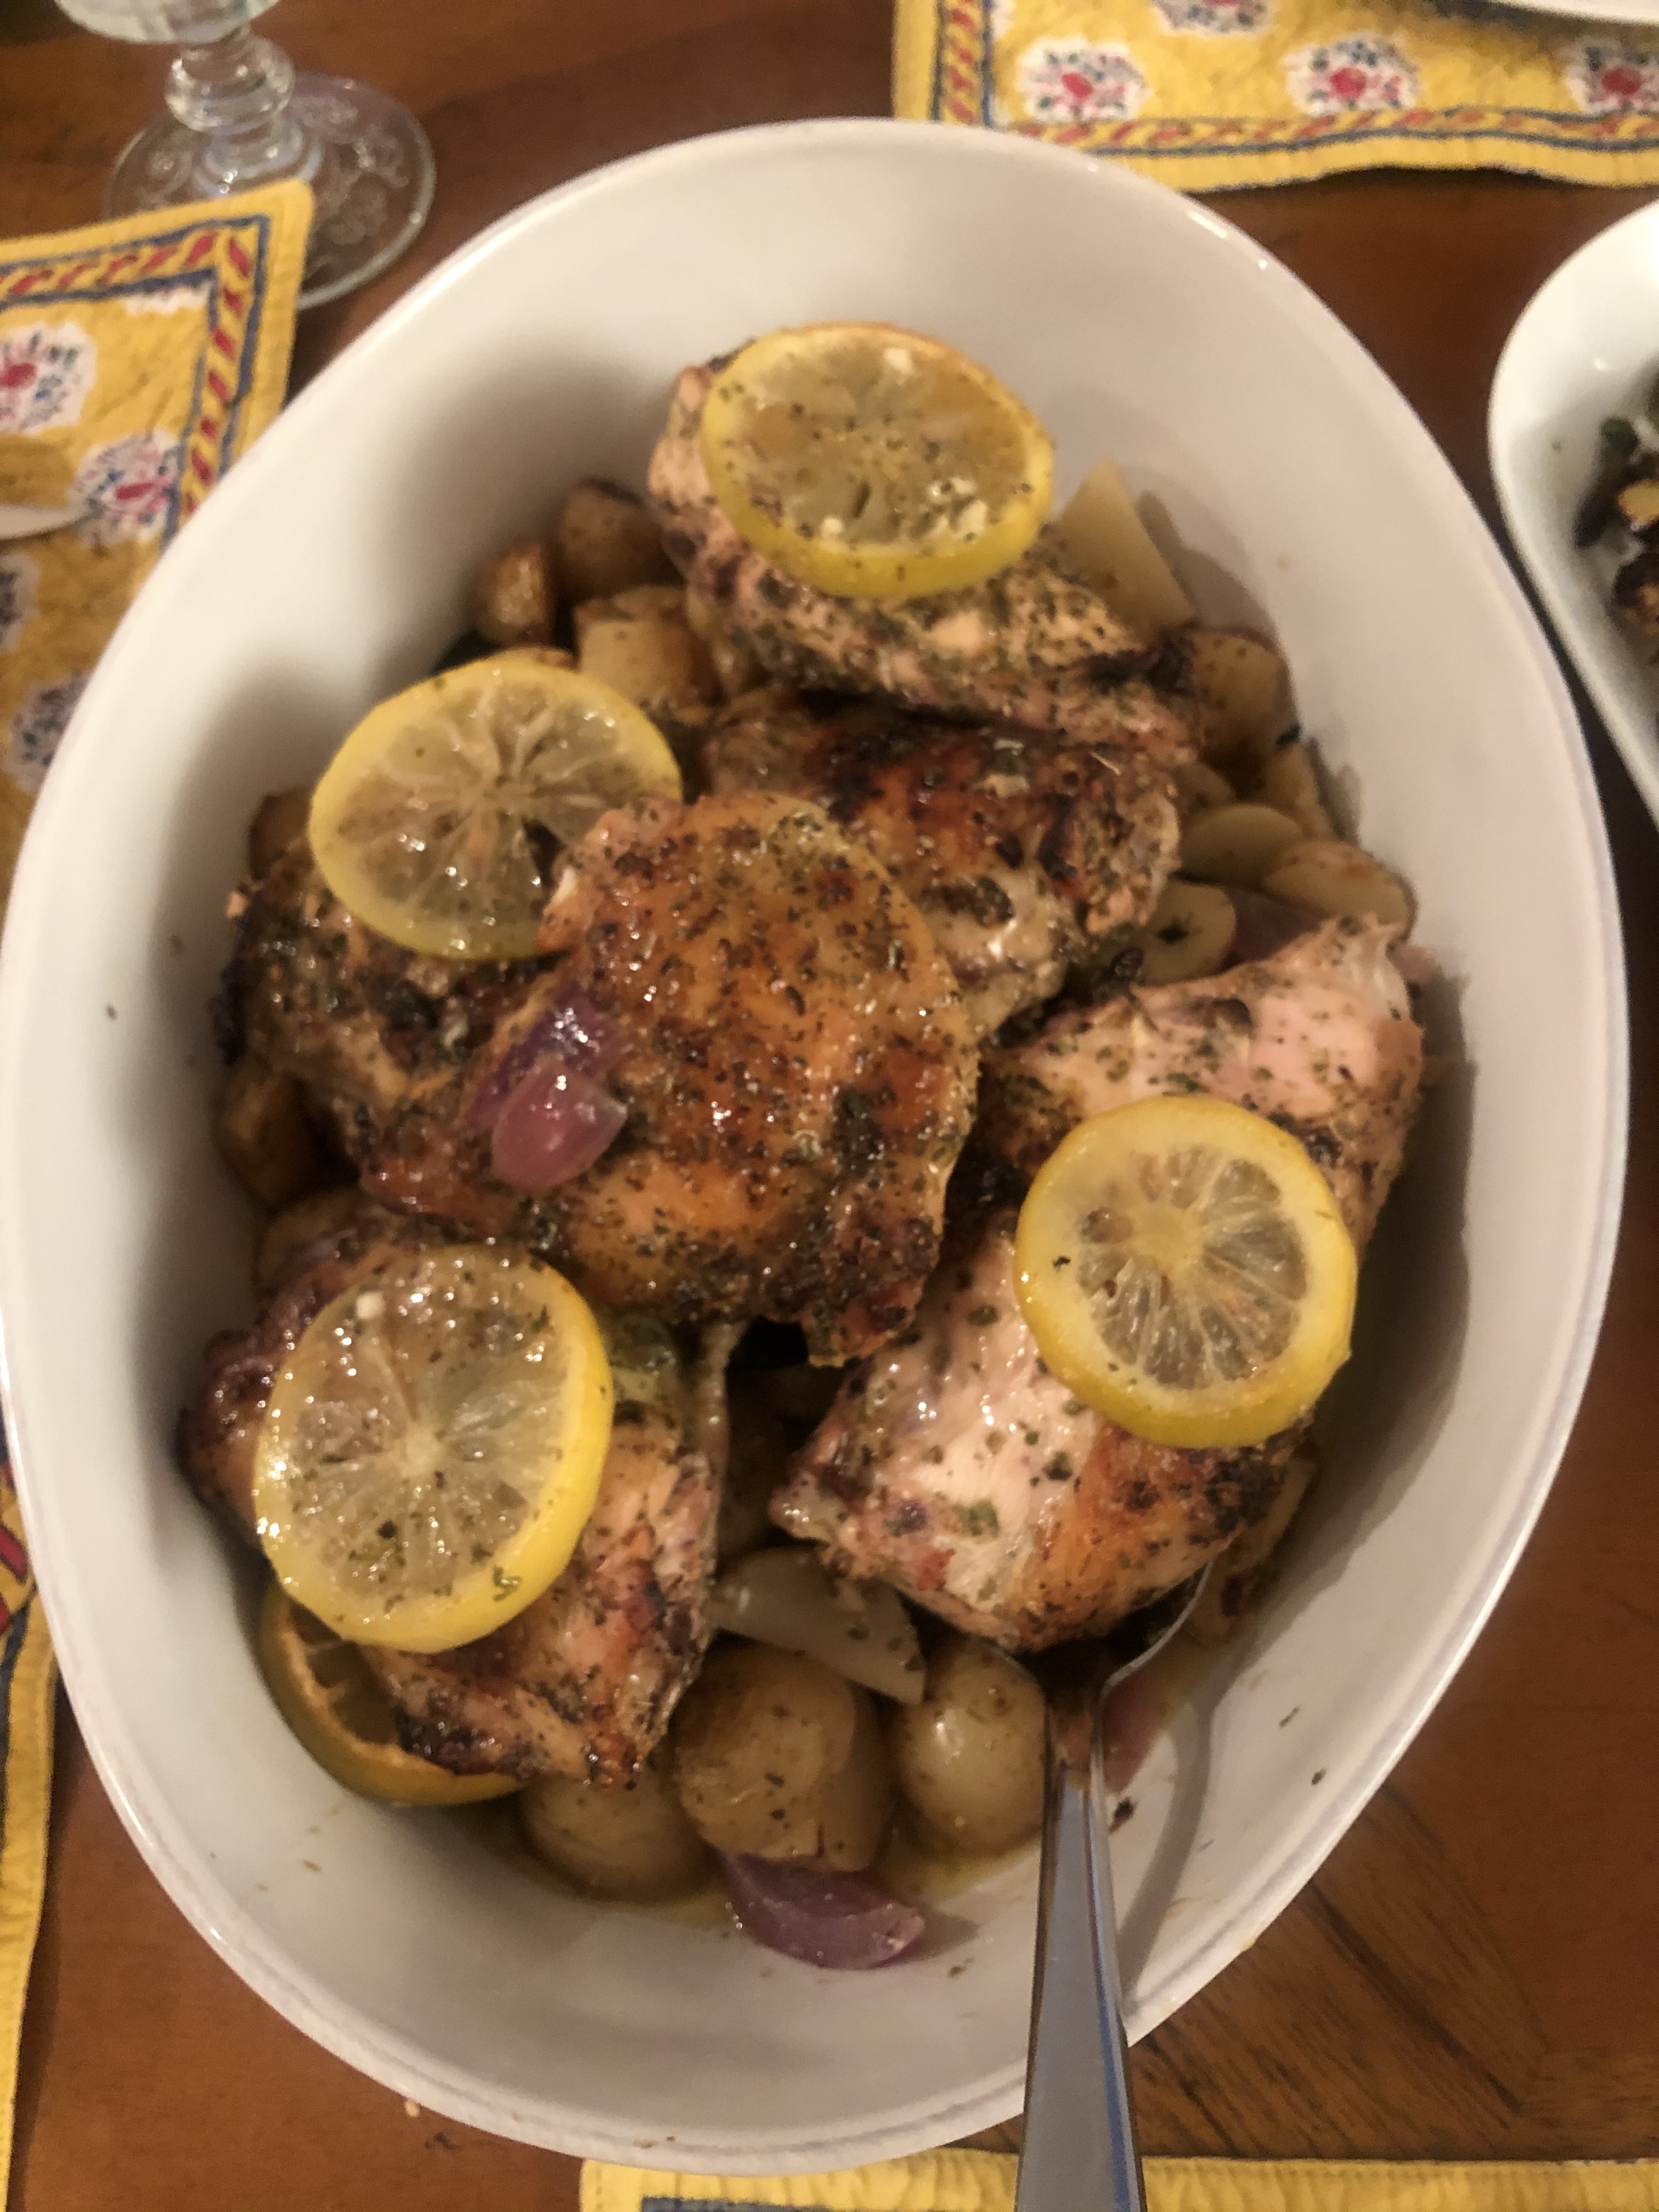
Author Archives: cookingwithcandi

Simple Cole Slaw

I love Cole Slaw and it is such a simple thing to make to add to any bbq or meal. It is especially good in the summer when we all love cold salads. I like it all year round. It’s a great side dish to almost any meat and I really like it with roast chicken.

It’s super easy if you buy the bags of pre -shredded cole slaw. If you want to do it yourself you can just cut a whole cabbage in half and remove the core, wash , drain, dry and shred in the food processor or by hand. I just picked up 2 bags of Cole Slaw available everywhere in the produce section. You’ll need about 8 cups. I used 2 bags about 16 ounces.

This is what I did.

Ingredients:

For app. 8 cups of cabbage/cole slaw mix

1/2 cup mayo

2 Tablespoons Apple CiderVinegar

3 Teaspoons Dijon Mustard

1/2 tsp. Kosher Salt and more to taste

1/4 tsp. Freshly Ground Black Pepper and more to taste

Mix dressing in a bowl with a whisk is best.

Start slowly adding dressing to coleslaw mix in a large enough bowl to continue tossing. I added a little bit at a time and kept mixing till it was completely saturated with the dressing.

Then I refrigerated it till we were ready to eat and gave it a good toss and tasted for Salt and Pepper before serving!

Enjoy!


Shrimp and Orzo in One Pan

This recipe is from the NYT Cooking blog courtesy of Ali Slagle and a big thanks out to her . I always read the NYT Cooking it’s really got the most amazing recipes and some of the best chefs out there participate. This recipe caught my eye because of our love of Shrimp. 

I also made  changes which just worked out best for me. That’s the beauty of cooking you can make changes which better suit you. However the recipe is perfect as is. I used a very large shrimp but you can use whatever size suits you and your budget. I used an under 10 Mexican White Shrimp. If you’re buying ask them to clean and de-vein them — Joel did mine.

It’s a spin on a scampi and I love cooking in one pan.

It’s rather yummy! Thanks to Ali Slagle for a great recipe. Original recipe is on the NYT Cooking website. I made changes to suit me.

This recipe is for 4 but if I was making for 4 I would add 1/2 lb. more shrimp and I would make extra orzo on  the side. I served with a green salad but a vegetable would be perfect on the side as well. 

Ingredients:

1 – 1 1/2 lb large shrimp, peeled and de-veined

4 Tablespoons Extra Virgin Olive Oil

1 Tablespoon fresh Lemon Zest plus 1 Tablespoon Fresh Lemon Juice–1 average to large size lemon

1/2 teaspoon red-pepper flakes– obviously optional if you don’t like the pepper

Kosher Salt and Freshly Ground Black Pepper to taste

4 Garlic Cloves, minced

2 Tablespoons unsalted butter

1 cup orzo

1/3 cup dry white wine

2 cups boiling water, seafood stock, or chicken stock–I used Chicken

3 Tablespoons Finely chopped Parsley

Directions:

In a medium bowl, stir together the shrimp, 2 Tablespoons Olive Oil, the lemon zest, red-pepper flakes, 1/2 teaspoon kosher salt, 1/4 teaspoon black pepper, and half the minced garlic.

In a medium skillet sprayed with cooking spray, add the butter, the remaining oil and garlic and heat over low to medium heat. Don’t burn the garlic. When the butter starts to bubble, add the orzo and another 1/2 teaspoon kosher salt and cook by stirring around the pan as often as possible, toast the orzo in pan for about 2 minutes, adjusting the heat so as not to burn the orzo or the garlic. Carefully add the wine to the pan and stir in until it is absorbed for another minute or so. Stir in the chicken stock , reduce heat to low, cover and cook until the orzo is al dente, probably another 12- 15 minutes. This would be a good time to taste for salt and pepper .

Add the shrimp ( see photo) put them in a snug even layer on top of the orzo, cover and cook until the shrimp is pink and cooked through. This will all depend on the size of your shrimp. Remove from heat and let sit, covered for another few minutes till you’re ready to serve.

I poured the lemon juice over the finished shrimp — placed on a platter and sprinkled with chopped parsley.

Serve and Enoy!

Super Easy Peach Cobbler

I had some amazingly delicious peaches and knew that there was no way they were getting eaten so I figured I’d make a Peach Cobbler or a Peach Crisp. Now I have other recipes @cookingwithcandi but I also happen to be in possession of a box of yellow cake mix in my pantry and wanted to use it. So for those of you who don’t feel comfortable messing around with flour and the likes of that — this one’s for you. No judging here and this was very delicious and simple as could be.

Ingredients:

6 – 7 Ripe Peaches

3 cups Water

3/4 cup Sugar

1 9 ounce box Golden Yellow Cake Mix — doesn’t matter what brand

1/4 teaspoon cinnamon

1/4 cup butter, melted

Directions:

Preheat the oven to 350 degrees and lightly spray a 9 x 13 inch baking dish with non-stick cooking spray of your choice.

Peel and Slice Peaches. Add peaches to a medium sized pot and add the 3 cups water and 1/2 cup sugar. Cook over medium low heat until the peaches are soft. 10 – 15 minutes.

Remove from heat and strain peaches and while you’re straining do so into a bowl so you can reserve app. 1/2 cup of the strained liquid from the peaches. Then add strained peaches to the prepared baking dish. Add 1/2 cup of the liquid from the peaches and pour over the peaches.

Sprinkle with boxed cake mix .

Top cake with 1/4 cup of the sugar and 1/4 Teaspoon Cinnamon

Using a butter knife, make swirls in baking dish to combine some of the dry ingredients with the peach juices below.

Drizzle melted butter

Bake for app. 30-35 minutes till golden brown and set.

Serve with Ice-Cream.


Chicken Fajitas on the Grill

IMG_5599.JPG

IMG_5593.JPG Wow–Fajitas on the Grill and the best part is there were no pots and pans to clean up! Cooked in Aluminum Foil Packs right on the grill! They call them Hobo Packs.

Very quick prep and delicious ingredients. Feel free to substitute whatever peppers you would prefer. This is what I did.

Last night there were 4 of us so I used about 2 lbs. of chicken but kept everything else the same and it worked out just fine!

You’ll need heavy-duty aluminum foil for the grill.

Follow me on Instagram @cookingwithcandi

Ingredients:

1 lb. chicken tenders–you can 1/2 them lengthwise into thin strips or leave them whole which is what I did. If you can’t find tenders use a cutlet and cut into thin strips.

1 medium red onion, halved and sliced 1/4 inch thick (approximately)

1 poblano chile or serrano chile whatever you can get. Stemmed and cut lengthwise into 1/2 inch strips. I used both .

1 Red Bell Pepper–cut into strips lengthwise

1 Yellow Bell Pepper –cut into strips lengthwise

*you can really use any peppers that you’d like–these are the ones I used Shishito Peppers would be wonderful as well.

1/4 cup extra-virgin olive oil

1 1/2 tsp. cumin seeds

Kosher Salt and Freshly Ground Black Pepper- you’ll need to be fairly generous with the salt –I used about 1 1/2 teaspoons of salt and a few grinds of the pepper mill.

4 -6 fresh oregano sprigs–at least 1 in each packet–I used 2 in each packet.

1 lime, thinly sliced crosswise

Warm flour or corn tortillas, sour cream , guacamole and salsa and some hot sauce for serving. I used small tortillas but any kind will work out nicely. This is a very easy Summer Meal.

Directions:

Cut up all the veggies, onions and chicken and light the grill, I had the grill turned up high , it should be medium to high. I put it to high to pre-heat and then lowered to a more medium – high, if you are unable to do this step just check on them after 12 minutes to make sure the bottom isn’t burning.

In a large bowl, toss the chicken, onion and all the peppers with the olive oil and cumin seeds. Season generously with salt and pepper and toss again.

Arrange 4 14 inch sheets of heavy duty foil on a work surface ( see pics) app. 14 inches don’t get the ruler out. Just eyeball it, it needs to fit a pile of veggies and chicken. Last night I increased the chicken so we had about 6 packs.

Pile the chicken and veggies evenly on one 1/2 of each foil sheet and top with the oregano and lime slices. Fold the foil over the ingredients and pinch the edges to seal.

Place the foil packets on the grill, close the lid and cook over moderately high heat until the chicken is cooked through, anywhere from 12 to 15 minutes.

Open the packets and serve with warm flour fajitas, sour cream , guacamole, salsa and hot sauce.

*Packets can be made a night ahead of time and kept in the refrigerator.

Enjoy!

Basic Corn Salad

It’s Summer and the living is easy –and the corn is delicious.  There are times I buy fresh corn but don’t feel like serving it on the cob even though it is perfectly delicious this way. This corn salad is a suggestion for you as a side dish with very little ingredients and pretty much all corn. I like to serve as a side dish in the summer because it can be made ahead and served at room temperature. It’s a most perfect side dish. It doesn’t get more basic or easier than this recipe.  My absolute go-to summer side dish. Super Easy.


Enjoy the rest of the summer and keep on Cooking with Candi.

Ingredients:

5-6 ears of corn , shucked

1/2 cup small diced red onion

3 Tablespoons cider vinegar

3 Tablespoons good olive oil

1/4 Teaspoon Kosher Salt – you can always add more salt after you finish and taste for salt

1/4 Teaspoon Freshly Ground Black Pepper the same applies for the pepper as for the salt

app. 1/2 cup cut up fresh basil leaves–use as much or as little as you like –it adds wonderful flavor

*add a few small cut up grape tomatoes for another variety on this

Directions:

In a large pot of boiling water, cook the corn for app. 3 minutes (just to let go of the starchiness) Drain and immerse in ice water to stop the cooking and set the color. When the corn cools down , cut the kernels off the cob , cutting close to the cob to get the whole kernel. I use a bundt pan to catch all the kernels.

Toss the corn kernels in a large bowl with the red onions, vinegar, olive oil, salt and pepper. Just before serving, toss in the fresh basil. Taste for seasonings and serve cold or at room temperature.

How simple and easy is this?IMG_5739

Crunchy Noodle Salad–with Ramen Noodles

This is an oldie but goodie and always welcome on the table. It is perfect with a bbq and always seems to be a hit.  It’s the time of year when cold salads are abundant but this beauty is really wonderful all year round.

Napa Noodle Salad

4 cups sliced Napa Cabbage ( I cheat and buy the cabbage in a bag. It’s not always Napa but sometimes I don’t feel like chopping.  if you buy the bag, it’s fine, just use 1 whole bag. It’s more than 4 cups but it’s fine, and if all you can find is the cole slaw kind it’s Ok too, it will just have some carrots and some purple cabbage.

5 green onions (scallions) sliced very thin (green parts only)

Mix cabbage and green onions and refrigerate for a few hours (at least 2). This gives it a chance to meld and wilt a bit.

2 packages of Ramen noodles– buy the ones with the flavor packets   (It doesn’t matter which flavor you buy b/c you will be throwing away those flavor packs  –you won’t be needing them for this salad–just the noodles 

handful of sliced almonds

1/2 cup sesame seeds (available in the spice aisle)

1/4 cup butter

Take the noodles (hard crunchy ones) and put in a large plastic bag. Bang noodles with a mallet or your fist (fist is fine) and just crack them up. They’ll be easier to work with. Add the almonds and sesame seeds and brown all together in the butter.

Dressing

1/2 cup sugar ( I know, but I never said I cook DIET)

1/2 cup salad oil (plain old vegetable oil will do just fine)

1/4 cup vinegar (I use white rice vinegar, which is available in Asian section of supermarket or just wherever the vinegars are.)

1 Tbsp. soy sauce (low sodium always)

Toss all together and Serve

*cabbage and onions need to meld and wilt a bit, so make sure to give them at least 2 hours in the fridge. The hard noodles should stay a little crunchy. Don’t burn–just brown–the ingredients until the butter gets a bit bubbly; not burnt. Be careful. While you’re browning the noodles with the almonds and sesame seeds, move them around with a wooden spoon so it all gets buttery.

I know this is fattening, but isn’t everything fattening so yummy??? And you’re not eating the whole thing, so enjoy!!!

Of course you can double up this recipe, it’s just a whole lotta cabbage to toss! As a side dish, this is a nice amount as is.

Serves 4 – 6 as a side dish

Tomato Time Pasta

photo 2 (3)photo 4 (2)photo 5 (3)Nothing but beautiful tomatoes out there begging to be eaten in a million different ways. Perfect for a “Meatless Monday” dish or any night of the week . There are tons of local tomatoes out there now. At any local farmers market you can pick up pints of these beautiful babies. This is a lovely light pasta.

I had bought 2 pints of those beautiful little cherry tomatoes and right now there are those gorgeous yellow sunburst tomatoes also available.  I wasn’t sure what I would do with them. They varied in size so I knew if I made a sauce some were getting cut and some would stay whole. Nothing ever sounds better than a plate of pasta to me,  nothing.   These beautiful tomatoes are only out for such a limited time you have to get them while the getting is good.  Some of the tomatoes were super small and I left them whole while I halved the larger ones. There are so many variations of this sauce and feel free to improvise. We love it this way. So simple and so delicious.

Follow me on Instagram @cookingwithcandi

Ingredients:

1 lb. spaghetti , I like long spaghetti for this but whatever kind you like is good– I used a whole box but you can use however much you’d like

4 tablespoons extra-virgin olive oil

4 cloves garlic, peeled and minced. If you’d prefer you can slice thinly

1/2 teaspoon crushed red pepper* we like it spicy so if you don’t want it that spicy cut to 1/4, I actually used 1 whole teaspoon and it packed a lot of kick.

2 pints of cherry tomatoes or you can use about 3 cups of chopped fresh tomatoes of any type. I cut the larger tomatoes in 1/2 and I left the little ones whole.

app. 20 leaves of fresh basil, I just cut them up into small slivers

Kosher Salt and Freshly Ground Black Pepper to taste –I used app. 1 teaspoon on tomatoes and added towards the end

freshly grated parmesan at your discretion

Directions:

Cook pasta according to directions on box for al dente. Reserve a cup of pasta water in the event you may need a little more liquid in your sauce. Add 2 tablespoons of salt to cooking water for pasta. The Italians like to say that their pasta water should be like sea water good and salty.

Heat a large sauté pan over medium heat add 4 tablespoons of olive oil and garlic, cook until garlic is golden brown, about 2 minutes. Be careful don’t want to burn this garlic. Add the crushed red pepper now and the tomatoes, and cook over medium heat. I also added some kosher salt (about 1/2 teaspoon to start, you can always add more) and a little freshly ground black pepper. Stir for a while to make sure garlic doesn’t burn and tomatoes start to burst and deflate about 5  minutes. I let the tomatoes simmer in the pan for about 15 minutes. Taste for Salt and Pepper. The longer the tomatoes sit in the oil and cook down on a low simmer the better the sauce will be so if you have a little time let it sit.

Once the spaghetti is cooked and you’ve drained it ( remember to reserve a cup of pasta water).  Add it to the pan with tomatoes and over medium-high heat toss the pasta with the tomatoes well. Add the basil and if you’d like add cheese. I let everyone add their own cheese at the table.

Remove the pan from the heat and plate it up.

Yum! and even more delicious the next day.

Easy Peasy Chicken Caprese

This is one of those recipes that I make that is so super easy. Very few ingredients and other than cutting tomatoes and mozzarella balls, there is very little prep. You gotta love meals like this, especially in the summer when these beautiful heirloom tomatoes are abundant. I really only make this in the summer . It is light and delicious and makes for a beautiful salad as well and you can serve it at room temperature. I made this last night with burnt brussel sprouts on the side . You’re not going to believe how easy this is. It’s amazing!

Follow me on Instagram @cookingwithcandi

Ingredients:

1 container marinated bocconcini ( mozzarella balls) you will need the oil from the container to marinate chicken ( it comes in an olive oil marinade with spices)

4 skinless, boneless chicken breast halves , I buy them pounded thin

Kosher Salt and Freshly Ground Black Pepper

1 pint heirloom ( if you can get them) cherry or grape tomatoes, halved

*a little cut up basil is always a good idea!

Directions:

Take bocconcini balls out of the marinade. Cut bocconcini balls in quarters. Transfer about 1/2 of the marinade from bocconcini to a medium size baking dish , add the chicken , salt and pepper the chicken and let it sit at room temperature for about an hour before cooking. If you’d like you can refrigerate , and take out and bring to room temperature before grilling.

Put cheese in a bowl, add the remaining oil marinade and add the cut tomatoes to this bowl. Salt and Pepper to taste, give it a good stir and put in refrigerator till you’re ready to cook chicken. I removed from fridge about 1/2 hour before I cooked the chicken. Just bring it to room temperature.

Grill the chicken over medium high heat , till you get nice grill marks, probably about 8 minutes. You can cut the chicken into smaller pieces and mix with tomatoes and cheese. I just plated up the chicken and put tomato/cheese mixture on the plate. Perfect summer meal.

Old Fashioned Lemon Icebox Cake–No Baking at all

IMG_1266

Nothing not to love here, Lemons, cream cheese, heavy cream, lemon curd and did I mention no baking??? So great and fairly easy with simple ingredients. You’ll need either an electric mixer or a hand mixer to whip cream. Nothing beats an electric mixer though with the whisking attachment.

I made it in a 9×13 pan but I think next time I will try to do it in a bowl. It would also be beautiful garnished with fresh lemon slices or berries. We were in a hurry to dig into it so never did get to garnish it.  If you’d like it to look neater when you scoop it out you will have to be more precise with the layering. My cake was very uneven and all the layers and flavors blended together, who cares? it was delicious. If you’d like you can also layer in a trifle type bowl and make a very pretty presentation! Up to you but it was all delish.

This is simple and delicious food if not very rich, but hey it’s dessert! Perfect for the Labor Day barbeque or anytime!

Enjoy your summer and keep on cooking with candi.

Ingredients:

4 ounces cream cheese, softened (just leave it out at room temperature for a while till it’s room temperature and feels squishy and soft)

3 cups heavy cream

1/3 cup confectioners sugar

3 teaspoons lemon zest, plus a little more for garnish

1/2 teaspoon vanilla extract

11 ounces vanilla wafer cookies ( app. 1 1/2 boxes)

10 ounces lemon curd–usually available with the jams and jellies  or baking aisle of most supermarkets. (see photo)

Directions:

Beat the cream cheese in a large bowl with an electric mixer until soft. Add the heavy cream, sugar, lemon zest and vanilla and beat until it just holds stiff peaks. It takes app. 3-6 minutes for peaks to form, be patient.

Spread the bottom of a 9 x 13 inch baking dish with 1/2 cup of the whipped cream. Arrange 1/2 of the cookies on top of the cream, fitting in as many as you can without overlapping.(see photos) Spoon 1/2 of the remaining cream mixture on top and smooth evenly with an offset spatula or if no offset spatula use a butter knife. In spoonfuls , app. every 2 inches, spoon half of the lemon curd onto the cream and then use a butter knife to swirl the curd into the cream. Top with another layer of cookies, followed by the remaining cream. Spoon  the remaining lemon curd and swirl into the cream again with the butter knife. Cover with plastic wrap and refrigerate until the cookies have softened, it should be fine after at least 3 hours and you can make a day ahead and just leave in the fridge!

It would be pretty garnished with some lemon zest , some lemon slices or fresh berries, we were in a rush to eat it so no garnish in my photos. Next time!

*if you use a bowl you’ll just have to figure out the cream to cookie ratio but make sure you follow my steps so it ends up the same.

*another good thing–I actually froze leftovers and when I wanted to eat it , I removed from freezer for about an hour and it was perfect.

Baked Shrimp with Feta

Still recuperating from my partial knee replacement surgery but couldn’t face another take-out meal. Luckily for me I am in NYC now and was able to order all of my ingredients on line from Agata and Valentina and had it delivered and Joel cleaned up so all was good. This tasted as good as any Greek Restaurant dish I’ve had. I know the Italians think it’s against the law to put cheese on seafood but gratefully the Greeks don’t. This is super tasty and very easy to make. I served over orzo and it was perfect. I ordered my shrimp cleaned and de-veined and used very large (under 10 white shrimp). I used San Marzano canned tomatoes and delicious Greek Feta Cheese. The only thing I forgot to order was some fresh mint to sprinkle on top.

Ingredients:

Extra Virgin Olive Oil

4 nice size garlic cloves, minced

Salt and Pepper –Use Kosher Salt and Freshly ground black pepper

1 large can San Marzano Tomatoes in juice –28 oz. size can

1/2 teaspoon crushed red pepper flakes

1 lb. large shrimp, peeled and de-veined. I used under 10’s and white shrimp. You can stretch this for more people with another 1/2 lb. which will probably get you to 3-4 people as a main dish. Figure 4 shrimp per person. Also the orzo stretches this as well.

1/2 lb. Greek Feta Cheese

1/2 teaspoon dried oregano

*2 Tablespoons roughly chopped fresh mint

Orzo according to package directions

Directions:

Put 4 Tablespoons Olive Oil in a wide skillet over medium heat . Add the garlic and season with salt and pepper. ( about 1/2 tsp. salt and 1/4 tsp. pepper) You’ll want to season properly because shrimp and tomatoes need salt but remember feta is salty. Lower heat and allow garlic to soften in pan, sometimes I actually turn off the heat and let garlic just sit there for a few mins.

Open can of tomatoes and pour into saucepan with olive oil and garlic. I cut the tomatoes in 1/2 . I added more salt and pepper and red pepper flakes. I cooked the tomatoes stirring occasionally till very soft about 12-15 mins.

Put shrimp in a mixing bowl and add 1 Tablespoon Olive Oil and season with salt , pepper and if you’d like you can add a little more red pepper flakes here.

Put tomato mixture into a large earthenware baking dish.

Arrange shrimp over tomato mixture in one layer. I diced up my cheese and sprinkled over the surface and I sprinkled dried oregano . ( See photo) You can crumble cheese or dice it up — either way is fine.

I baked for 12 minutes and then put it on broil for another 3-4 minutes till tomatoes were bubbling and cheese got a little brown.