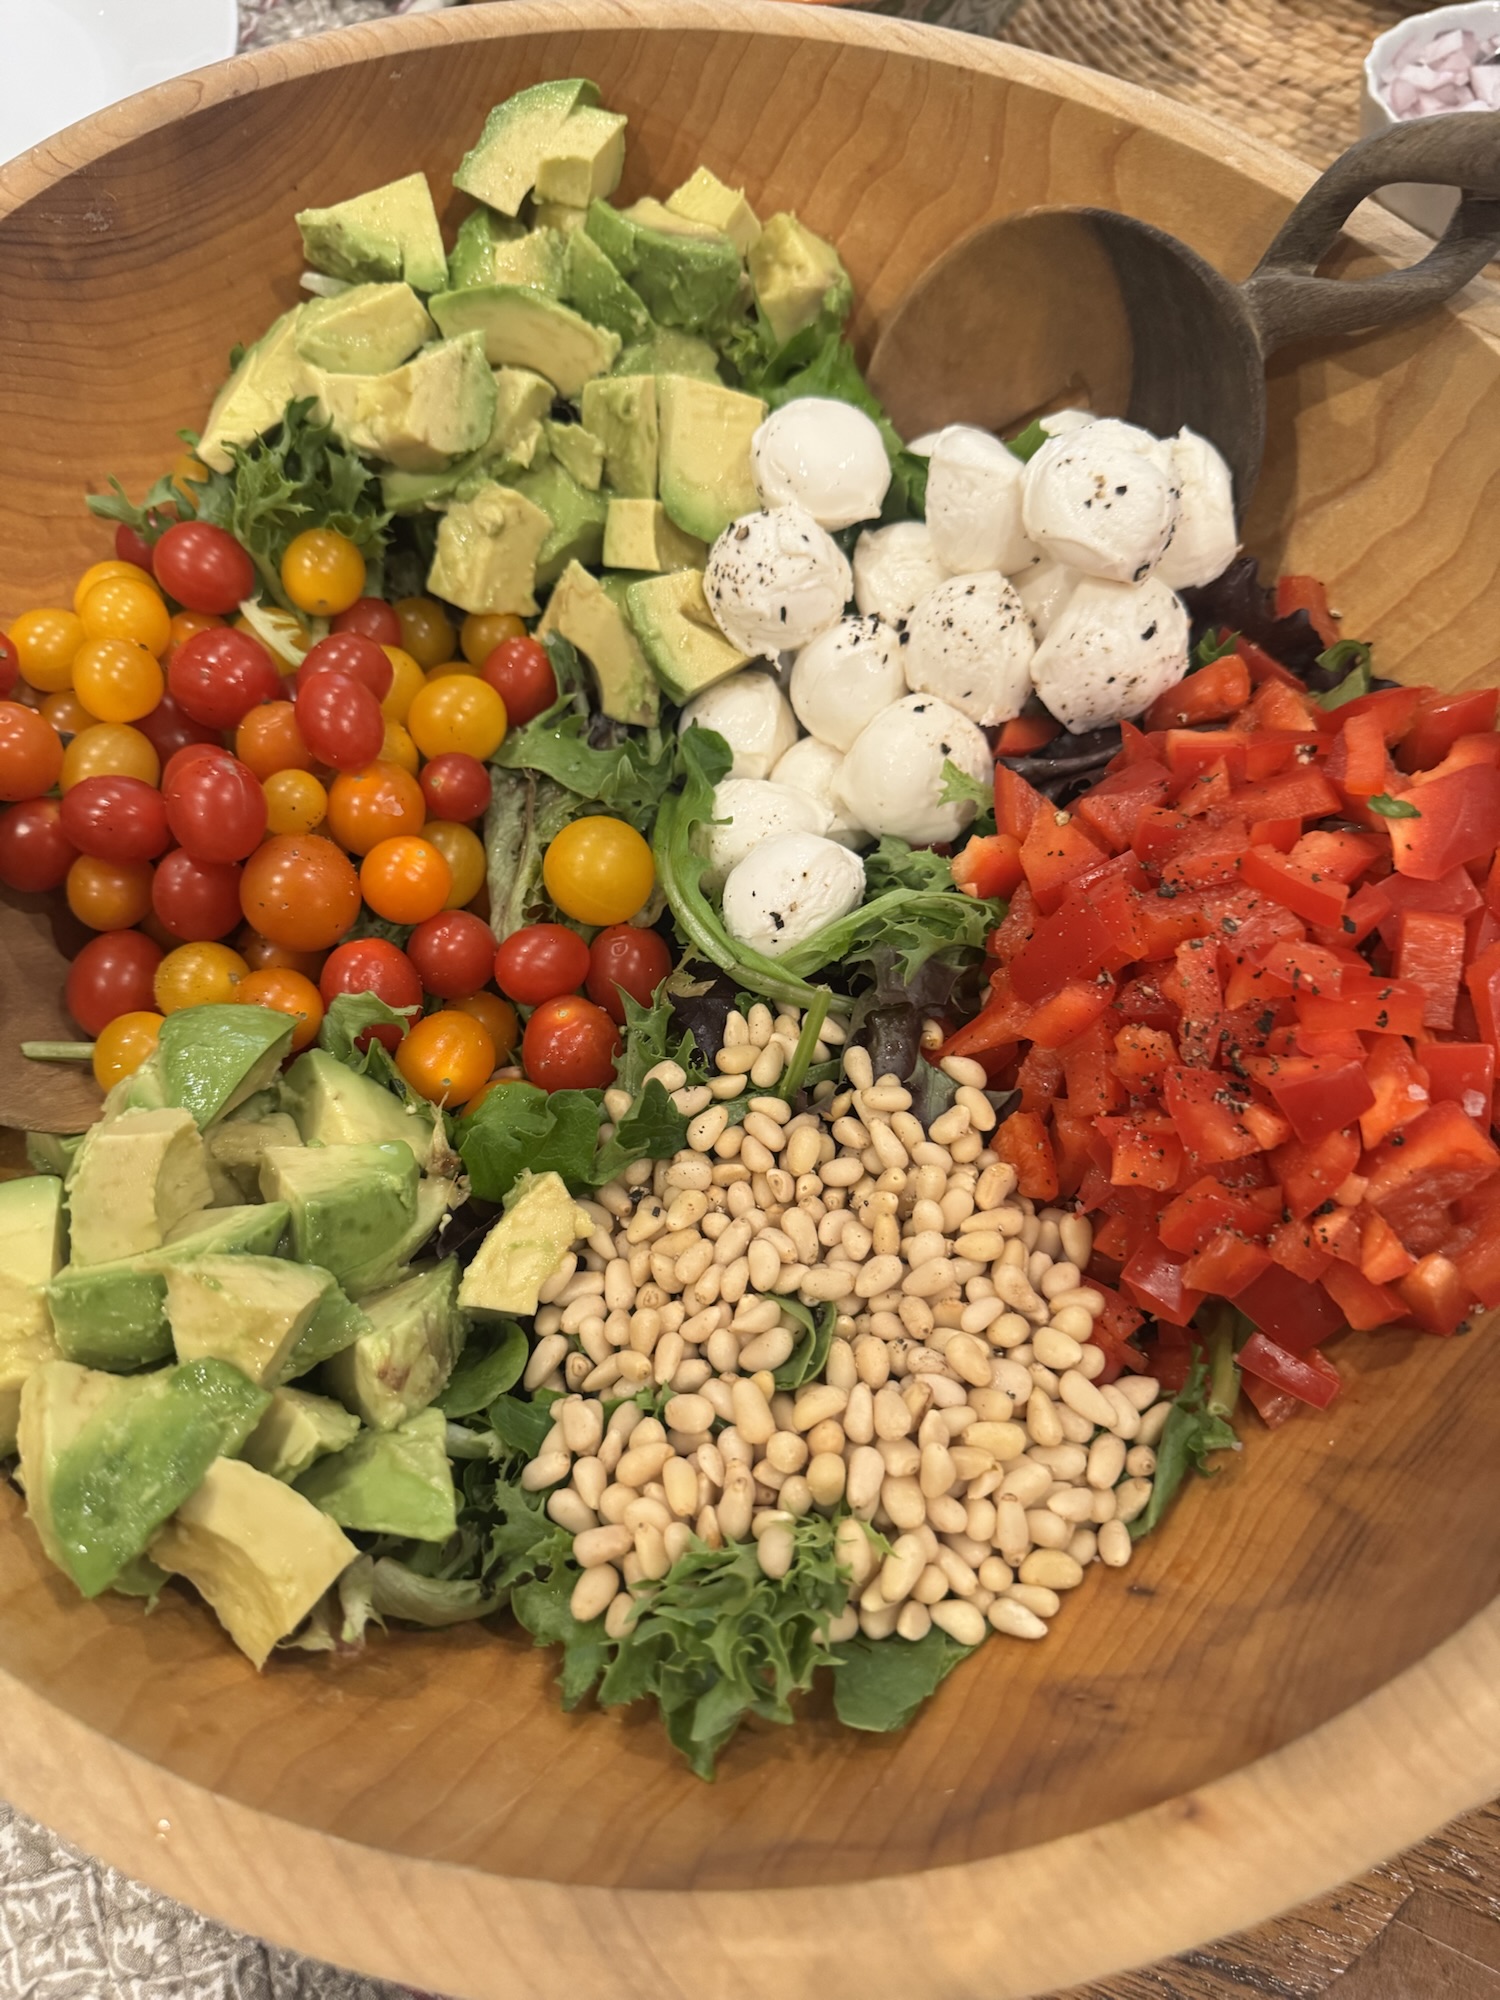
Author Archives: cookingwithcandi

Chocolate Bark Surprise

Chocolate Bark Surprise

chocolate bark surprise before breaking it all up

Believe me when I say that I know how very difficult this Holiday is going to be for almost all of us. If you’re looking for something your kids can make with you this is one of the better recipes and fun to eat afterwards. I usually make this recipe on the holidays and it’s easy and delicious. If you have your kids or your grandkids and want to have a cooking project together this could be the one.

One of the most wonderful surprises to come out of my blog is the constant sharing of recipes, ideas, thoughts and sometimes even a little criticism. I love it all.  Sharing has got to be the part I enjoy the most. I love sharing my family recipes with all of you. I especially love when you send me a recipe and I love it and I make it part of Cooking with Candi.  As those of you who have gotten to know me and my blog you know this to be true. I try to always give credit where credit is due, sometimes I name the recipe after the person who passed it on to me.  I rarely get to know the origin or provenance of these recipes but they’re way to good to keep “under wraps”. Thanks again to all my friends for their recipes and inspiration not to mention support with this “labor of love”. I write this blog so that you can all share the  recipes that I have had come to know.  Why keep it to myself? I love the feedback you all give me and nothing makes me happier than when I meet someone who started cooking and now enjoys it because of my recipes.

It’s hard to know the provenance of most recipes and I am doing this for fun not profit!

Speaking of sharing I got this wonderful recipe from At Home with Joy , thanks for sharing with us Joy. This recipe was so easy and so delicious, for those of you who love Candy and who doesn’t? Give it a try,  please check out Joy’s blog you’ll be happy you did.

And this would be perfect on your Passover Table. It’s a really nice dessert served anytime but really perfect now.

www.athomewithjoy

Chocolate Bark Surprise

Ingredients:

1 9 oz. bag chocolate chips ( I used semi-sweet) this would have to be amazing with white chocolate chips as well

1/4 cup shelled pistachio nuts ( I used no salt but a little salt would probably be fine)

1/4 cup raw almonds

1/4 cup dried cranberries

1 Tablespoon shredded coconut

Directions:

Line a small sheet pan with parchment paper

Place chips in microwave safe bowl and heat for app. 2 1/2 minutes. Check frequently as microwaves can vary. 2  – 2 1/2 minutes was sufficient. Once the chocolate is smooth and creamy, add the rest of the ingredients into the bowl and stir until combined. Make certain your bowl is large enough to accommodate the chocolate and dry ingredients.

Stir until well combined, and immediately pour mixture onto parchment paper and using a spatula evenly smooth it around, it should be about 1/4″ thick.

Place pan in fridge and allow it to harden for at least an hour or until hardened.

Using your hands, break bark into pieces. The pieces will be uneven.

Store extra bark in freezer in an airtight container.

Enjoy!

My Favorite Macaroons–Traditional Style for Passover

macaroons for passover

I am not sure why I only make these macaroons during Passover. They are definitely my favorites; they are very easy to make, look totally professional, and are the Passover cookie in my book. These can be made ahead of time and stored. I usually make a few days before the Seder because I dip them in melted chocolate (just the tops). You don’t have to dip, you can leave plain. I dip up to 1/2 the macaroon in the chocolate. They are sweet and crunchy on the outside, and moist and chewy on the inside. After Passover, if there are any left over, I freeze them. Cannot have them lying around. Of course you may make these any time of year…they are always welcome on the menu.

*When dipping, just turn macaroon upside down (with top part into the chocolate). I usually go just a bit more than the top (probably 1/2 the macaroon into the chocolate). Use as much or as little as you like.

*just a little note, silpat is awesome to use for this recipe instead of parchment paper. You must cool completely before trying to lift off the paper. Also before you dip into chocolate I like to cool down completely.

This could be a fun recipe to do with your kids. A little messy but whatever — desperate times call for desperate measures right? They may not come out uniform but the kids could have fun making them and dipping them.

Stay Safe and Be Smart

Ingredients:

3  large egg whites (When I bake, I always leave eggs out so that they are at room temp.)

1/2  cup sugar

1/4 teaspoon salt

1 package (14 oz.) sweetened, flaked coconut ( I like this Angel Flake Baker’s Brand, but they’re all fine)

*1 package semi-sweet chocolate chips (You can really use any semi-sweet chocolate to melt. It’s just easy with the chips.)

Directions:

Preheat oven to 350 degrees. Line a baking sheet with parchment paper (you can use non stick cooking spray, like Pam, but I just line with parchment, which works really well).

In a large bowl, whisk together egg whites, sugar and salt until frothy. With a fork, stir in coconut until moistened.

Using a level tablespoon (measuring ones are perfect), pack the mixture into the spoon, so all macaroons are equal size. Drop mixture onto prepared sheet (cookies will not spread). Bake until golden brown, about 25 – 30 minutes. Towards the end, check on them to be sure they don’t burn. I make a little peak with my fingers on the cookies before I bake them (this makes for easier dipping). You can also just leave the top round — this is perfectly fine.

*To melt chocolate on stove top: I bring a small saucepan of water to a rolling boil, and on top of it put a small stainless (oven proof) bowl filled with the chocolate.( works like a double boiler if you don’t have one) When it completely melts, take off heat. Once macaroons are completely cool, you can dip the tops. Just make sure chocolate and macaroons are cooled off first. Just dip top of cookie in chocolate and place on a plate to cool. When I am all done, I refrigerate the macaroons to set the chocolate. You can leave in fridge until you are ready to serve and take out with enough time to bring to room temp. Before serving, I usually use a cool cookie sheet with parchment paper to cool off cookies once they’ve been dipped.

*should yield about 20 – 25 cookies. You can double if you’d like.

Un-Stuffed Cabbage

photo 3 (4)photo 2 (2)photo 3 (4)photo 3 (5)photo 4 (3)photo 2I love stuffed cabbage and my Grandmother made the most amazing stuffed cabbage ever . I love stuffed cabbage but do not feel like dealing with the actual stuffing of the cabbage, it is way too labor intensive for me.  I have made several variations of this and found this one to my liking the best. You can play with the ingredients which is what I did . Original recipe is from Kosher by Design and it is perfect for Passover by just leaving out the rice and substituting matzoh meal in its place. Most perfect for Rosh Hashana and use rice.  Basically this is meatballs in a sweet and sour sauce with cabbage . I doubt very much that Joel would ever eat real “stuffed cabbage” but he liked this. The cabbage cooks down so much that you don’t even realize you’re eating cabbage. I also used 1/2 chicken ground meat and 1/2 beef ground meat , this is entirely up to you. I wouldn’t do all chicken because it might be a bit dry, you can definitely make this with turkey but use dark meat turkey or the balls will also be very dry. You can also make this ahead for the holidays which is always a very good thing and feel free to freeze it.  This is the original recipe adjust amounts for how much you’re making – this recipe is for 3 lbs. if you’re making for less people and only use 2 lbs. of meat you can cut ingredients accordingly.  You’ll want to use a large pot for this recipe. Enjoy!

*for passover substitute matzoh meal for rice

Follow me on Instagram @cookingwithcandi

Ingredients:

Meat

3 lbs. ground meat– I used chicken and beef (dark meat turkey is best here) white meat turkey tends to be very dry. Mixed with beef it’s fine but if using alone you’ll need to use dark meat ground turkey. Use any meat you’d like or I like to combine — sometimes dark meat ground turkey with beef or all turkey — you need 3 lbs. White meat chicken tends to be very dry — so I will mix with beef 80/20 — do what works best for you

2 large eggs, lightly beaten. Use room temperature eggs they work best.*see my post about eggs–a little note on my blog.

3/4 cup uncooked long grain white rice, for Passover use matzoh meal and omit the rice – for Passover if you observe use 1/2 cup Matzoh Meal

1/4 cup water

1 onion finely chopped

Kosher Salt to taste–app. 1/2 to 1 tablespoon

Pepper to taste–app. 10 grinds on a pepper mill, or app. 1/4 of a tablespoon

*garlic powder if you like

Sauce:

2 packages of shredded cabbage, probably about 1 head of cabbage finely shredded, no need to do it when you can buy it pre-shredded (not red cabbage)

1 Tablespoon Vegetable Oil

Kosher Salt to taste ( app. 1/2 tablespoon)

1 1/2 tablespoons Kosher Salt

1 1/2 cups tomato juice

4 8 ounce cans tomato sauce ( or 32 ounces)

1/2 cup brown sugar ( use whichever brown sugar you have in house , it won’t make a difference. Light or Dark, I actually used dark.

1 cup sugar

3 lemons squeezed , I got about 1/2 cup , they were smallish lemons

1/2 cup raisins

Directions:

In a large mixing bowl combine the meat, eggs, water, rice and onions. Season with Salt and Pepper , and if you like garlic powder. Gently mix by hand, and I do mean gently, if you over do it the meat will be like concrete. Set aside.

Heat the oil in a large pot over medium heat. Add the shredded cabbage and about 1/2 tablespoon of kosher salt. Simmer for 10 minutes. Add the tomato juice, tomato sauce, brown sugar, sugar, lemon juice and the raisins. Stir till well combined and continue cooking sauce at simmer setting.

Gently form meatballs out of the meat mixture, I made a rather nice size meatball, not too large and not too small. Make whatever size you’d like. Just do not over-handle the meat because it will cause meat to toughen. Add to cabbage mixture, just drop into the hot sauce and do not stir, you can pile them on top of one another because they will cook down.

I left it to simmer for about 1 1/2 hours . I didn’t touch the meat balls for at least the first 1/2 hour, you’ll want them to cook through and form into nice balls before you stir, so just leave them to cook. After the first 1/2 hour or so you can gently stir and move the meatballs around. They don’t require a lot of stirring around .

This dish brought back memories of my childhood and was a most satisfying main dish.

Slow Cooked Brisket–Super Easy

Featured Image -- 8316I am always on the look-out for a brisket recipe and it seems like everyone is always asking me for a good brisket recipe. If you ask me brisket is the ultimate comfort food, it’s old fashioned pot roast slowly cooked with just a small amount of ingredients.  This is a great recipe for the Jewish New Year because you can cook it ahead of time . My friend Susan gave me this recipe for a slow cooker brisket and I actually made it the night before in the slow cooker .  I cut up the onions , seared the brisket and got it all together in about 1/2 hour and put it in the slow cooker by midnight! When I woke up in the morning the house smelled amazing and the brisket had cooked for a full 8 hours! I then took the whole insert with cover and refrigerated it till later that day when I would remove any and all congealed fat that had naturally gathered in the pot. I highly recommend doing it ahead of time so that you can remove any unwanted fat from the brisket. You can even do it a week ahead and freeze the brisket, or a few days ahead whichever works best for you. The recipe is from the website Kitchn and Susan had already made it so I knew it would be good. So easy and so good.

This is such a wonderful recipe I highly recommend for the Jewish Holidays or any time you’re in the mood for good comfort food.

I also recommend an electric knife as it is the best tool for slicing a brisket thinly and getting the most out of the meat. I love my electric knife and it is great for cutting all roasts. Ingredients are simple and you probably have most of them in the house already.

*If you are freezing it, you can slice up and then put it in the freezer. Take out of freezer and re-heat the way I did.

* a 4 lb. Brisket with side dishes should serve 6 people

www.kitchn.com original title Slow-Cooked Brisket and Onion

Ingredients:

3 1/2 to 4 lb. Brisket

1 tablespoon olive oil

app. 2 large onions, sliced into half moons (not too thinly)

Kosher Salt and Freshly Ground Black Pepper

6 cloves garlic , minced

2 cups beef broth

2 Tablespoons Worcestershire Sauce

1 Tablespoon Soy Sauce ( reduced sodium is fine here)

Directions:

Heat a deep sauté pan or cast iron skillet over medium heat with the 1 tablespoon olive oil. Add the onions and cook on medium-low to medium heat, stirring frequently for app. 20 minutes or until the onions have caramelized lightly. This means that the onions will lightly brown up and completely wilt.

Remove brisket from its packaging and pat it dry, season the meat with salt and pepper generously.  While the onions cook if you have another large skillet or sauté pan heat it up over medium-high heat and turn on your vent or fan. Sear the brisket until a golden brown crust appears on both sides of the meat. Remove and place in a slow-cooker insert fatty side up.  I would spray the insert with cooking spray first. If you don’t want to dirty  2 pans wait till the onions are cooked and then just add brisket to that pot to sear.

Sprinkle the minced garlic over the meat. Pile the sautéed onions on top and around the meat. Mix the broth, Worcestershire Sauce and soy sauce and pour into the slow-cooker insert.

Cover and cook in the slow cooker on LOW for 6-8 hours or until the brisket is very tender. I did 8 hours because it depends on the size and shape of your brisket. This brisket was about 4 lbs. and pretty thick in spots.

Now the thing about cooking ahead was that I could refrigerate it right in the insert . The next day I removed from refrigerator mid afternoon and scraped off the congealed fat.

To reheat: First I slice the brisket if I haven’t already done so. Heat the oven to 300 degrees. Transfer the brisket and all the juices to a baking dish and cover tightly with a lid or two layers of aluminum foil. Warm in the oven for at least an hour till brisket is completely warmed through. Of course the timing will depend greatly on the size and shape of the brisket; once it’s sliced it will re-heat faster which is why I always do so.

If you don’t have a slow cooker and don’t want to buy one you can cook in the oven instead. You’ll need a dutch oven ( Le Creuset type) with a lid. Or a baking dish covered  very tightly with foil. Follow instructions as above but cook in the oven at 325 degrees for about 4 hours for a 4 lb. brisket. You may need to cook longer depending on the size and shape of your brisket.

Cooking Time varies for how you prefer your brisket. If you want a more formal presentation you’ll probably stay within the 8 hours . If you like it shredded and more like pulled beef you may want to increase cooking time by another hour. We sliced it after 8 hours and then re-heated it and it was perfect! Sorry I didn’t take more pictures.

IMG_6380

Happy New Year Brisket – perfect for Passover

Brisket can definitely be an intimidating thing to make. I once made it as a young cook, and it was perfectly inedible. Back then, I couldn’t believe how long it took to cook, but it does take very long. Now I usually make it in the slow cooker which is an awesome way to go but this time I used my trusty Le Creuset, which worked out beautifully. A lot of people have some pretty awesome brisket recipes and I welcome you to send me yours. This really couldn’t be any easier and it’s super tasty. This original recipe came from my friend, Michele (with a few comments from Karyn too.) I did change a few things to the original recipe, but not a lot and I thank Michele for the recipe.

INGREDIENTS:

4 lb. brisket (I didn’t need larger but you can adjust this recipe for whatever size brisket you use)

Lawry’s seasoned salt available in the spice aisle

2 large Spanish onions (Karyn uses Vidalia, which is also good), sliced thickly

2 cans of tomato sauce , I used the 16 oz. size. You can also use the 1 can of 28 oz. size. It depends on you and how much sauce you like.

2 tbsp. brown sugar (this is my addition. It doesn’t really change the flavor so much as cut the salt a bit)

DIRECTIONS:

Preheat oven to 350 degrees.

I sprinkled Lawry’s seasoned salt on both sides of the brisket (generously) then seared it in the Le Creuset pot with a little vegetable oil–probably about a tablespoon. (After the meat was seared, it shrunk to fit perfectly in my pot but I don’t think that a larger brisket would have fit.) Next, I added the tomato sauce and onions, covered the pot and put it in the oven. I cooked it for a total of 3 hours. I checked on it after each hour, which probably wasn’t even necessary. I then let it cool, off of the heat, for about an hour. Next, I sliced it with an electric knife, which came out beautifully. The meat was soft, but not falling apart at all. I then added the brown sugar to the gravy, put the brisket in a container with the gravy and froze it. I’ll take it out the night before I serve. Karyn pulses her gravy with an immersion blender. I didn’t do this but I think it makes for a good suggestion. In fact, I might still do it next time I make this recipe.  I’ll let you know. Thanks again Michele and Karyn!

  • I also use an electric knife to cut my brisket –I find it works best (worth the investment and a rather inexpensive one at that–you’ll have it for years)

Chicken Marbella–perfect for Holiday Cooking

This recipe is my “go to” chicken. I’ve made it almost every Passover and Rosh Hashana since I found it. many moons ago. The original recipe is from the “Silver Palate” cookbook.  It has been a staple on my holiday table for as far back as I can remember.  It’s really a perfect recipe for any time of the year.  

*the key to this recipe is an overnight marination so don’t skip that and obviously 4 chickens is a lot of chicken depending on how many people you have and what other dishes you have you can cut in 1/2 easily!  I usually cut in 1/2 and it’s more than enough. 

Enjoy! and Happy Passover to all of those who celebrate.

Ingredients:

1/2 cup olive oil

1/2 cup red wine vinegar

1 cup pitted prunes

1/2 cup pitted Spanish green olives (no pimentos)( if you can’t find, just pick out pimentos)

1/2 cup capers with a bit of juice

6 bay leaves

1 head of garlic, peeled and finely pureed(chopped well)app. 10-12 cloves in a head

1/4 cup dried oregano

Kosher salt and freshly ground black pepper, to taste (I start with 1 teaspoon kosher salt, and a few grinds of black pepper.)

4 chickens, cut into eighths (original recipe calls for chickens to be quartered but I find that you get more per person if you do it in eighths.) the chickens are about 2 1/2 lbs. apiece , so it’s about 10 lbs. of chicken . Sometimes I ask the butcher to cut the breasts in 1/2, if they are very large.

1 cup brown sugar

1 cup dry white wine

1/4 cup fresh flat-leaf parsley (finely chopped)

Directions:

Combine the olive oil, vinegar, prunes, olives, capers and their juice, bay leaves, garlic, oregano, and salt and pepper. ( You can combine in a large bowl, but I use a large Ziploc bag.) Add the chicken, then stir or mix around to coat well. Refrigerate overnight.

Preheat oven to 350 degrees.

Take a large shallow baking pan (you may need 2), arrange the chicken in a single layer and spoon the marinade over it evenly. Then sprinkle the chicken pieces with the brown sugar and pour the white wine around them.

Bake, basting frequently with the pan juices until the thigh pieces yield a clear yellow juice (don’t want it pink). It takes anywhere between 50 to 60 minutes to cook. (Test thigh with a fork.)

When you are ready to serve, transfer the chicken with a slotted spoon to serving platter. Moisten with some of the pan juices and sprinkle generously with the parsley. You can pass the remaining juices in a gravy boat.

*should serve 10 or more

* this chicken is delicious cold or at room temperature. If you make ahead and it is in fridge, just remove from fridge, reheat it in the juices, then allow to come to room temperature.

Honey Roasted Chicken – Holiday Chicken

DSCN4234DSCN4234This recipe was actually given to me by my daughter Jennifer.  She has made it numerous times. always to raves from the family.  It is a delicious chicken dish and it perfect for the Jewish new year and for Passover. It’s sweet and savory and has a wonderful blend of flavors.

Remember to pay attention to cooking directions as you will not be preheating oven!!!!!!

Obviously this recipe can be cut in 1/2 for a smaller group.

Ingredients:

1 stick butter or margarine

1/2 cup minced yellow onion

2 large cloves garlic, minced

1/4 cup Dijon Mustard

1/2 cup mild honey

1 teaspoon kosher salt

a rounded teaspoon curry powder

2 tablespoons peach or mango chutney ( available in most supermarkets)

small handful of dried currants or chopped dark raisins

2 roasting chickens  cut up in 8’s or you can cut recipe in 1/2 and use 1 chicken and 1 roasting pan

Directions:

you will need 2 shallow baking sheets with 1 inch rims ( you may be able to get it on 1 large sheet)Spray baking sheets well with cooking spray.

to make sauce:

Melt butter/margarine in a heavy 2 quart saucepan over medium heat. while it is bubbling, saute onion and garlic until softened, about 3 – 5 minutes. add remaining ingredients except for chicken and stir until well combined. heat until warm throughout and set aside to cool slightly.

to prepeare chicken:

I would spray each baking sheet with pam cooking spray first

Rinse and pat chicken dry . (each piece) dip each piece in honey mixture, coating chicken completely. lay chicken pieces ( skin side up) on baking sheets. spoon any remaining sauce over chicken.

To Bake Chicken:

place chicken in a cold oven, turn heat to 400 degrees and bake for one hour. if you are using 2 baking sheets , roast in the upper and lower thirds of the oven and switch shelf positions 1/2 way through the cooking time.

to serve:

Transfer chicken to a warmed serving platter and serve . this chicken is good hot, at room temp. and cold out of fridge the next day.

*if you cannot find peach or mango chutney ( I found it at Whole Foods) Stonewall Kitchen Brand , you can use Peach Jam, Apricot Jam, etc. Probably Saucy Susan would work. Use your imagination and don’t kill yourself trying to find the chutney. I think the chutney would give it a bit more kick, and cut the sweet, but either one will be fine.

Happy Holiday from my Kitchen to Yours

Traditional Ashkenazi Charoset–Apple/Walnut

DSCN2703This is my easiest Charoset to make — all in the food processor.   It’s traditional in the sense that it’s an Ashkenazi (Eastern European) recipe. I add a little brown sugar instead of white sugar and it gives it just a bit more character. Remember, while a reminder of the mortar used in making bricks for Pharaoh, charoset is really just a sweet condiment of apples and wine! And we love it on Matzoh!

Have a Sweet Passover !

Ingredients:

3 medium Fuji apples (or any other kind you like), peeled, cored and finely diced (use processor to make your life simpler) I usually use whatever is in the house, but on Passover I go through so many apples, so buy what you like (I always like Granny Smith because they are nice and tart)

1 1/2 cups walnuts, chopped (buy them pre-chopped)

1/2 cup sweet red wine such as Manischewitz Extra Heavy Malaga or just Concord Grape is fine

*20 pitted dates, chopped; or 1/2 cup golden raisins (optional)

1 1/2 teaspoons ground cinnamon

1 tablespoon packed brown sugar

*for a bit of extra added flavor you can add 1/2 teaspoon of powdered ginger (optional)

Directions:

After chopping apples, stir all ingredients in a large bowl. Keep in refrigerator ’til ready to serve. Serve at room temperature. You can also pulse everything together in processor, just be very careful not to over-process. I often do this to save time. You don’t want it too fine, so just go gently with the processor if you go that route. I do it in the processor, and I know exactly how I like it to come out, so go easy with the chopping.  If it’s a little dry or too thick, you can always add more wine. I find this always tastes better after it sits and allows the wine  to really soak and ripen for 24 hours. Before serving, check for consistency and add a little more wine, if necessary.

Peach Farfel for Passover – crowd favorite

 
This is most definitely a “must have” Passover recipe.  It has been a winning no no recipe ever since my friend Audrey gave it to me many years ago. This one is probably one of the most favorite Passover staples. Recipes are funny in that -they tend to spread out to a wide group of people and people start passing them down to their people and so forth and so on and before you know it no one remembers where the original recipe came from , they just remember that it was on their Passover table and they can’t imagine a Seder dinner without it.  Enjoy this one; it is sweet and makes for a delicious side dish with poultry or beef. This has always been a crowd pleaser. I know, the amount of eggs is obscene on this holiday! This one has 7 eggs in it!!!!!

Make this part of your Passover tradition, you’ll be happy you did.

Follow me on Instagram @cookingwithcandi and please DM me or email me any questions or comments — I look forward to hearing from all of you. Happy Cooking from my kitchen to yours .

  • as I said I have never froze this particular recipe but I would cook 1/2 way so it’s in a more solid form and then wrap well and freeze. If you’re lucky enough to have an extra freezer and can freeze in the original baking dish even better.

Ingredients:

1 box matzoh farfel (I think it’s in a canister now) you will need 16 ounces of the farfel

2 15 oz. cans sliced peaches

7 eggs

2 cups sugar

1 tsp. salt

2 sticks margarine, melted

2 tsp. vanilla

4 cups hot water

Directions:

Preheat oven to 350 degrees.

Place dry farfel in a bowl, then pour hot water over it. Let stand until absorbed.

In a separate bowl, combine eggs, syrup from peaches, salt, sugar, margarine, and vanilla. Add farfel and combine well. In a well sprayed 9 x 12 baking dish, pour 1/2 the mixture, then arrange a layer of peaches on top. Add remaining mixture on top, then top with remaining peaches. Sprinkle with just a bit of cinnamon if you’d like. Bake for 1 hour at 350 degrees. Serve hot out of oven, or room temp. It is quite delicious at room temperature, if you don’t have the room in your oven, and it makes for a pretty awesome leftover.

Can be assembled, cooked 1/2 way through, then cooked the rest of the way through on the day of the holiday.

Homemade Chicken Soup with Not-So-Homemade Matzo Balls

IMG_4514I always make my own chicken soup. It is delicious broth. I usually make a few batches and freeze them because it’s a great thing to have frozen in quart containers as stock and will last for up to six months frozen. When the holidays come—whether Rosh Hashanah or Passover—I always make my chicken soup with matzo balls. I make the soup a day ahead and skim whatever fat is on there before adding my matzo balls. Keep reading for my “secret matzo ball recipe”.

INGREDIENTS: CHICKEN STOCK:

1 5lb. organic roasting chicken (I throw away the insides)

1 package of chicken wings (this was suggested to me a long time ago by my BFF Karyn and she was oh so right. It adds some fat, which translates into a lot of flavor and you will skim off the fat the next day. Thanks, Karyn…yes, I remembered!)

1 large, yellow Spanish onion; unpeeled and quartered

A big bunch of dill

4 celery stalks with leaves, cut into thirds

4 carrots, unpeeled and halved

Bunch of flat-leaf parsley (Use this only if you want. This time, I didn’t have it so I used only the dill.)

A bunch of thyme (if you wish)

1 head of garlic, cut in half cross-wise (skin and all)

2 tbsp. kosher salt

2 tsp. whole black peppercorns

DIRECTIONS FOR SOUP:

I place the chicken, chicken wings, onion, carrots, celery, whatever herbs I’m using, garlic, salt and pepper in as large a  pot as I can find (usually about a 16-20 qt. stockpot.) Add cold water to cover chicken by at least 2 inches above the chicken but not to the top of the pot because it will boil over (very messy). Bring to a boil and then simmer, uncovered, for about 3 hours. I skim the soup skum (sounds lovely) off for the first half hour or so—after that, you shouldn’t have much more. I remove the chicken from the broth after an hour or so, because it is cooked and it will taste like a rubber chicken if you plan on eating it. Sometimes, I like to shred it and return it to the soup. If you are not using the chicken (what a waste of good chicken), just leave it in. It will fall apart in there. I leave the wings and discard them at the end of the 3 hours. Next, I strain all of the soup, discard all remnants, fill my containers and put in the fridge. The next day (or the day of the holiday), I usually skim off the fat that has risen to the top and make my matzo balls (recipe below).

MATZO BALLS:

This has always been my secret, but now it’s out. Okay, I own it. After years of making matzo balls from scratch, my mother (yes, my mother, the cook) turned me on to Manischewitz boxed matzo ball mix! It just wasn’t worth it. My balls weren’t as consistent as I would have liked, whereas these are always perfection! Light and fluffy and everyone always loves them. No sinkers here!

I follow the directions on the box carefully. They sell just the mix box. You will need vegetable oil and 2 eggs per box. I do add a little piece of dill inside each ball, but that’s it! Now my secret is out. Sometimes this is really the only way to go. It saves time and ingredients and is really good. No MSG or trans-fats either! So make the soup, cheat with the balls, and enjoy. There is no substitute for homemade chicken soup, though.

*You can also add thin soup noodles to this recipe, if you like. (obviously not on Passover)