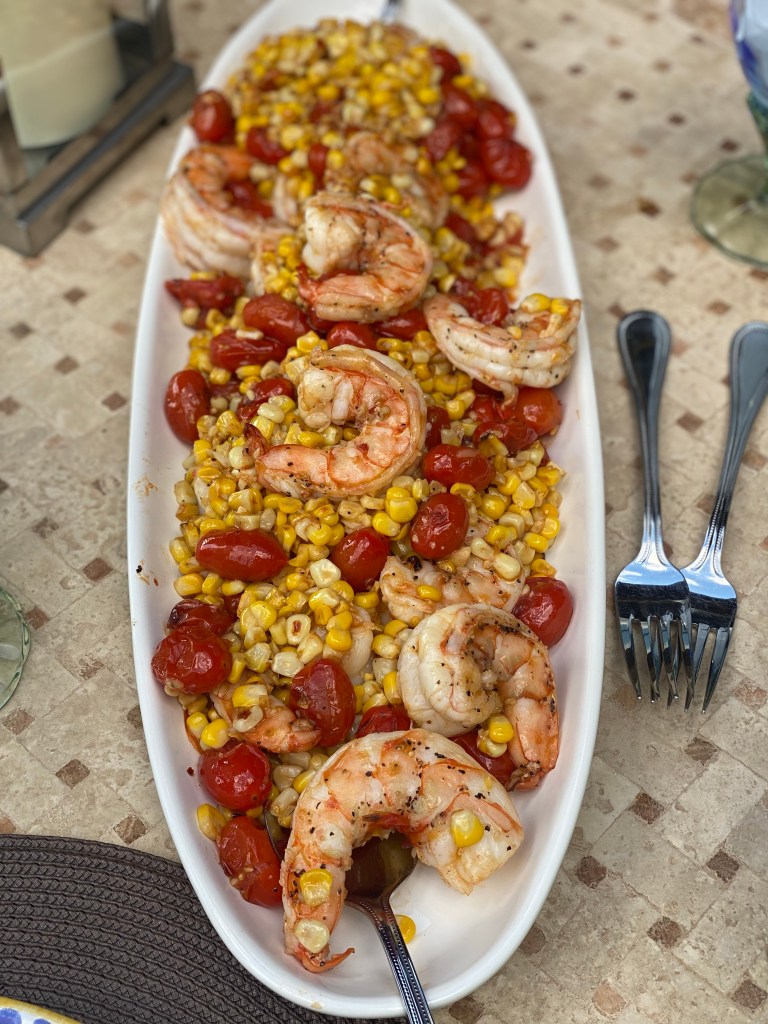
Author Archives: cookingwithcandi

Caprese Baked Chicken– One-Pan

I made this delicious dinner last night to rave reviews. It was very easy to make with very few ingredients. Cooks in about 1/2 hour. Prep is fairly quick – maybe 15 minutes. I go to a local butcher when I am in the city but if I buy the chicken from Whole Foods or somewhere I pound them myself with a mallet which is a great tool to have on hand. You want chicken breasts to be about 1/2 thick.

Enjoy with spaghetti on the side , a fresh green salad, or zucchini noodles would be great.

*this recipe would probably serve 4 with a pasta and vegetable/salad on the side.

Ingredients:

3 cloves garlic, minced

1 pint grape or cherry tomatoes — your choice, Campari Tomatoes are also delicious when available I used cherry tomatoes

3 Tablespoons Olive Oil

2 Tablespoons balsamic glaze, plus more for serving — this is a must and it’s available in most food stores

1 1/2 Teaspoons kosher salt

4 medium boneless, skinless chicken breasts mine were small but it was just for the two of us so make sure yours are larger if you are cooking for 4 (app. 2 lbs. total)

1/4 teaspoon freshly ground black pepper

4 oz. fresh mozzarella cheese or grated mozzarella — I used grated because that’s what I had in the house

fresh Basil — about a 1/4 of a small bunch

Directions:

Arrange rack in the middle of the oven and heat oven to 425 degrees

Mince 3 garlic cloves

Use cooking spray on a 9×13 inch broiler safe baking dish

wash tomatoes and add to the sprayed baking dish

In a small dish I mixed 3 minced garlic cloves, 3 Tablespoons Olive Oil, 2 Tablespoons balsamic glaze, and app. 1/2 teaspoon kosher salt — stir to combine and pour over the tomatoes and using clean hands mix around on the tomatoes making sure tomatoes get covered

Pound 4 medium boneless, skinless chicken breasts if not already pounded by butcher: Season all over with the remaining 1 teaspoon kosher salt and 1/4 teaspoon black pepper

Add the chicken to the baking dish 1 piece at a time, turning to coat all over with the balsamic mixture. Push the tomatoes to the edge of the baking dish and nestle the chicken in a single layer in the middle ( see photo)

Roast until the chicken is cooked through and registers at least 165 degrees on an instant read meat thermometer inserted into the thickest part about 20 minutes.

If using fresh mozzarella slice thinly, Pick the leaves from the bunch of basil and chop it or thinly slice it as well.

Remove the chicken from the oven and I took a fork and smashed tomatoes which happened very easily to release the juices and then heat the oven to broil . Place the cheese over the chicken and return to the oven and broil for app. 2 minutes. All ovens differ so check on it after 1 minute, mine needed 2.

Drizzle with more balsamic glaze if desired ( recommend) and garnish with fresh basil.

Spoon the tomatoes and sauce over the chicken and over pasta if you’re using. It’s a light sauce but should yield enough for a small amount of pasta.

Greek Chicken–Sheet Pan Style with Potatoes and Lemons

This has become one of the staples in our house. Truly easy and so delicious –as good as any restaurant chicken I have ever had.  It is so delicious and the only caveat is it should be marinated for at least 6 hours and if you remember to do it — overnight. I usually do it early in the morning and it’s perfect. I also use chicken thighs because we prefer but if you want you can use chicken breasts but they tend to dry out so be careful with the cooking time and use a meat thermometer to keep an eye on them.  A big thank you to Pamela Salzman for this wonderful recipe and you should all check out her blog and her cookbooks @pamalasalzman.com  

I pretty much followed the recipe as is and the marination is key to it’s success so don’t skimp on that part. Just keep in mind when cooking on a sheet pan all together –the pieces all need to be as uniform in size as possible so that they cook together at the same approximate time. So meat needs to be the same size and the veggies should be as uniform as possible.

Ingredients:

4 bone-in, skin-on chicken breasts (halved) or 8 chicken thighs , we prefer the thighs

1/4 cup extra virgin olive oil plus a little extra

1/4 cup fresh squeezed lemon juice (app. 2 large lemons) plus 1 lemon thinly sliced

1 Red Onion, sliced into 1/4 inch wedges

app. 1 lb. Yukon Gold Potatoes, diced into 1″ pieces — see photos if using small potatoes you can cut in 1/2 and use whatever potatoes you like

1 Tablespoon Red Wine Vinegar

1 Tablespoon minced garlic — app. 2 large cloves

2 Tablespoons dried oregano plus extra for sprinkling

2 Teaspoons Kosher Salt or Sea Salt whichever you have on hand, plus extra for sprinkling–I used Kosher Salt and it was just fine

Freshly ground Black Pepper, to taste

Directions:

In a large bowl , whisk together the olive oil, lemon juice, vinegar, garlic, oregano, salt and pepper.

Place the chicken in the bowl and toss to coat all the pieces. Allow to marinate overnight or at least 6-8 hours. I recommend overnight or first thing in the morning.

Pre-heat oven to 425 degrees and I sprayed my stainless sheet pan . You can use parchment paper but not necessary if you spray.

I took Chicken out of refrigerator and brought it to room temperature. Then I put potatoes and onions on the sheet pan sprinkled with a little olive to finely coat and then I added chicken and lemon slices and sprinkled with salt , pepper and a few pinches of dried oregano. This step was important for me as I felt the chicken needed a little more salt and the potatoes definitley did. I mixed around so the marinade got on everything as well.

Bake for about 35-45 minutes until chicken is cooked through and the internal temperature is 165 degrees. Breasts could take a little longer — mine didn’t. My chicken was also browned beautifully if you’re wanting it to be more browned stick under the broiler for a minute or two and keep your eye on it if it needs more time. Chicken should be cooked through before this step though.

Follow me @cookingwithcandi on Instagram.


Springtime in a Bowl – Shrimp, Asparagus and Tomato Pasta

Since it’s truly Springtime here in NY I think about lightening up the menu. Asparagus is so very beautiful this time of year and shrimp is always my go-to. This recipe is a variation on my Summertime Tomato Pasta. I wanted to use some of those beautiful asparagus out there. Even though I knew Joel would pick them out I still made this dish. The asparagus are large enough for him to easily pick out and put on my plate. This dish is light and delicious and pretty quick to prepare. It is like springtime in a bowl!  There are so very many things to do with asparagus but this just appealed to me  and if you leave the shrimp out you have a lovely vegetarian pasta dish and if you leave the pasta out you have a super light dish!   I also used linguine in this recipe because it just seems to hold on to the flavors nicely. Happy Spring and Enjoy.

Ingredients:

1 lb. box linguine ( I used Fini Linguine , it was lighter than regular linguine and was just perfect) but any spaghetti will work here.

2 Tablespoons Olive Oil

2 pint size containers of little grape tomatoes, cherry tomatoes, or any small tomato ( app. 16-20 oz. of tomatoes)  I cut tomatoes in 1/2.

kosher salt

freshly ground black pepper

* crushed red pepper ( we like the heat) use your own discretion depending on how you like it, totally optional

3 large cloves of garlic, chopped finely

1/2 cup dry white wine ( I use whatever I have open)

1 lb. Asparagus , trimmed, stalks cut on a diagonal into app. 1 1/2 inch pieces

1 pound large shrimp, peeled and deveined

fresh basil chopped ( app. 1/2 cup)

1 teaspoon dried oregano

Directions:

Cook the pasta according to box directions.( Fini Linguine cooks in 6 minutes perfectly) scoop out a little pasta water after cooking about 1/2 cup to 1 cup and keep it handy if pasta is too dry, you can add water to it a little bit at a time.

Heat the olive oil in a large skillet over medium high heat. Add the tomatoes, app.  1/4 teaspoon kosher salt and app. 1/4 teaspoon freshly ground black pepper. Cook, stirring occasionally, until tomatoes are soft , it takes at least 5 minutes . You want the tomatoes to start to burst so they make a delicious sauce.  Add the crushed red pepper and garlic. Cook for another few minutes ( don’t burn the garlic)keep on low heat and stir around. Add the wine and the asparagus. Bring to a low boil and simmer for at least 5 minutes . Taste for Salt and Pepper, if it needs more this is when I would add it, and I did. I added a bit more salt here, pepper was fine. You need to use your own discretion about the salt .

Sprinkle shrimp in a bowl with a little salt and pepper. Add the shrimp to the pan and continue to simmer until the shrimp is cooked through, about 10 minutes. Shrimp needs to be firm to the touch, and opaque if cut into. Stir in the chopped basil and the oregano.

Pour the sauce over the pasta and toss well to combine.  You can always add more crushed red pepper when finished.

This was really delicious and light. Joel of course picked out every piece of asparagus, and put them in my bowl. That was fine with me because I love asparagus.

*this dish will easily serve 4, if you like you can always add another 1/2 lb. of shrimp for 4 people.

Lemon Couscous with Chicken and Peas

photo (11)  Lemony couscous with grilled chicken and peas!!! Love it!!! It was so easy using very few ingredients and very yummy!   I used chicken breasts and threw them on the grill pan with a little olive oil , salt and pepper. If you really want to make this easy you can use a store-bought rotisserie chicken. You can also substitute any grain of your choice. I happen to love the Israeli couscous ( pearl couscous), it’s not as mushy and has a better texture for this dish especially. I also like to use organic lemons when I’m using the zest of a lemon. If it’s just the juice of a lemon I don’t care as much but I have to say I prefer the organic ones when I know I’ll be eating the skin of the vegetable or fruit.  The flavor of the fresh lemon is just wonderful . 

Enjoy this one!

Ingredients:

2 tablespoons olive oil

1 1/3 cups Israeli couscous ( pearl)

2 1/2 cups chicken broth

Zest of 2 large lemons ( organic)

1/4 cup fresh lemon juice

1/2 – 1 teaspoon kosher salt ( start with less and you may need to add a little more) the parmesan is salty, and you’re salting the chicken.

1/4 teaspoon freshly ground black pepper

1/2 cup grated Parmesan

4 green onions, chopped

1 cup frozen peas

1 lb. thin chicken breasts, a little olive oil and salt and pepper or use a rotisserie chicken breast

Directions:

On a baking sheet, brush chicken breasts with a little olive oil and lightly salt and pepper. The thin cutlets grill up very quickly app. 3 minutes per side. Grill and set aside . I cut chicken up into small pieces before adding them to couscous. You can also cut up thicker chicken cutlets into 2 inch pieces and using a grill pan or frying pan cook them the same way ( olive oil salt and pepper) I like to put chicken in a bowl glaze them with olive oil and s and p and then cook them.

In a large saucepan, heat the 2 tablespoons of olive oil over medium high heat. Add the couscous and cook until lightly toasted , 2-3 minutes. Add the broth, lemon zest, lemon juice, salt and pepper. Bring to a boil. Reduce the heat to medium-low and simmer uncovered until the couscous is tender but still firm to the bite, app. 8 minutes.

I then stirred parmesan cheese into couscous along with the green onions, peas and cut up chicken. Taste for salt and pepper.

I plated it up and we totally enjoyed!

Air Fryer Salmon in 15 Minutes

Last night I made this salmon and I have to say it was so delicious — served it up with a side salad and Trader Joe’s vegetable fried rice — easy peasy and delicious — all you need is an air fryer and some very basic spices. Perfect and quick and delicious! This is a very loose recipe so use as much or as little of the spices as you like. You can use whatever spices you like as well– the paprika gives it a nice color though.

Not much more to say so here’s what I did. Couldn’t be easier.

Ingredients:

I used 3 Salmon Fillets because I like to have a piece left over for the next day so as many filets as you like

Dijon Mustard or you prefer a different mustard use what you like I love Dijon and I slather it on

Paprika

Garlic Powder

Kosher Salt

Black Pepper — I prefer freshly ground but use what you have

Olive Oil Spray

Directions:

Pat salmon filets dry – this is important so that toppings stick to the salmon

I place salmon on a small cookie sheet and slather the salmon tops with dijon mustard use a flat knife or brush — see photo

I then sprinkle each of the spices over the salmon — eyeball it and don’t go too crazy with any one spice but be generous with garlic powder and paprika. Easy on the kosher salt just sprinkle and a few grinds of the black pepper. I then finish with a quick spray of olive oil on top to keep the salmon moist .

I like to pre-heat my air fryer so I set it to 400 and pre-heated for 5 minutes ( optional)

I can only get two filets into my air fryer at a time — I cooked the first two skin side down at 400 for 8-10 minutes depending on how you like your salmon, 9 minutes should be perfect but every air fryer is a little different. Then repeat with the rest of the salmon. Salmon doesn’t have to be served piping hot so you can wait another 9 minutes to serve. The salmon skin gets crispy when you pre-heat the air fryer which I find perfect. Pre-heating is really optional and you can remove the skin after cooking if you prefer — I don’t. The salmon gets a beautiful crust and the mustard gives it delicious flavor.

*obviously the size and thickness of your salmon will impact cooking time so always best to undercook the salmon and add time rather than over cook the salmon.

Sheet Pan Shrimp with Asparagus and Potatoes

IMG_4193

This dinner was just delicious.  I used under 8 size shrimp. What this means is that there were about 8 to a pound , so rather large and the cooking times were perfect for them. You will probably have to adjust your cooking time depending on the size of your shrimp. Obviously the larger shrimp took a little longer to cook. Timing will vary depending on your oven and the size of the shrimp you use.  The potatoes and asparagus times will remain pretty much the same. I just love cooking on one sheet in the oven! This recipe is a keeper and one I will re-visit often and maybe use different veggies, since I am the only one who ate the asparagus anyway.

Ingredients:

1 pound large shrimp ( anywhere from 8 – 16 count) is perfect – thawed, peeled and de-veined and leave the tails on

Extra – Virgin Olive Oil

3 cloves of garlic-minced

1/4 tsp. crushed red pepper flakes if you hate the spice you can omit it

2 Lemons, 1 for zest and juice of, the other 1 thinly sliced

1 lb. Asparagus-trimmed

1 lb. Fingerling Potatoes–halved lengthwise

Kosher Salt and Freshly Ground Pepper–read directions for amounts

Directions:

Preheat oven to 400 degrees.

Spray a large rimmed baking sheet for easy clean up

Place the shrimp in a large mixing bowl and drizzle with 2 Tbsp. Olive Oil . Add in minced garlic and crushed red pepper flakes. Stir to coat and set aside.

In another mixing bowl , toss the sliced potatoes with 1 Tbsp. Olive Oil. Season generously with Kosher Salt and Freshly Ground Black Pepper. Transfer Potatoes to the baking sheet in a single layer. Roast potatoes for anywhere between 20 and 30 minutes, or until they are almost tender.

While potatoes are roasting, toss asparagus with 1/2 Tbsp.of Olive Oil and season with Salt and Pepper,  Set aside

Now add 1 Tablespoon Lemon Juice to bowl of shrimp and toss to coat. Season Shrimp pretty generously with kosher salt and freshly ground black pepper.

After 20 minutes or so remove potatoes from the oven and add asparagus and lemon slices to baking sheet. Continue to roast potatoes and asparagus for another 10 minutes,  potatoes should be tender by now , pierce a potatoe with a fork to check for tenderness. If potatoes still need time you can leave them in for a few more minutes. Using a slotted spoon add shrimp to baking sheet and put back in the oven. Roast for another 10 minutes or until shrimp are pink-opaque and firm to touch. My shrimp took about 12 more minutes, this time will depend on your shrimp. I checked after 5 minutes and using tongs turned them over and continued cooking for another 7 more minutes.

When I removed from oven I sprinkled with lemon zest. Perfection on a plate!

*one added tip– after my shrimp is peeled and de-veined and before I am about to cook I always wrap my shrimp in some paper towels to dry them off. It helps with the oil and spices sticking to shrimp.

Maroulosalata (Greek Lettuce Salad)also known as Marouli Salad

this is a traditional Greek Green lettuce salad which is simple to make with just a few key ingredients. When I eat in a traditional Greek Restaurant this is my “go-to”. While I love a good greek salad there’s something about the combo of herbs and cheese and lemon here that I love.

I love a good herb flavor and this one is packed with delicious fresh dill. If you’re not a fan of dill this one’s probably not for you and stick with my Lemon Parmesan Salad.

Enjoy!

Ingredients:

2 hearts romaine lettuce

4-5 scallions, diced

1 small bunch fresh dill, chopped — this is the flavor you’re after so don’t omit unless you hate dill then go with another salad

4 oz. Feta Cheese, crumbled

*feel free to add chopped cucumbers

Dressing:

1/2 cup olive oil

1 large lemon, juiced

1/4 tsp. kosher salt

*1 teaspoon dried oregano –also optional

*cracked black pepper to taste -also optional

Directions:

Rinse your lettuce –then thinly slice. Dry well.

whisk together the oil, lemon juice and salt until smooth. Can be made ahead .

Place the first 4 ingredients in a large enough bowl to hold salad and toss. Toss all ingredients together .

That’s it folks!

*dressing holds for a few days in the fridge – probably a week

Easy Israeli Salad

This salad is so delicious and fresh and works so well with grilled chicken, fish or really any protein. It’s a perfect accompaniment to a BBQ or even a Holiday Meal because it’s fresh and tasty . It works well with lunch, brunch or dinner.

I just love it for lunch or dinner and it’s so easy that anyone can do it. Add in feta cheese, olives, or canned chick peas to add to this wonderful deliciousness.

Whatever and whenever you decide to serve this it will be most wonderful.

Just a word about making ahead… I chopped and diced all the vegetables and put in a bowl and put in the fridge. I juiced my lemon and had it set aside. Right before serving I added olive oil and lemon juice stirred it up well and tasted for salt and pepper.

If you add oil and lemon juice too soon it will be very soggy and I don’t like it that way at all. So just have it all ready to serve and add dressing right before.

Ingredients;

this is what I used feel free to substitute or add in whatever you’d like. ( Canned Chick Peas are also delicious in this) Olives, Scallions, Feta Cheese, whatever you feel like.

1 Large Seedless Cucumber or remove the seeds from a seeded one or just keep the seeds if you don’t care

1 box grape tomatoes halved

1 yellow pepper, diced or an orange one. I used orange and yellow about 1/2 and 1/2

1/2 cup diced red onion

2 Tbsp. Fresh Parsley , chopped

3 Tablespoons Lemon Juice

2-3 Tablespoons Olive Oil– I used 3 but you can start with 2 add the salt and pepper and add for more flavor after

Kosher Salt and Freshly Ground Black Pepper

*I love chick peas so I always add about 1/2 can of rinsed and drained chickpeas and of course a little feta never hurt anyone either — use as much or as little as you’d like and of course some Kalamata olives work very well here as well– obviously you can make this delicious salad your way

Directions:

In a large bowl, toss together all the vegetables. Add the lemon juice, olive oil and chopped parsley and mix thoroughly to coat.

Season with Salt and Pepper to your liking. Serve cold or at room temperature. I like it cold but it’s delicious either way.

Matzo Brei

This is a delicious way to make a meal with eggs and matzo. Sometimes we eat it for dinner and it’s just sort of perfect. Real comfort food for us.  I always loved Matzo Brei since I was a little girl, and I always wondered why it is that we only eat this delicious concoction during Passover.  It’s such a delicious treat why don’t we eat it more often? In our house we usually eat it till the matzo runs out. Usually for the week of Passover, then we stop. It’s so good. Everyone has their own little special spin on it.  Before I met Joel I always ate my matzo brei sweet with maple syrup sort of a matzo french toast. Joel loves it crispy and salty with a lot of pepper and since I know him he always asks for it this way , I sort of grew to love it this way as well. What’s not to love?  You definitely don’t have to be Jewish to love Matzo Brei. This is how we make it around our house.

Ingredients:

*serves 2 just barely (can and should be doubled)

3 Sheets of Matzo broken into little pieces

2 Large Eggs

Salt and Pepper

2 Tablespoons Vegetable Oil to cover bottom of pan — but usually 2 Tablespoons is about right

Directions:

Break the matzo into little pieces and place in a bowl. Cover with very hot water from tap. Let it stand for a couple of minutes, and then drain it. ( I usually put a plate over bowl and pour out all the water) Beat Eggs in another bowl, season with salt and pepper. Use your own discretion here, Joel likes it with a lot of salt and pepper. Wait a few minutes so matzo isn’t very hot before adding the eggs then combine the eggs with the drained Matzo till a batter forms. Heat the vegetable oil in a large frying pan over medium -high heat — make sure oil is very hot . I carefully  add the matzo mixture to the hot oil  and start to fry it up scrambling it as I go, we like it in little pieces. ( you can make this batter into small pancakes as well and just fry up until golden brown) I cook it till it is all fryed up and crispy. It should cook up pretty quickly if the oil is hot enough. You can serve it with less salt and pepper and put jam on the side, maple syrup on it, cinnamon , whatever you like! Matzo Brei is awesome even when you feel like you can’t face another piece of matzo.

Matzoh Crunch ( like candy)


Many years ago I made this recipe and it was so awesome that it’s been part of our Seder ever since. It’s easy to make and really delicious to eat.  Marcy who is a great cook and gave me this recipe says she must always supply it for her kids, and she keeps in containers in  the refrigerator and sends them home with it ( even better) this is the stuff that I find deadly to keep around. It’s candy, and fun to make with your kids or grandkids. You can use white chocolate, M & M’s , or toasted almonds/pecans /walnuts etc. or stick with recipe as it is.

 Thanks for sharing  the recipe Marcy.

Happy Passover!

Ingredients:

4 – 6 unsalted matzoh sheets

1 cup unsalted butter or margarine

1 cup brown sugar, firmly packed

3/4 cup chocolate chips or semi-sweet chips you can use white chips as well

*nuts if you’d like sprinkled on top (almonds/walnuts etc.) or colored sprinkles are fun ! 

Directions:

Preheat oven to 375 degrees

Line a cookie sheet with foil and cover bottom of pan with baking parchment on top of foil. ( this is important b/c mixture is very very sticky) Line bottom of pan evenly with matzoh sheets, cutting extra pieces of matzoh to fit on the cookie sheet as even as possible. Combine margarine/butter and brown sugar in a heavy bottomed saucepan. Cook over medium heat, stirring constantly. Remove from heat and pour over matzoh. Place in oven and reduce heat to 350 degrees.  Bake for 15 minutes watching to make sure the mixture is not burning. Remove from oven and sprinkle chocolate chips on top. Let stand 5 minutes, then spread melted chocolate over matzoh after you spread melted chocolate sprinkle with whatever toppings you like — I like colored sprinkles and chopped pecans . While still warm, cut into squares or odd shapes and put in refrigerator until set. Chocolate will get hard. I think it’s better to go with the “odd shapes” as it may be hard to cut perfectly square. You can use white chocolate, and if you’d like sprinkle nuts on top as I mentioned above.

Once it’s completely cooled down you can put into containers and store it will keep for a while. So you can definitely make this recipe ahead of time.