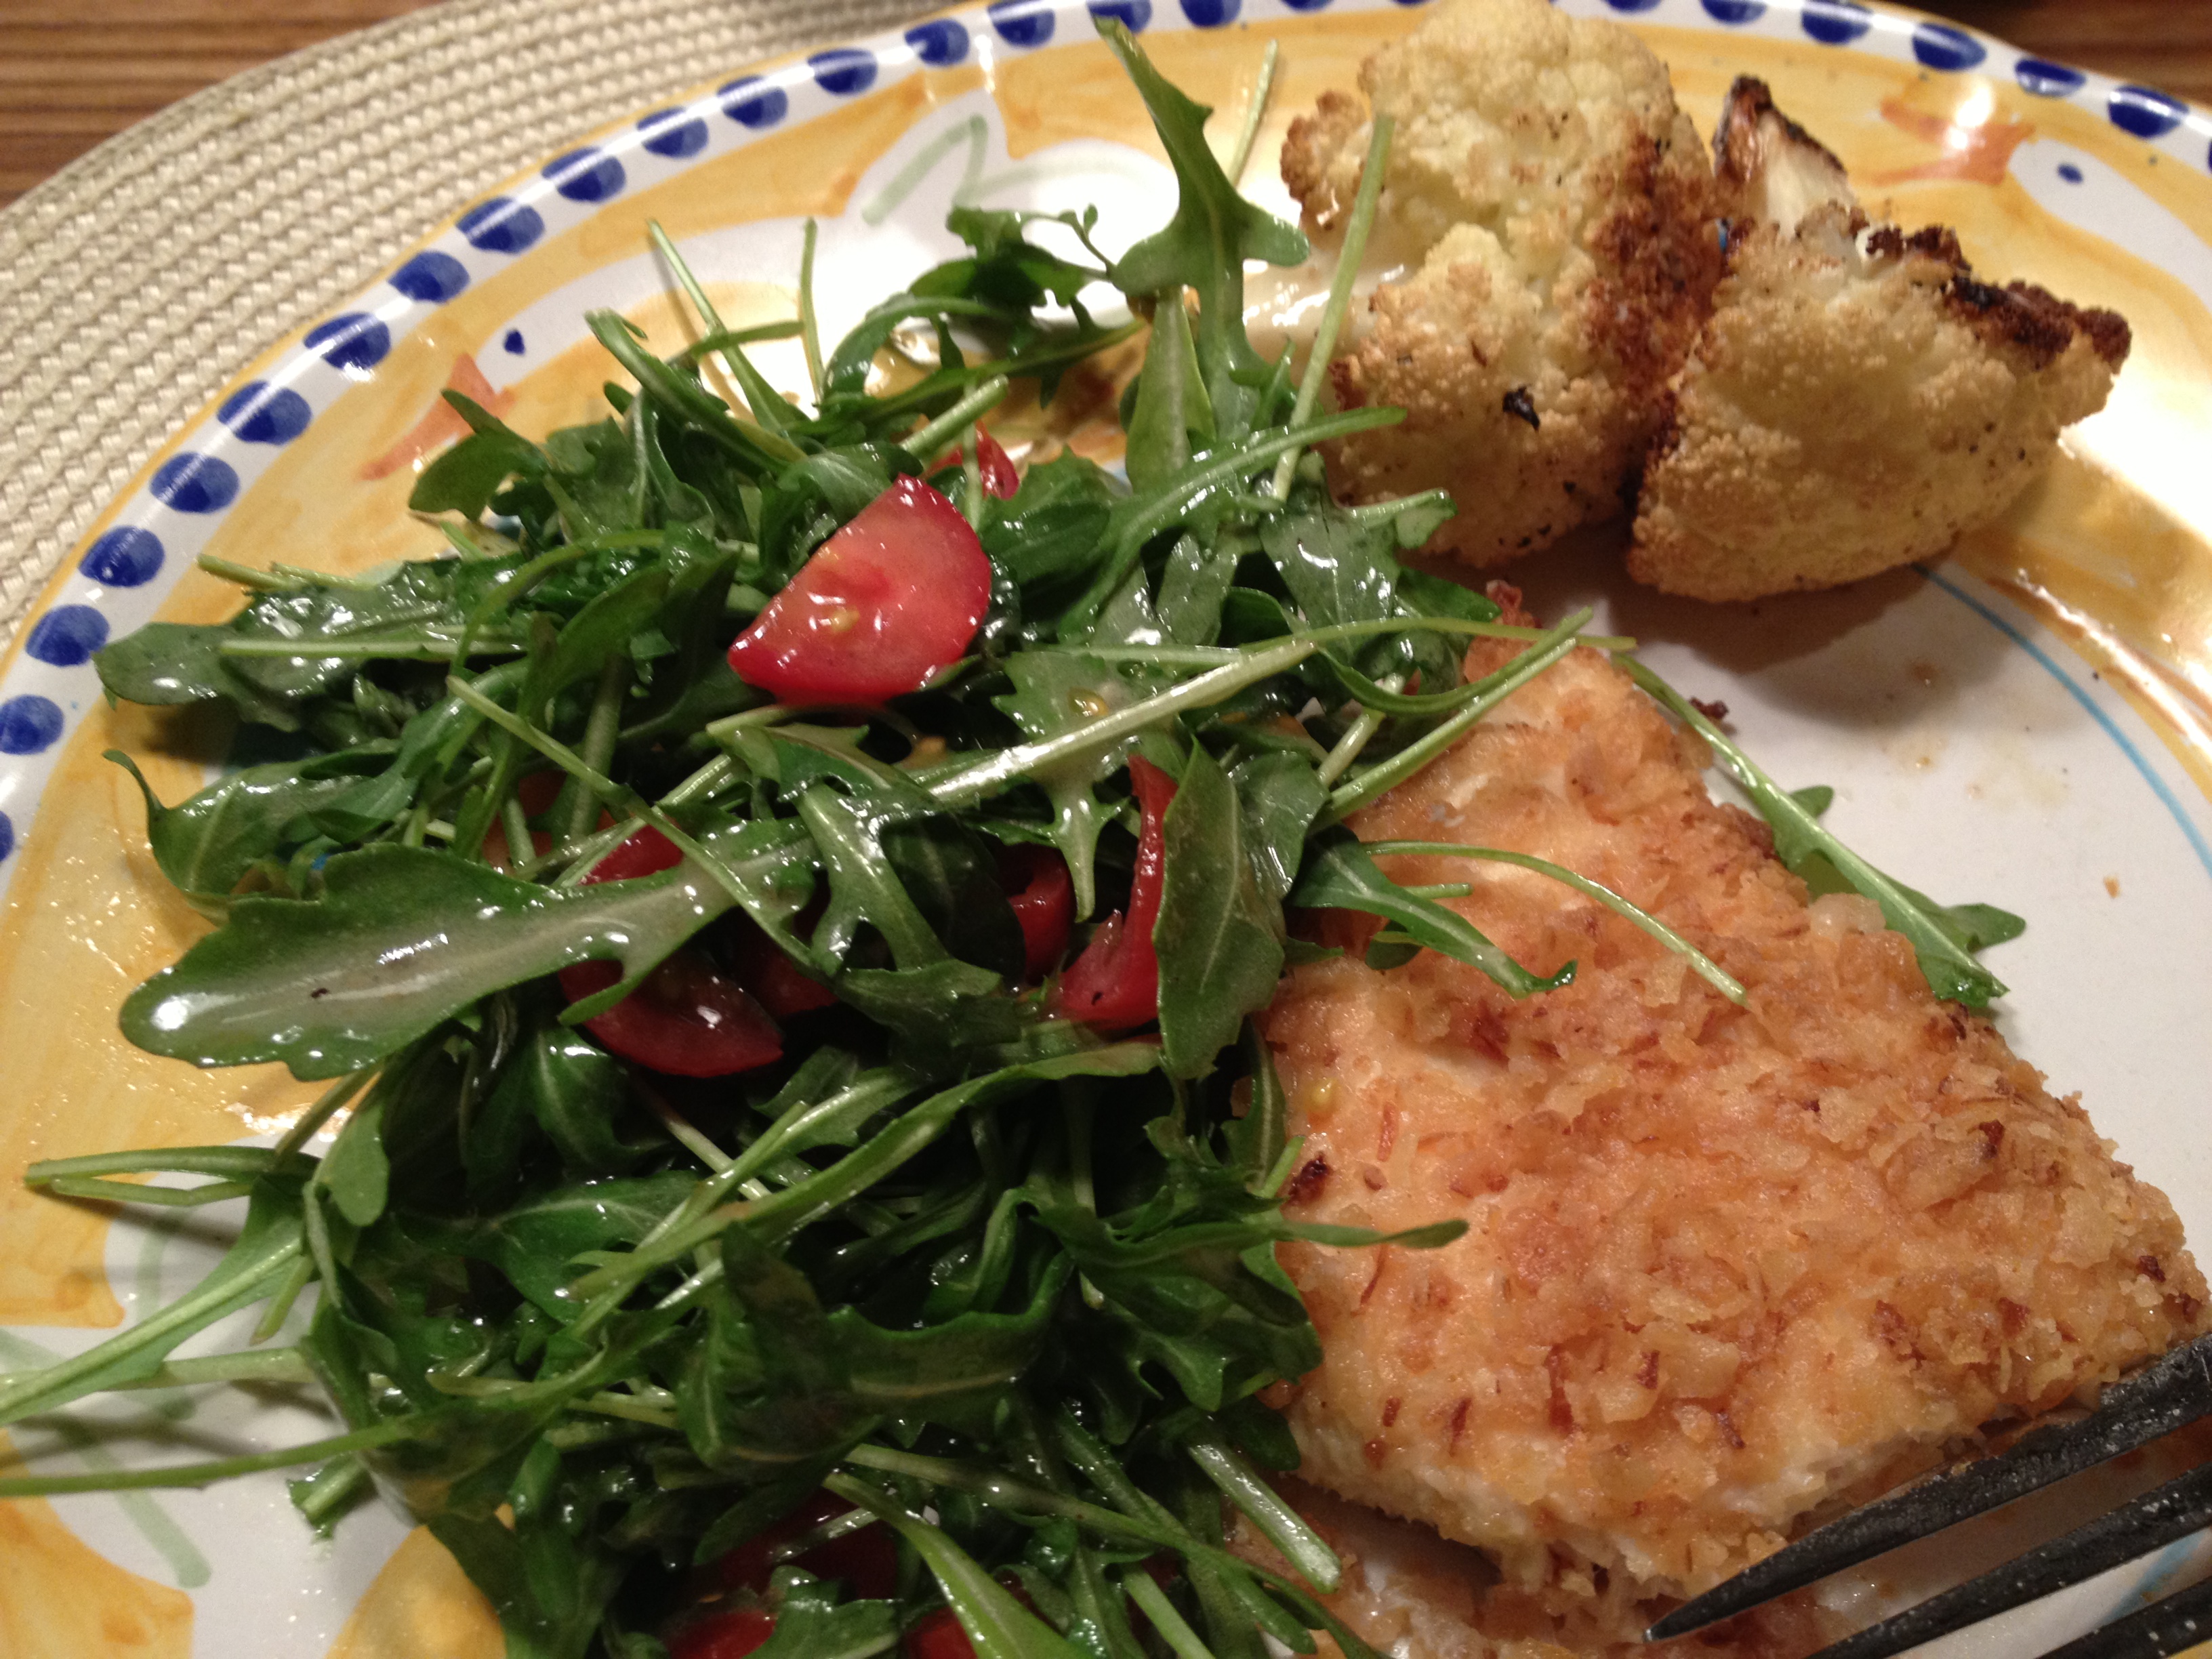
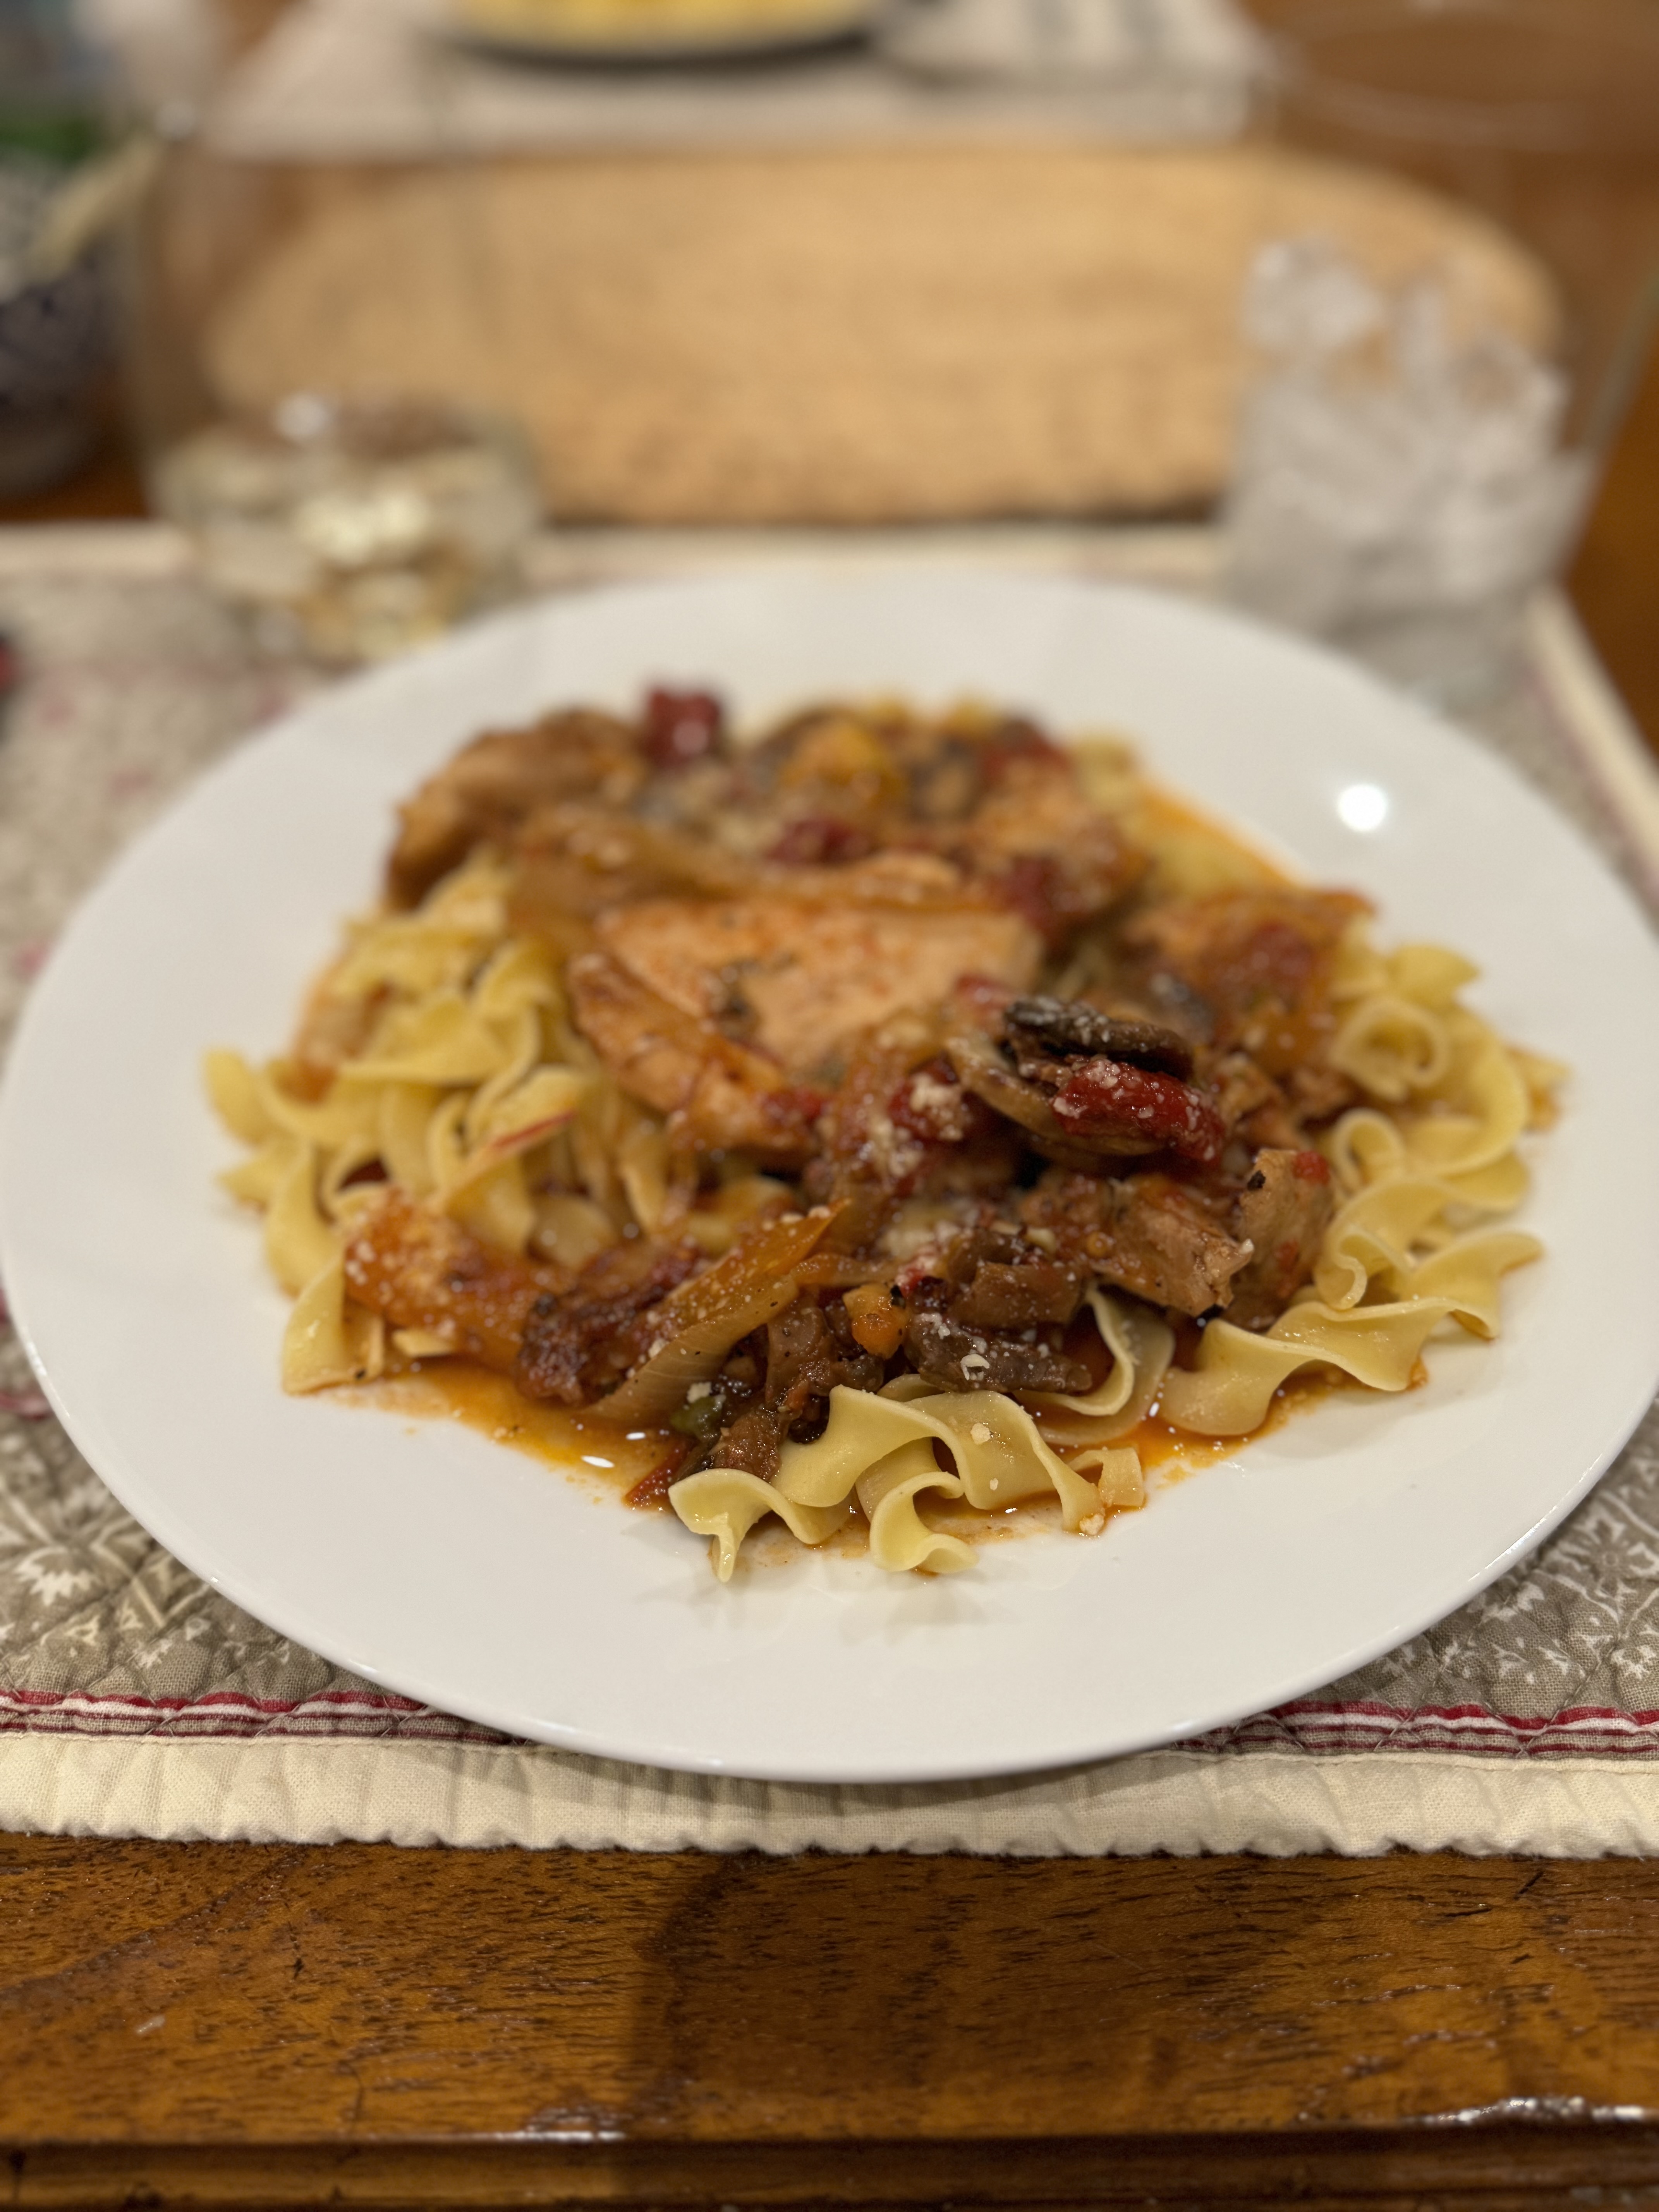
Tag Archives: recipe

Winner Winner Chicken Dinner-Mustard and Balsamic


I made this for dinner the other night and I have to say it was very delicious. I used boneless skinless chicken thighs, of course you can use any cut of chicken you’d like.  All I needed was the chicken and the fresh rosemary.  I had all the other ingredients on hand. You will need to marinate for about 1/2 hour and cooking time is about an hour, no need to marinate over night which is part of what I loved about this recipe.  Balsamic Vinegar and Dijon Mustard and a few other easily obtainable ingredients make this a no fuss recipe.  This recipe is for 8 boneless skinless thighs but feel free to double it up, I used about 10 thighs . It would be perfect on the grill as well. I used my oven and I have to say we both loved this recipe. It is sort of a Balsamic Chicken with a hint of mustard. 

I will say that sometimes I don’t have rosemary and have all the other ingredients and it is just as tasty! So no worries if you don’t like Rosemary or if you just don’t have it in the house. I couldn’t find any fresh Rosemary yesterday so it had none! All Good!

The chicken would also be wonderful on day 2 as a leftover in a salad!

Enjoy!

Ingredients:

8 boneless chicken thighs or 1 package of thighs about 1 – 1 1/2 lbs. you can double recipe but you probably don’t need to double olive oil — maybe 3/4 cup for double but double down on everything else if you’re doubling

1 Tbsp. Dijon Mustard ( make it heaping)

1/4 cup of Balsamic Vinegar

1/4  cup of Olive Oil 

2 tbsp. fresh lemon juice ( I average lemon)

2 Tbsp. Fresh Rosemary chopped

1 garlic clove, minced

app.  1/4 tsp. of kosher salt, I just sprinkled lightly over the chicken and about 6 grinds on the pepper mill. If you’re doubling recipe you will obviously need more salt and pepper

Directions:

In a bowl, combine the mustard, vinegar, garlic, rosemary and lemon juice. Slowly add in the olive oil with the mixture while you whisk–to emulsify.

Place the chicken in a container or Pyrex  (don’t use metal). I sprinkled about 1/4 teaspoon of kosher salt over the chicken tops.  Pour the marinade over the chicken and mix around so chicken gets a good covering on all sides.  I left it out for 1/2 hour and let it marinate, you can refrigerate it.

Preheat oven to 375 degrees

Transfer the chicken to a sprayed ( cooking spray ) baking dish and empty any remaining sauce on top of it.

Place in the oven and bake for 50 minutes  or until the chicken is cooked through. It got a nice crust without drying out the chicken after one hour. If you’d like for maybe 2 minutes you can put under the broiler but watch it carefully so it doesn’t char too much, I do this sometimes if it doesn’t have a nice crust from baking it.  Depending on your oven and the size of your chicken 1 hour should do it. If you’re working with breasts you’ll have to cut into chicken after 50 minutes to check for doneness depending on the size of your breasts. Haven’t tried it on the grill yet but I can’t imagine this would be anything but delicious, just don’t burn it up!!!!!

Once cooked I spooned a little cooked marinade over the chicken and rice! and served with burnt brussels this time out or any vegetable will do.

Yummy!

Chicken Noodle Soup with Ground Chicken– Easy Peasy

I know that most of the time I post a soup recipe with chicken it’s using a rotisserie chicken which is a convenient hack but this time out I used ground chicken. Saw this recipe on my favorite cooking site @nytimes.com/recipes and knew I had to make this . Of course I made a few changes to better suit our tastes but feel free to check out original recipe. Very very easy and very delicious. You can definitely add egg noodles or any small pasta or cavatelli. I used ditalini which I almost always use for a small pasta. You may need to adjust amount of stock so have extra on hand.

Enjoy!

Ingredients:

5 Tablespoons olive oil–

1 pound ground chicken ( if you can get dark meat I would but unless you’re going to a butcher you probably won’t find it) white meat is fine

Kosher Salt and freshly ground black pepper

4 garlic cloves, roughly chopped

1 1/2 teaspoons ground coriander

1 large carrot, peeled and cut into small cubes or slice and cut in 1/2 moons —

2 celery stalks, halved lengthwise, then sliced 1/2″ thick

1 large shallot , finely chopped

1 can small white beans 🫘 drained

1 teaspoon dried thyme– if you want to use fresh thyme about 1 Tablespoon of thyme leaves

7-8 cups chicken stock, more as needed

1 cup dried small shaped pasta

Directions:

In a large stock pot , heat 3 tablespoons oil over medium heat. Add the chicken, season with some salt and pepper and cook, using a wooden spoon to crumble chicken, app. 5 minutes.

Add the garlic and coriander and continue to cook, stirring frequently, until chicken is cooked through, app. 3 minutes. Using a slotted spoon remove chicken to a small bowl and cover with aluminum foil to retain moisture, cover and set aside.

Add the carrot, celery, shallot, thyme and the remaining 2 tablespoons of olive oil to the pot, season with some salt and pepper and cook stirring until everything is slicked with olive oil, app. 3 minutes. Add the stock — I started with the full 8 cups and brought to a boil over high heat. Add the can of drained white beans while boiling . If you don’t like beans you can omit .

I cooked my noodles in a separate pot . When the soup cooked down for a while and vegetables were very soft ( probably a 1/2 hour or more) I added the ground chicken and any and all juices that were in the bowl and heated until warmed through, taste for salt and pepper.

I placed some pasta in the individual bowls and poured the hot soup over the pasta and if you’d like a squirt of fresh lemon is always delicious here.

Enjoy!

Lox on a Chip — Appetizer

I made these last night for New Years and they were really delicious -crispy crunchy base with just a touch of smoked salmon and a blend of cream cheese and sour cream. I topped it with capers and because I didn’t have fresh chives I passed on that part but if I could get them I would have. They’re delicious and salty and crunchy and kind of perfect. So very easy to make and perfect for just yourself or a small crowd — I made app. 25 chips and it was perfection on a chip. Next time you need a little appetizer this is wonderful. Simple and sophisticated.

recipe credit goes to onceuponachef.com

Ingredients:

1/4 cup sour cream

4 oz. cream cheese- softened ( just leave out at room temperature for a while till it’s soft enough to mix with sour cream)

pinch kosher salt

8 oz. smoked salmon ( available in packages in the supermarket)

a few tablespoons capers, drained

a few tablespoons minced fresh chives

25-30 large potato chips, preferable a ripple cut -as you can see chips are uneven in size and it doesn’t matter – I tried to just get whole chips.

Directions:

In a small bowl, mix the softened cream cheese with the sour cream and salt until evenly combined and set aside

Take out the largest chips from the bag and I just tried to get whole chips , place a folded small piece of salmon , put a small dollop of the cream cheese mixture ( you can eyeball it) Top each crisp with a few capers and a sprinkle of fresh minced chives.

Arrange the crisps on a platter and serve immediately — they will start to get soggy if they sit around too long. So right before you’re serving finish the recipe.

img_5489-1

Cabbage, Dates and Feta Salad– Sweet and Salty Salad

Salads are always one of my favorite recipes — this one is absolutely delicious and very easy and very simple to follow. Salads are my favorites because they are so loose, you can swap out ingredients for something you like more and add in some stuff you like. I have made this with a variety of bases , cabbage, or one of those cabbage mixes that they sell in the supermarkets. The last time I made this I used a cabbage mix with Kale and Carrots that they sell in Whole Foods which tasted wonderful. I wouldn’t use a lettuce mix because it won’t hold up to the dressing so stick with a cabbage type of base.

You can even dress ahead if you prefer your cabbage a little less crunchy. Kale also tastes best when it gets to sit in dressing for a bit.

Absolutely delicious fresh tasting salad — make it your way with any cabbage or cabbage mix

* should serve 4-6 nicely as a side salad

Ingredients:

1 head of purple or green cabbage or a package and 1/2 of cabbage mix — app. 1-1 1/4 pounds –as you can see in photos one time I used a package of a kale and cabbage mix and one time I just chopped up a head of red cabbage. Do whatever combo you like

3 Tablespoons of Olive Oil

2 Tablespoons of fresh lime juice — I prefer the taste of lime but if no lime use a lemon

Salt and Pepper– you can use black pepper or crushed red pepper flakes — to taste — I sprinkled a little crushed red pepper not too much just a pinch or so.

1/2 cup pitted dates, coarsely chopped or sliced

4 ounces of feta but if you really like feta you can use a little more — crumbled or chunked your call

2 teaspoons well-toasted sesame seeds– put into oven on a small baking sheet and cook for a few minutes to brown up slightly — be careful not to burn

Directions:

Toss cabbage with Olive Oil and one Tablespoon of fresh lime juice, sprinkle a little salt and pepper, coating everything evenly. Taste and add more lime juice, if needed more salt and pepper. Go easy on salt because feta is salty but you will need a little salt. You’ll want the base well seasoned because this is where salt and pepper are best absorbed. I let it sit for a bit so that the cabbage softens up. You can actually let the whole salad sit for at least an hour, if not longer in the fridge. The salad leftovers tasted pretty good the next day as well.

Fold in the dates and the feta and sprinkle with the toasted sesame seeds.

That’s it folks — easy and delicious fresh tasting salty and sweet salad.

Crispy Parmesan Sweet Potatoes

Thanks to my friend Leslie for this delicious recipe. So great when friends share their delicious recipes with you and you love the recipe so much that you are making it on repeat and now I’m sharing with all of you.

These are cheesy and crispy on the outside and soft and mushy on the inside — just like a sweet potato should be.

The first time I made these I didn’t use parchment paper but I think I would use all the time in the future. I sprayed the baking sheet and it was fine and came out easily enough but I believe parchment paper is the way to go– I would however still lightly spray the bottom of your baking pan before placing the parchment paper which can help it stay in place . Parchment paper is designed to be non-stick so spraying it would be redundant. As you can see in photos some of the cheese fell off but it’s ok because they were delcious anyway.

This is easy to make and delicious to eat and highly recommend if you love Sweet Potatoes and you love Parmesan Cheese.

*little hack that I was unaware of that I’m passing on to all of you– when I went to my local cheese shop to buy grated parmesan cheese the owner happened to be there and he told me after I use grated cheese put it in the freezer , it will not freeze. When I need it again just take out of freezer and use and return un used cheese to freezer. It will not go bad!!!!!! as it often does once it is opened and expiration date is only for a few weeks. This is a great little hack one I will use from now on.

Ingredients:

4 small sweet potatoes -just buy potatoes that can be cut in 1/2 the long way sometimes it’s tough with “knobby” ones

2 Tbsp. Olive Oil

1/2 tsp. garlic powder

1/2 tsp. Italian seasoning

1/2 cup -3/4 cup finely shredded parmesan

Kosher Salt and Coarse Black Pepper

Directions:

Pre-heat oven to 400 degrees and line a baking sheet with parchment paper or just spray with baking spray

In a small bowl I mixed olive oil, garlic powder and Italian seasoning

Place your cut sweet potatoes in a large enough bowl to fit all of them — pour olive oil mixture over them mix well getting olive oil all over the sweet potatoes — sprinkle with some salt and pepper and let them sit for a minute while you prep pan

Sprinkle parm cheese evenly onto prepared baking sheet – place sweet potato halves cut side down on top of parmesan

bake for 30-40 minutes till sweet potatoes are tender and bottom layer of cheese is crusty and deeply browned.

Remove and let cool a little bit before serving!

I wish I had better pictures but you get the picture.

img_5356
img_5358-1

Happy Holidays to all.

Saucy Stuffed Shells – Baked and Meatless

Shells 007
Shells 009

  I just love a baked pasta — nothing like it for good old fashioned comfort food. This recipe is delicious and perfect comfort food for those cold winter nights. I wanted a crowd pleaser that was vegetarian and something that can easily be made ahead and frozen and that would appeal to both kids and adults equally.

     I served with a salad with my Homemade Maple Syrup Salad Dressing ( see on blog) and it was really pretty awesome. Took a few hours to prepare, mostly because I made my own sauce ( Sunday night sauce) but feel free to use a jar of prepared sauce if you’d like. This is a perfect meal to make ahead of time, and just pop into oven.

*This dish will stay fresh in the freezer for up to 3 months. Assemble the shells with the cheese and cover tightly and freeze. When you’re ready to eat, you can bake from frozen but be sure to add another 30 minutes to the cooking time. You can also freeze individual sized portions of leftover shells that have already been cooked. Reheat previously baked shells in the microwave in 90 second intervals until heated through. 

Perfect for Christmas and New Years.

Of course if you love it with meat you can make a meat sauce and follow same directions.

Happy Holidays to all — and visit me on Instagram @cookingwithcandi

Ingredients:

1 box Jumbo Shells ( you won’t use all but a lot of them break, etc.)

1 lb. Ricotta ( I used Part Skim)

1 Egg

1 lb. Mozzarella Shredded ( I used Part Skim) if you can obtain fresh mozzarella and shred it that would make it even better! whatever works for you

1 cup grated Parmesan ( any kind you like)

1/4 cup chopped flat leaf parsley

Salt and Freshly Ground Black Pepper

*marinara sauce or any red sauce I made my own and use my own recipe. If buying sauce and there are some delicious good sauces out there, you’ll need at least 1 large jar of Sauce and my go-to if not using my own is Raos Marinara.   It’s nice to have a little extra sauce in case you need it when you re-heat the stuffed shells. 

Directions:

Preheat oven to 375 degrees.

Prepare Pasta , cook for between 12 and 15 minutes, you’ll want them soft but not undercooked at the center. Drain pasta and cool for easy handling.

Combine ricotta, 1/2 of the mozzarella, 1/2 of the Parmesan, parsley and egg in a bowl. Taste for Salt and Pepper.

When shells have cooled down, fill them with rounded spoonfuls of cheese mixture and arrange them seam side down in casserole dish. I used a 9 x 13 Pyrex and spray with cooking spray. Top Shells with remaining sauce and remaining mozzarella and grated cheese. Place shells in very hot oven . You can turn on broiler for last few minutes , it should be slightly browned and bubbly. Let cool for a few minutes before serving.

Delicious!

Sheet Pan Chicken Thighs with Mustard -Lemon and Garlic with Brussels

Very delicious weeknight meal for the family or for just you! It’s easy and all in one pan with Brussels and red onions. Easy to put together, just try and marinate chicken for how ever long you can — at least 30 minutes and up to 48 hours in the fridge. The marination process is key — I did it for about 6 hours in fridge and removed from fridge to bring to room temperature before cooking.

I don’t recommend using chicken breasts in this recipe as they tend to dry out. So use chicken thighs to get juicy and delicious tasting chicken.

Enjoy this meal bursting with flavor!

You’ll need a rimmed sheet pan, a large glass bowl, a small bowl, and I recommend using a kitchen thermometer which if you don’t have one you should own for cooking chicken.

Ingredients:

2 pounds of chicken thighs ( about 6 ) bone in , skin on

3 Tablespoons Olive Oil ( divided)

1 Tbsp. Italian Seasoning ( available dry in most supermarkets)

2 tsp. Kosher Salt

app. 1/2 ground black pepper

2 Tbsp. fresh Lemon Juice

1 heaping Tbsp. Dijon Mustard

1 heaping Tbsp. stone ground Mustard

app. 10 oz. Brussels sprouts trimmed and cut in half if very large cut in 1/4s and if very small leave whole

1 Red Onion cut into 8 wedges

6 cloves garlic minced

Directions:

To marinate the chicken, pat dry the chicken and put in a large bowl. In a smaller bowl add 1 Tbsp. Olive Oil, Italian seasoning, 1 teaspoon kosher salt, freshly ground black pepper, lemon juice , dijon mustard, stone ground mustard. I whisk it all together and pour over the chicken in bowl and with clean hands squish around the chicken and cover and place in the fridge. Take out of fridge and bring to room temperature before putting into the oven (probably a 1/2 hour)

Pre heat oven to 400 degrees

I spray baking sheet with cooking spray first, then place trimmed and halved Brussels sprouts on the sheet pan. I then put 6 garlic cloves in mini processor and add 2 Tablespoons of Olive oil to processor and when this is done pour over the Brussels and coat well and sprinkle the remaining 1 tsp. kosher salt and some freshly ground black pepper to them.

Place marinated chicken thighs skin side up on the sheet pan moving Brussels and onions around so the chicken touches the sheet . (see photo)

Bake uncovered at 400 degrees F. for 30 minutes then crisp the skin up and brown it under the broiler. I did it for about 4 minutes till I obtained a nice crispy skin. Check chicken temperature before serving but it should be 165 and perfect!

Served over rice and it was delicious.

img_5094
img_5096
img_5092

Banana Pudding from Magnolia Bakery – One of my Top Ten Desserts that you don’t even bake

Since the first time my daughter Jenn made this dessert we have added it to our Thanksgiving Table. Just what you need after that big dinner is this dessert!!! We love it and can’t get enough of it. Whether you’ll be making it for Thanksgiving or anytime just be prepared to fall in love with it. Completely decadent and totally ridiculous in calories and richness it is love at first bite.

It is actually a subtle taste of bananas, but I wouldn’t make this if I didn’t like bananas. I happen to just adore bananas and I absolutely love love this pudding. I cannot have it in the house because I will continually find an excuse to go into the fridge and eat it till it’s pretty much all gone.  As full as I was last year and swearing I wasn’t going to eat another thing for at least a week, when I saw this  pudding I knew I was going to eat it.  I find it impossible to resist and I know others who suffer from this same fate. If you’re in the market for a purely decadent rich over the top dessert then this is it for you. Probably up there on my top ten desserts ever. This is from the More from Magnolia Cookbook so how could it be bad?

*this recipe really needs time , so you must start the day before to let initial pudding set, and then you’ll need at least 4 more hours minimum before serving. So you must factor time into your prep of this awesome pudding but it’s so worth it.

Happy Thanksgiving from our house to yours.

Ingredients:

1 14 ounce can sweetened condensed milk

1 1 /2 cups ice-cold water

1 3.4 ounce package instant vanilla pudding mix ( preferably Jell-O brand)is there another brand?

3 cups heavy cream

1 12 ounce box Nabisco Nilla Wafers ( no substitutions) is there another brand?

4 cups sliced ripe banana

Directions:

In a small bowl, on the medium speed of an electric mixer, beat together the sweetened condensed milk and cold water until well combined, about 1 minute. Add the pudding mix and beat well, about 2 minutes more.* Cover and refrigerate for 3 – 4 hours or overnight, before continuing. It is very important to allow the proper amount of time for the pudding mixture to set.

In a large bowl, on the medium speed of an electric mixer , whip the heavy cream until stiff peaks form. Gently fold the pudding mixture into the whipped cream until well blended and no streaks of pudding remains.

To assemble the dessert, select a large, wide bowl ( preferably glass) with a 4 – 5 quart capacity. Arrange one-third of the wafers to cover the bottom of the bowl, over-lapping if necessary, then one-third of the bananas and one-third of the pudding. Repeat the layering twice more, garnishing with additional wafers or wafer crumbs on the top layer of the pudding . ( Just crush up a few remainder cookies in food processor) Cover tightly with plastic wrap and allow to chill in the refrigerator for *4 hours–or up to 8 hours, but no longer! Serve and behold the love!

Serves anywhere from 12- 15

It’s a large dessert and a substantial one. It stands alone beautifully!

Apple Pear Crisp

It’s Fall and this is the most perfect dessert while apples and pears are abundant . Baked with brown sugar and oat topping served warm with vanilla ice cream and it’s perfection on a plate. This is what I did and it really is pretty easy and not very technical for those of you who want to bake a great dessert but don’t want to fuss with cakes and frosting etc. and special equipment. Most perfect!!! Can be made ahead of time and even frozen . Perfect Thanksgiving dessert and if you like just use all apples and omit the pears doubling up on the apples. But Pears are so wonderful — just saying.

Can easily be cut in 1/2 for a much smaller gathering. You can even put into small ramekins and bake like that for individual servings.

Delicious Easy Dessert.

Happy Thanksgiving to all of you from my kitchen to yours.

Ingredients:

Fruit Mixture:

3 ripe firm pears peeled, cored and thinly sliced

3 apples peeled, cored and thinly sliced

3 Tablespoons freshly squeezed orange juice

1/2 cup granulated sugar

2 Tablespoons flour

3/4 Tablespoon ground cinnamon

1 teaspoon pure vanilla extract

Topping:

1 cup old fashioned rolled oats

2/3 cup all purpose flour

2/3 cup light brown sugar

1/2 teaspoon salt

1/2 teaspoon ground cinnamon

1/2 cup unsalted butter, melted

*Vanilla ice cream for serving — obviously optional but in our house it’s a must

Directions:

Preheat oven to 350 degrees. I spray a 9 – 10 inch deep dish pyrex type of dish or any baking dish you like — set aside

In a large bowl combine pears, apples, orange juice, sugar , flour , cinnamon and vanilla — All the fruit mixture ingredients

Dump all the ingredients into your prepared baking dish.

Make the topping in a separate bowl . Combine oats, flour, brown sugar, salt and cinnamon. Add in the melted butter and stir until combined, using your clean fingers crumble the mixture over the fruit. You’ll want to press some of it together to form clumps.

Bake for 45-60 minutes until topping is golden brown, and fruit is tender and it is bubbling all around the edges.

Serve warm with ice cream.

*I put into oven when we sat down to dinner and let it cook so it was ready for dessert. Let it sit for awhile to set.

You can also make ahead and then just re-heat for 45 minutes to an hour . I cover with aluminum when re-heating.

Enjoy!!

The Stuffing that Will Be on Our Table

I made this recipe for the first time Thanksgiving 2011 and it has become my favorite stuffing.  I found it in a Barefoot Contessa cookbook, loved all of the ingredients and thought it was delicious. I know there a lot of stuffings out there and unfortunately  this one is not vegetarian.

I am not gonna lie this stuffing takes some work and a lot of ingredients but it’s well worth it .

I don’t cook my stuffing in the turkey. I make it ahead of time and cook it in a buttered/sprayed baking dish the day of.

Happy Thanksgiving from our house to yours.

Ingredients:

3/4 cup diced dried figs, stems removed

3/4 cup dried cranberries

1/2 cup Calvados or brandy (I used Calvados, bought the bottle last year)

2  yellow onions, diced (approx. 1 1/2 cups)

1/2 stick unsalted butter

1 cup (3 stalks) celery, diced about 1/2 inch

1 lb. pork sausage (I do 1/2 sweet and 1/2 hot. Feel free to substitute any kind of sausage you would like. Try to get the butcher to take it out of casing for you. It’s one less thing to do.)

1 1/2 tablespoons chopped fresh rosemary (please don’t leave this out)

1/4 cup pine nuts, toasted (put in oven at 400 for about 5 minutes and watch them!)

3 cups herb-seasoned stuffing mix –I use Pepperidge Farm Brand

1 1/2 cups chicken stock

1 extra large egg, beaten

Kosher salt and freshly ground black pepper

Directions:

Preheat oven to 325 degrees.

Place the dried figs and cranberries in a small saucepan and pour in the Calvados and 1/2 cup water. Bring the mixture to a boil over medium heat, then lower the heat and simmer for about 5 minutes. Remove from the heat and set aside.

Melt butter in a large saute pan over medium heat, add the onions and celery and saute until vegetables are softened and onions are translucent (don’t burn them.) Add the sausage, crumbling it as you go. Continue to saute, stirring frequently and breaking up sausage. Keep cooking for about 10 minutes, until cooked and browned up. Add the figs and cranberries with their liquid, the chopped rosemary, and pine nuts, and cook until all ingredients come together, for a couple of minutes. Scrape up and remove all the brown bits with a wooden spoon.

Place the stuffing mix in a large bowl. Add the sausage mixture, chicken stock, beaten egg, 1 teaspoon kosher salt, and 1/2 teaspoon pepper and mix well. (This can be prepared ahead and stored in the refrigerator overnight, which is what I do. It’s just too much to do the day of.)

I put the stuffing in a well-sprayed, slightly buttered (optional), baking (gratin) dish. If you put this in the preheated over, you will likely cook it for at least 45 minutes and probably more like an hour to two hours if it’s doubled.  I also stir frequently while it is cooking, and then let it go for the last 15 minutes and it browns up. Taste for Salt and Pepper.

obviously if you are doubling this recipe you will need to use a large (very) frying pan. Or you can just do it in batches. You will need a very large pan to cook it up in though. You need to spread it out while it cooks so it cooks through. Once it is cooked you can always put it in a pretty baking dish and as it heats up just mix it through every once in a while so top doesn’t burn and bottom won’t be soggy.

I know everyone thinks that their stuffing is the best, but if made properly this one is absolutely amazing!

*This will probably serve at least 8 -12 as one of many sides, but feel free to double.

Happy Thanksgiving!