Old Fashioned Lemon Icebox Cake–No Baking at all

IMG_1266

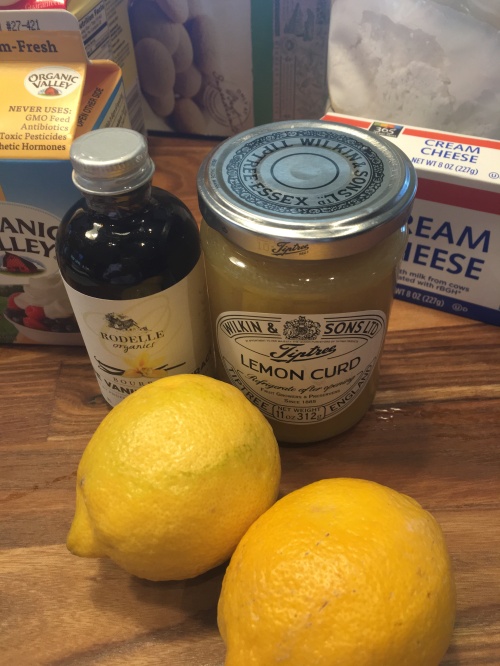
Nothing not to love here, Lemons, cream cheese, heavy cream, lemon curd and did I mention no baking??? So great and fairly easy with simple ingredients. You’ll need either an electric mixer or a hand mixer to whip cream. Nothing beats an electric mixer though with the whisking attachment.

I made it in a 9×13 pan but I think next time I will try to do it in a bowl. It would also be beautiful garnished with fresh lemon slices or berries. We were in a hurry to dig into it so never did get to garnish it.  If you’d like it to look neater when you scoop it out you will have to be more precise with the layering. My cake was very uneven and all the layers and flavors blended together, who cares? it was delicious. If you’d like you can also layer in a trifle type bowl and make a very pretty presentation! Up to you but it was all delish.

This is simple and delicious food if not very rich, but hey it’s dessert! Perfect for a Labor Day BBQ or anytime!

Enjoy Labor Day Weekend even if it’s a little strange this year.

Visit me on Instagram @cookingwithcandi

Ingredients:

4 ounces cream cheese, softened (just leave it out at room temperature for a while till it’s room temperature and feels squishy and soft)

3 cups heavy cream

1/3 cup confectioners sugar

3 teaspoons lemon zest, plus a little more for garnish

1/2 teaspoon vanilla extract

11 ounces vanilla wafer cookies ( app. 1 1/2 boxes)

10 ounces lemon curd–usually available with the jams and jellies  or baking aisle of most supermarkets. (see photo)

Directions:

Beat the cream cheese in a large bowl with an electric mixer until soft. Add the heavy cream, sugar, lemon zest and vanilla and beat until it just holds stiff peaks. It takes app. 3-6 minutes for peaks to form, be patient.

Spread the bottom of a 9 x 13 inch baking dish with 1/2 cup of the whipped cream. Arrange 1/2 of the cookies on top of the cream, fitting in as many as you can without overlapping.(see photos) Spoon 1/2 of the remaining cream mixture on top and smooth evenly with an offset spatula or if no offset spatula use a butter knife. In spoonfuls , app. every 2 inches, spoon half of the lemon curd onto the cream and then use a butter knife to swirl the curd into the cream. Top with another layer of cookies, followed by the remaining cream. Spoon  the remaining lemon curd and swirl into the cream again with the butter knife. Cover with plastic wrap and refrigerate until the cookies have softened, it should be fine after at least 3 hours and you can make a day ahead and just leave in the fridge!

It would be pretty garnished with some lemon zest , some lemon slices or fresh berries, we were in a rush to eat it so no garnish in my photos. Next time!

*if you use a bowl you’ll just have to figure out the cream to cookie ratio but make sure you follow my steps so it ends up the same.

*another good thing–I actually froze leftovers and when I wanted to eat it , I removed from freezer for about an hour and it was perfect.

Summer Crumble — Peach and Blueberries

photo 3 (6)photo 3 (7)photo 2 (6)photo 2 (8)A crumble or a crisp whatever you call it there is no reason not to make this simple delicious dessert. In the summer you have so very many seasonal fruits to choose from and all sorts of delicious combinations. I used peaches and blueberries today because the peaches are amazingly beautiful and I had an abundance of blueberries. Any stone fruit, berries, or pitted cherries will work. In the Fall I make this with apples and pears which is Joel’s favorite of all time. The fruit comes out soft and tender and the crumbly crunchy cap is ever so crisp. Delicious served warm with a scoop of vanilla ice cream.

I used an 8×11 pyrex but any baking dish around that size will work out just fine.

You’ll need a food processor to do the crisp topping this way. You must use cold butter straight out of fridge. I also added a little bit of chopped nuts but this is totally optional.

Plums and Nectarines work just as well. I also sprinkled a dash of cinnamon on the top (just a touch) right before baking , this is also totally optional.

Ingredients:

Fruit Mixture:

app. 8 cups sliced stone fruit, berries or pitted cherries I used peaches which I pitted, peeled and sliced and 1 container of blueberries (6 oz.)

1 cup sugar

2 Tbsp. Corn Starch

1 tsp. finely grated orange zest ( almost a whole orange)

2 Tbsp. of freshly squeezed orange juice from zested orange

pinch of kosher salt

In a large bowl toss fruit, sugar, cornstarch, salt, zest and juice together with a spoon. Set aside. I also sprayed baking dish with Bakers Aid cooking spray which is great stuff.

Preheat oven to 375 degrees.

Crumble Topping:

Ingredients:

3/4 + 1/4 cup of old-fashioned oats separated. 3/4 cup will be used at beginning and 1/4 cup at end.

1/3 cup all-purpose flour

1/4 cup light brown sugar ( firmly packed)

1/2 teaspoon kosher salt

1 stick chilled unsalted butter , straight out of fridge and this is important here. Butter should be diced into small pieces. Cut stick in half then cut into small uniform pieces.

Directions for crumble topping:

In the bowl of food processor with blade , pulse oats, flour, light brown sugar, salt together. Then through the top tube drop in diced cold butter and pulse until no dry spots remain, it takes a few minutes. Transfer to a bowl and add in 1/4 cup old-fashioned oats with your fingers.

Transfer fruit mixture to prepared baking dish, scatter crumble topping over the mixture. I added some chopped nuts and a little cinnamon at this point. Place baking dish on a baking sheet ( sprayed with cooking spray as well) and bake at 375 degrees for at least 50 minutes, check on it. You don’t want to pull it out too soon because you want the crumble to brown perfectly and the fruit will not thicken. You’ll know it’s ready by the color of the crumble topping.

Allow to cool for an hour.

You can heat up before eating at 250 degrees covered for about a 1/2 hour should be enough.

You can freeze this as well. Take out the night before you’ll want it and let it defrost in the refrigerator, the next day take it out and let it come to room temperature before re-heating. I freeze it often and it works out quite well.


Summer Bolognese

I call this summer bolognese because it’s lighter than my regular bolognese recipe . It’s made with fresh tomatoes which makes all the difference. I made this sauce the other night and I have to say it was just perfect . It cooked up in no time ( about 1/2 hour) and tasted fresh and delicious. Of course if you would like it vegetarian just omit the chicken. I wanted the protein so added a pound of ground chicken you can also use turkey and if you want ground beef. This time I kept it fairly light and used ground chicken. Used a thick ropy pasta — Bucatini and it was perfection on a plate made with fresh tomatoes.

Ingredients:

1/2 cup extra-virgin olive oil

8 garlic cloves– minced– I use a mini food processor always for mincing garlic — just makes it easy

1 lb. ground chicken, turkey or beef

Kosher Salt to taste

1/4 cup dry white wine

4 Tbsp. tomato paste if you use double concentrate use 2

1 lb. cherry tomatoes ( which are abundant and fresh right now)

12 oz. Bucatini or any spaghtetti you like or rigatoni or penne would work here as well

about 1 cup of Pasta Water — which you may or not need

Finely Grated Parmesan for serving

Directions:

In a large skillet or pot heat oil then add garlic and cook till softened ( a few minutes) don’t brown it just soften it — sometimes you’ll need to turn off stove and let it just cook for a couple of minutes to soften.

With pan at medium high add chicken and cook, breaking up chicken for about 5 minutes or until chicken is no longer pink and fully cooked.

Add wine and reduce heat to medium low. Continue breaking up meat till it’s small pieces until wine is evaporated– another 5 minutes or so. Add tomato paste and cook, stirring till absorbed into chicken and cook for another few minutes.

Add tomatoes and let it cook down, stir to coat the tomatoes with the mixture — allow the tomatoes to cook till they are ready to burst — about 5 minutes. I used a masher ( see photo) and I smashed down on the tomatoes and burst all of them. You can leave some whole if you like but I didn’t because this is where the sauce will come from. Stir occasionally on medium low but don’t allow to burn. Allow sauce to thicken for about 5 minutes.

Meanwhile cook the pasta in a large pot of salted water until very al dente ( at least that’s how we like it)

Reserve about 1 cup of cooked pasta water because you may need it if sauce is too thick.

Taste sauce for salt and add accordingly. I probably added a teaspoon of Kosher Salt — everyone’s taste is different for salt so add to your liking.

Drain pasta and I used tongs and transferred pasta to pan with sauce. Tossing it in and cooking at a low simmer the pasta and the sauce thickened and I added a little pasta water at a time till I reached a perfect consistency . I probably used about 1/2 cup of pasta water. ( which also contains salt so consider this and don’t over-salt sauce — you can always add salt but it’s tough to take away if you make it too salty. The sauce was creamy and delicious .

Remove from heat and if you’d like add fresh basil.

Transfer to pasta bowls and top with Parmesan.

Orzo with Lemon Shrimp and Spinach

photoDSCN0367DSCN0363DSCN0372DSCN0384DSCN0390By now you all know how very much we love shrimp. It comes in handy to have an ex-shrimp monger on hand to clean and devein my shrimp. I love cooking it but not so much cleaning and deveining it. Joel not only obtains the best shrimp around but he really does do a great job of cleaning and deveining.  In any event we make a pretty good team when it comes to shrimp dishes.
 This dish was pretty easy to pull together once shrimp was prepped. Not a whole lot of ingredients, and whole thing took about 1/2 hour.  This dish was very light in flavor and a perfect summer night meal, doesn’t have to be served super hot , can be room temperature. 

*once the shrimp is prepared this dish is a snap. Have your fish store clean and de-vein your shrimp for you if possible.

Ingredients:

Vinaigrette:

1/3 cup olive oil

zest of 2 large lemons ( try to use organic if you’re zesting and eating the peel) and scrub those lemons well

1/2 cup fresh lemon juice ( from the 2 large lemons you just zested)

1/2 teaspoon of kosher salt

1/2 teaspoon of freshly ground black pepper

In a small bowl, whisk together the olive oil, lemon zest and lemon juice, salt and pepper until smooth and set aside.

Ingredients:

1 lb. orzo

1 lb. shrimp , I used large under 10’s, peeled and deveined  ( you can have fish monger do this )

2 tablespoon olive oil

1 large shallot , chopped

app. 1 more teaspoon kosher salt

1/2 cup dry white wine ,  ( I used what I had on hand)

6 ounces of spinach , I used baby spinach, use whatever greens you like. You can use arugula as well.

Directions:

Cook orzo according to directions. Drain and reserve 1 cup of the pasta water.

Place shrimp in a bowl and sprinkle with kosher salt and some freshly ground black pepper . Heat the 2 tablespoons of olive oil over medium high heat. Add the chopped shallots and cook until soft for a few minutes. Add the shrimp, cook shrimp until they turn pink and are just cooked through depending on the size of your shrimp. When shrimp is cooked through remove the shrimp from the skillet. Increase the heat to high and add the 1/2 cup of wine, allow to boil up and scrape up all the brown bits from the bottom of the pan, cook for another minute or so until most of the liquid has evaporated.  Then add orzo to the pan along with the vinaigrette and the spinach and let it wilt down.  I added most of the reserved pasta water , you’ll use as much or as little as you need, I used whole cup of reserved pasta water. Add the shrimp back in and toss well until all the ingredients are well coated. Serve up and enjoy.

Baked Chicken Meatballs

I love meatballs — all kinds of meatballs and these were just delicious. I made with Basil Pesto Pasta and it was just perfect. You can also drop these into any red sauce for a delicious meal. They are very easy to make and we ate some and I stored the rest in the freezer for the next time.

Ingredients:

1 pound ground chicken

1 egg –lightly beaten

1/2 cup Panko or regular breadcrumbs– I prefer Panko

1/2 cup grated Parmesan Cheese

2 Tablespoons Olive Oil

1/2 teaspoon Kosher Salt

1/4 teaspoon freshly ground black pepper

1/2 teaspoon garlic powder

1/2 teaspoon onion powder

*crushed red pepper flakes — if you like a little heat add a pinch if not omit

Directions:

Preheat oven to 400 degrees.

In a large bowl combine all the ingredients. Don’t over-mix just mix till combined

For easy clean-up line your baking sheet with aluminum foil and spray with cooking spray.

Roll the meat into smallish balls — not too small — I get anywhere between 18-25 meat balls out of this. Line them up on your baking sheet and bake for app. 20-30 minutes.

Check on them after 20 — I cooked for about 25 minutes. It will depend on your oven and the size of the meatballs.

You can double up this recipe easily for lots of meatballs. And like I said I froze a bunch for next time.

Served with my Basil Pesto Pasta.


Blueberry-Banana Muffins

Love blueberries and love bananas. Blueberries are abundant now and super delicious . Bananas are always around and I always buy too many and need to figure out what to do with the rotten bananas. I realize there are a lot of ingredients in these muffins and just measuring it all out was a task, but I enjoyed it and it was well worth it. I will freeze a few for when I am in the mood for them but not in the mood to bake them. The recipe yielded exactly 12 decent sized muffins, in one pan.  This muffin mix is perfect, not too sweet which makes for a perfect breakfast muffin or snack muffin. I used buttermilk ( low fat) couldn’t find non fat , but if you can feel free to use it here. There are 2 eggs but no butter and only 1/4 cup of canola oil . The buttermilk allows you to cut way back on the butter and the oils. These muffins worked out perfectly.

Ingredients:

3/4 cups nonfat or low-fat buttermilk ( I used low -fat b/c I couldn’t fine nonfat)

3/4 cups packed light brown sugar

1/4 cups canola oil

2 large eggs (room temperature, and I used my little trick because I decided to bake at the last minute) just let the eggs sit in warm water for 1/2 hour.

1 cup mashed ripe bananas ( I used 2 medium sized bananas)

1 1/4 cups whole wheat flour

1 cup all purpose flour

1 1/2 teaspoon baking powder

3/4 teaspoon ground cinnamon

1/2 teaspoon baking soda

1/2 teaspoon salt ( regular table salt)

1/4 teaspoon ground nutmeg

1 1/4 cup blueberries

Directions:

Preheat oven to 400 degrees. I sprayed a 12 cup muffin pan with baking spray ( and they came out perfectly) you can also line with paper liners if you like.

Whisk together the buttermilk, brown sugar, oil and eggs in a large bowl. Stir in the mashed bananas.

In another bowl, whisk whole-wheat flour all -purpose flour, baking powder, cinnamon, baking soda, salt and nutmeg.

Fold the dry ingredients into the wet ingredients and stir until just combined . Fold in the blueberries. Divide the batter into the 12 cup muffin pan till full.

Bake until the tops are golden brown and a cake tester inserted into the center comes out clean.

I baked for 25 minutes.

S’Mores Baked in the Oven

IMG_8638IMG_8636IMG_8639 IMG_8641 IMG_8642IMG_8634 IMG_8633 IMG_8632Oh Wow!!! what could be better??? truly easy and very little fuss perfect with the kids and perfect for the adults. Very rich and gooey. Whole thing takes about 40 minutes from start to finish and you can re-heat the sliced bars in the microwave for about 30 seconds if you have some left-over. It’s great for a large group and I would say about 12-15 servings here. Let’s hold on to the last few weeks of summer with this delicious dessert.

For a very traditional s’mores taste eat immediately, I think they tasted a little better after they cooled down for a bit. Whichever way you prefer them –this is a great recipe for a crowd. You can prepare first and then pop in the oven while you are having dinner. Enjoy!

*also I was able to obtain these amazing square marshmallows in the supermarket, if you see them –grab them otherwise just regular old marshmallows will do the trick.

Ingredients:

Crust:

18 graham crackers

1/4 cup granulated sugar

pinch of salt

8 Tablespoons unsalted butter-melted

*parchment paper — I think you’ll want to work with it for this recipe–it can get difficult once they harden to get them out of pan. Clean up was a snap with it.

Topping:

3 extra-large Hershey Bars (or 7 regular-size ones)

24 jumbo marshmallows–look for the large square ones

Directions:

Preheat the oven to 400 degrees. Lightly grease a 9×13 Pyrex type baking pan with cooking spray and then line with parchment paper , allow an extra couple of inches of paper to hang over the edge.

In the food processor bowl, pulse the graham crackers until they are finely ground. Transfer the crumbs to a medium-sized bowl.

Add the sugar and salt to the graham crackers and stir to combine. Add the melted butter and stir until the crumbs are moistened. Pour the crumb mixture into the prepared pan and press into an even layer.

Bake the crust for about 10 minutes or until the edges turn lightly golden. Let the crust cool off completely before adding chocolate. I probably let it sit off heat for about 1/2 hour.

Arrange the chocolate bars (see picture) evenly on the top of cooled crust, I had to remove 1 row of chocolate to fit it in pan and left a little uncovered crumbs around edges. Arrange the marshmallows on top of the chocolate, leaving a little space between each one (see photos) Marshmallows will expand slightly.

Bake until the chocolate is soft and beginning to melt, and the marshmallows are evenly toasted on top. Probably about 10-15 minutes depending on your oven.

I couldn’t wait to eat them but I would suggest letting them cool off for  a little bit, cutting was easier when it cooled down ( after 15-20 minutes) I was able to cleanly cut slices. It’s more like campfire s’mores when you eat them hot out of the oven and certainly messier.

You can re-heat the sliced bars in the microwave for about 20-30 seconds. If you are keeping them , cut them and store individual slices.

Asian Slaw

This is a fresh and delicious side dish salad that pairs well with almost any meal. It elevates a simple Turkey Burger to another level . Serve it alongside chicken, seafood and beef for a perfect meal. You’ll probably have most of the ingredients in your pantry and you can substitute powdered ginger for fresh if you don’t have but I recommend using fresh ginger always when you can.

Enjoy!

Ingredients:

6 cups shredded slaw — it comes in a bag in almost every supermarket as Cole Slaw ( raw) in the salad section 

*2 Bell Peppers thinly sliced whatever colors you prefer or a combo this is also optional if you don’t like raw peppers

1/4 cup chopped green onions and you can add more for garnish on the top

*1/4 cup Cilantro Leaves coarsely chopped — I love Cilantro but if you don’t omit it

1/2 cup sliced slivered almonds — lightly toasted in the oven at 350 for a few minutes be careful not to burn set the timer for 3 minutes and check on them because once you start to smell them they’re usually burning

2 teaspoons sesame seeds

Dressing:

2 Tablespoons Vegetable Oil

1/4 cup Rice Vinegar

1/4 cup Hoisin Sauce

1 Teaspoon honey

1 Tablespoon soy sauce

1 teaspoon fresh ginger finely grated or 1/8 teaspoon powdered ginger

1 Tablespoon toasted sesame oil

Salt and Pepper to taste but you really shouldn’t need much salt at all but adust to your own taste

Directions:

Place the cabbage cole slaw mix in a bowl with cilantro, green onions and almonds.

Combine all dressing ingredients in a bowl and whisk until well combined.

Pour the dressing over the cabbage mixture. Toss to coat evenly. Sprinkle the sesame seeds over the slaw. Use as much dressing as you need to coat.

Chopped Vegetable Salad

FullSizeRender (2)FullSizeRenderThis chopped salad is a great addition to any menu or add a protein and make it a meal which would be ever so perfect!  It contained fresh  vegetables and a salad all in one!  Perfection in a bowl. This is what I did and what veggies I used, feel free to use the vegetables you would love. These were the quantities that worked perfectly though. I won’t lie it took some prep for this and a good idea would be to chop a lot of the veggies ahead of time and have them ready. Avocado and lettuce must be added right before serving though. Dressing and veggies can be made ahead of time .

*I served as a side dish and it was generous for about 6 -8 servings , if you’re using for a main probably 4-6.

Ingredients:

Dressing:

2 Tbsp. red wine vinegar

1 Tbsp. freshly squeezed lemon juice

1 Tbsp. Dijon Mustard

1 garlic clove–minced

1/2 tsp. kosher salt plus a little more to taste at the end

1/4 tsp. freshly ground black pepper plus more to taste at the end

1/4 cup good extra-virgin olive oil

Salad:

1/2 lb. green beans, trimmed and cut into small pieces — about 1/2″

2 medium carrots, cut into small pieces

3 ears of corn, cut kernels off cobs

1/2 pint small cherry or grape tomatoes cut in 1/2

2 ribs celery, cut into small pieces , about 1/2″ pieces

1 red bell pepper, cored and cut into small pieces , also about 1/2″ size

1/3 cup finely chopped red onion

1 head romaine , chopped

1 large ripe avocado, peeled, pitted and diced

1/4 cup finely grated Parmesan Cheese

Directions:

Bring a large pot of salted water to a boil.

Meanwhile in a large bowl, whisk together vinegar, lemon juice, mustard, 1/2 tsp. kosher salt, garlic, and 1/4 tsp. black pepper. Lastly, whisk in the oil slowly. Set aside.

When water comes to a boil, add cut up green beans and carrots to boiling water and cook until tender, about 5-6 minutes. Add corn and cook a couple of minutes more. Drain in a colander and rinse under cold water, let veggies completely cool down. I let them sit till they were completely cool. Give vinaigrette a quick whisk, and add veggies to the bowl. Add in the tomatoes, celery , bell pepper and onion and toss well. Set aside and let marinate for at least 1/2 hour. I probably let it sit in marinade for about an hour.

Right before serving, add chopped romaine, avocado and parmesan . Taste for salt and pepper and add as needed. Toss gently to combine.

Serve immediately.

Lime-Garlic and Ginger Chicken —

I made this recipe for dinner last night and it was just delicious. It elevated the weeknight bbq chicken for sure . The only thing is this recipe is best left to marinade for at least 6 hours. After breakfast I made the marinade and let it sit all day. This chicken can sit in the marinade for up to 8 hours–just let it come to room temperature before cooking. Not so tough to do and worth the results. If you don’t have an outdoor grill use a grill pan on medium-high . I plan on making this chicken all year round. Not a lot of ingredients at all and very easy to put together.

This can easily be doubled.

Ingredients:

1 1/2 to 2 pounds of boneless, skinless chicken thighs which is what I used but feel free to use chicken breasts

Kosher Salt and Freshly Ground Black Pepper

1/3 cup Mayonnaise — now I don’t use diet mayonnaise and the mayo burns off so you won’t be tasting it -the mayo makes it moist and yummy

1 Tablespoon Lime Zest — app. 2 limes and save the lime to squeeze over the chicken

1 Tablespoon finely grated fresh ginger — if no fresh ginger use about 1/8 of a teaspoon of powdered ginger –1/8 to 1/4 of powder is equivalent to 1 Tablespoon Fresh

2 garlic cloves finely minced — I always put my garlic in my mini processor for a fine mince . If you don’t have a mini processor you can just mince by hand but it’s a great little machine to own.

Directions:

Pat the chicken dry with some paper towels.

In a large enough bowl to add the chicken stir together the mayonnaise, lime zest, garlic, ginger and 1 1/2 teaspoon kosher salt and about 1/2 teaspoon black pepper. Add the chicken to the mayo mixture and stir to coat. I put my chicken in the fridge for the whole day and removed it about an hour before cooking to bring to room temperature.

To grill: Heat your grill to medium high and grill the chicken till cooked through I cooked for about 5 minutes per side and they were perfect. Breasts will cook up faster so just watch them . They’re finished when juices run clear. Turn as necessary to avoid burning them.

If cooking inside the house with a skillet/grill pan cook over medium-high heat also about 5 minutes per side.

I squeezed the fresh lime over before serving and they were just delicious.

Enjoy!!! Simple and Delicious!