Summer Sangria on the Light Side

It is the un-official start of the summer season so if the weather would cooperate it might just feel that way. Well this drink could help you kick off Memorial Day Weekend whether you’re inside or outside.

This is a light cool drink for when the weather turns warm. Sangria and Summer!  Perfect to make for a large crowd, easy as could be and light because it’s made with sugar-free Lemonade .  If you don’t want to use sugar-free just use regular lemonade, it’s no problem. I remember making Sangria and it was messy and required a lot of different ingredients plus a lot of sugar.  It can be made with white or red wine. It makes 2 quarts without ice, so that goes a long way . You can cut up whatever fruit you like , peaches are beautiful , oranges, apples, pears, strawberries whatever you like. I like to make the Sangria in the afternoon just so the fruit gets the full  flavor of the wine and marinates for at least a few hours. It’s not critical though. I think you’ll like this one.

Ingredients: 

1 Bottle Wine Red or White ( I used Pinot Grigio but you can use whatever you like or have) I wouldn’t use a very expensive bottle for this.

1 Bottle Club Soda ( not the very large bottle ) 1 quart bottle

Fruit of your choice , peaches , pears, oranges, nectarines, apricots, apples ,etc. I slice into thin slices which are easy to eat . Slice them up and eyeball it. Whatever you like, I used peaches, apricots, apples and oranges .

1 packet Sugar Free Wylers or Crystal Light Lemonade , I use Yellow Lemonade for White Wine and Pink Lemonade for Red Wine , if you’re opposed to using sugar substitutes you can certainly use fresh lemonade.

You’ll need a large pitcher, I use a nice glass pitcher . It can be kept for a while in fridge in a plastic  container. Sometimes for a very large gathering I make an extra one and keep in refrigerator without the fruit, just as a back up. *the pitcher needs to be large enough for bottle of wine and bottle of Club Soda — at least 2 quarts — but should be a little larger to contain liquid plus fruit.

Directions:

Cut up fruit into slices/pieces for Sangria. I take a large pitcher pour in the bottle of wine, put in the packet of Wylers or Crystal Light, add the Club soda almost up to the top of the container or pitcher leaving room for fruit, so you may not need whole bottle . Add fruit and Stir, I usually add the rest of the club soda after fruit goes in . Put in refrigerator and let flavors meld together for a few hours and get cold. Serve in glasses with ice, you can add additional fruit like raspberries at the time you serve. It’s delicious , refreshing, low in calories and did I mention super easy???

Blackberry Cobbler

before cobbler gets baked , with biscuit topping

before cobbler gets baked , with biscuit topping

finished product - Yum

finished product – Yum

photo (3) It’s almost Memorial Day Weekend again and it brings me to this delicious dessert filled with the most delicious in season blackberries.  I have posted numerous blueberry cobblers but this one has to be my personal favorite made with Blackberries.  It’s a real deal Old Fashioned Cobbler.  You can really make this with any fruit but I love Blackberries while they’re sweet, plump and delicious! Blueberries and Red Raspberries will also work  well. Or you can mix up the fruits!  I just love blackberries when they’re in season and can’t get enough of them so this time of year I go with just blackberries.

Enjoy and have a safe weekend and here’s to a much better summer than the last one.

Ingredients:

1 pound or about 3 1/2 – 4 cups blackberries , cleaned , rinsed and dried

1 tablespoon arrowroot or cornstarch

2 tablespoons fresh lemon juice

1 cup all-purpose flour

3/4 cup sugar, I use regular granulated sugar for cobbler inside and on top I use turbinado sugar. 1/2 cup granulated sugar for inside cobbler and 1/4 cup turbinado sugar for topping

1 teaspoon baking powder

1/4 teaspoon salt

1/2 cup whole milk or you can use low-fat buttermilk

3 tablespoons unsalted butter, melted

3/4 cup boiling water

Directions:

Preheat the oven to 350 degrees.

In a bowl I place the clean blackberries that I’ve washed and dried. I sprinkle them with the arrowroot and lemon juice and mix gently  Set aside.

In a medium size bowl, I sift the flour, 1/2 cup sugar, baking powder and salt. Add the milk and butter. Stir until just combined, don’t over stir, it shouldn’t be smooth. Then by the mound-ful drop dough onto blackberries. I spread around a little bit but don’t completely cover the top of berries. ( see photo) the dough will spread a little once it’s baked.

Pour boiling water over the dough and fruit before you bake it. Sprinkle top with 1/4 turbinado sugar or regular sugar. Raw sugar or turbinado sugar makes it a little crunchier topping. I prefer it to regular sugar for a topping.

*if you are preparing in advance which is what I did today. Prepare up till the boiling water and sugar part. Refrigerate for up to 2 days , bring to room temperature then pour boiling water and top with sugar and bake. I baked for app. 45 minutes till dough gets browned and crackly looking and blackberries are bubbling. ( see photos)

Remove from oven and let sit but serve while it’s still warm with ice-cream for extra added deliciousness!

Happy Summer from my kitchen to yours.

Veal Parmigiana

This recipe has got to be one of my husband’s absolute favorites and with good reason. He likes Chicken Parm a lot and that’s what I mostly make but every once in a while I will get veal cutlets and make this delicious meal and kick it back “old school” style. It’s classic comfort food for sure all gooey and delicious.

Firstly you’ll want to get your veal cutlets from a butcher and make sure they’re ready for frying. In NYC there are a lot of butchers and specialty stores to choose from so while I’m in town I make them. They also are rather pricy so saying all that you can also make this recipe with chicken. Veal is low in fat and high in protein and makes a great veal parmigiana. There are many variations but I am sort of a purist and like it with tomato sauce and cheese. Baked to perfection!

Last night this is what I did and served along side spaghetti.

Enjoy!

Ingredients:

1 lb. Veal Slices ( Cutlets) pounded thin if you go to butcher tell them what you’re using them for

1 cup Italian Seasoned Bread Crumbs– you may need a little more

4 Tablespoons of Grated Parmesan / Romano cheese and more for sprinkling cutlets

Olive Oil for frying

pasta of your choice but I like spaghetti with it

1 egg with a splash of milk

Spaghetti Sauce — whatever kind you have — obviously home made is great but I like Raos a lot and when I don’t have any homemade on hand that’s my go-to. The marinara one is perfect as is the Arabiata if you like it a little more spicy — app. 12 ounces of sauce for veal and spaghetti. If using a jar buy the 24 oz. and then you’ll have enough sauce for both veal and spaghetti. Use as much or as little as you like.

1/2 lb . mozzarella cheese , shredded

Directions:

Pre-heat oven to 350 degrees

Set up a breading station using 2 bowls. One bowl with egg and splash of milk beaten, and then one bowl with bread crumbs mixed with grated parmesan cheese (app. 3 Tablespoons of cheese and use the rest to sprinkle on cutlets)

I pat dry the veal cutlets before dipping into the egg and milk

Dip in the egg and then dip in the bread crumbs. Coat the veal completely. I place on a small cookie sheet and put in the refrigerator till I am ready to fry them . I find this holds bread crumbs in place best but obviously if you’re short on time just go right to the frying. I only put them in for about 1/2 hour but you can leave them in longer if you’d like .

I use a large skillet and add a good coating of oil to bottom of pan — enough to cover bottom of pan and enough for each cutlet to fry up — maybe 1/4″ to 1/2″ of oil. You do not submerge the cutlets in the oil just enough to fry them up. Pre heat the oil so it’s very hot when you add veal. Flame on pan should be medium-high depending on your stove top.

Pan fry both sides — I turn over gently to make sure they’re golden brown and then turn them . Do not over fry because they still need to bake in the oven. (see pics) you want them to be golden brown

Drain the fried cutlets on some paper towels blotting the tops for excess oil.

I spray a baking dish with cooking spray and add enough sauce to cover bottom of the baking dish and don’t be skimpy with it, you’ll probably use about 8 oz. of the sauce. I sprinkle with a little grated parmesan and then add shredded mozzarella to top .

Place in hot oven and I cooked covered (aluminum foil) for first 10 minutes , then 5 minutes uncovered and then put oven to broil for another 3-5 minutes till cheese gets a bit brown and bubbly. All ovens vary but this is what worked best for me to get that beautiful finish. You must keep an eye on it when under broiler . Mine was ready in about 3 minutes.

I cooked up some spaghetti added a little sauce to it and plated the veal and the spaghetti and dinner was served.

Sheet Pan Chicken Fajitas

IMG_7067IMG_7069
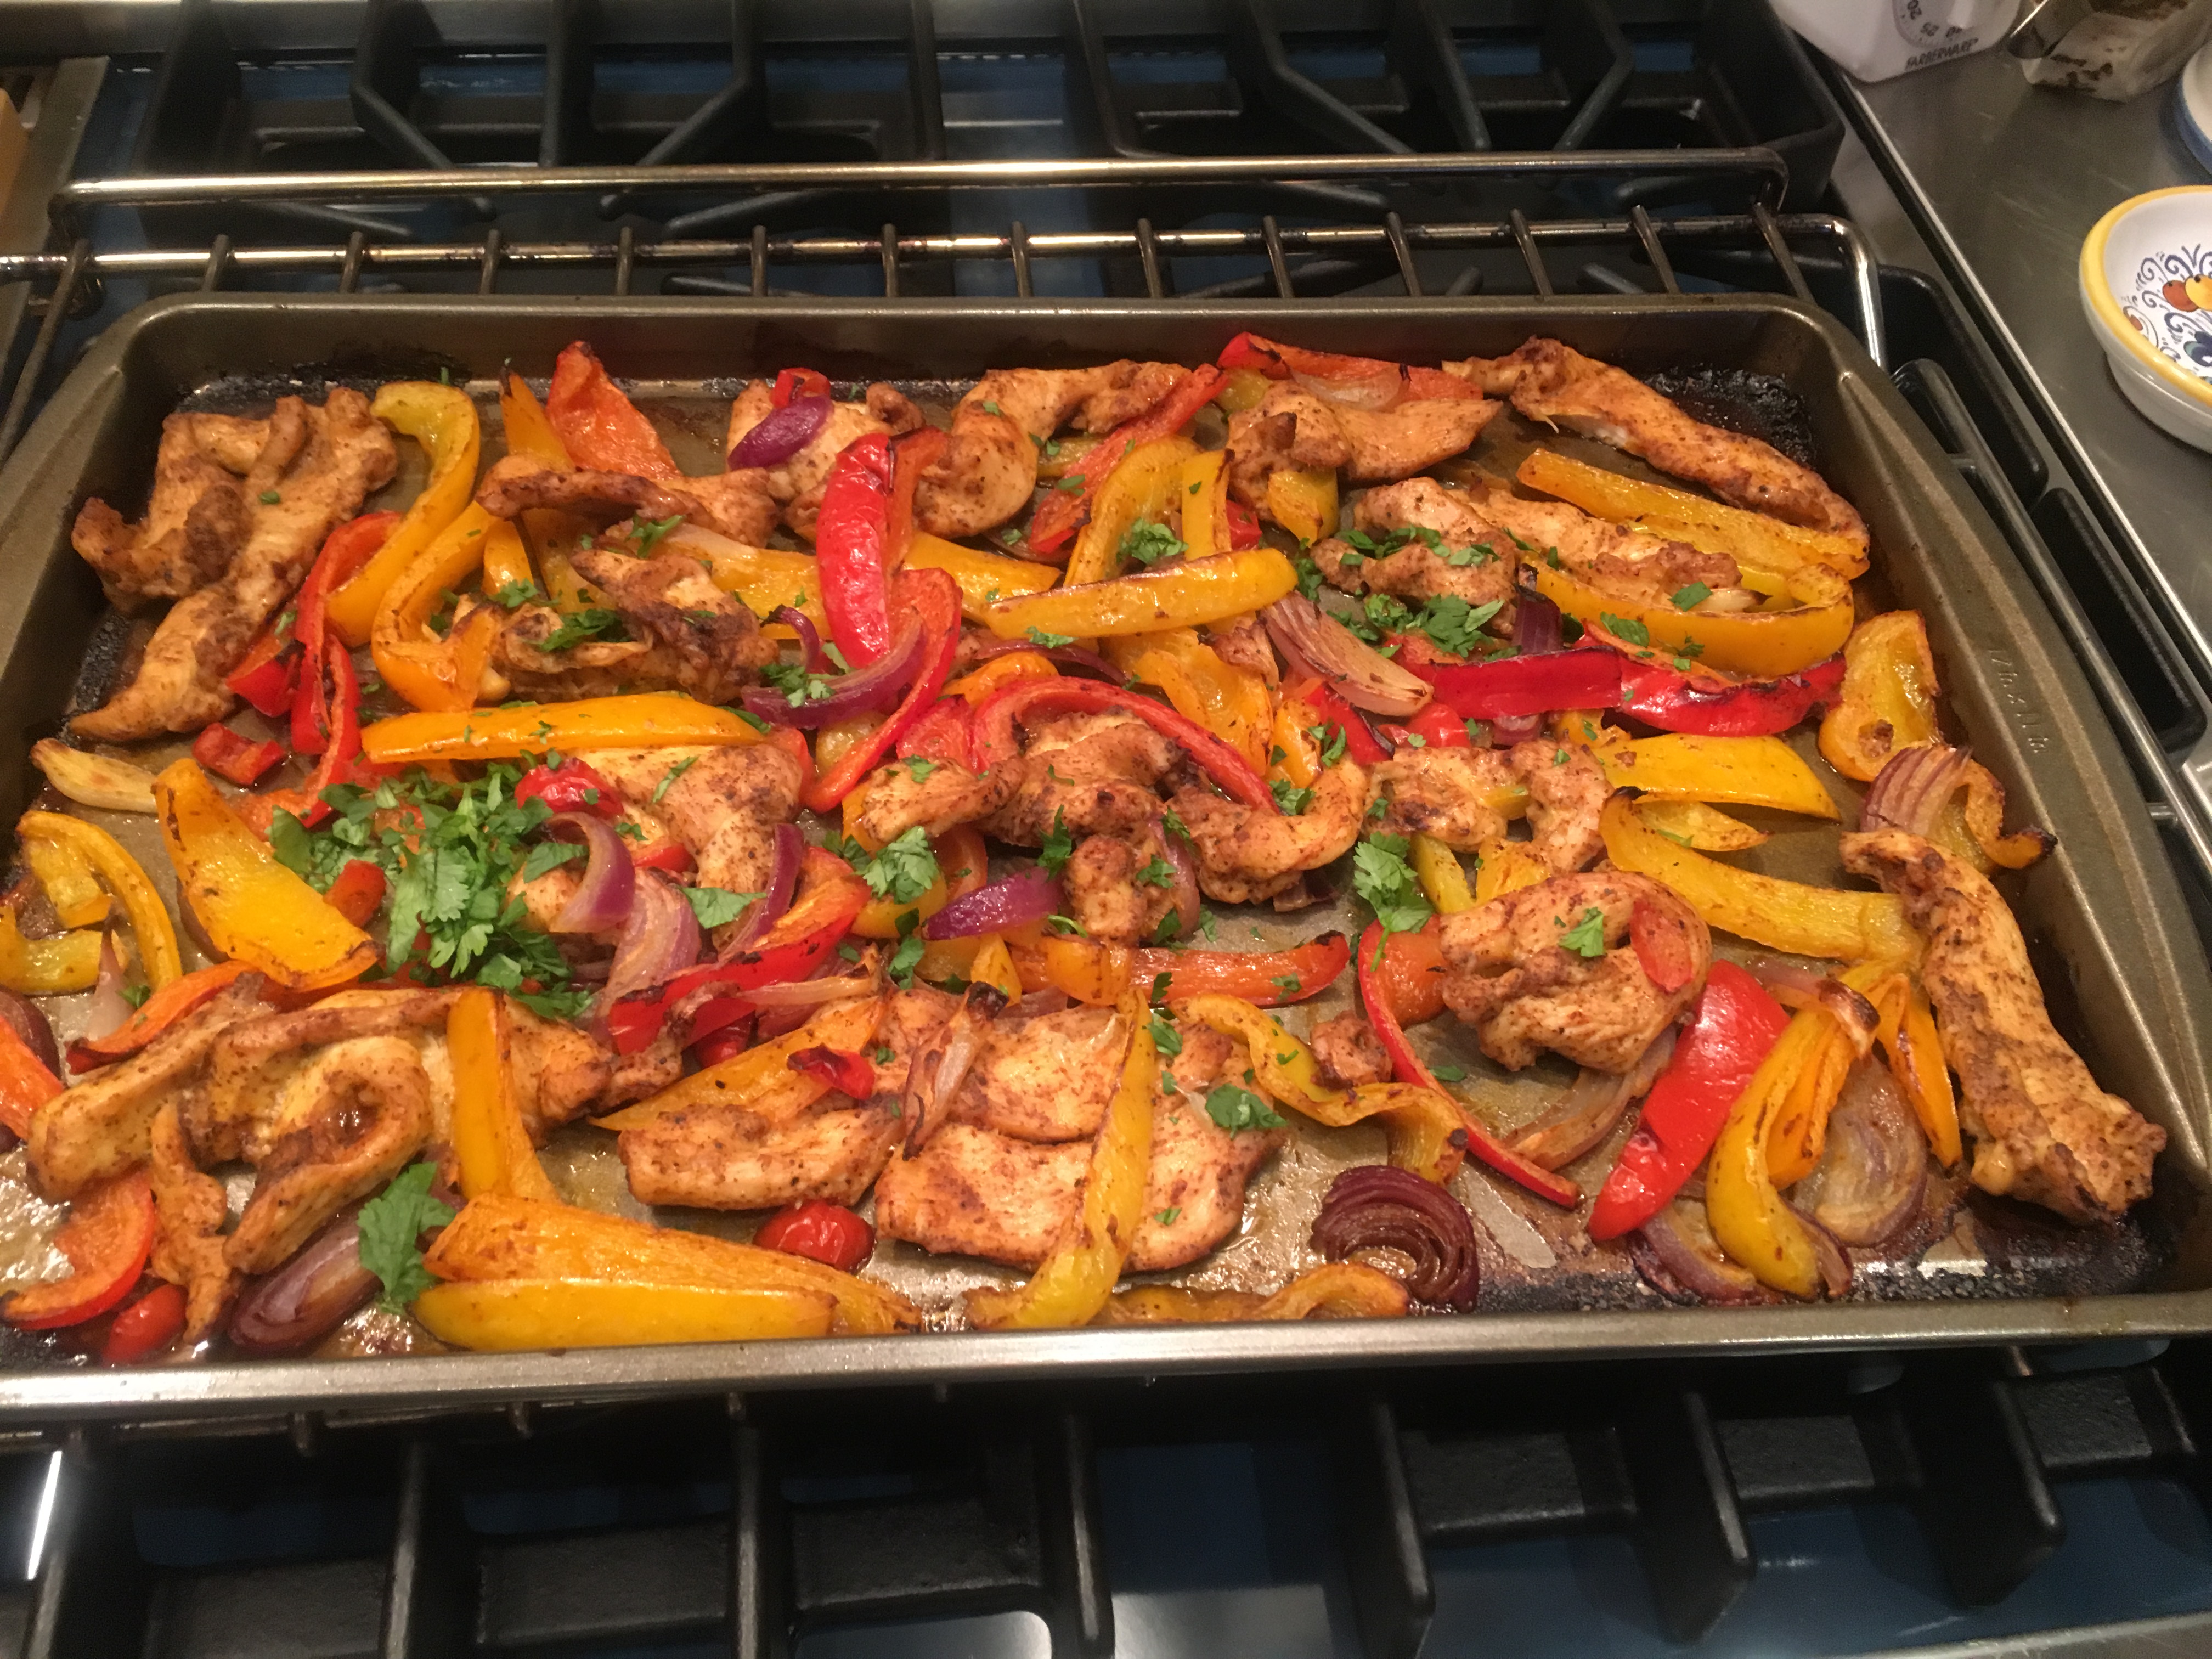
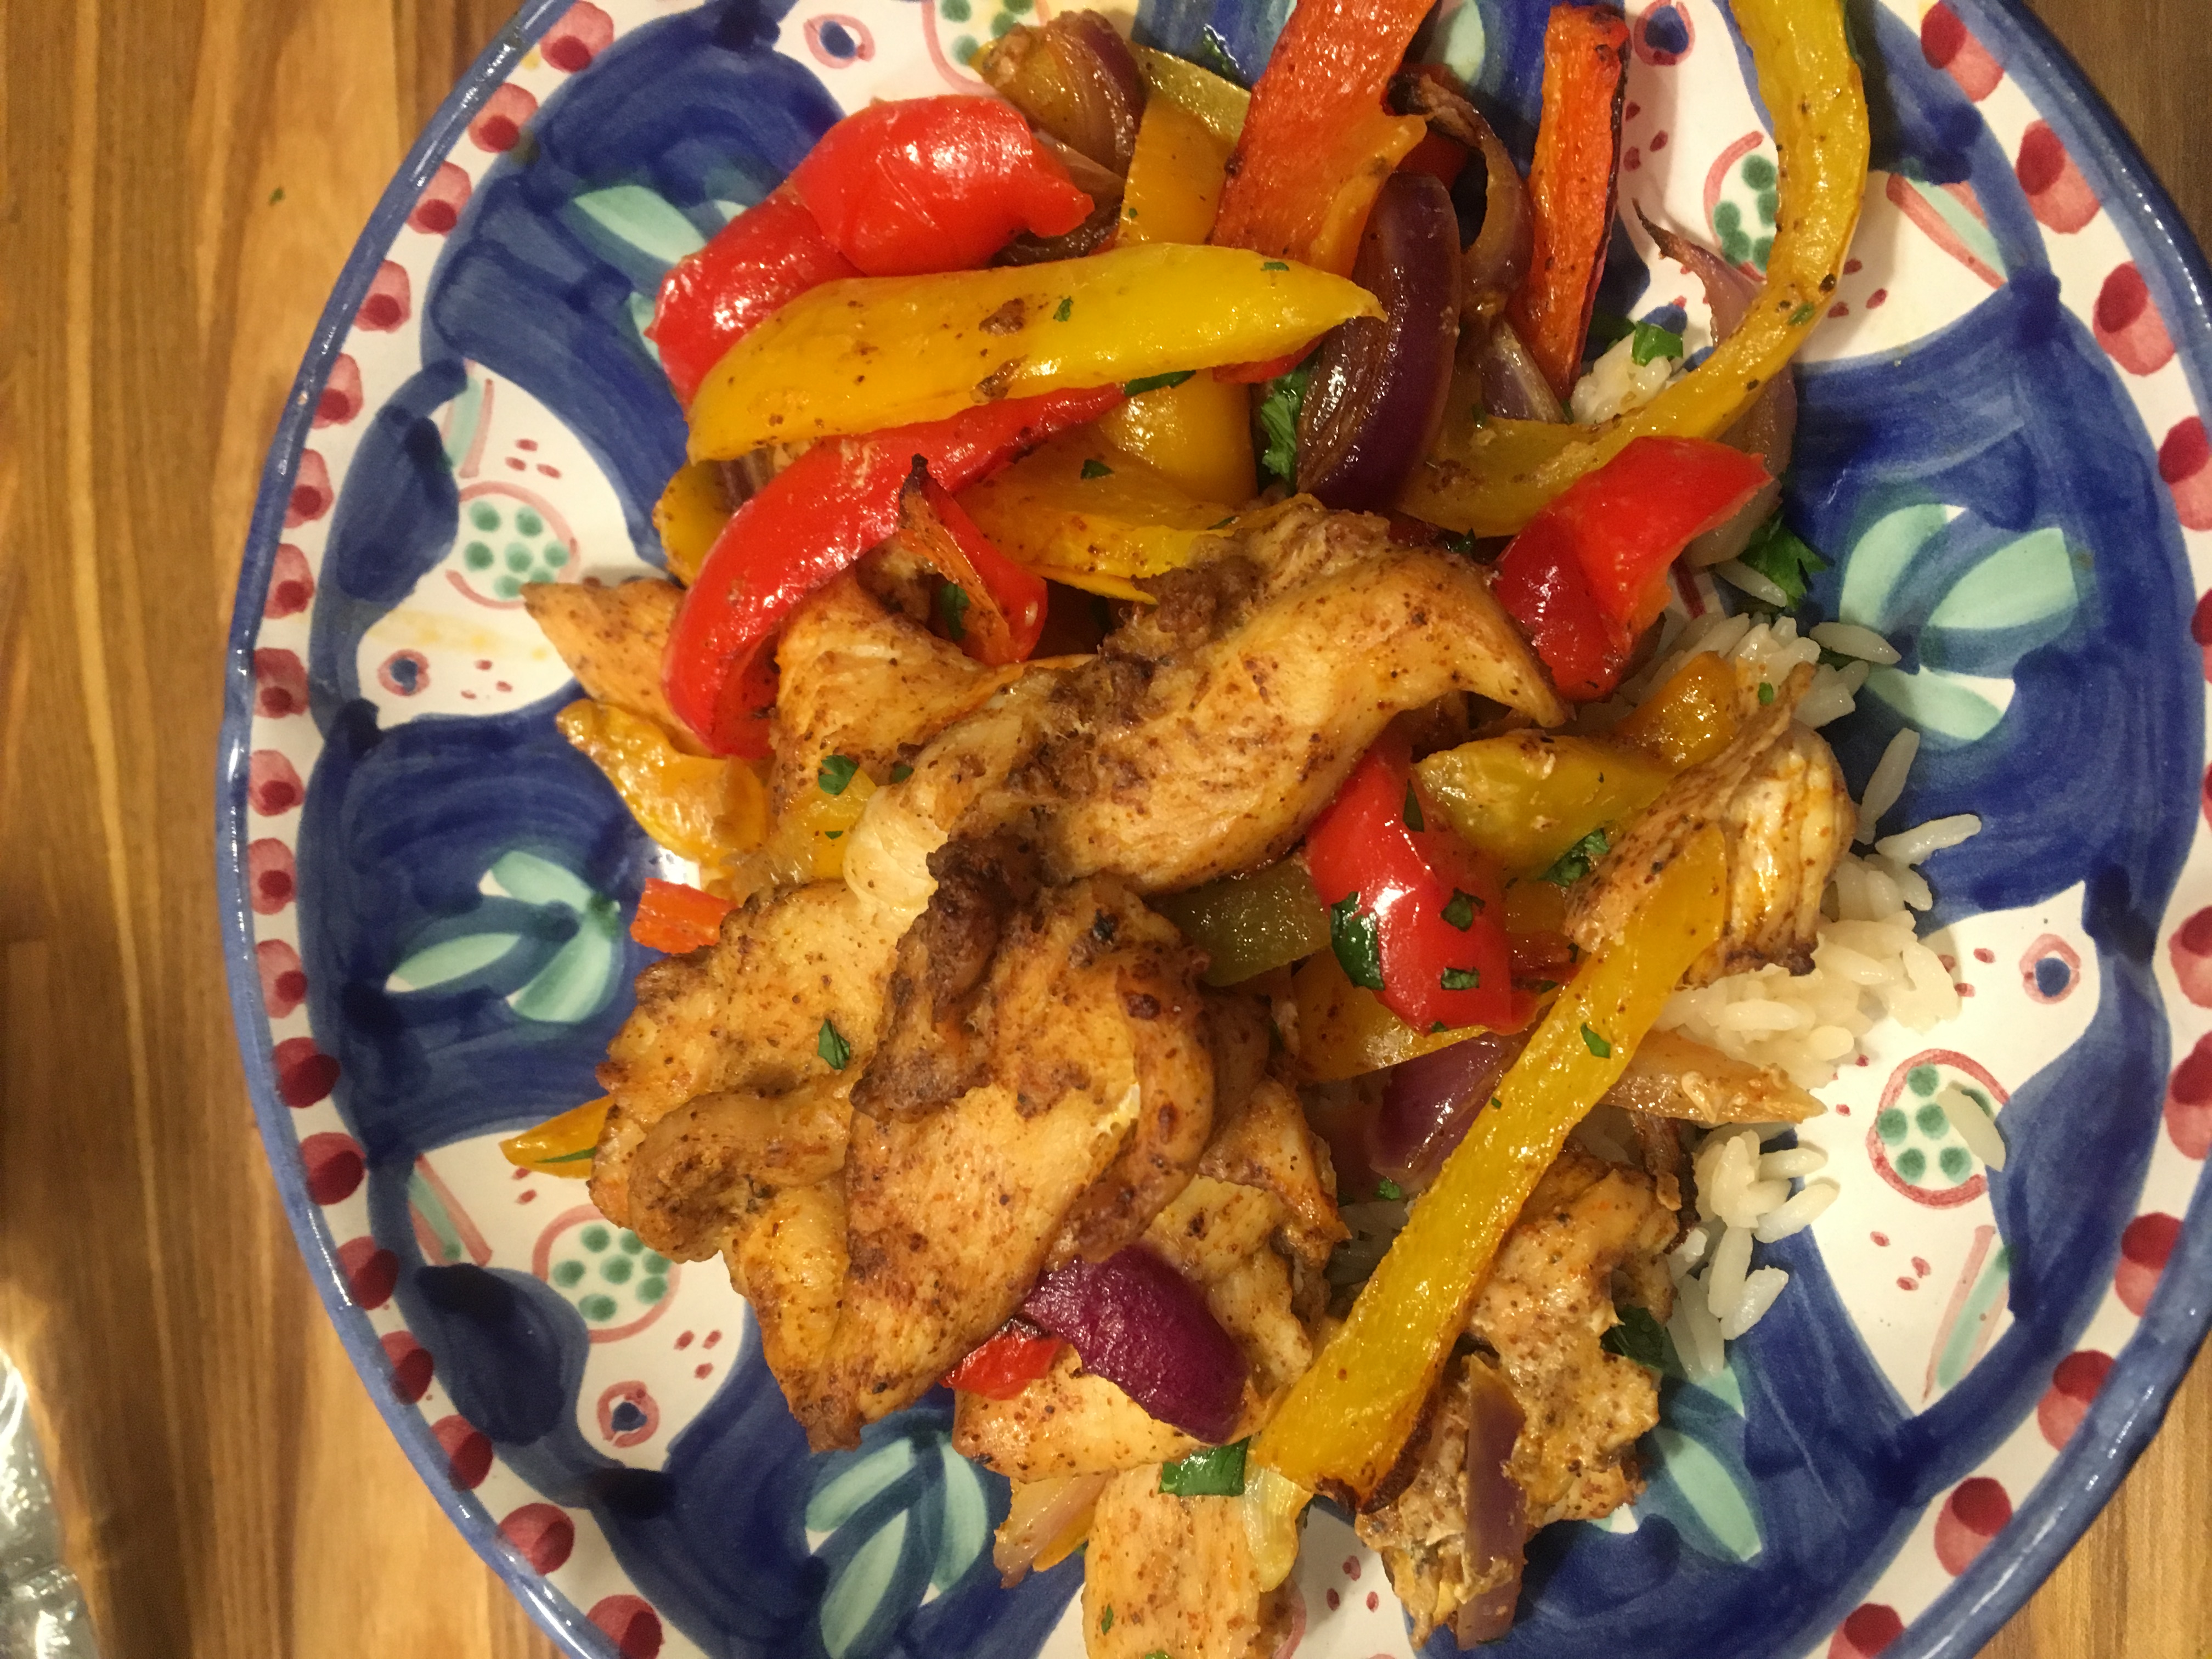
More of my favorite way to cook with Chicken Fajitas made on the Sheet Pan . I made this the other night and it is the easiest and most delicious meal. I am always experimenting with making Chicken Fajitas in new ways and trying to keep the oil down. If you use too little oil they come out tasting dry and that’s no good so use the 3-4 tablespoons of olive oil that I suggest.  This is what I did and I served with small soft tortillas and you can provide any fixings you like. I also served over rice in a bowl which is how I like to eat my fajitas. Obviously what you do with them is totally up to you! A little sour cream and guacamole never hurt anyone either. And buy some tortillas and you have perfection on a plate.

And if you’re ready to fire up the outside grill check out my recipe for chicken fajitas on the grill!

*it is important that all veggies be cut up into fairly uniform sizes this will help cooking process and timing

Enjoy!

Ingredients:

1 1/2 lbs. of chicken breast tenders– or just cut some chicken cutlets into strips

1 yellow bell pepper –sliced into 1/4″ slices

1 red bell pepper–sliced into 1/4″ slices

1 orange bell pepper–sliced into 1/4″ slices

1 small red onion–sliced into 1/4″ slices

3-4 Tablespoons of Extra Virgin Oil –now I have tried 2 Tablespoons and it was a little dry so use your own discretion here –depending on how much chicken you’re using and you’ll want a light glaze all over the chicken and veggies

1 teaspoon of kosher salt –this was enough for us but again use your own discretion

several turns of the pepper mill — freshly ground black pepper always works best

2 teaspoons of chili powder

1/2 teaspoon of garlic powder

1/2 teaspoon of onion powder

1/2 teaspoon of ground cumin

1/2 teaspoon of smoked paprika

Lime for squeezing at the end

*fresh chopped cilantro for garnish and delicious flavor if you like it

*warmed tortillas–if you like

Directions:

Preheat oven to 425 degrees

In a large bowl , combine onion, bell pepper, chicken strips, olive oil, salt and pepper and all the spices. Start with 2 Tbsp. of Olive Oil and add more . I really felt it needed more than 2 Tbsp.

Toss well and combine and allow to sit for a while before cooking. I find that the longer it sits the better it tastes. I prepped and let it sit for an hour or so.

Spray a baking sheet with non stick cooking spray

Spread chicken and onions and everything on baking sheet

Cook at 425 degrees for about 20 minutes, if you’d like to use a meat thermometer here chicken should be 165 degrees. After 20 minutes I turned the oven to broil and cooked for additional 2-4 minutes just letting the veggies get some nice color. Watch it carefully to make sure it doesn’t burn.

I served in bowls over rice with warm mini tortillas and sour cream and guacamole.

*should serve 3-4 nicely with the rice and sides

Enjoy!

Roasted Salmon with Corn and Tomatoes

Sometimes you just need to lighten up the meal and I find Salmon always does the trick . It is filling enough without that full feeling when you’re done eating . This Salmon dish is light but satisfying in every way. This is what I did and I hope you enjoy it as much as we did. This will become your new favorite way to eat salmon.

*this recipe should serve 4 nicely–easy to cut in 1/2 for 2

Ingredients:

I asked for 6 oz. fillets– just make sure they are the same size and I like from the middle of the salmon not the end–you will need 4 for 4 people. One fillet for each person

Kosher Salt and Freshly Ground Pepper

1 small container of cherry or grapes in any coloration you’d like-halved

2 cups frozen or fresh whole kernel corn

2 tsp. olive oil

1 tsp. chili powder

1/2 tsp. ground cumin

1/2 tsp. lime zest

1 Tbsp. Lime juice

1 tsp. honey

1/4 cup finely chopped red onion — I used a shallot this time because I didn’t have a red onion in the house or you can skip all together if you don’t like red onion — last night I added it and adds a nice little crunch and another layer of flavor

*if you love it snip some fresh cilantro in there at the end –while I love cilantro I don’t always have it to add and have to say equally as delicious

*also makes for delicious leftovers

Directions:

Pick up Salmon from your local fish store or Whole foods type of market

I rinse the salmon off and pat dry with paper towels. Preheat oven to 400 degrees. Line a 15×10 baking dish with aluminum foil or spray with your favorite cooking spray and I prefer to just spray and it’s fine but if no cooking spray then use aluminum foil.  Place fish in prepared pan. Sprinkle with about 1/2 tsp. kosher salt over salmon and about 1/4 tsp. freshly ground black pepper–you will have to eyeball it but the salmon needs salt and pepper it’s a question of how much. Lightly sprinkle.

In a medium sized bowl combine tomatoes, onion/shallot,  corn, oil , chili powder, cumin and a little more salt and pepper ( app. 1/4 -1/2 tsp. more salt and 1/4 tsp. pepper) Toss to coat. Spread tomato mixture around the fish in the baking pan. Roast uncovered, app. 15-18 minutes or until fish flakes easily and is cooked through. Cooking time will depend on the thickness of your fish so you should check on it after 15 minutes.

Meanwhile in a small bowl , stir together lime zest, lime juice, and honey

When fish is done to your liking remove fish to a platter. Brush fish with honey mixture. Add  cilantro to tomatoes in pan, stirring gently to combine all ingredients. Top fish with tomato mixture and if you’d like a little more cilantro this would be a good time to add it.

Blueberry Banana Bundt Cake

I had rotten bananas and I had some blueberries and I had all the other ingredients for this delicious bundt cake in the house. It took about 20 minutes to prep and another 50 minutes in the oven and it’s going into the freezer for another time and place. This cake freezes so well and the bananas were going in the garbage so there you have it –snacking cake for another time. You can freeze this cake for up to 3 months, but make sure you wrap it up carefully and mark the date you freeze it on the bag.

Enjoy!

  • when I freeze I usually cut up into sections rather than freeze the whole cake –it’s easier to freeze and takes up less space in the freezer and if I just want a small piece it works out best!

Ingredients:

1 1/4 cups flour

1 teaspoon baking soda

1 teaspoon fine salt (table salt)

1/2 cup butter unsalted and softened

3/4 cup sugar

3 large eggs — room temperature

1 teaspoon vanilla extract

4 bananas mashed– very ripe black bananas

1 cup blueberries — rinsed and dried

Directions:

Preheat oven to 350 degrees. I spray a Bundt Pan with Bakers Aid Spray– you can use other sprays but I prefer this one for baking

In a large bowl combine the flour, baking soda and salt with a wire whisk. Set it aside

Cream Butter and Sugar in an Electric Mixer. Add eggs one at a time and the vanilla. Beat until well combined

Add the flour Mixture to the bowl and Combine until just mixed. Fold in the Blueberries and Bananas with a spatula

Pour the batter into the sprayed Bundt Pan

Bake for 50 minutes. Check with a cake tester or toothpick till it comes out clean.

Enjoy!!

Farro Salad

This is a delicious farro salad made with arugula — this salad is similar to my take on Jennifer Aniston’s Salad but with arugula and shaved warm instead of feta. This is light and yummy and you can add a protein and make it a dinner salad if you’d like. Original recipe credit goes to the chef Charlie Bird on this one.

You can obviously add what you like and remove what you don’t like . Feel free to swap cheeses, or onions for radishes, etc and chopped up dates would be just fab.

Enjoy!

Follow me on Instagram @cookingwithcandi

Ingredients:

1 cup Farro– I use pearled farro

1 cup apple cider not apple cider vinegar

2 cups of water

2 teaspoons kosher salt, and more to your own liking

2 bay leaves

8 Tablespoons extra -virgin olive oil

2 Tablespoons fresh lemon juice- I used 1 large lemon

app. 1/2 cup shaved Parmesan Cheese , I used a vegetable peeler but I do know you can buy Parmesan Cheese shaved this way ( time and mess saver)

app. 1/2 cup shelled Pistachios–I used salted pistachios and chopped them myself. You can use raw pistachios but they’re a tad tasteless.

app. 2 cups Arugula

app. 1 cup torn Basil Leaves

app. 1 cup Mint leaves-cut up into smaller pieces

2 large radishes sliced thinly or rough chopped–optional and you can use red onion here as well — sliced thinly or chopped into small pieces

Directions:

Farro:

In a medium saucepan, bring farro,  apple cider , dash of kosher salt , 2 bay leaves and 2 cups of water to a simmer. Simmer until farro is tender and liquid evaporates, about 30 minutes. If farro is cooked but there is still water I put in a colander/strainer and leave it till it cools down. If on the other hand the water evaporates before the farro is done, you’ll have to add a little more water. You can always strain it so no worries–but don’t overcook. Let farro cool down and discard the 2 bay leaves.

Salad:

In a salad bowl (large enough to fold in arugula and mix) whisk together the olive oil and lemon juice, I use a wire whisk, it’s an amazing kitchen tool. Add the cooled down farro, parmesan cheese and chopped pistachio nuts, mix well.

This salad base will sit for a few hours at room temperature. I made it that afternoon for that evening and never put it in fridge. Salad is always best at room temperature so if you do refrigerate, just bring to room temperature before serving.

Just before serving, fold in the arugula, herbs, radishes and taste for salt. If not salty enough sprinkle a little flaky sea salt or kosher salt. You’ll thank me for this recipe.IMG_1779IMG_1780

Springtime in a Bowl – Shrimp, Asparagus and Tomato Pasta

Since it is really Spring it just makes you want to lighten up the menu a bit and my mind immediately goes to asparagus!  This recipe is a variation on my Summertime Tomato Pasta. I wanted to use some of those beautiful asparagus out there. Even though I knew Joel would pick them out , I still made this dish. The asparagus are large enough for him to easily pick out and put on my plate. This dish is light and delicious and pretty quick to prepare. It is like springtime in a bowl!  There are so very many things to do with asparagus but this just appealed to me  and if you leave the shrimp out you have a lovely vegetarian pasta dish and if you leave the pasta out you have a super light dish!  I used the shrimp.  I also used linguine in this recipe because it just seems to hold on to the flavors nicely. Happy Spring and Enjoy.

Ingredients:

1 lb. box linguine ( I used Fini Linguine , it was lighter than regular linguine and was just perfect)

2 Tablespoons Olive Oil

2 pint size containers of little grape tomatoes, cherry tomatoes, or any small tomato ( app. 16-20 oz. of tomatoes)  I cut tomatoes in 1/2.

kosher salt

freshly ground black pepper

* crushed red pepper ( we like the heat) use your own discretion depending on how you like it, totally optional

3 large cloves of garlic, chopped finely

1/2 cup dry white wine ( I use whatever I have open)

1 lb. Asparagus , trimmed, stalks cut on a diagonal into app. 1 1/2 inch pieces

1 pound large shrimp, peeled and deveined

fresh basil chopped ( app. 1/2 cup)

1 teaspoon dried oregano

Directions:

Cook the pasta according to box directions.( Fini Linguine cooks in 6 minutes perfectly) scoop out a little pasta water after cooking about 1/2 cup to 1 cup and keep it handy if pasta is too dry, you can add water to it a little bit at a time.

Heat the olive oil in a large skillet over medium high heat. Add the tomatoes, app.  1/4 teaspoon kosher salt and app. 1/4 teaspoon freshly ground black pepper. Cook, stirring occasionally, until tomatoes are soft , it takes at least 5 minutes . You want the tomatoes to start to burst so they make a delicious sauce.  Add the crushed red pepper and garlic. Cook for another few minutes ( don’t burn the garlic)keep on low heat and stir around. Add the wine and the asparagus. Bring to a low boil and simmer for at least 5 minutes . Taste for Salt and Pepper, if it needs more this is when I would add it, and I did. I added a bit more salt here, pepper was fine. You need to use your own discretion about the salt .

Sprinkle shrimp in a bowl with a little salt and pepper. Add the shrimp to the pan and continue to simmer until the shrimp is cooked through, about 10 minutes. Shrimp needs to be firm to the touch, and opaque if cut into. Stir in the chopped basil and the oregano.

Pour the sauce over the pasta and toss well to combine.  You can always add more crushed red pepper when finished.

This was really delicious and light. Joel of course picked out every piece of asparagus, and put them in my bowl. That was fine with me because I love asparagus.

*this dish will easily serve 4, if you like you can always add another 1/2 lb. of shrimp for 4 people.

Sheet Pan Asian Style Chicken Meatballs and Burnt Broccoli —

This was a delicious twist on chicken meatballs. The meatballs were so amazingly moist and tasty and I served over Jasmine Rice and it was just perfect. The original recipe is from Bon Appetit and I took a few liberties with it. We like spicy food so I used some Sriracha along with the ketchup — you can make this as spicy as you like or not spicy at all depending on how much or how little Sriracha you use or use none at all. If you’re in the mood for something a little different this one’s for you. We just love meatballs and we’ll eat them any which way. Have fun with this one. And you all know that my husband absolutely still refuses to eat broccoli so it was his loss because it was delicious.

*a little note I use my mini chopper to chop ginger and garlic and I use it for onions as well . It gets it finely minced. If you don’t have one of these mini choppers I highly recommend it’s use to get garlic, ginger and onions and other vegetables finely grated when recipe calls for that.

Enjoy!

Ingredients: Sauce

2/3 cup Ketchup — I decreased the ketchup and added about 1/3 Sriracha – and it was very spicy but we like very spicy . So please either keep it 2/3 of ketchup for totally not spicy or decrease a little ketchup and add a little Sriracha.

1/4 cup Worcestershire Sauce

2 Tbsp. Water

2 Tbsp. Honey

4 tsp. Soy Sauce

1/2 inch piece of ginger, peeled and finely grated

1 garlic clove — finely grated — see note above about finely grating

1/2 tsp. freshly ground black pepper

Ingredients: Meatballs and Broccoli

app. 1 lb. of Broccoli — you just want florets so if you’re starting with a head of broccoli you’ll have to trim and cut etc. I just bought a 1 lb. package of broccoli florets available in most grocery stores these days. ( not frozen)

2 Tbsp. Vegetable Oil divided — 1 for broccoli and 1 for Meatballs

2 1/2 tsp. Kosher Salt divided — 1 1/2 for Broccoli and 1 for Meatballs

* a pinch of Crushed red Pepper which is also optional

1 lb. ground chicken– I try to use 85/15 chicken the 90/10 tends to be very dry and really the best is ground dark meat if you can find it

1 large egg beaten to blend

4 scallions , thinly sliced

2 garlic cloved, finely grated

1 ” small piece of ginger , finely grated

1/3 cup Panko ( Japanese Breadcrumbs)

1 Tbsp. Sesame Oil — I use regular Sesame Oil but you can use Toasted as well

1/4 tsp. freshly ground black pepper

Rice for Serving any kind you like , I used Jasmine this time but any kind will do

Directions:

Mix ketchup, Sriracha ( if you’re using) , Worcestershire Sauce, water, honey, soy sauce, grated ginger, and pepper in a small saucepan. I measured out about 1/4 cup mixture into a small bowl for glazing meatballs, later. Bring remaining mixture to a simmer over medium high heat stirring occasionally and reducing heat if necessary, let sauce thicken , about 5 minutes. Transfer sauce to a small bowl or leave in pan and remove from heat.

Meatball and Broccoli Assembly:

Place a rack in upper third of the oven; pre-heat to 450 degrees. I sprayed a sheet pan with cooking spray and lined it with aluminum foil. In a separate bowl I tossed florets with 1 Tablespoon Vegetable Oil, 1 1/2 tsp. Kosher Salt, and a few pinches of crushed red pepper ( optional) I brushed the sheet pan with the remaining 1 Tbsp. of Vegetable Oil and then placed broccoli florets on the edges of the baking sheet to create space for my meatballs.

Mix chicken, egg, scallions, garlic, ginger, panko, sesame oil, pepper , 1 1/2 tsp. Kosher Salt, and 4 Tbsp. Water in a medium bowl and mixed all ingredients together till just combined — don’t overmix

Using wet hands form into 12 meatballs — Probably 2 inches apiece though I didn’t measure but I got 12 beautiful sized meatballs. Arrange on baking sheet; brush with some of the reserved glaze ( 1/4 cup) ( see photo) Bake until meatballs are cooked through, about 15-20 minutes. Remove from oven; heat broiler. Brush meatballs again with glazing mixture; broil until broccoli is charred and meatballs are browned in spots, app. 5 minutes but keep an eye on them. At the end of 5 minutes if you’re meatballs look ready but your broccoli isn’t charred enough, remove meatballs and continue to broil broccoli till it’s charred enough.

Spoon meatballs and broccoli over rice in a bowl. Drizzle with sauce and there you go!

Cinco de Mayo Salad and Green Goddess Dressing

photo (2)photo (5)photo (2) photo Happy Cinco de Mayo!!! This salad is fresh and delicious and perfect for celebrating the day. If you’d like add a protein to it — chicken , shrimp or even tofu. May is here and it brings warm weather and beautiful flowers and springtime has finally arrived here .  This is a perfect way to bring a little Cinco de Mayo into your home in a pretty healthy way.

Any excuse to celebrate a holiday with a new recipe! Happy Cinco de Mayo everyone and here is a new salad and salad dressing to help celebrate with. While I am not a vegan and don’t always cook that way,  I tried this salad dressing which I found in Gwyneth Paltrow’s cookbook, “It’s All Good”, and I have to say it is all good! All good ingredients. I am not talking diet food–just good, healthy food, that when eaten in moderation, yields very good results. I used * Vegenaise in making this and highly recommend it in the place of mayonnaise. You can also use yogurt in its place. This is low salt and low sugar. Delicious, fresh ingredients. I made it with the delicious salad listed below. I love love cilantro, and I have to say that if you don’t love cilantro, this one’s not for you. I used half of a jalapeno and it was not hot at all, next time I will use a little more.  I scraped the seeds out. Be very careful handling jalapenos and their seeds–make sure to wash your hands well afterwards and maybe wear gloves to prevent any problems.

*This dressing will keep well in a jar for up to a week.

*a little story about Vegenaise, which is lighter than mayonnaise and contains no eggs, milk or animal products. No GMO’s (Genetically Modified Organisms). Mix it with Dijon for great flavor in the place of real mayo. Extra added bonus is a great jar to store future salad dressings in.

Stay Safe Guys and Enjoy the Day!

Be in control of your ingredients as much as possible.

Ingredients:

*this will be vegan if you use Vegenaise

DRESSING INGREDIENTS:

2/3 cup of Vegenaise, yogurt, or mayonnaise

2 scallions, white and light green parts only, chopped

1/4 cup freshly squeezed lime juice (about 4 limes)

1/2 green jalapeno, roughly chopped (you can use more or less, whatever level of heat you like)

1/2 cup extra virgin olive oil

1/2 teaspoon kosher salt

1 tablespoon honey

DRESSING DIRECTIONS:

Blend all ingredients in a blender except for olive oil (I open the top and pour oil in after all other ingredients are combined.) It is a beautiful light green color with specks of dark green. Joel was definitely suspicious of the color but he really loved it! Gave it a big thumbs up!

This should serve 4 nicely as a salad but adjust quantities based on how many people you are feeding.

SALAD INGREDIENTS:

About two hearts of romaine Lettuce, shredded

1/2 can of yellow corn (or 2 fresh ears of corn, shucked)

1/2 can black beans (I use organic canned beans and rinse and drain them)

4 scallions, white and light green parts only, thinly sliced

1 ripe avocado, cut into chunks

approx. 1/2 cup chopped tomatoes (I used delicious cherry tomatoes, halved)

1/4 cup roughly chopped cilantro

Green Goddess Dressing (see above)

If you’re using fresh corn, you’ll have to cook it first. I used the canned version this time. Place the lettuce in a large bowl and dress it with about 1/4 cup of the dressing, just so it’s nicely coated. I then added beans, tomatoes, scallions, avocado, cilantro and corn. Add a little more salad dressing, and serve immediately. Joel likes a lot more dressing on his salad so I served with dressing on the side.