Easy Peasy Chicken Caprese

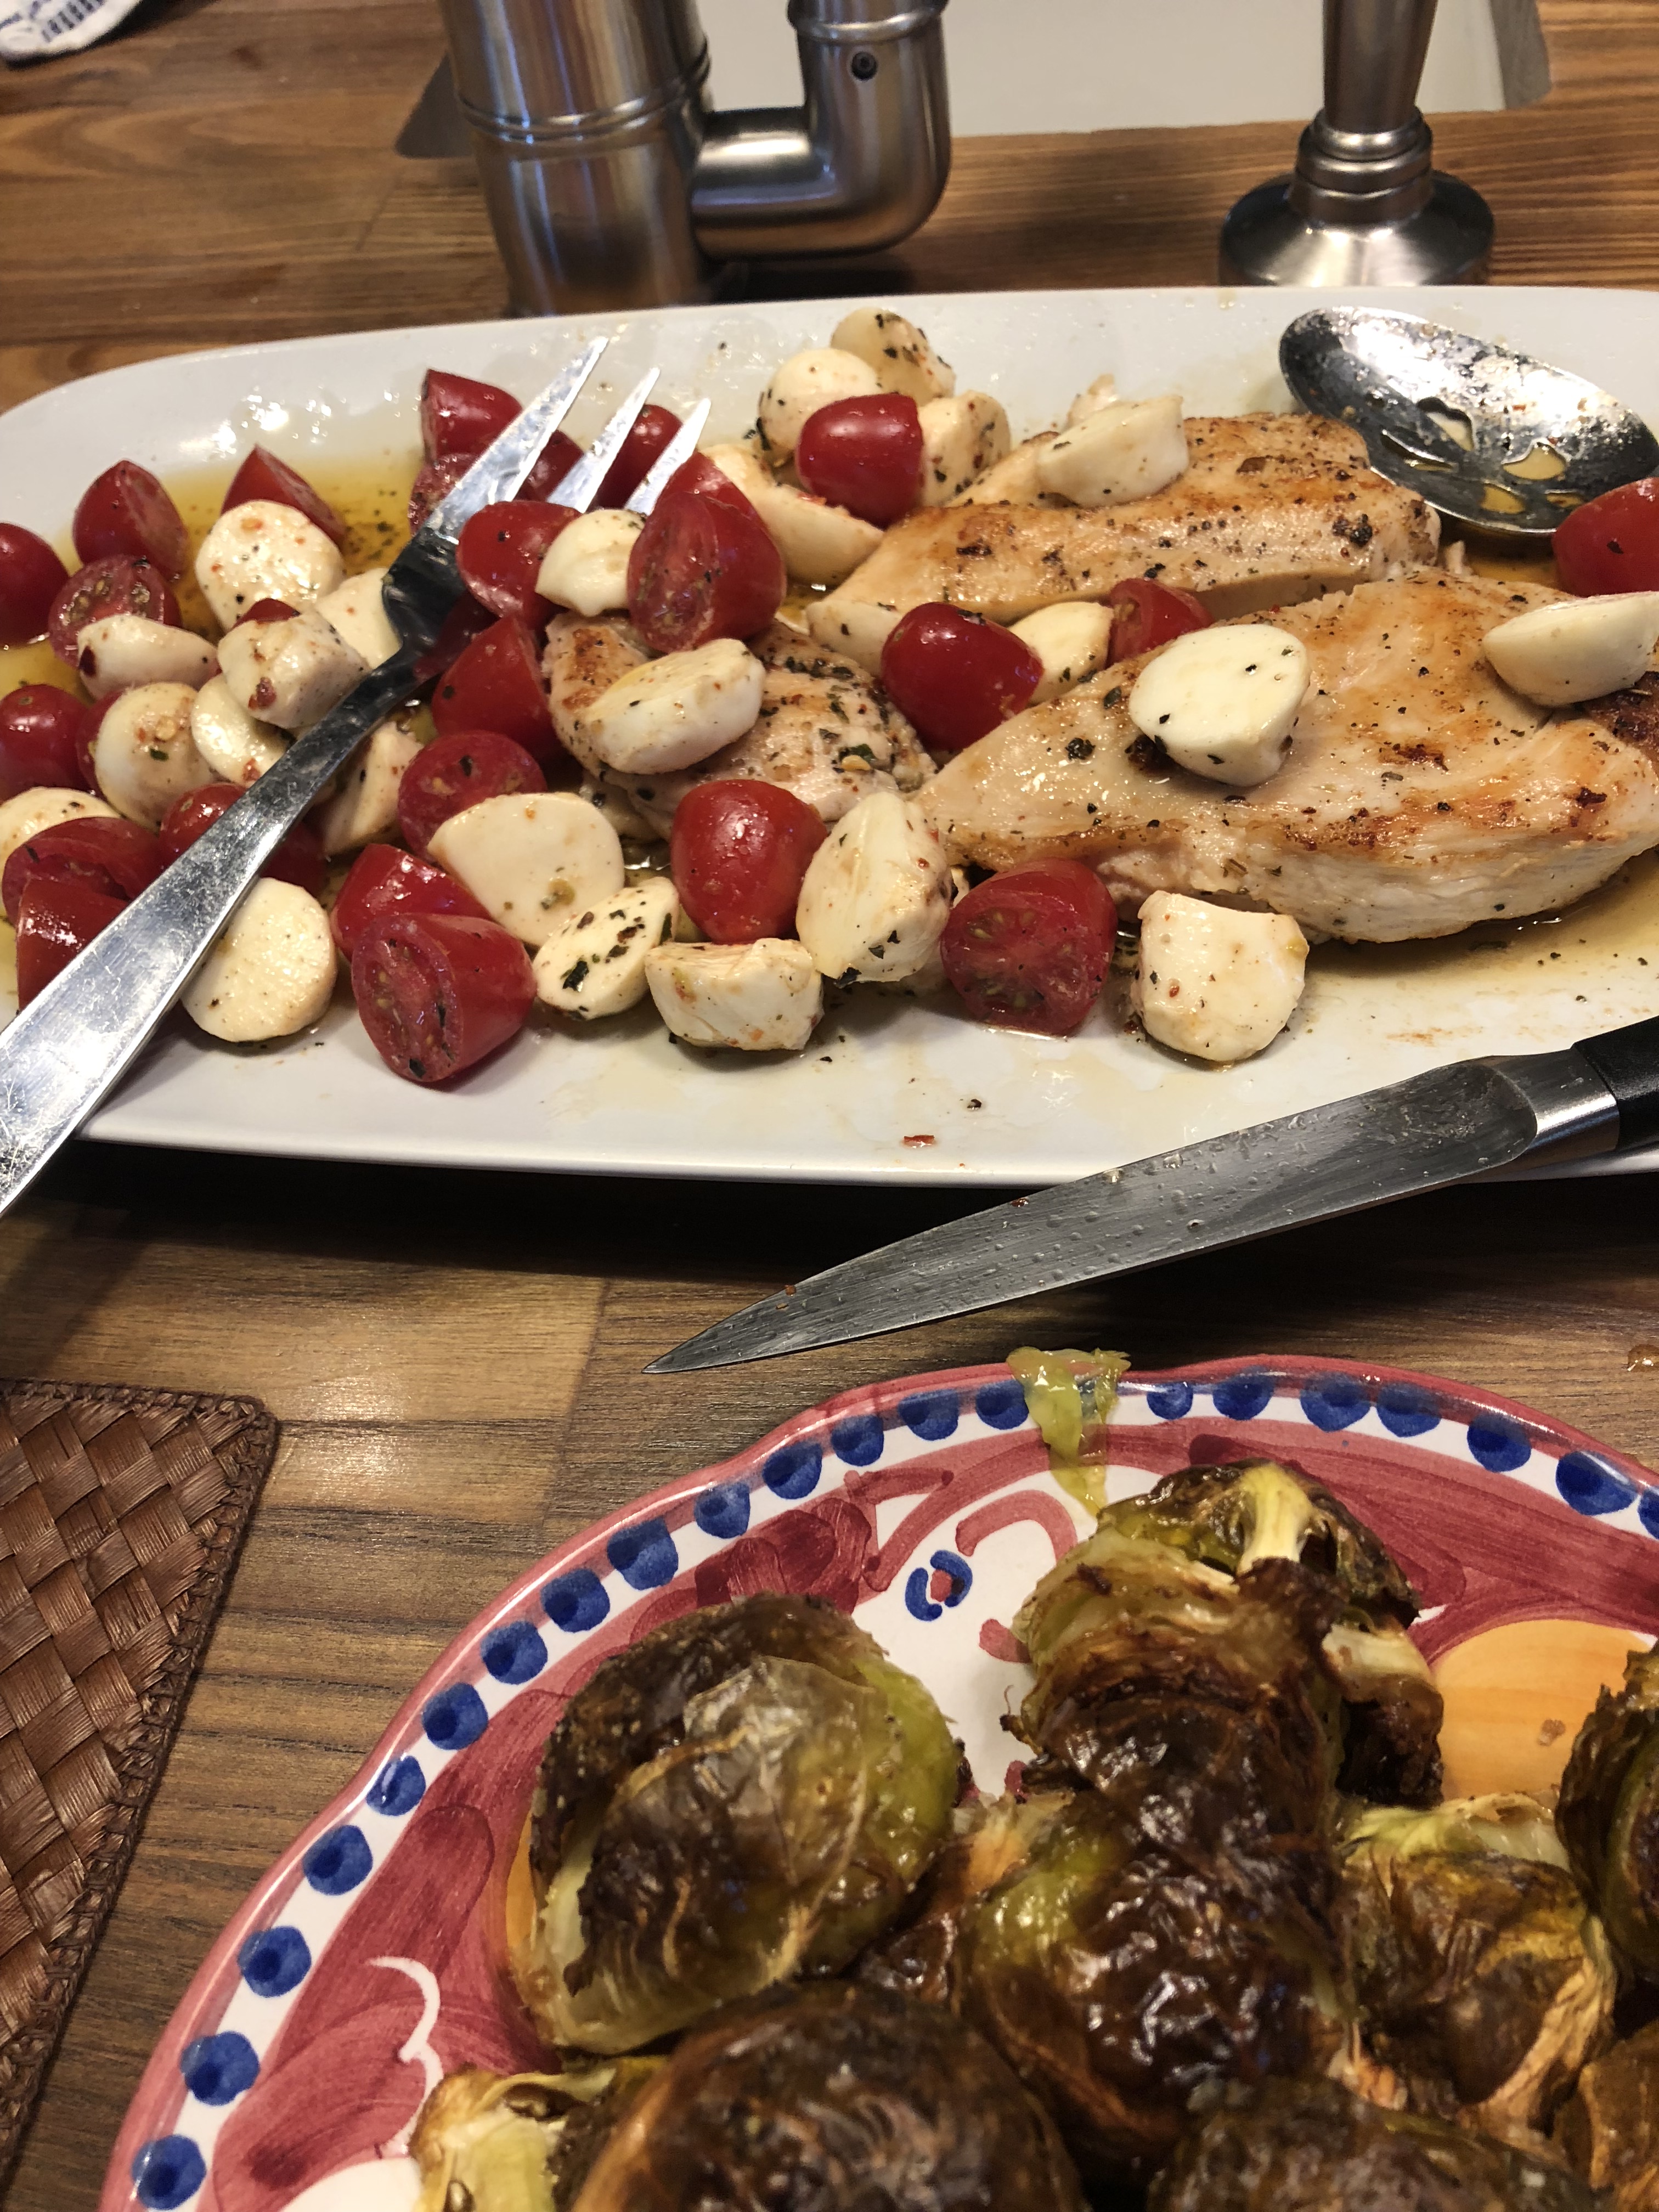
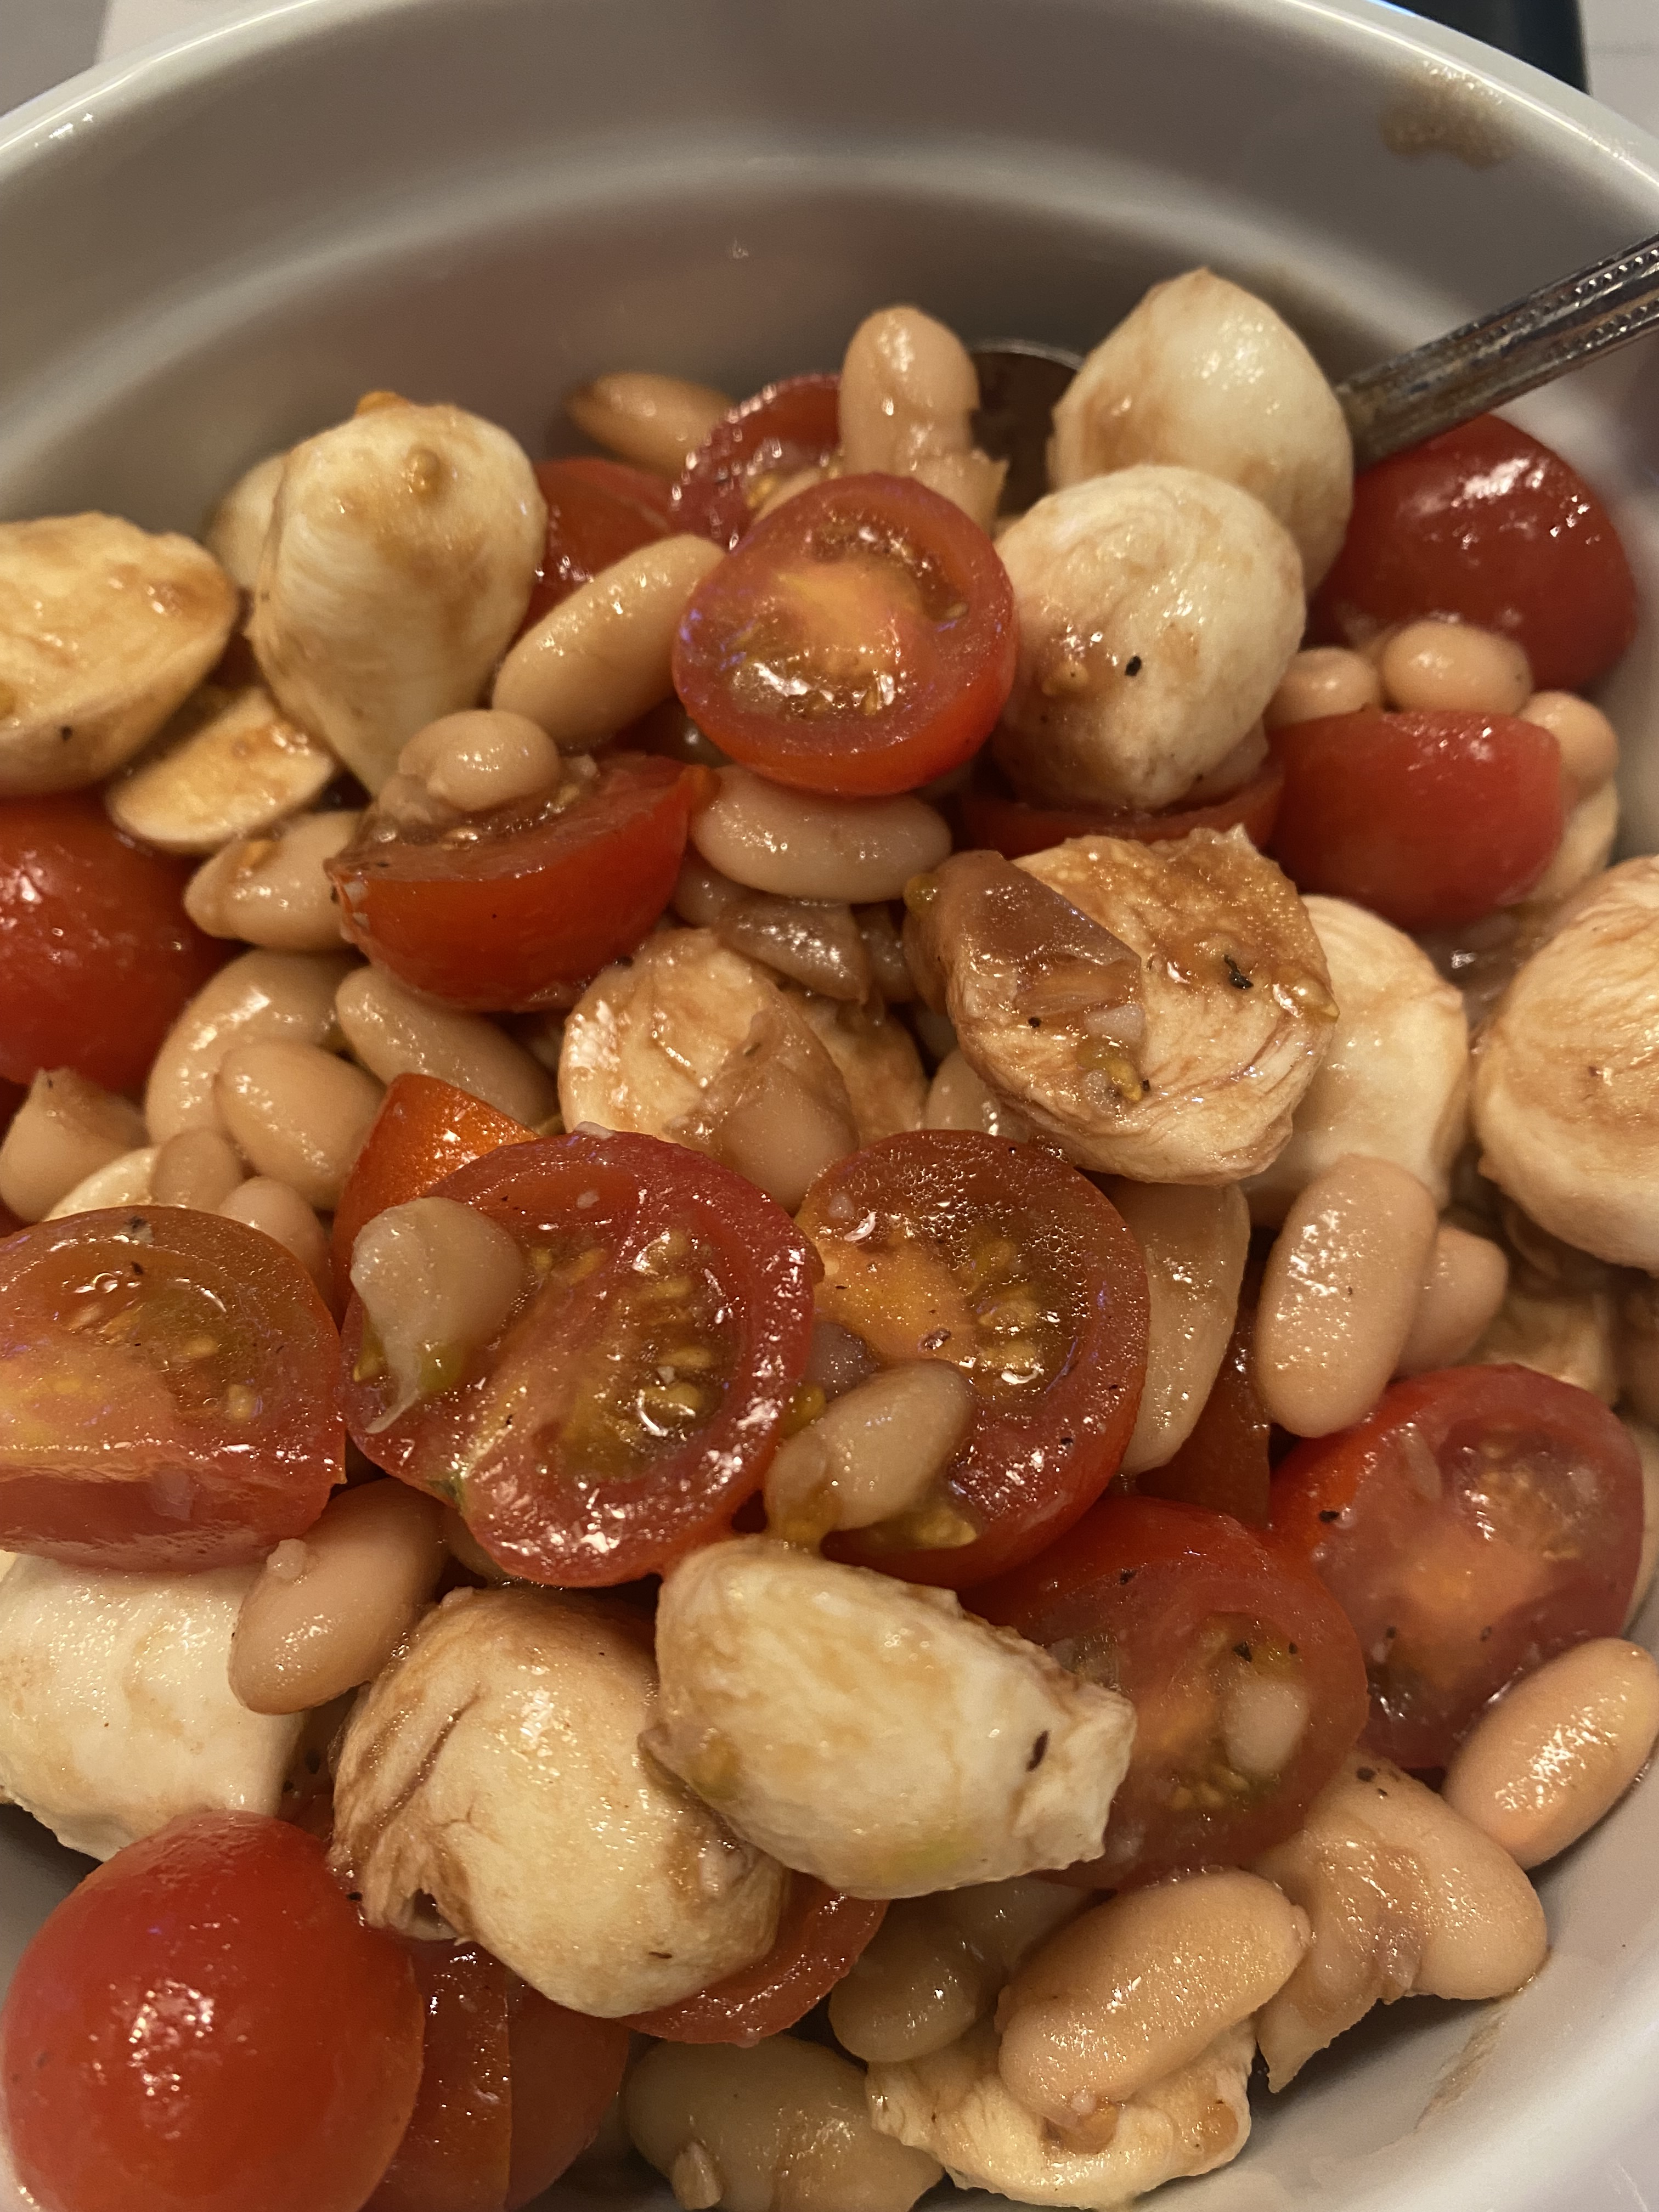
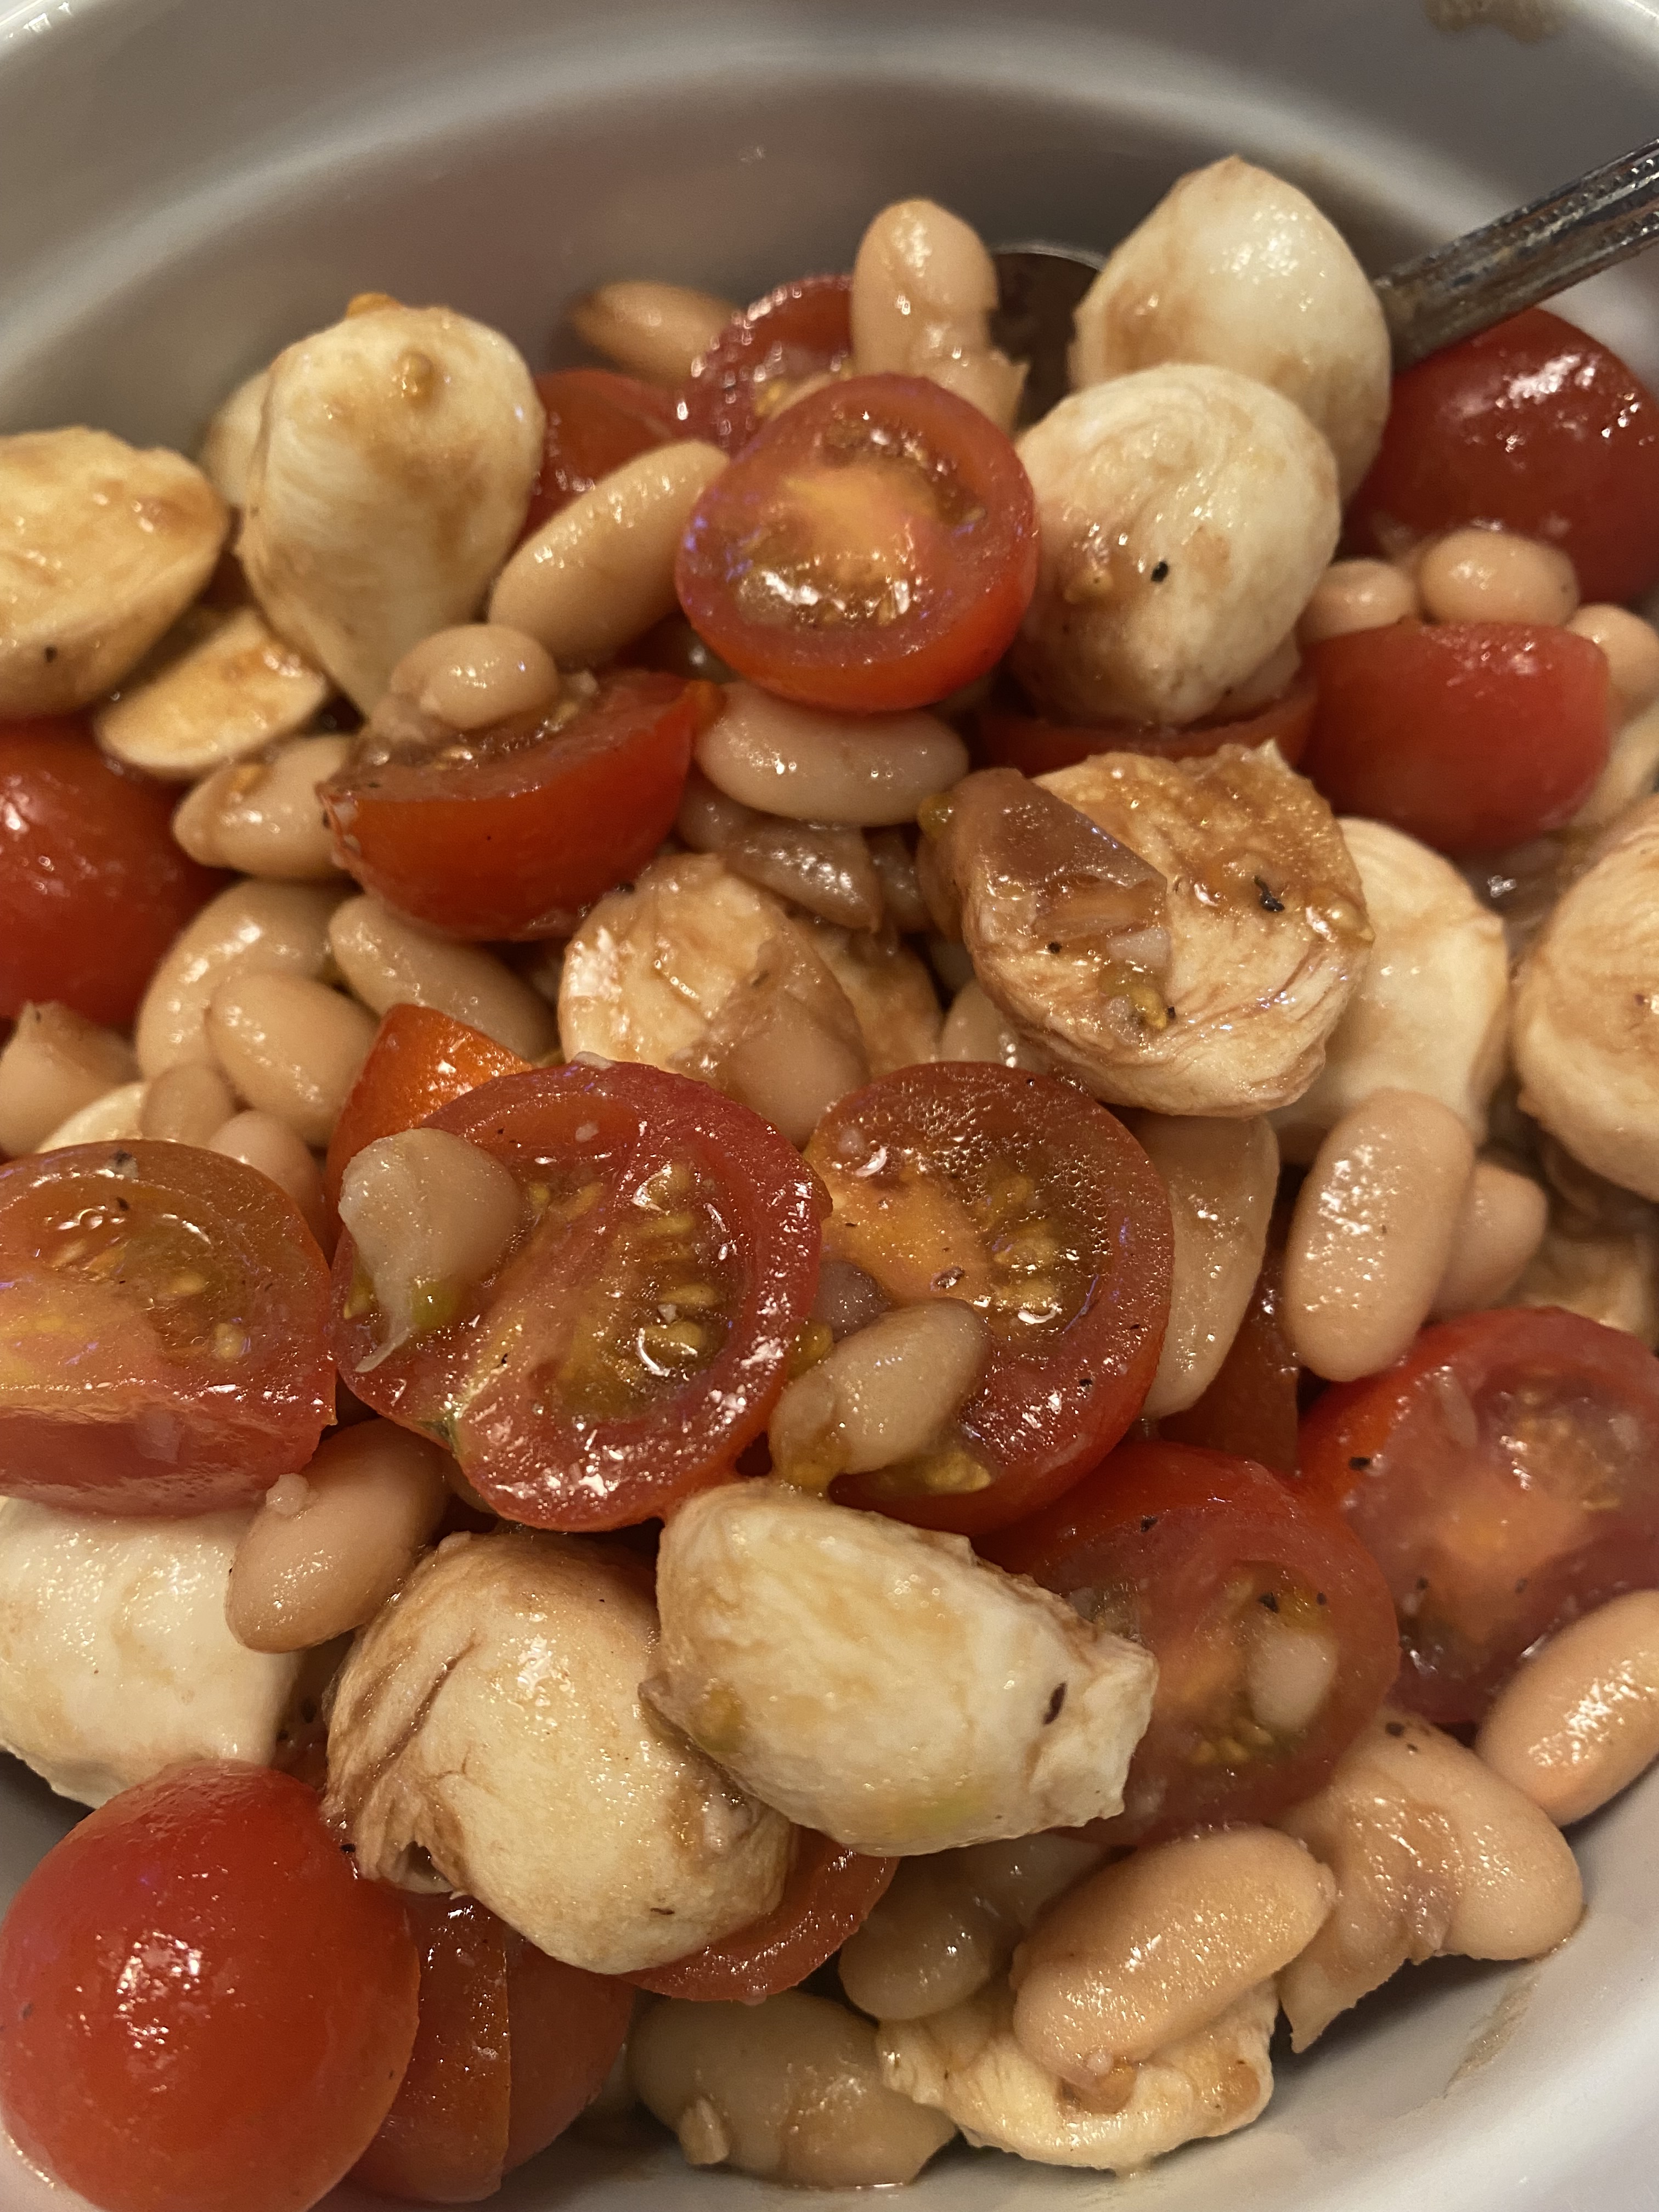
This is one of those recipes that I make that is so super easy. Very few ingredients and other than cutting tomatoes and mozzarella balls, there is very little prep. You gotta love meals like this, especially in the summer when these beautiful heirloom tomatoes are abundant. I really only make this in the summer . It is light and delicious and makes for a beautiful salad as well and you can serve it at room temperature. I made this last night with burnt brussel sprouts on the side . You’re not going to believe how easy this is. It’s amazing!

Follow me on Instagram @cookingwithcandi

Ingredients:

1 container marinated bocconcini ( mozzarella balls) you will need the oil from the container to marinate chicken ( it comes in an olive oil marinade with spices) available in most cheese sections of the supermarket ( Whole Foods)

4 skinless, boneless chicken breast halves , I buy them pounded thin or use chicken tenderloins –you just don’t want them too too thick

Kosher Salt and Freshly Ground Black Pepper

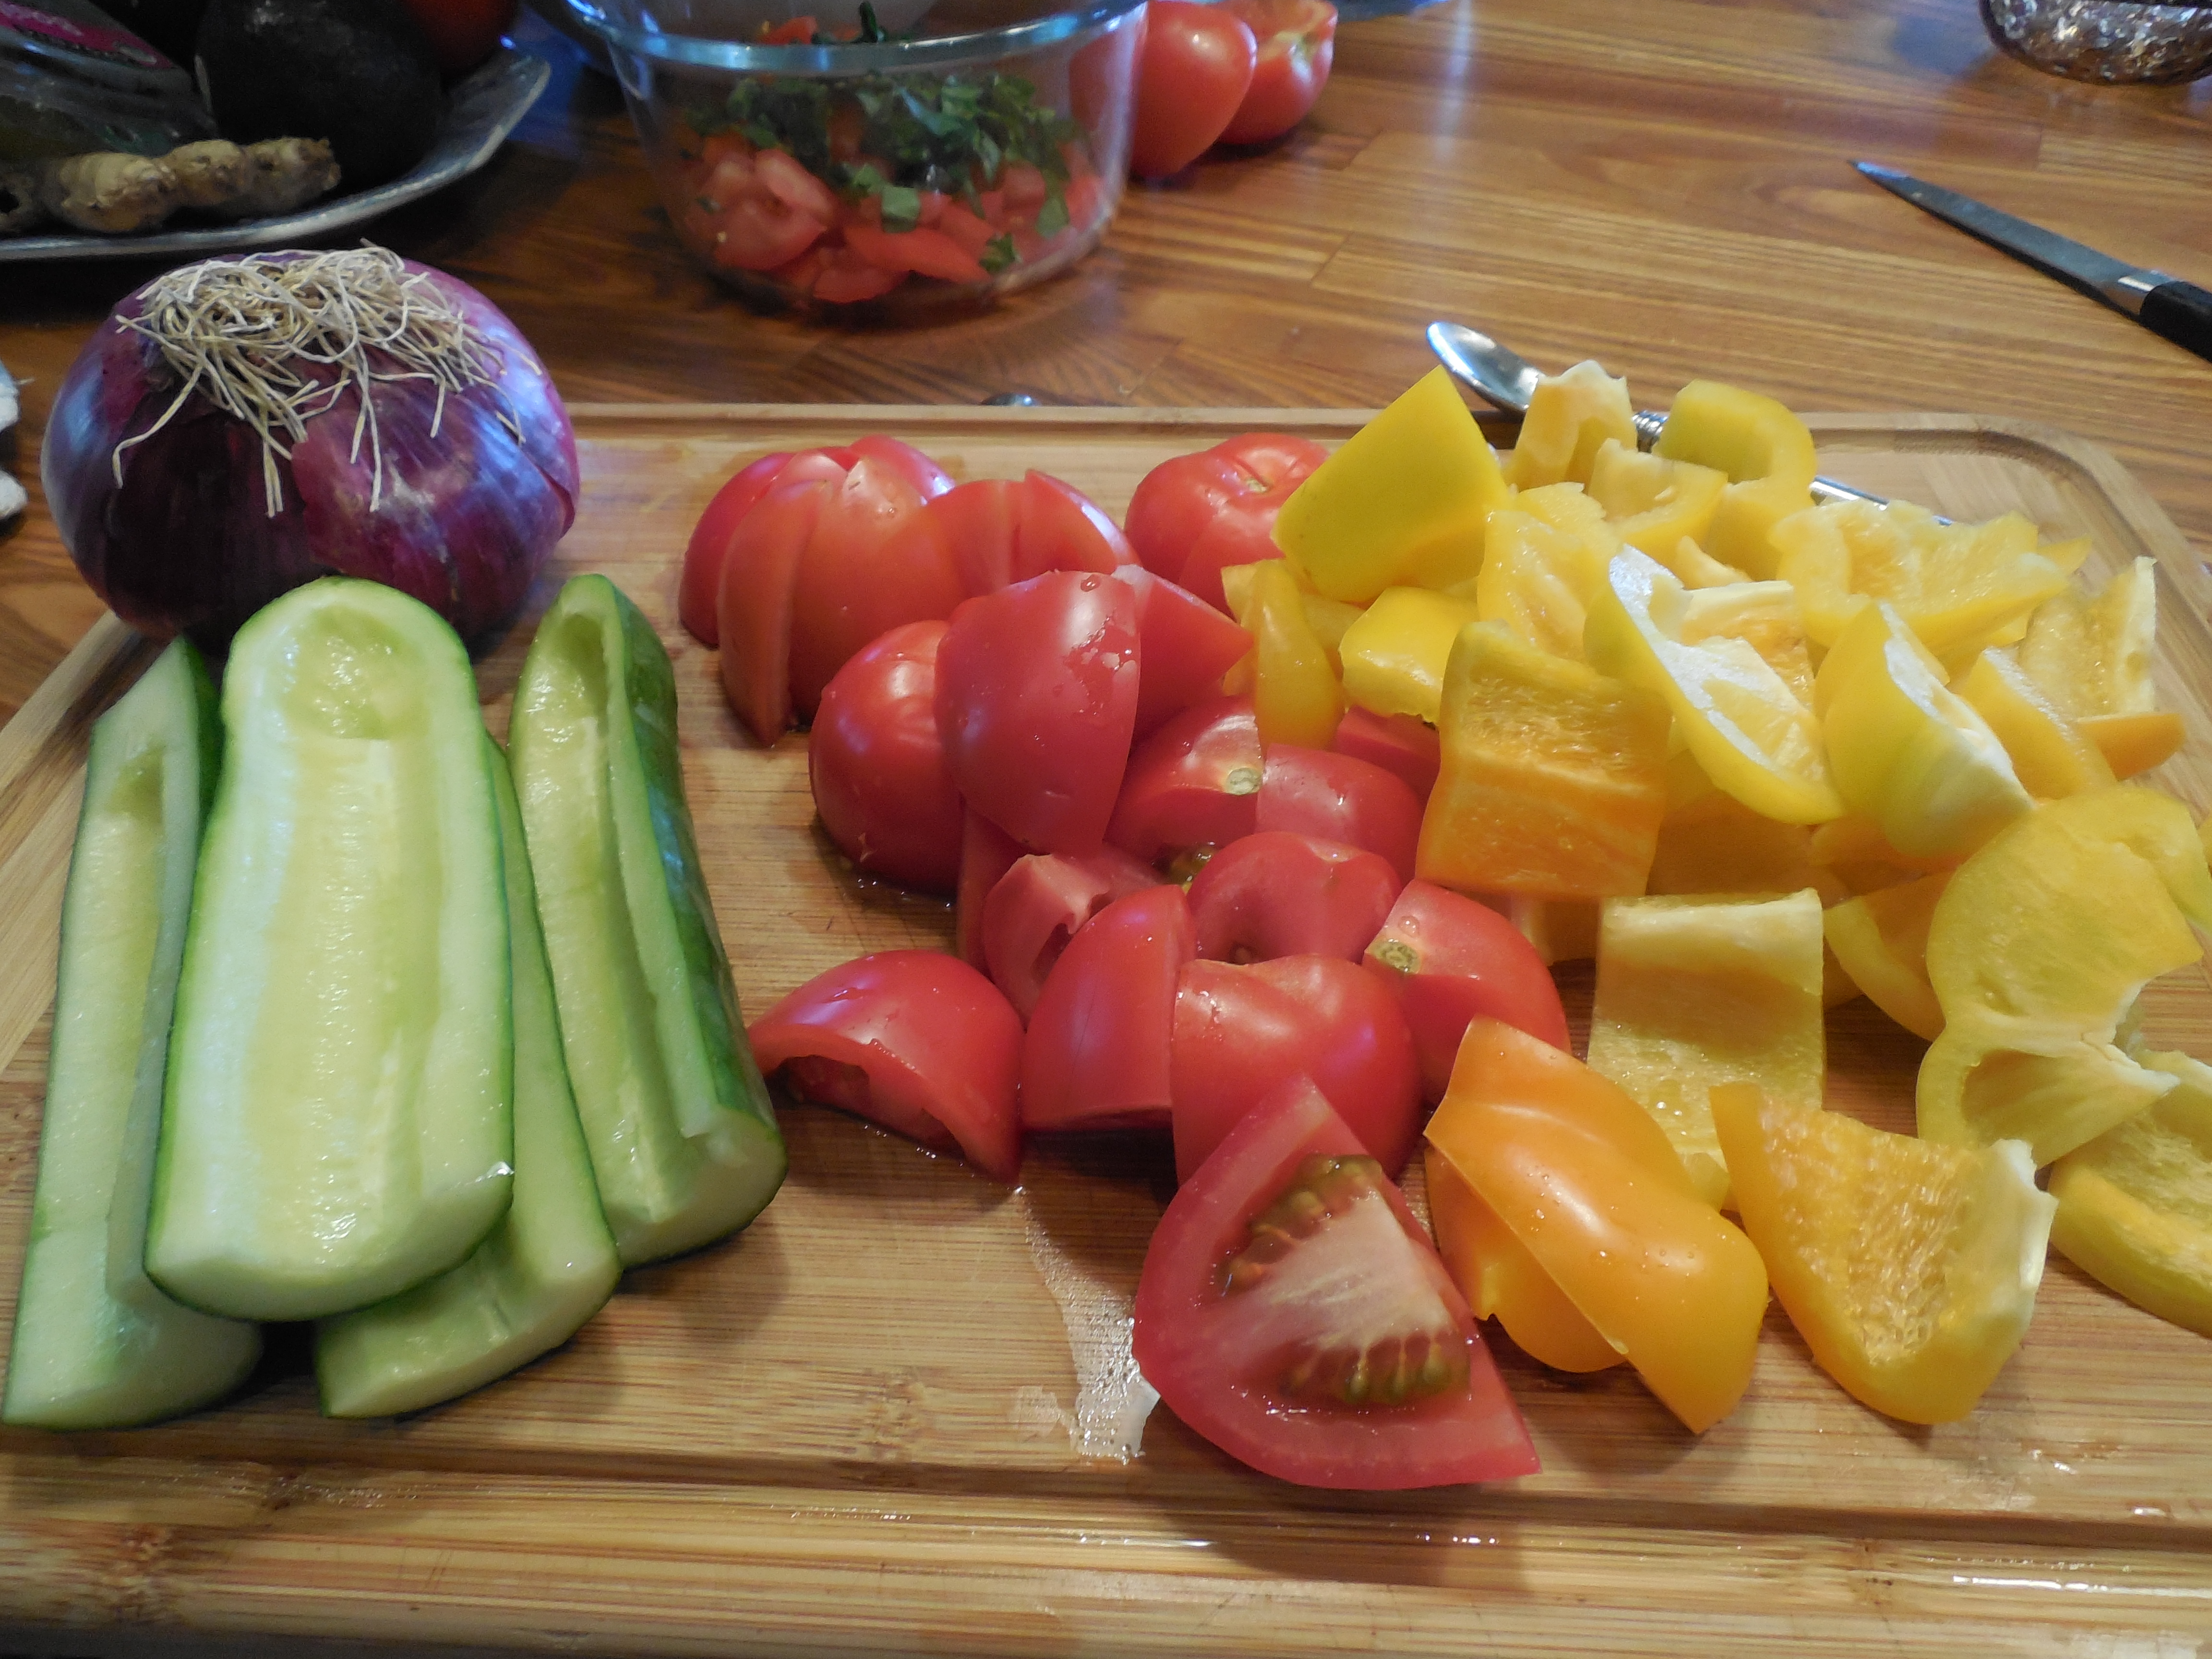
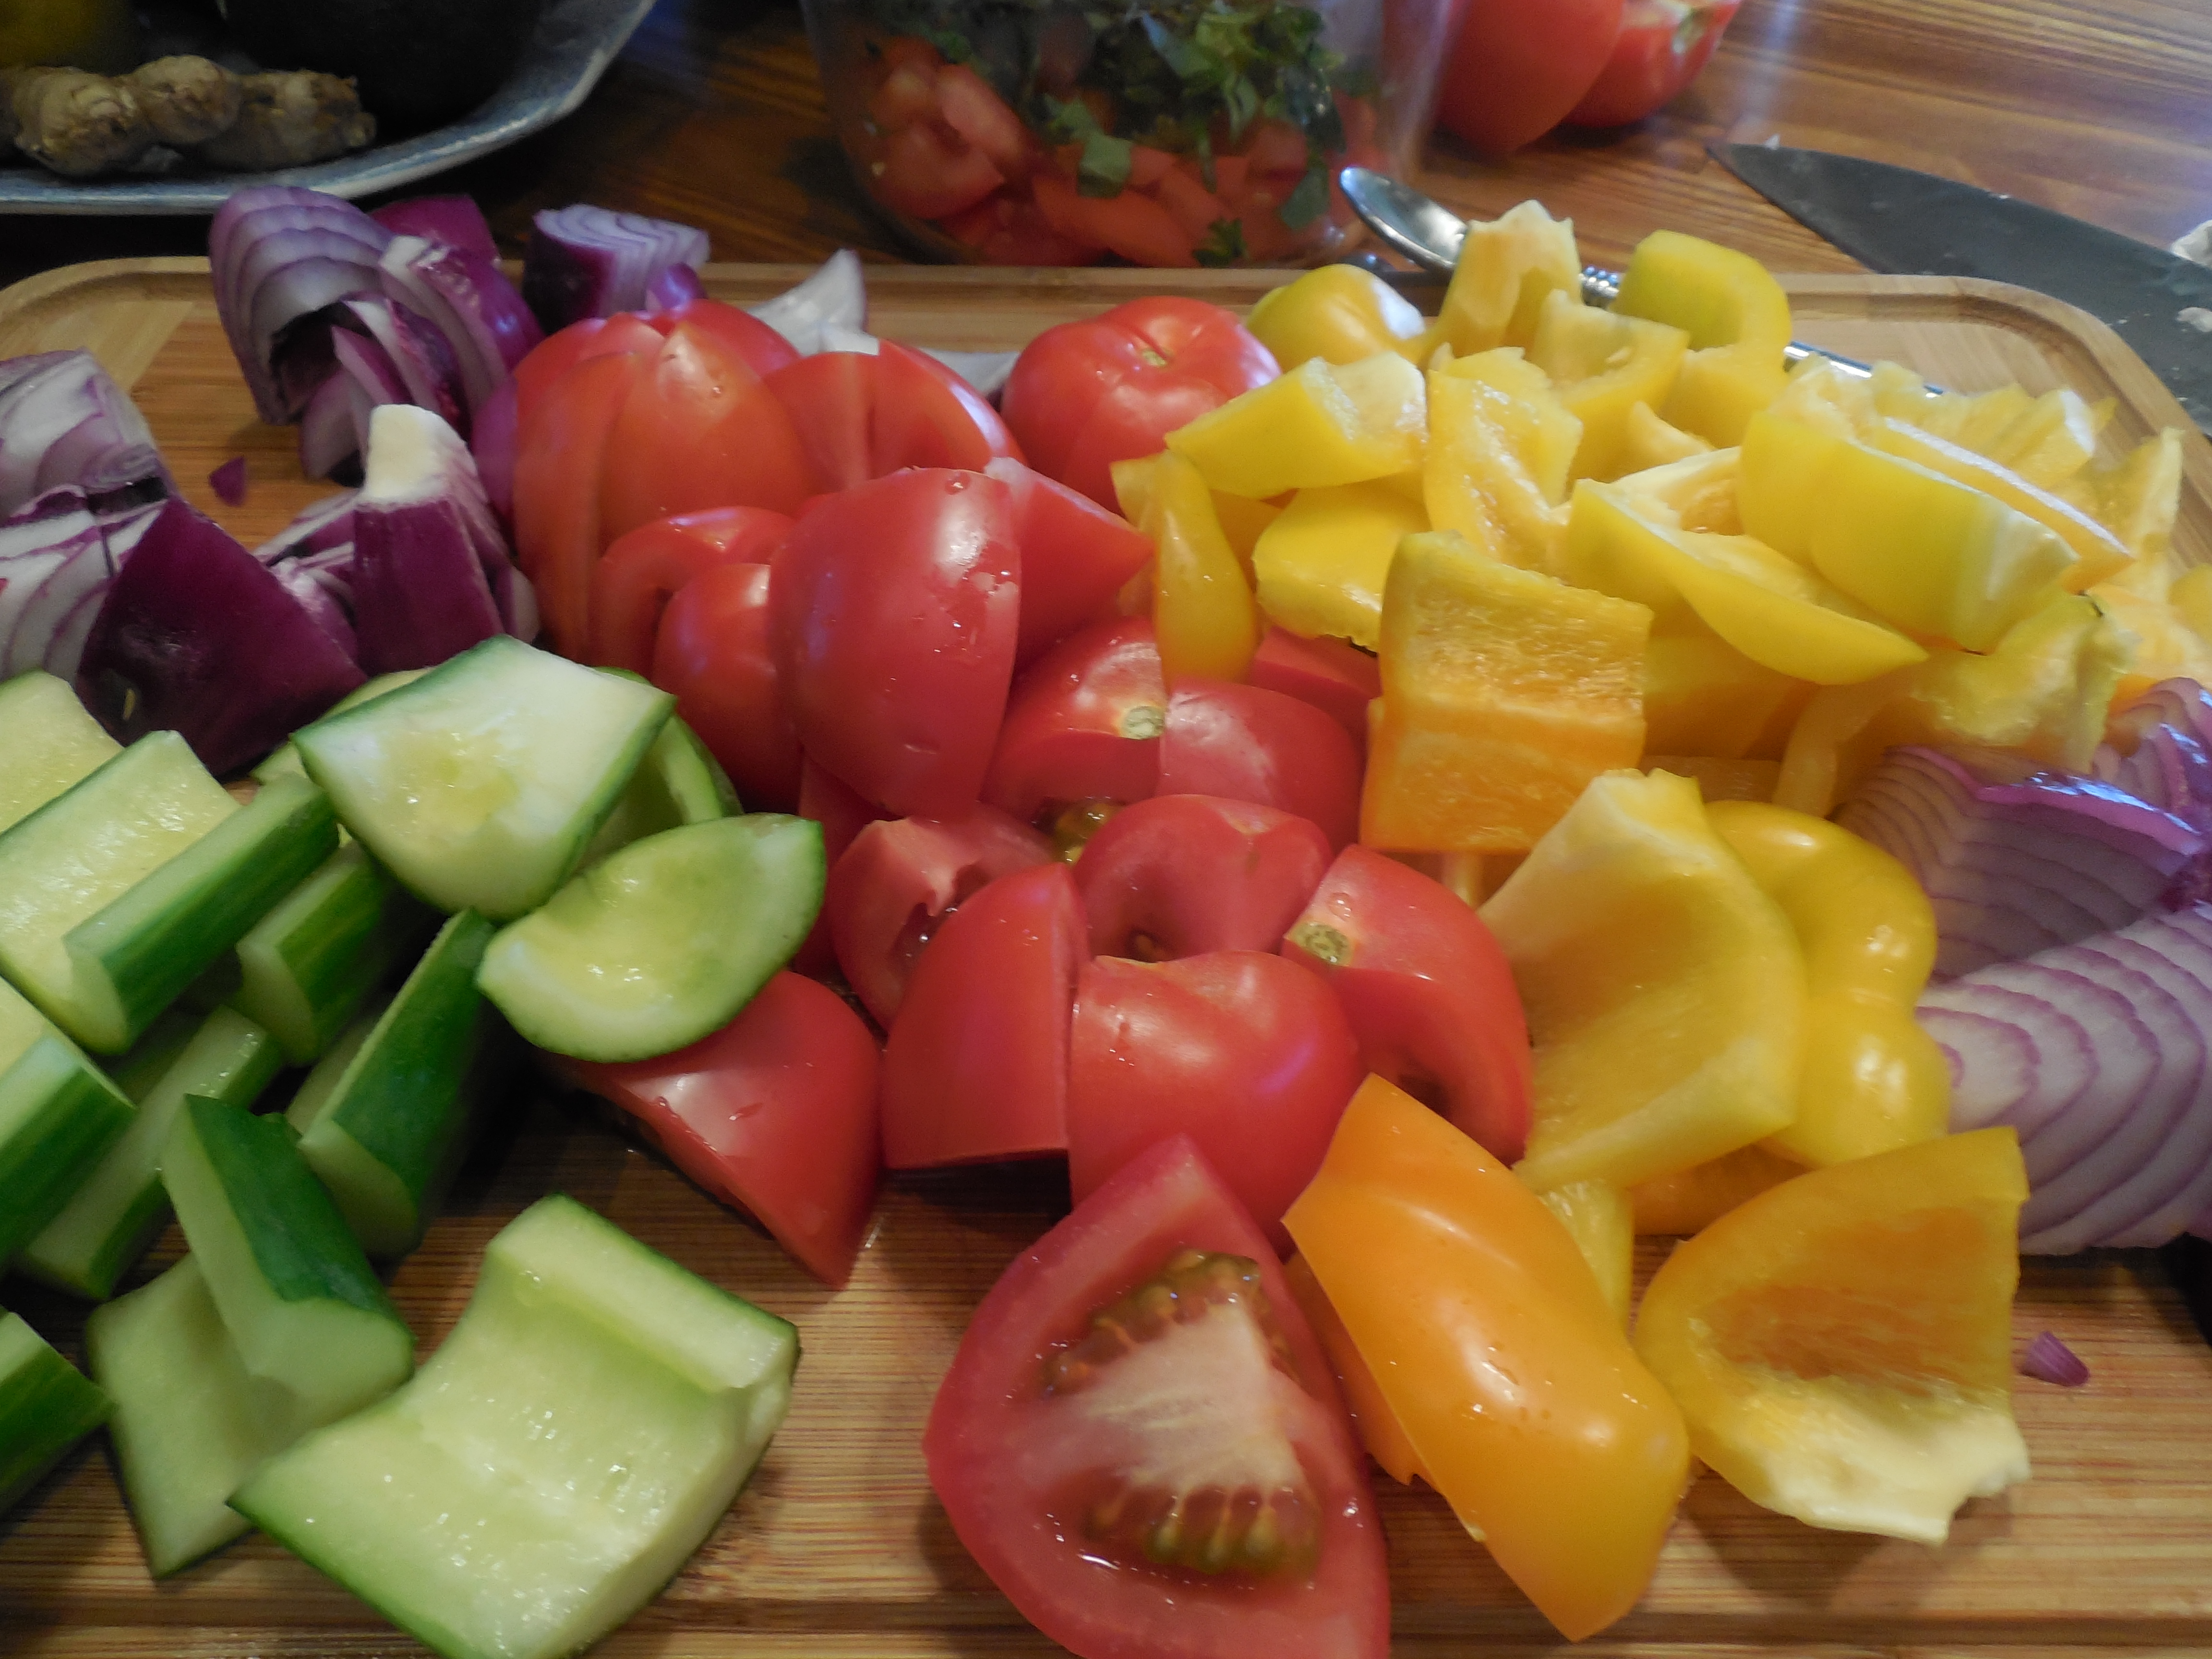
1 pint heirloom ( if you can get them) cherry or grape tomatoes, halved

*a little cut up basil is always a good idea!

Directions:

Take bocconcini balls out of the marinade. Cut bocconcini balls in quarters. Transfer about 1/2 of the marinade from bocconcini to a medium size baking dish , add the chicken , salt and pepper the chicken and let it sit at room temperature for about an hour before cooking. If you’d like you can refrigerate , and take out and bring to room temperature before grilling.

Put cheese in a bowl, add the remaining oil marinade and add the cut tomatoes to this bowl. Salt and Pepper to taste, give it a good stir and put in refrigerator till you’re ready to cook chicken. I removed from fridge about 1/2 hour before I cooked the chicken. Just bring it to room temperature.

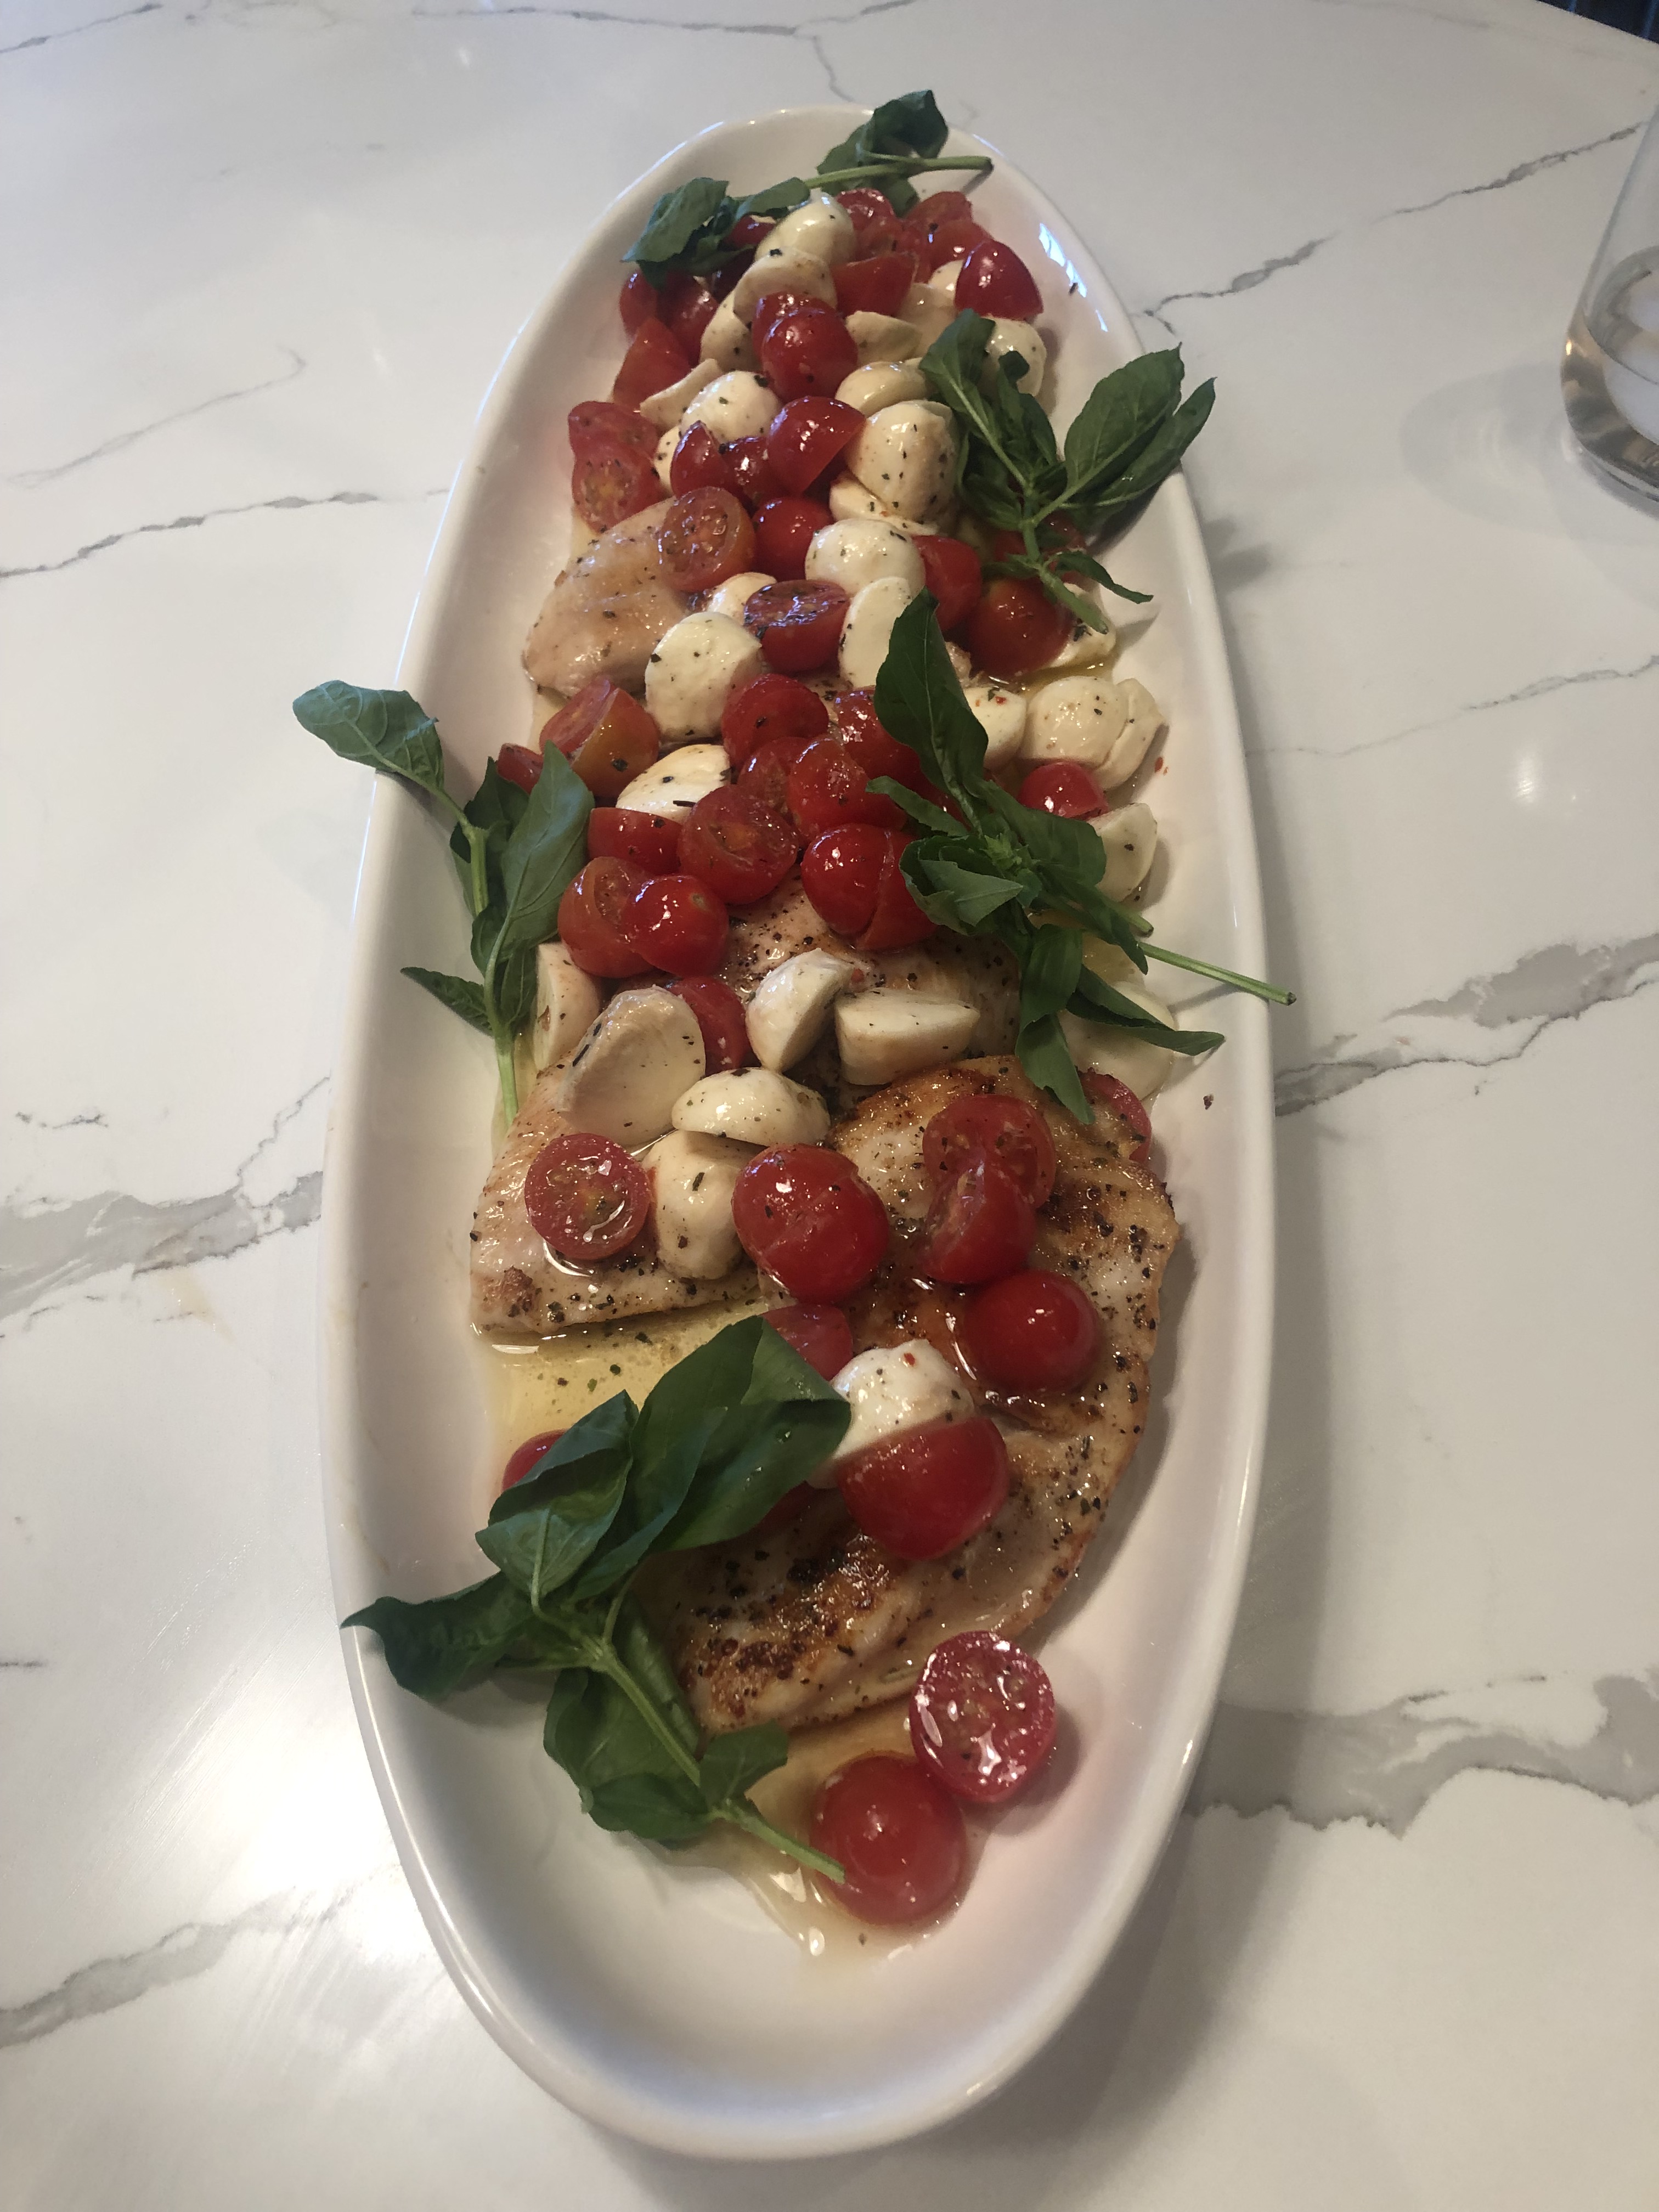
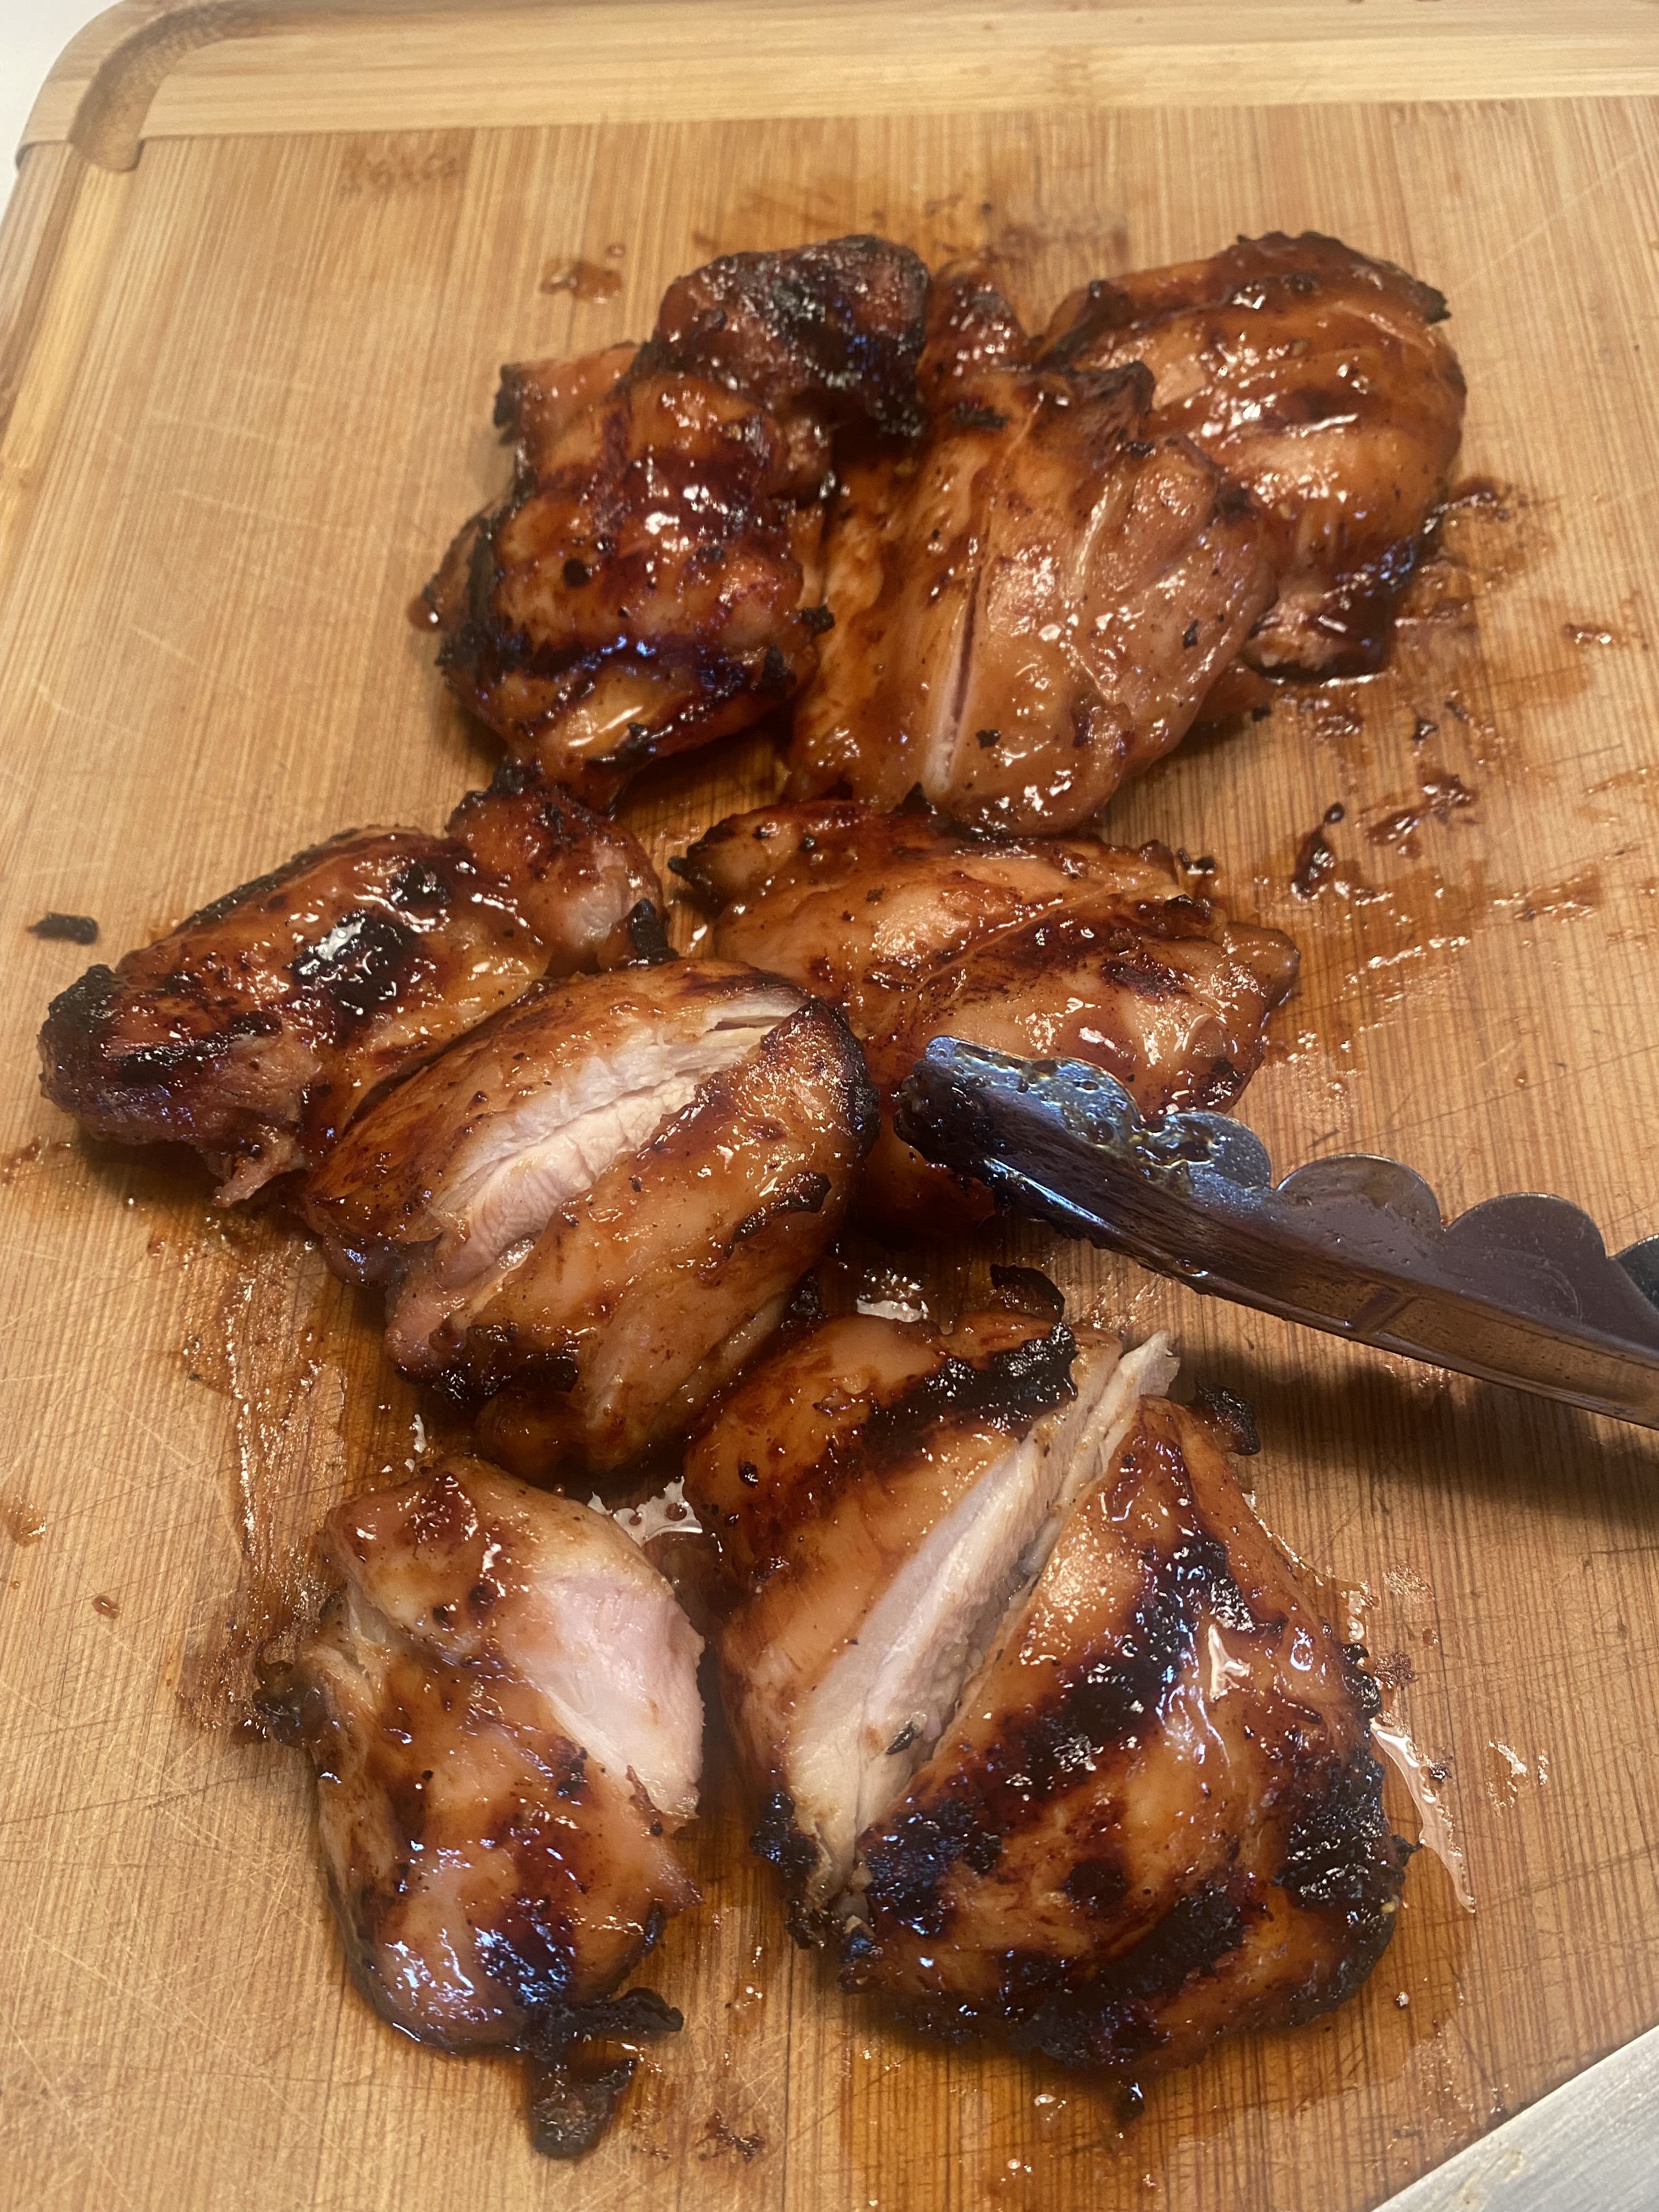
Grill the chicken over medium high heat , till you get nice grill marks, probably about 8 minutes. You can cut the chicken into smaller pieces and mix with tomatoes and cheese. I just plated up the chicken and put tomato/cheese mixture on the plate. Perfect summer meal.

Tomato Time Pasta– perfect Summer Pasta made with fresh tomatoes–Meatless

photo 2 (3)photo 4 (2)photo 5 (3)Nothing but beautiful tomatoes out there begging to be eaten in a million different ways. Perfect for a “Meatless Monday” dish or any night of the week . There are tons of local tomatoes out there now. At any local farmers market you can pick up pints of these beautiful babies. This is a lovely light pasta.

I had bought 2 pints of those beautiful little cherry tomatoes and right now there are those gorgeous yellow sunburst tomatoes also available.  I wasn’t sure what I would do with them. They varied in size so I knew if I made a sauce some were getting cut and some would stay whole. Nothing ever sounds better than a plate of pasta to me,  nothing.   These beautiful tomatoes are only out for such a limited time you have to get them while the getting is good.  Some of the tomatoes were super small and I left them whole while I halved the larger ones. There are so many variations of this sauce and feel free to improvise. We love it this way. So simple and so delicious.

Follow me on Instagram @cookingwithcandi

Ingredients:

1 lb. spaghetti , any kind of long spaghetti is good for this — sometimes I use bucatini type and sometimes I use thin type long spaghetti– use whatever you’d like

1/4 cup extra-virgin olive oil plus more as needed

4 cloves garlic, peeled and minced.

1/2 teaspoon crushed red pepper* we like it spicy so if you don’t want it that spicy cut to 1/4, I actually used 1 whole teaspoon and it packed a lot of kick.

2 pints of cherry tomatoes or little plum tomatoes or you can use about 3 cups of chopped fresh tomatoes of any type. I cut the larger tomatoes in 1/2 and I left the little ones whole.

app. 20 leaves of fresh basil, I just cut them up into small slivers–this is totally optional if your kids don’t like green stuff– but it looks pretty

Kosher Salt and Freshly Ground Black Pepper to taste –I used app. 1 teaspoon on tomatoes and added towards the end as needed

freshly grated parmesan at your discretion

Directions:

Cook pasta according to directions on box for al dente. Reserve a cup of pasta water in the event you may need a little more liquid in your sauce. Add 2 tablespoons of salt to cooking water for pasta. The Italians like to say that their pasta water should be like sea water good and salty. After finished cooking pasta — reserve 1 cup of pasta water and set aside before you drain pasta.

Heat a large sauté pan over medium heat add 4 tablespoons of olive oil and garlic, cook until garlic is golden about 2 minutes. Be careful you don’t want to burn this garlic. Add the crushed red pepper now and the tomatoes, and cook over medium heat. I also added some kosher salt (about 1/2 teaspoon to start, you can always add more) and a little freshly ground black pepper. Stir for a while to make sure garlic doesn’t burn and tomatoes start to burst and deflate about 5  minutes and if you think you need a little more olive oil add it now . I let the tomatoes simmer in the pan for about 15 minutes to 1/2 hour for the best consistency. I smashed down stubborn little tomatoes at the end with the back of a wooden spoon. A very low simmer at the end.  Taste for Salt and Pepper. The longer the tomatoes sit in the oil and cook down on a low simmer the better the sauce will be so if you have a little time let it sit.

Once the spaghetti is cooked and you’ve drained it ( remember to reserve a cup of pasta water).  Add it to the pan with tomatoes and over medium-high heat toss the pasta with the tomatoes well. Add the basil . I let everyone add their own cheese at the table.

Remove the pan from the heat and plate it up.

Yum! and even more delicious the next day.

S’mores Dip

Melted Chocolate and Toasty Marshmallows!!! This is a hit for your next party or just for your family. Who says it’s only for camping out? This was made in the oven very quickly and came out perfectly delicious and perfect all year round.  A few minutes in the oven and a few minutes to prep and you have a delicious most fun dessert to serve. Serve it with graham crackers or graham cracker sticks and watch it disappear. You can also mix it with peanut butter chips for a little bit different spin on S’mores. All I can say is yum!

Ingredients:

app. 1 regular size bag of  chocolate chips, you can use semi-sweet, milk chocolate, peanut butter chips or any combo.

Marshmallows- start out with a whole bag — you’ll probably use 3/4 of the bag –you can use minis or the large ones but I just used regular sized this time which are readily available

Graham Cracker Squares–for dipping

I used an 8 inch cast iron skillet– it makes for a great presentation and it cooks perfectly– just be very very careful with serving it because skillet will be very hot — careful supervision with this one

Directions:

Pre-heat oven to 350 degrees and spray the cast iron pan with cooking spray ( this will help with clean up)  Pour the chips you’re using in an even layer on the bottom of the skillet.  Bake for3-4  minutes or until chocolate chips are melted . Watch closely because you don’t want to burn. Using an oven mitt –remove the skillet from the oven and stir the chocolate around  then cover the top with the marshmallows completely. Bake for another 4-5 minutes or until marshmallows are browned on top. ( see photo)  Serve immediately with graham cracker squares —only tip is to be very careful , because the dip and the pan will be very hot!!!! you’ll have to supervise with little ones and even some of the over anxious adults. You can let it rest for about 4-5 minutes before serving. But it should be served hot.

*if you don’t have a skillet you may use another oven-safe baking dish like a 9×13 pyrex would work . Chocolate does melt more evenly in cast-iron skillet and it retains heat better. 

*you can adjust the amounts of chocolate and marshmallows to your liking, and the size of the skillet. Some of these photos show the jumbo sized marshmallows which will work just as well or you can cut them in 1/2. 

*use whatever kind of chips you like, and any kind of marshmallows you like — mini marshmallows work well here too.

Farmers Market to Table Gazpacho

DSCN0375DSCN0378

Delicious fresh vegetables from the local farmers market went into this gazpacho. This time of year you must take advantage of the awesome selection of fruit and vegetables at your local farmers market. In Colorado there is so much local produce it would be a pity not to . I bought the tomatoes , cucumbers, peppers, garlic and red onion all from our local farmers market. Whole Foods also sells many local products which is so amazing.  It’s just quite wonderful to put food on your table from your own garden or at least from one within 100 miles of where you live. Farm to Table . Simply put it’s the best .

Ingredients:

1 cucumber or 2 – 3 Kirby size cukes, halved and seeded , but don’t peel . If not Kirby cukes you can use a hothouse cucumber. Go organic, because you are eating the peel.

2 yellow bell peppers, cored and seeded. Of course you can use red bell peppers, but not green.

4 tomatoes — Whole Foods and most grocery stores have beautiful produce this time of year so use the heirlooms if you can get them or any of the fresh tomatoes will do.

1 red onion

3 garlic cloves, minced or throw them into the food processor along with vegetables

3 cups Spicy V8 or use regular tomato juice

1/4 cup champagne vinegar or white wine vinegar

1/4 cup good olive oil

1/2 teaspoon kosher salt

1 teaspoon freshly ground black pepper

*1/2 to 1 whole jalapeno depending on how spicy you like it, remove seeds from jalapeno

* cilantro, chopped is a nice touch for garnish

*avocado cut up is also nice garnish

*shrimp is also a nice garnish

Directions:

I cut up cukes, tomatoes, bell peppers and red onions into app. 1 inch cubes. Put each vegetable separately into a food processor with steel blade and pulse until it is coarsely chopped. Do not make baby food, don’t over process.

After each vegetable is chopped up combine them in a large bowl and add the garlic ( if you haven’t already) , juice, vinegar, olive oil, salt and pepper. Mix well and chill before serving. It’s a good idea to chill for a while, the longer it sits the more the taste develops.

The second night I added shrimp and avocado.

20130809-090155.jpg

20130809-090221.jpg

BBQ Chicken Marinade

Last night I put together this marinade and it was so very delicious. It has a definite Chinese flavor which we love. It’s sweet and savory all at the same time. You don’t have to marinade over night. I marinated the chicken for about 2 hours. Of course you can marinade overnight if you’d like but not necessary with this one. Easy to obtain ingredients — you may have to buy Chinese 5 spice powder if you don’t have in the house, this makes the flavor so don’t omit. Very easy prep on this one; most of the ingredients come out of bottles of which I had all in pantry or fridge. I cooked on the outside grill on a medium setting so as not to burn the chicken. Cooks in about 10 -12 minutes. This chicken would be delicious the next day but we didn’t have any leftovers. I cut in 1/2 for the two of us. We also prefer thighs which we like best but this would be just fine on white meat as well but timing may vary. Serve alongside a salad , some rice and a vegetable and you’re good to go. The leftovers would be amazing over fried rice — just saying. If no outdoor grill use a grill pan.

Enjoy! it’s my marinade for the summer.

Ingredients:

2 -2 1/2 pounds boneless, skinless chicken thighs

2 large garlic cloves, minced

1/2 teaspoon Chinese five-spice powder

1/4 cup honey

1/4 cup hoisin sauce

3 Tablespoons soy sauce

2 Tablespoons Ketchup

4 teaspoons toasted sesame oil

Directions:

Pat the chicken thighs with paper towels to remove excess moisture

In a large bowl ( big enough to hold chicken) stir together the minced garlic, five-spice powder, honey, hoisin, soy sauce , ketchup and sesame oil. I whisk all ingredients together.

Remove about a cup of the sauce to a small dish for glazing the chicken.

Add the chicken to the bowl, coating all pieces well. Cover with plastic wrap and since I only did for a few hours I left it on counter . If you’re doing over-night place in fridge but take out and bring to room temp. before cooking. You can marinade for as little as 30 minutes or up to over-night.

I pre-heated grill to medium and I cooked chicken for about 10-12 minutes depending on the size of the thighs. I basted with a brush some of the marinade at the very end ( app. 2-3 minutes)Transfer to a platter and let sit for a few minutes.

That’s it — very simple and very delicious week night meal or BBQ for guests.

White Bean Caprese Salad

An easy side salad for the lazy hazy last days of Summer and really good anytime of the year. White Beans from the can which is always in my pantry works to make this an easy simple delicious side salad. You can add some arugula or just serve alongside any protein and it’s perfection with simple ingredients.

Ingredients:

1 14 oz. can white beans such as cannellini, rinsed

app. 5 oz. small cherry or grape tomatoes , halved

app. 5 oz. small mozzarella balls such as cilliegine which is available in most grocery stores in an 8 oz. container. You can also use any good quality fresh mozzarella torn into bite size pieces.

1/4 cup loosely packed basil leaves , I like them cut up

2 Tablespoons olive oil, plus more if needed —

Kosher Salt and Black Pepper to taste and sometimes a pinch or two of crushed red pepper if you like a little kick

2 Teaspoons good – quality balsamic vinegar, plus more if needed

Directions:

In a medium bowl, combine the beans, tomatoes, cheese and 1/2 the basil. Gently toss together.

Add the olive oil and season the salad with salt and pepper. Gently stir to combine.

Drizzle the salad with the balsamic vinegar and top with the remaining basil and taste and adjust the seasonings to your liking.

Add a drizzle or so more of oil and vinegar if needed.

Enjoy!

Lime Shrimp with Corn and Avocado

IMG_8249 (2) IMG_8233 IMG_8228 (2)All I can say is Wow!!!! This is truly one of my most favorite recipes ever.   I cooked about a pound of beautiful shrimp and I wanted to use it in a delicious light salad incorporating some fresh corn and avocados. This salad has some of my most favorite ingredients in it.  I used fresh corn, fresh tomatoes, jalapeno, red onion, and shrimp! Limes are the secret ingredient here because they add all the flavor to this super light dressing.  This has got to be one of the healthiest most delicious salads.  Totally not fattening but filling because of the shrimp , corn and avocados. If you’re into these ingredients this is a must go to for summer entertaining. Light and Fresh , low in calories and so so easy to make.

If you like cilantro I would chop some up and add it, but a lot of people hate it so much I chose to not add. I removed all the seeds from the jalapeno and probably used 3/4 of a large one. One small seeded jalapeno is perfect and not hot at all. Be careful handling the peppers and the seeds,  I’ve taken to wearing surgical gloves to cut up the peppers.

This is a perfect salad just don’t add avocados till you’re ready to serve,  everything else can be assembled ahead of time. I put together in the morning of the day I was serving and then added my avocados right before I served. This is what I did.

Honestly one of my most favorite salads.

Ingredients:

1 lb. cooked shrimp (after cooking it should be 1 lb.) I then cut it up into smaller pieces. I probably cut each shrimp into 4 pieces. Remember I used under 10’s. So that’s 10 shrimp to a pound. You want the shrimp pieces to be bite size but not too small.

1/4 cup chopped red onion

3 cobs of fresh cooked corn ( just put cobs in boiling salted water, bring to a second boil and remove and plunge into an ice bath) let corn cool and remove kernels from cobs.

2 limes-juiced , I use my juicer to juice because it’s tough with limes and you need as much lime juice as possible from 2 limes. I squeezed a third lime over at the end, but it’s probably not necessary. The citrus helps keep avocado from turning brown as well.

1 Teaspoon Olive Oil

1/4 teaspoon kosher salt

a few grinds on the pepper mill–to taste

I put in about 1/2 pint of small grape tomatoes, but you can eyeball if using larger tomatoes, I didn’t want tomatoes to over power the other outstanding flavors –if you prefer you can cut tomatoes in 1/2. I sometimes do this if I am not using the small grape tomatoes.

2 avocados–sliced and cut into cubes

1 small-medium jalapeno–seeded and minced

*a handful of chopped fresh cilantro if you love it

Directions:

  • We Cook shrimp- peel and de-vein or buy it cleaned and de-veined whichever works best for you. I like cooking my own shrimp but you can certainly use a “cooked shrimp” readily available in most markets. I cut shrimp up into bite size pieces but not too small.

Cook corn and allow to cool down. When corn is cooled completely down I cut kernels off.

In a separate small bowl, place chopped red onion, lime juice, olive oil and salt and a little black pepper. Whisk together .

I placed Shrimp, Corn, Jalapeno and Tomatoes into a large bowl. About an hour prior to serving I poured the lime juice combination over the bowl of Shrimp.

Mix well and allow to sit and marinade. You’ll want to mix a few times before adding avocados to circulate the marinade.

Taste for Salt and Pepper but it should be good.

I added the 2 Avocados right before serving and squeezed a little more lime over it, probably not necessary but I did. If you’re adding the cilantro go ahead and add it now.

That’s it–perfect summer salad.

Coconut Rice — Chrissy Teigen Recipe

This is my go to rice recipe — sweet and salty delicious recipe. Perfect served alongside a savory BBQ or any meal for that matter. Always a hit at our house. I like Chrissy Teigen’s recipe of all the coconut rice recipes. And don’t skimp on the toasted coconut. This is not diet food — but it’s delicious and worth the few extra calories. Absolutely yummy!

Don’t forget to rinse the rice and let it dry — it takes another 1/2 hour or so and is absolutely worth it. I just rinse it through a mesh colander– run cold water over rice and move rice around a little with your hands and let it dry . Rinsing or washing rice removes that excess starch, resulting in grains that are more separate when cooked.

Enjoy and thanks again to Chrissy Teigen for this wonderful recipe.

Ingredients:

1/2 cup unsweetened shredded coconut

1 1/2 cups Jasmine Rice ( rinsed and drained)

1 14 oz. can coconut milk– full fat not light

1 3/4 cups water

1/4 cup sugar

1 1/2 teaspoons kosher salt

Directions:

In a dry pan, toast coconut over medium-low heat, stirring until lightly brown and fragrant. About 4-5 minutes. Watch carefully . Transfer to a plate to cool.

In a medium saucepan, combine all other ingredients including rice, coconut milk, water, sugar and salt.

Bring to a boil over high heat, stirring occasionally. Once it boils reduce heat to a barely simmer until rice is fully cooked and liquid absorbed keep covered. About 20 minutes. I time it for 20 and check on it at 15 minutes. Remove from heat when all liquid is absorbed and fluff with a fork. Then re-cover the saucepan and let it stand for at least 5 minutes before serving. Last night I made an hour ahead and let it sit and it was perfect.

Transfer to a sering bowl and top with toasted coconut.

Enjoy!

A Berry Patriotic Trifle

I made this for the Fourth of July and it was so very pretty and pretty yummy too. I honestly didn’t care how good it tasted because it looked that good but it really was very yummy. Very easy to make and no baking involved. Perfect for the Fourth or Labor Day or really any old time . Actually this would be lovely made with all blackberries , all strawberries and just serve it any old time if you’re not feeling the Patriotic theme. It’s delicious and an easy solution for dessert for those summer bbq’s.

You’ll need a Trifle Bowl — worth the investment.

Ingredients:

1 store bought angel food cake

For the syrup:

1/4 cup sugar

1/4 cup fresh lemon juice

1/4 cup water

1/4 tsp. Almond Extract

Whipped Cream Cheese:

2/3 cup sugar

1 lb. Cream cheese , at room temperature

2 cups Heavy Cream, at room temperature

Fruit:

2 pints blueberries

2 pints strawberries, hulled and sliced

Directions:

Heat 1/4 cup sugar, lemon juice , and 1/4 cup water in a saucepan over medium-high heat, stirring, until the sugar dissolves. Remove from the heat and stir in the almond extract.

Cut the pre made angel cake into 1 ” slices

Brush both sides of the sliced cake with syrup — I put on a rimmed baking sheet to do this

Cut the slices into 1″ cubes

Beat 2/3 cup sugar and the cream cheese with a mixer with paddle attachment on medium speed until smooth and light. Add the cream and beat on medium-high speed until smooth and the consistency of whipped cream

Arrange half of the cake cubes in the bottom a 13 cup trifle dish. Sprinkle evenly with a layer of blueberries. Dollop half of the cream mixture over the blueberries and gently spread

Top with a layer of strawberries

Layer the remaining cake cubes on top of the strawberries. Then sprinkle with more blueberries

Top with remaining whipped cream and finish with the remaining strawberries and blueberries, arranging them in a decorative pattern. Cover and refrigerate for at least a few hours. Overnight is perfect and what I recommend.

Like I said any berries will do , it’s a lovely dessert.

Blueberry Crumb Bars

photo (2)photophoto (3)photo (4) It’s summertime and blueberries are abundant and deliciously sweet. These blueberry bars are great to make and keep in freezer till you need them. I combined a few recipes that I had and kept my fingers crossed and made a mess in the kitchen and used too much butter and here it goes. Sometimes I just don’t feel like using electric mixer even though I seemed to use a lot of different mixing bowls for this one. I had seen another recipe for a blueberry crumble but it called for shortening, so I substituted butter. It’s a lot of butter I know, but how much can be in one piece? My plan is to eat a little of this and freeze the rest for when my family comes out next month. As I was cutting it up to freeze I managed to eat way more than I should have and they were really beautiful and delicious. Just the right amount of sweet. I let them sit in fridge overnight, and they were way easier to cut into right out of the fridge. They are now nestled in the freezer except for the few pieces I left out to eat. I would keep unused and unfrozen pieces in the fridge and take out and bring to room temp. when you’re ready to eat them. You can also heat up in microwave if you prefer them warm. Either way, once you taste this buttery fruity combo you’ll be hooked.

Enjoy! and Happy Fourth of July.

Ingredients:

1 cup sugar plus 1/2 cup sugar

1 teaspoon baking powder

2 sticks cold unsalted butter I cut it up into small diced pieces. I sliced stick in half, and then cut up into smaller pieces which would be easier to blend in.

1 egg

3 cups all-purpose flour

1/4 teaspoon salt

4 teaspoons cornstarch

1/4 cup of lemon juice and zest of one whole lemon ( I did use a large lemon)

4 cups fresh blueberries

9 x 13 inch pan , I used a glass Pyrex and it was perfect

Directions:

Preheat the oven to 375 degrees and Spray 9 x 13 pan. I used Bakers Aid Baking Spray because there is enough butter in this already.

In a medium size bowl, stir together 1 cup sugar, 3 cups flour, and baking powder. Mix in salt and lemon zest. Using a fork or pastry cutter blend in the cold butter pieces and egg. Then with clean hands I played with the dough a bit and got a crumbly texture going. I took half the dough and patted it down gently into pan with my hands. I made as clean an edge as I could, but I wouldn’t worry too much about that.

In another bowl, stir together the sugar, cornstarch and lemon juice. Gently mix into the blueberries. Sprinkle the blueberry mixture evenly over the crust. Crumble with your clean hands the remaining dough over the berry layer.

Bake in preheated oven for about 45 minutes or until top is slightly browned. I baked for 50 minutes , then checked on them. I baked for another 5 minutes. Cool completely before cutting into squares. I actually cooled in refrigerator over night, and cut up the next day.