Light and easy — Cucumbers and Avocado Salad with a light lime dressing. This side salad will disappear very quickly and you’ll be wanting more.
I made it without the green onion so feel free to add it or not it was just as yummy without. Just happen to have avocado and cucumber in the house but next time I will make sure to add a little green onion!
Ingredients:
2 English Cucumbers — I scoop out seeds and cut into 1/2 moon slices– Slice Cuke in 1/2 — scoop out seeds and slice or any cucumbers you like I just like to take out seeds and cut smaller cukes into smaller pieces — it really doesn’t matter how you slice them up– if I use kirby type cucumbers (as pictured) I cut into smaller pieces — totally up to you– it’s all good — small Persians work well here and you’ll probably need 3 or 4 — I don’t scoop out seeds from the Persian cucumbers
1 large avocado pitted, peeled and cut into chunks or slices whichever you prefer
*1/3 cup green onion , chopped
2 Tbsp. Lime Juice from 1 medium lime
2 Tbsp. Olive Oil
1 tsp. Kosher Salt or Sea Salt
1/8 tsp. black pepper
Directions:
In a medium sized salad type bowl, combine sliced cucumbers , avocado and if you’re adding green onions.
Drizzle with lime juice, olive oil and season with salt and pepper to taste. I sliced cucumbers and dressing earlier than right before I served it added the avocado so it wouldn’t brown. The lime juice should prevent it from turning brown though.
VmI made this recipe for dinner last night and it was just delicious. It elevated the weeknight bbq chicken for sure . The only thing is this recipe is best left to marinade for at least 6 hours. After breakfast I made the marinade and let it sit all day. This chicken can sit in the marinade for up to 8 hours–just let it come to room temperature before cooking. Not so tough to do and worth the results. If you don’t have an outdoor grill use a grill pan on medium-high . I plan on making this chicken all year round. Not a lot of ingredients at all and very easy to put together.
This can easily be doubled.
Ingredients:
1 1/2 to 2 pounds of boneless, skinless chicken thighs which is what I used but feel free to use chicken breasts
Kosher Salt and Freshly Ground Black Pepper
1/3 cup Mayonnaise — now I don’t use diet mayonnaise and the mayo burns off so you won’t be tasting it -the mayo makes it moist and yummy
1 Tablespoon Lime Zest — app. 2 limes and save the lime to squeeze over the chicken
1 Tablespoon finely grated fresh ginger — if no fresh ginger use about 1/8 of a teaspoon of powdered ginger –1/8 to 1/4 of powder is equivalent to 1 Tablespoon Fresh
2 garlic cloves finely minced — I always put my garlic in my mini processor for a fine mince . If you don’t have a mini processor you can just mince by hand but it’s a great little machine to own.
Directions:
Pat the chicken dry with some paper towels.
In a large enough bowl to add the chicken stir together the mayonnaise, lime zest, garlic, ginger and 1 1/2 teaspoon kosher salt and about 1/2 teaspoon black pepper. Add the chicken to the mayo mixture and stir to coat. I put my chicken in the fridge for the whole day and removed it about an hour before cooking to bring to room temperature.
To grill: Heat your grill to medium high and grill the chicken till cooked through I cooked for about 5 minutes per side and they were perfect. Breasts will cook up faster so just watch them . They’re finished when juices run clear. Turn as necessary to avoid burning them.
If cooking inside the house with a skillet/grill pan cook over medium-high heat also about 5 minutes per side.
I squeezed the fresh lime over before serving and they were just delicious.
It’s the end of the Summer and the Palisade Peaches are still here in Colorado along with the most beautiful heirloom tomatoes. It’s a no-brainer salad going on here made with the freshest of ingredients. Fresh Mozzarella is readily available almost everywhere now and grab some fresh basil while you’re at it. This salad worked out well with a few easy ingredients and it packed some super delicious flavor. Hurry to your farmers market or produce store to grab some of these beauties before they’re gone .
*this recipe should serve 2- 4 but can easily be doubled for more
Ingredients:
1 pint of cherry tomatoes ( I grabbed some heirloom cherry tomatoes)
1 large peach or 2 small (Palisade Peaches here in Colorado have been amazing)
4 ounces fresh mozzarella
1 shallot
some fresh basil–throw in about 8 pieces and add more or less depending on your own particular taste
1 1/2 Tablespoon Extra-Virgin Olive Oil
1/4 teaspoon kosher salt or any flaky salt you like –this is approximate and use as little or as much salt as you like, tomatoes can endure a lot of salt
app. 1/4 teaspoon freshly ground black pepper
Directions:
Rinse off tomatoes and cut in 1/2. Clean and cut the peach in half, remove the pit and cut into bite size pieces. Add tomatoes and peaches to a platter or a bowl. Cut up the mozzarella and add to bowl.
Peel and slice the shallots into thin slivers or rings whichever you prefer. Scatter over tomatoes, add the basil, drizzle the olive oil, salt and pepper and stir gently.
Presentation is beautiful on a platter as well. Whatever way you do it the taste is phenomenal.
Nothing not to love here, Lemons, cream cheese, heavy cream, lemon curd and did I mention no baking??? So great and fairly easy with simple ingredients. You’ll need either an electric mixer or a hand mixer to whip cream. Nothing beats an electric mixer though with the whisking attachment.
I made it in a 9×13 pan but I think next time I will try to do it in a bowl. It would also be beautiful garnished with fresh lemon slices or berries. We were in a hurry to dig into it so never did get to garnish it. If you’d like it to look neater when you scoop it out you will have to be more precise with the layering. My cake was very uneven and all the layers and flavors blended together, who cares? it was delicious. If you’d like you can also layer in a trifle type bowl and make a very pretty presentation! Up to you but it was all delish.
This is simple and delicious food if not very rich, but hey it’s dessert! Perfect for a Labor Day BBQ or anytime!
Enjoy Labor Day Weekend even if it’s a little strange this year.
4 ounces cream cheese, softened (just leave it out at room temperature for a while till it’s room temperature and feels squishy and soft)
3 cups heavy cream
1/3 cup confectioners sugar
3 teaspoons lemon zest, plus a little more for garnish
1/2 teaspoon vanilla extract
11 ounces vanilla wafer cookies ( app. 1 1/2 boxes)
10 ounces lemon curd–usually available with the jams and jellies or baking aisle of most supermarkets. (see photo)
Directions:
Beat the cream cheese in a large bowl with an electric mixer until soft. Add the heavy cream, sugar, lemon zest and vanilla and beat until it just holds stiff peaks. It takes app. 3-6 minutes for peaks to form, be patient.
Spread the bottom of a 9 x 13 inch baking dish with 1/2 cup of the whipped cream. Arrange 1/2 of the cookies on top of the cream, fitting in as many as you can without overlapping.(see photos) Spoon 1/2 of the remaining cream mixture on top and smooth evenly with an offset spatula or if no offset spatula use a butter knife. In spoonfuls , app. every 2 inches, spoon half of the lemon curd onto the cream and then use a butter knife to swirl the curd into the cream. Top with another layer of cookies, followed by the remaining cream. Spoon the remaining lemon curd and swirl into the cream again with the butter knife. Cover with plastic wrap and refrigerate until the cookies have softened, it should be fine after at least 3 hours and you can make a day ahead and just leave in the fridge!
It would be pretty garnished with some lemon zest , some lemon slices or fresh berries, we were in a rush to eat it so no garnish in my photos. Next time!
*if you use a bowl you’ll just have to figure out the cream to cookie ratio but make sure you follow my steps so it ends up the same.
*another good thing–I actually froze leftovers and when I wanted to eat it , I removed from freezer for about an hour and it was perfect.
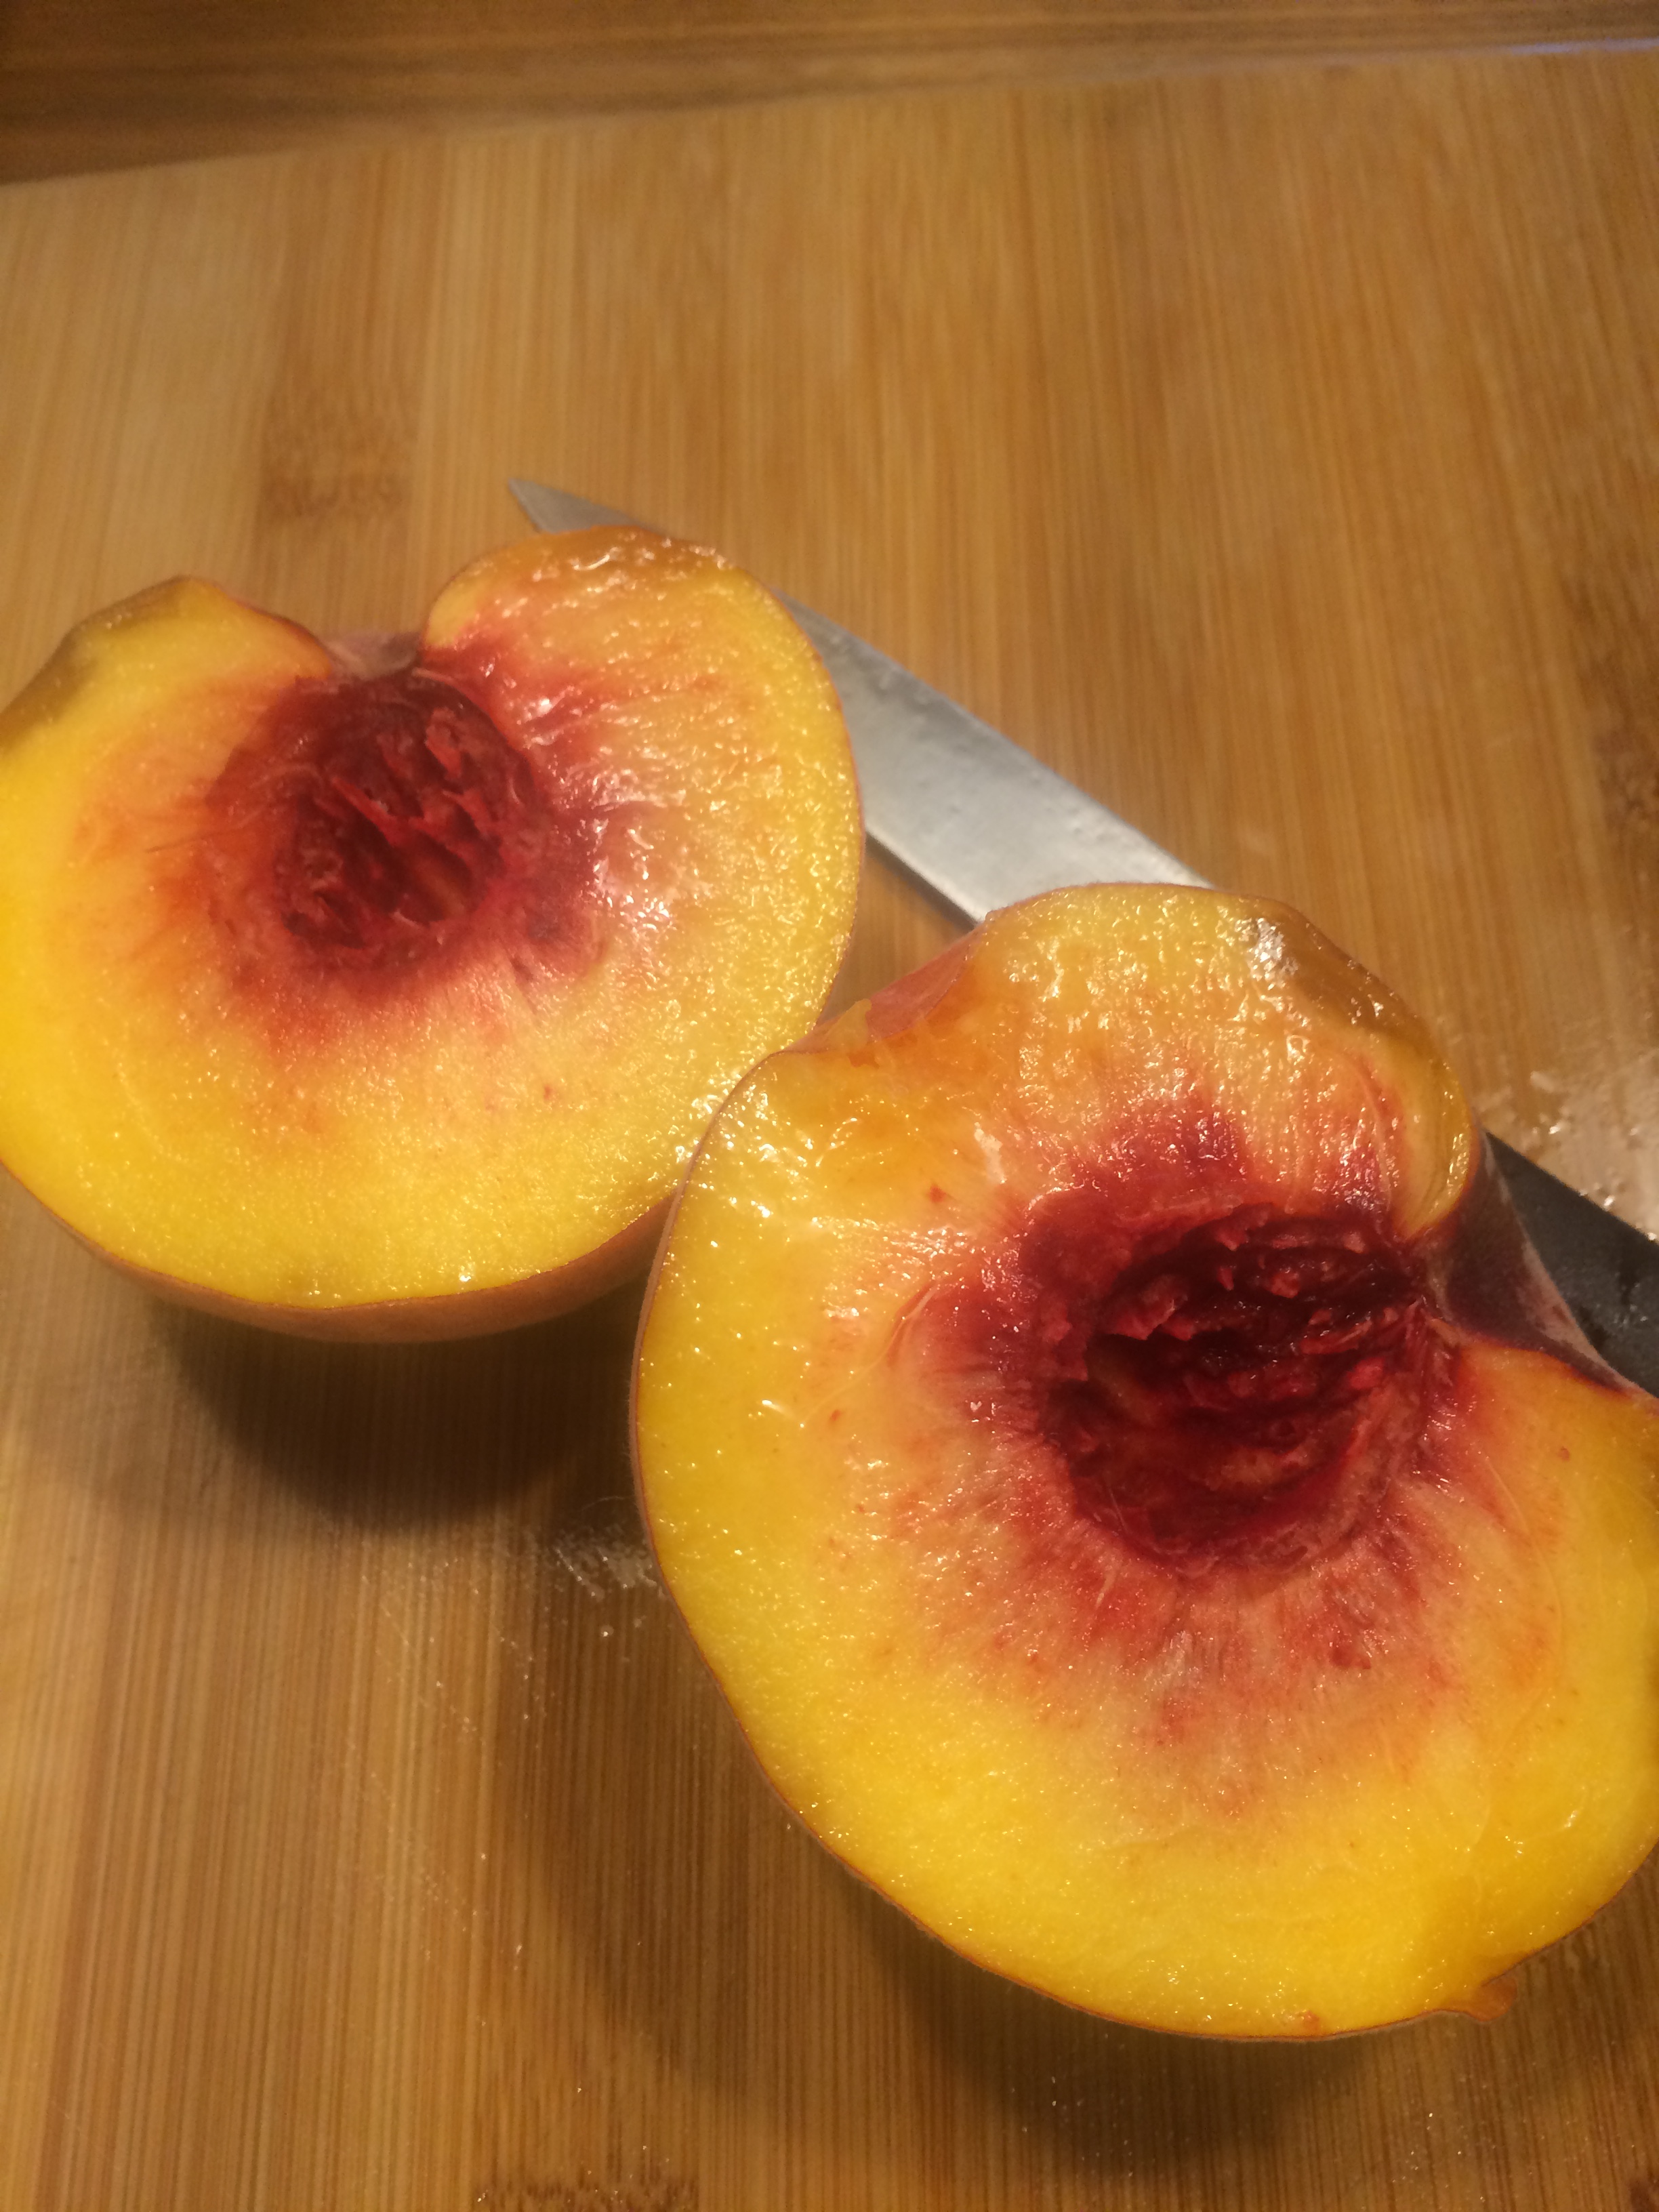
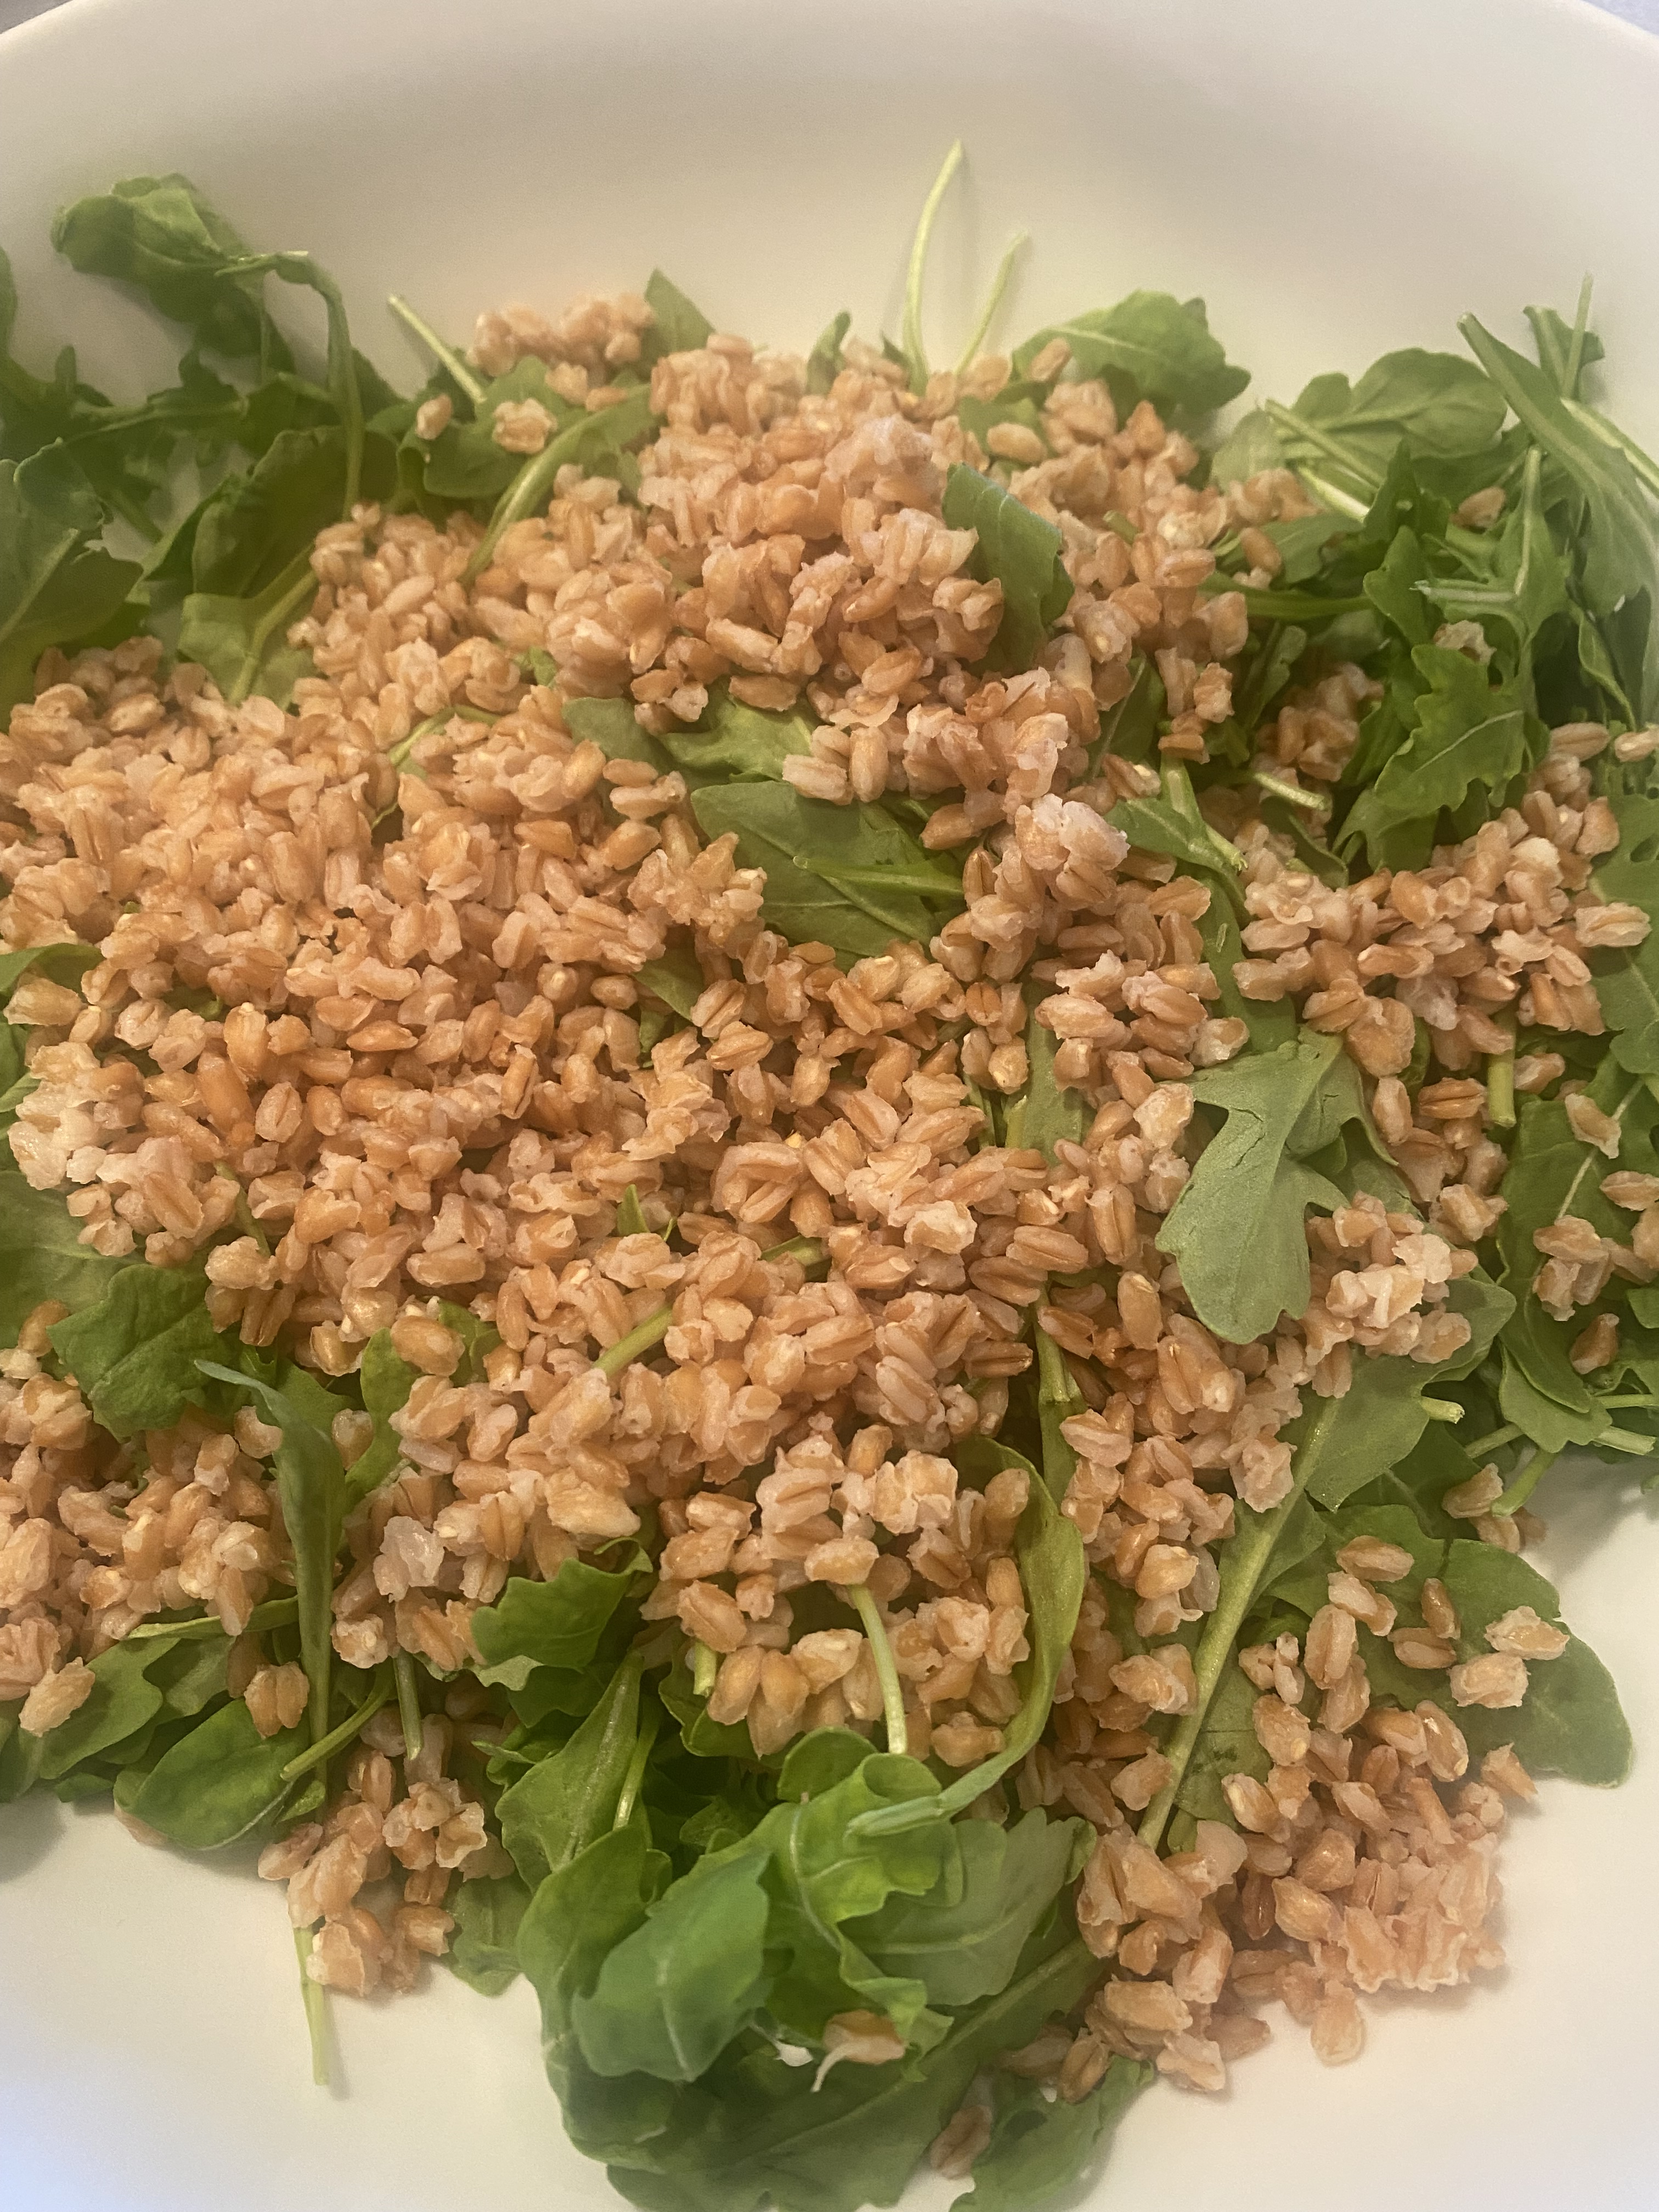
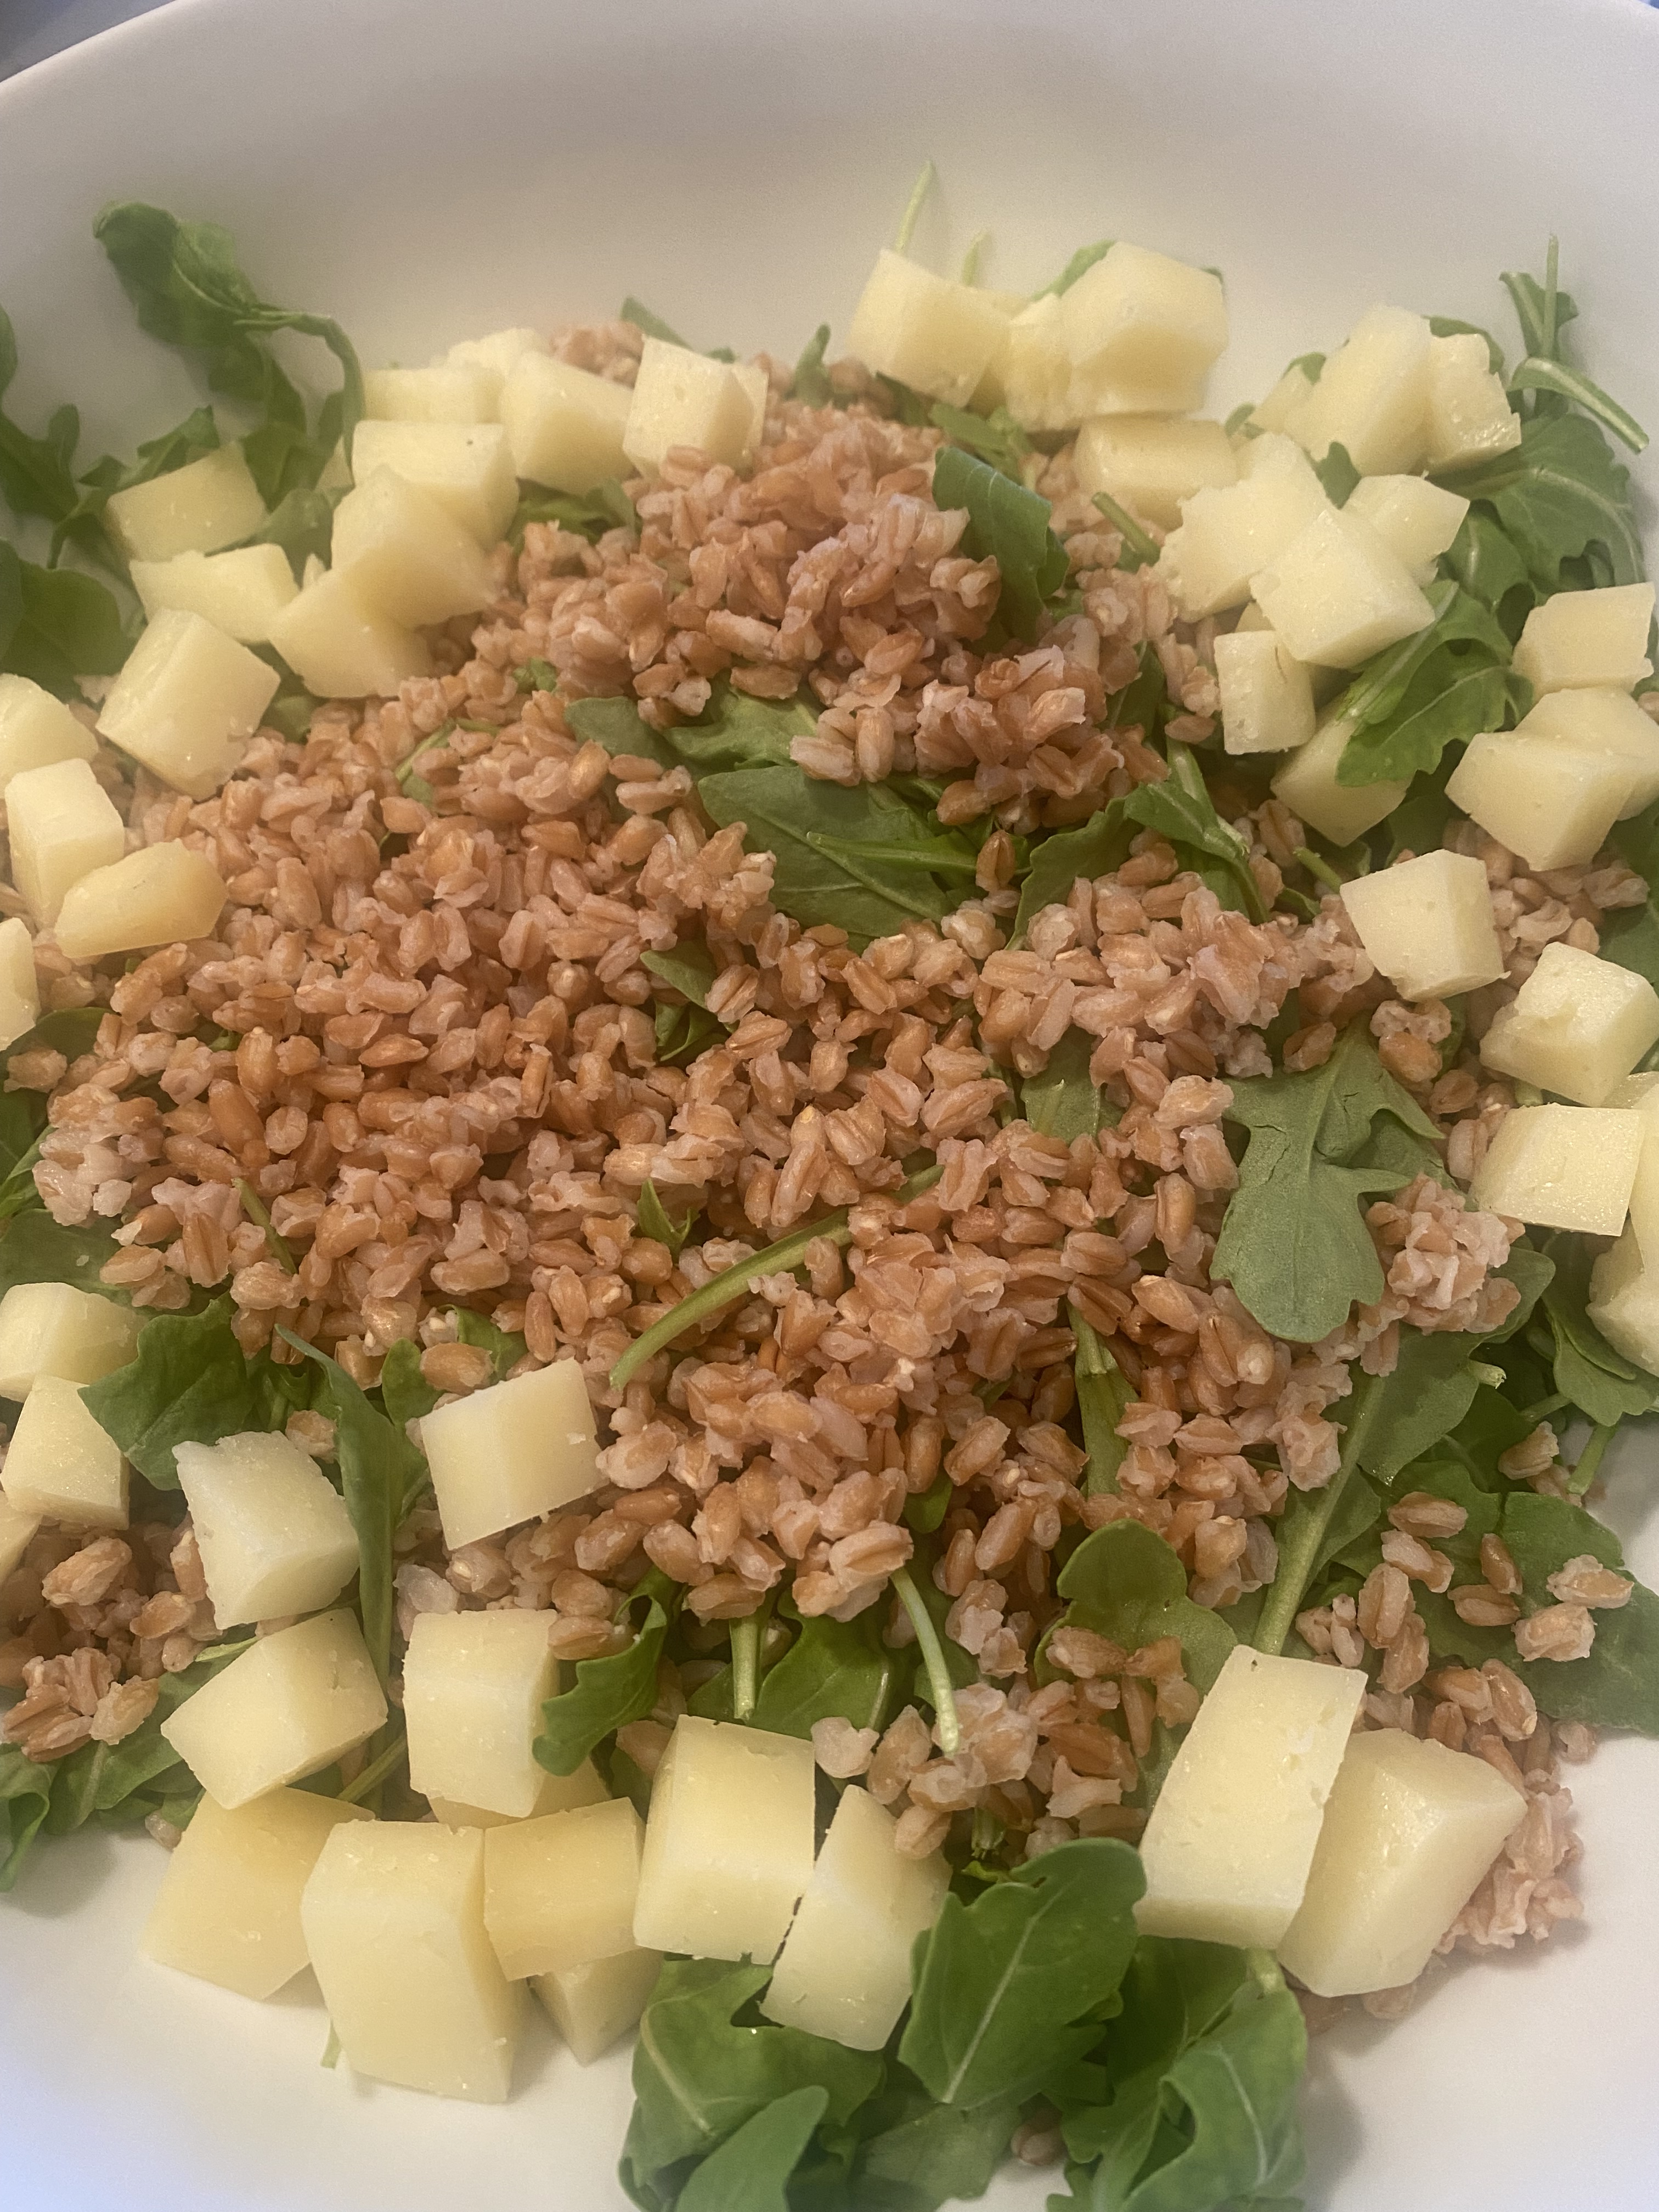
This past week I made this salad 3 times and it’s not over yet. It is a delicious salad filled with farro, manchego cheese ( or feta, parmesan, goat or any cheese you like) I just happen to love Manchego and marcona almonds, peaches and chives or scallions whichever you have or prefer or none at all. I will give you some substitutions in the ingredients section. The local peaches in Colorado are ripe and beautiful now so perfect for this lovely salad. And you can add any protein you like and it makes a perfect lunch or dinner salad.
Enjoy!
Ingredients:
3/4 -1 cup farro — should be about 2 -2 1/2 cups cooked
5-6 ounces arugula ( I prefer baby arugula)
2 peaches , chopped
1/4 cup chives, chopped or chopped up scallions or none
I used a handful of marcona almonds and chopped them, you can use almonds or walnuts I love Marcona
I used Manchego Cheese, and just used a bit of it — don’t want to overwhelm the salad with cheese , I cut up Manchego into small pieces but feel free to sprinkle crumbled feta, shaved Parm, gorgonzola etc.
Dressing:
3 Tablespoons Champagne Vinegar or White Vinegar
2 Teaspoons Honey
1/2 teaspoon kosher salt
a few grinds of fresh black pepper
5 Tablespoons of Olive Oil
Directions:
Cook Farro according to directions on package. I just place in small saucepan with water to cover by about 3 inches, add a little kosher salt, bring to a boil, lower to a simmer and cook until tender, about 25 minutes. Drain well and allow to cool. I try and make the farro ahead of time and put in container so it’s ready to use.
In a small bowl or glass jar place all ingredients for dressing, shake or whisk .
When ready to eat place all ingredients in a large bowl, add dressing ( you’ll probably use all of it) Toss and Serve.
A crumble or a crisp whatever you call it there is no reason not to make this simple delicious dessert. In the summer you have so very many seasonal fruits to choose from and all sorts of delicious combinations. I used peaches and blueberries today because the peaches are amazingly beautiful and I had an abundance of blueberries. Any stone fruit, berries, or pitted cherries will work. In the Fall I make this with apples and pears which is Joel’s favorite of all time. The fruit comes out soft and tender and the crumbly crunchy cap is ever so crisp. Delicious served warm with a scoop of vanilla ice cream. I had a lot of blueberries in the house but the blueberries do take over so all peach would be equally delicious as well .
I used an 8×11 pyrex but any baking dish around that size will work out just fine.
You’ll need a food processor to do the crisp topping this way. You must use cold butter straight out of fridge. I also added a little bit of chopped nuts but this is totally optional.
Plums and Nectarines work just as well. I also sprinkled a dash of cinnamon on the top (just a touch) right before baking , this is also totally optional.
Ingredients:
Fruit Mixture:
app. 8 cups sliced stone fruit, berries or pitted cherries I used peaches which I pitted, peeled and sliced and 1 container of blueberries (6 oz.) Use any combo you like.
1 cup sugar
2 Tbsp. Corn Starch
1 tsp. finely grated orange zest ( almost a whole orange)
2 Tbsp. of freshly squeezed orange juice from zested orange
pinch of kosher salt
In a large bowl toss fruit, sugar, cornstarch, salt, zest and juice together with a spoon. Set aside. I also sprayed baking dish with Bakers Aid cooking spray which is great stuff.
Preheat oven to 375 degrees.
Crumble Topping:
Ingredients:
3/4 + 1/4 cup of old-fashioned oats separated. 3/4 cup will be used at beginning and 1/4 cup at end.
1/3 cup all-purpose flour
1/4 cup light brown sugar ( firmly packed)
1/2 teaspoon kosher salt
1 stick chilled unsalted butter , straight out of fridge and this is important here. Butter should be diced into small pieces. Cut stick in half then cut into small uniform pieces.
Directions for crumble topping:
In the bowl of food processor with blade , pulse oats, flour, light brown sugar, salt together. Then through the top tube drop in diced cold butter and pulse until no dry spots remain, it takes a few minutes. Transfer to a bowl and add in 1/4 cup old-fashioned oats with your fingers.
Transfer fruit mixture to prepared baking dish, scatter crumble topping over the mixture. I added some chopped nuts and a little cinnamon at this point. Place baking dish on a baking sheet ( sprayed with cooking spray as well) and bake at 375 degrees for at least 50 minutes, check on it. You don’t want to pull it out too soon because you want the crumble to brown perfectly and the fruit will not thicken. You’ll know it’s ready by the color of the crumble topping.
Allow to cool for an hour.
last night I put together whole recipe and left in the fridge overnight. Next day a few hours before dinner I removed from fridge and baked it to have as dessert . Served in bowls with ice cream while it was still warm.
You can heat up before eating at 250 degrees covered for about a 1/2 hour should be enough.
You can freeze this as well. Take out the night before you’ll want it and let it defrost in the refrigerator, the next day take it out and let it come to room temperature before re-heating. I freeze it often and it works out quite well.
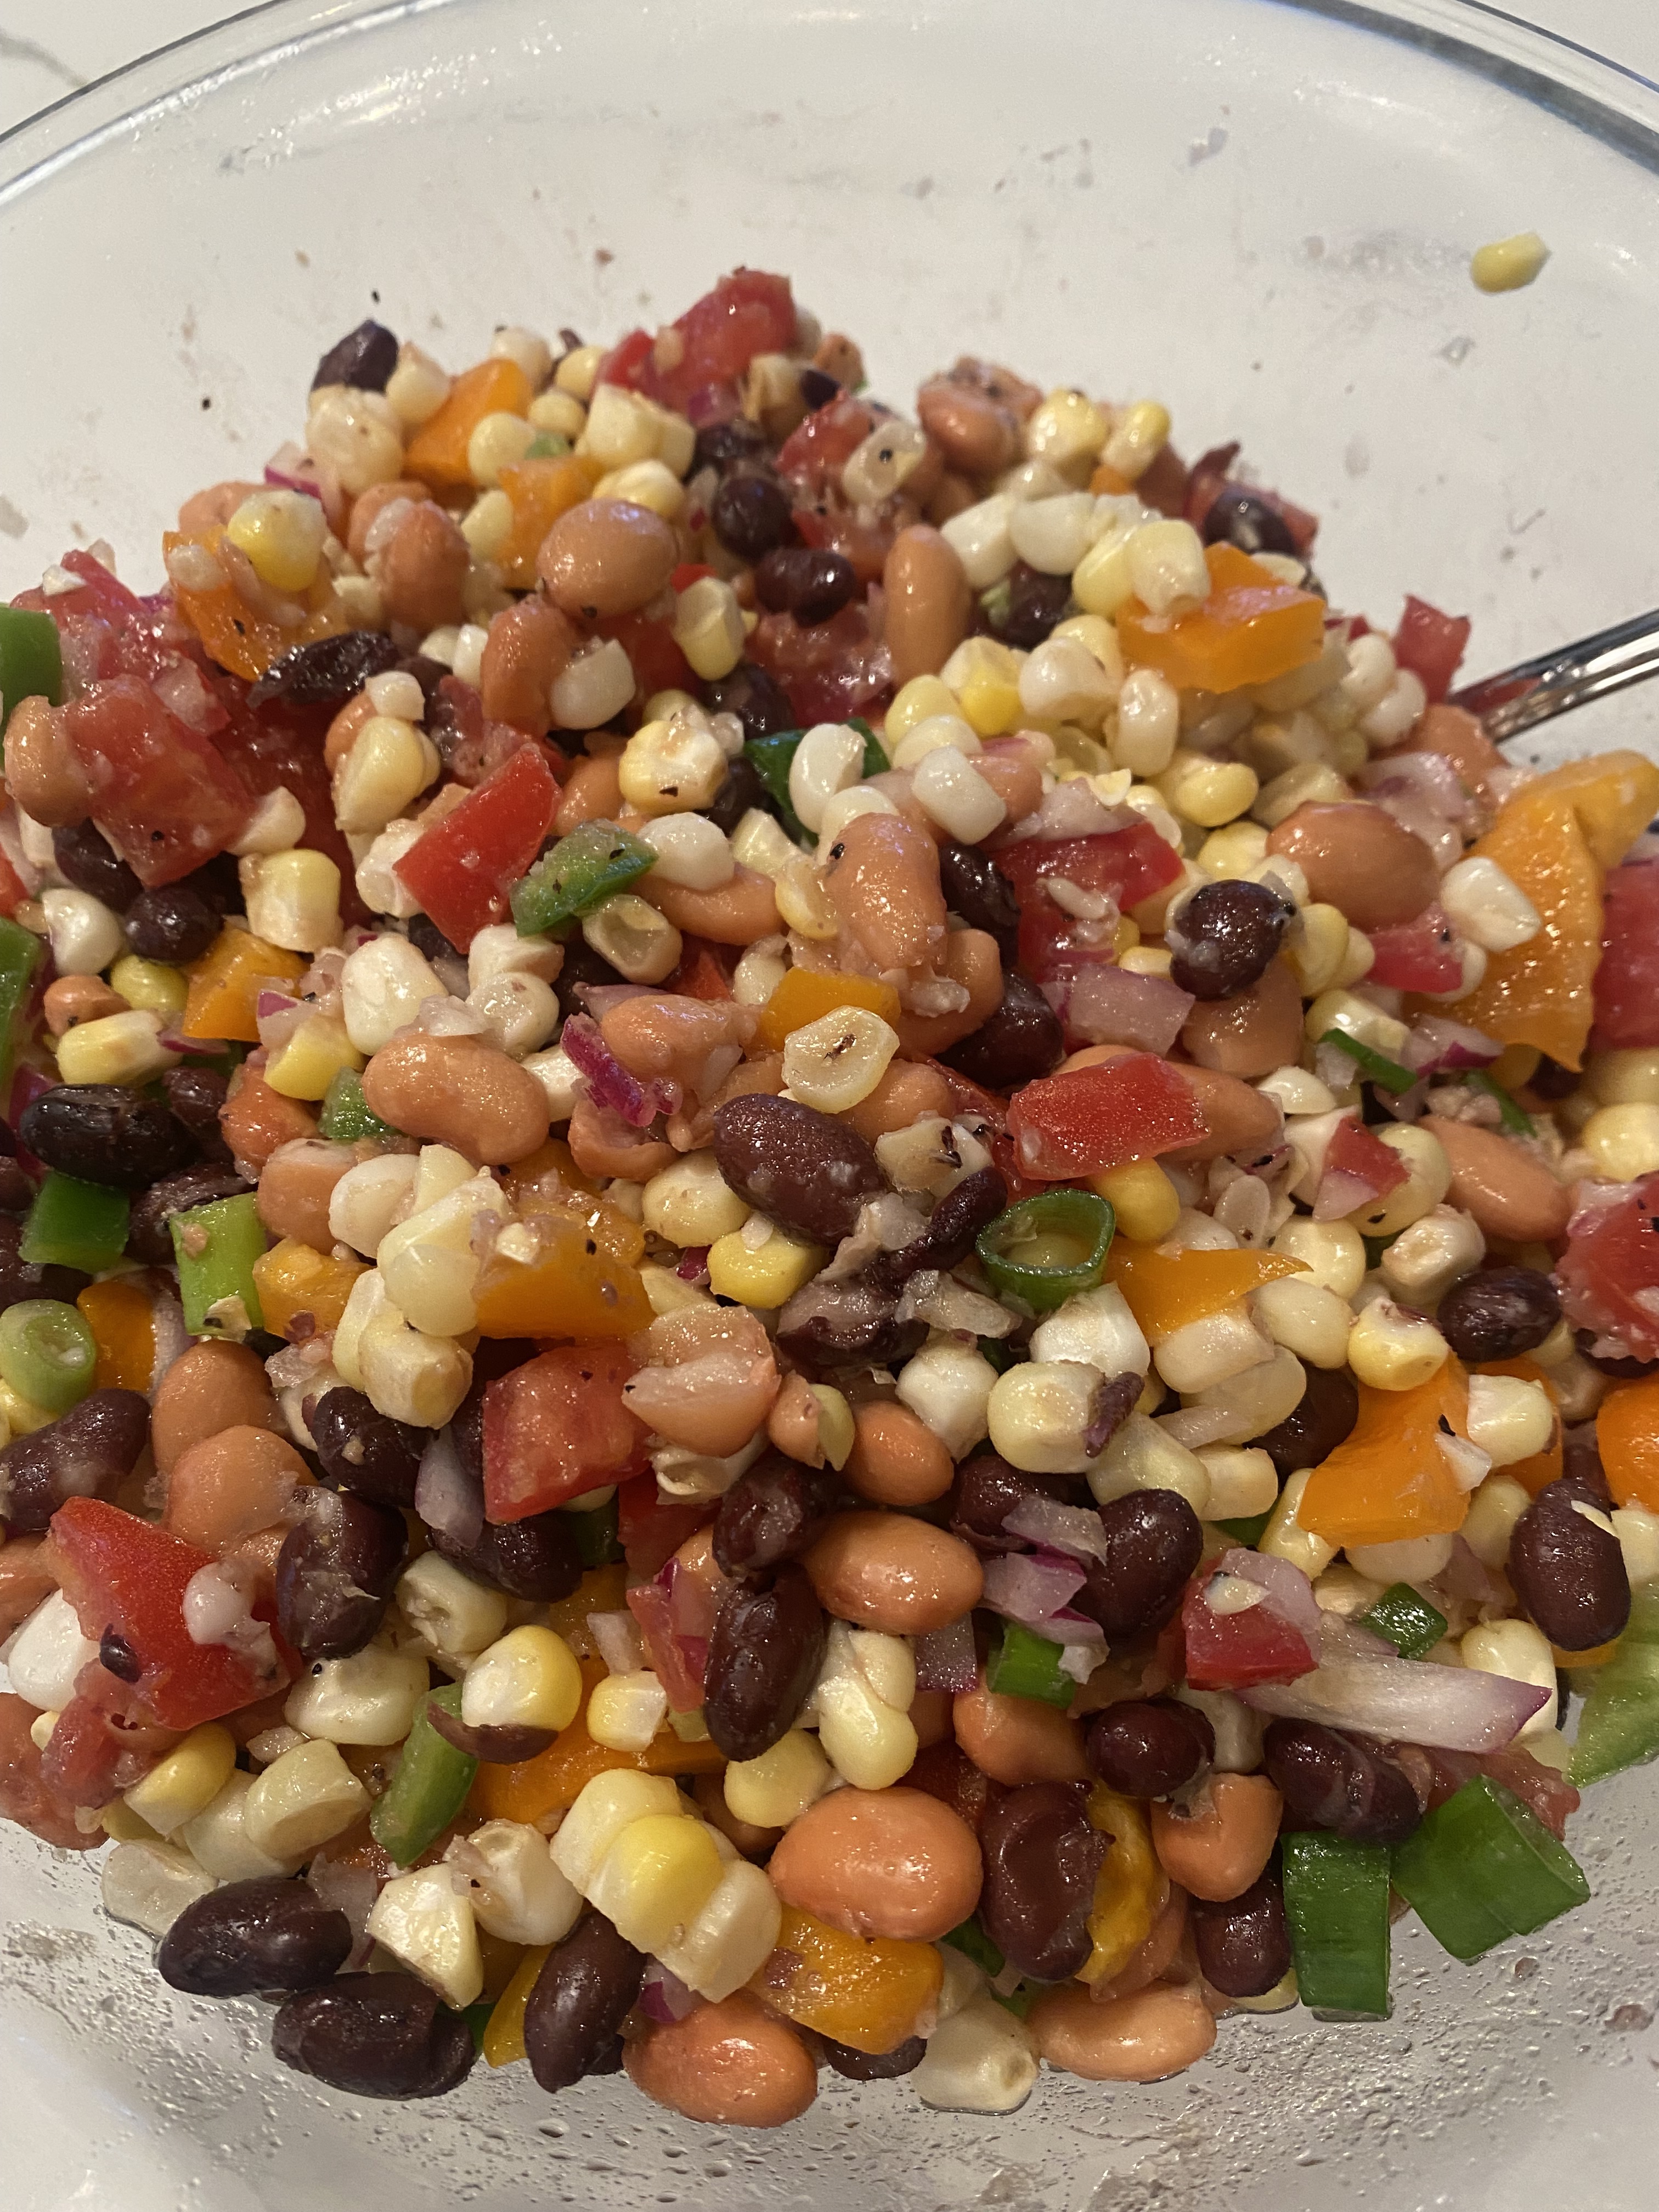
I made this for the first time and really enjoyed it. It’s a great dip as an appetizer with chips but I served it as a side dish alongside my chicken fajitas along with some chips. Ingredients can be swapped out to use what you like or don’t like just try and keep the quantities the same. I couldn’t find black eyed peas so used pinto beans and it was fine. I love a bit of spicy so used a jalapeño and I love cilantro but so many people don’t like it so I left it out this time. It ‘s very delicious and other than a bit of chopping up veggies which can be done ahead it’s super easy! You can add some fresh avocado chunks at the end right before serving and you can make a day ahead and maybe drain some of the liquid before serving, it’s almost better the next day since flavors meld overnight. A squeeze of fresh lime would also be nice. I wouldn’t omit the sugar as the amount is so small in relation to the whole recipe that health concerns are negligible. The sugar adds overall flavor and adds a balance between the acidity and the saltiness flavor. Have fun with this recipe no matter how you do it — no right and no wrong here do it your way. Enjoy!
Ingredients:
for the dressing:
1/3 cup Olive Oil
1/4 cup red wine vinegar
3-4 garlic cloves -minced
1 teaspoon granulated sugar
Kosher Salt and black pepper
For the Salad:
3 plum tomatoes, cored , seeded if desired and diced — you can also halved cherry tomatoes and use about 1/2 pint
1/2 red onion, finely diced — app. 3/4 up
1 15 oz. can black beans, rinsed and drained
1 15 oz. can black eyed peas , rinsed and drained– I used Pinto because I couldn’t find black eyed peas out here in CO whatever beans you like you can even use 2 cans of black beans
1 1/2 cups fresh corn kernels ( about 3-4 cobs) or thawed drained frozen sweet corn about 8 oz. or even roasted corn ( Trader Joes) if you like it and can get it– I used 4 cobs of fresh corn which is so abundant right now
1 red, green, or orange or yellow bell pepper, seeded and finely diced
1 jalapeno, seeded and finely diced *
*1/2 cup chopped cilantro leaves plus more for garnish — totally optional
1 scallion, white and green parts, added at the end before serving for garnish
*tortilla chips, for serving also optional
Directions:
Make the dressing: In a medium bowl, whisk the olive oil, vinegar, garlic, sugar, 1/2 teaspoon kosher salt and 1/2 teaspoon black pepper to combine– set aside
Add the tomatoes, red onion, drained and rinsed beans, corn, bell pepper, jalapeño, and if you’re using cilantro, Toss to combine with dressing and season for salt and pepper. Cover with plastic wrap and refrigerate for at least 2 hours before serving or even overnight.
To serve, take out of fridge, toss well and taste for seasonings. Sprinkle with scallions and if you’re serving as a dip or even as a side dish it’s great with tortilla chips. ( everything is better with chips)
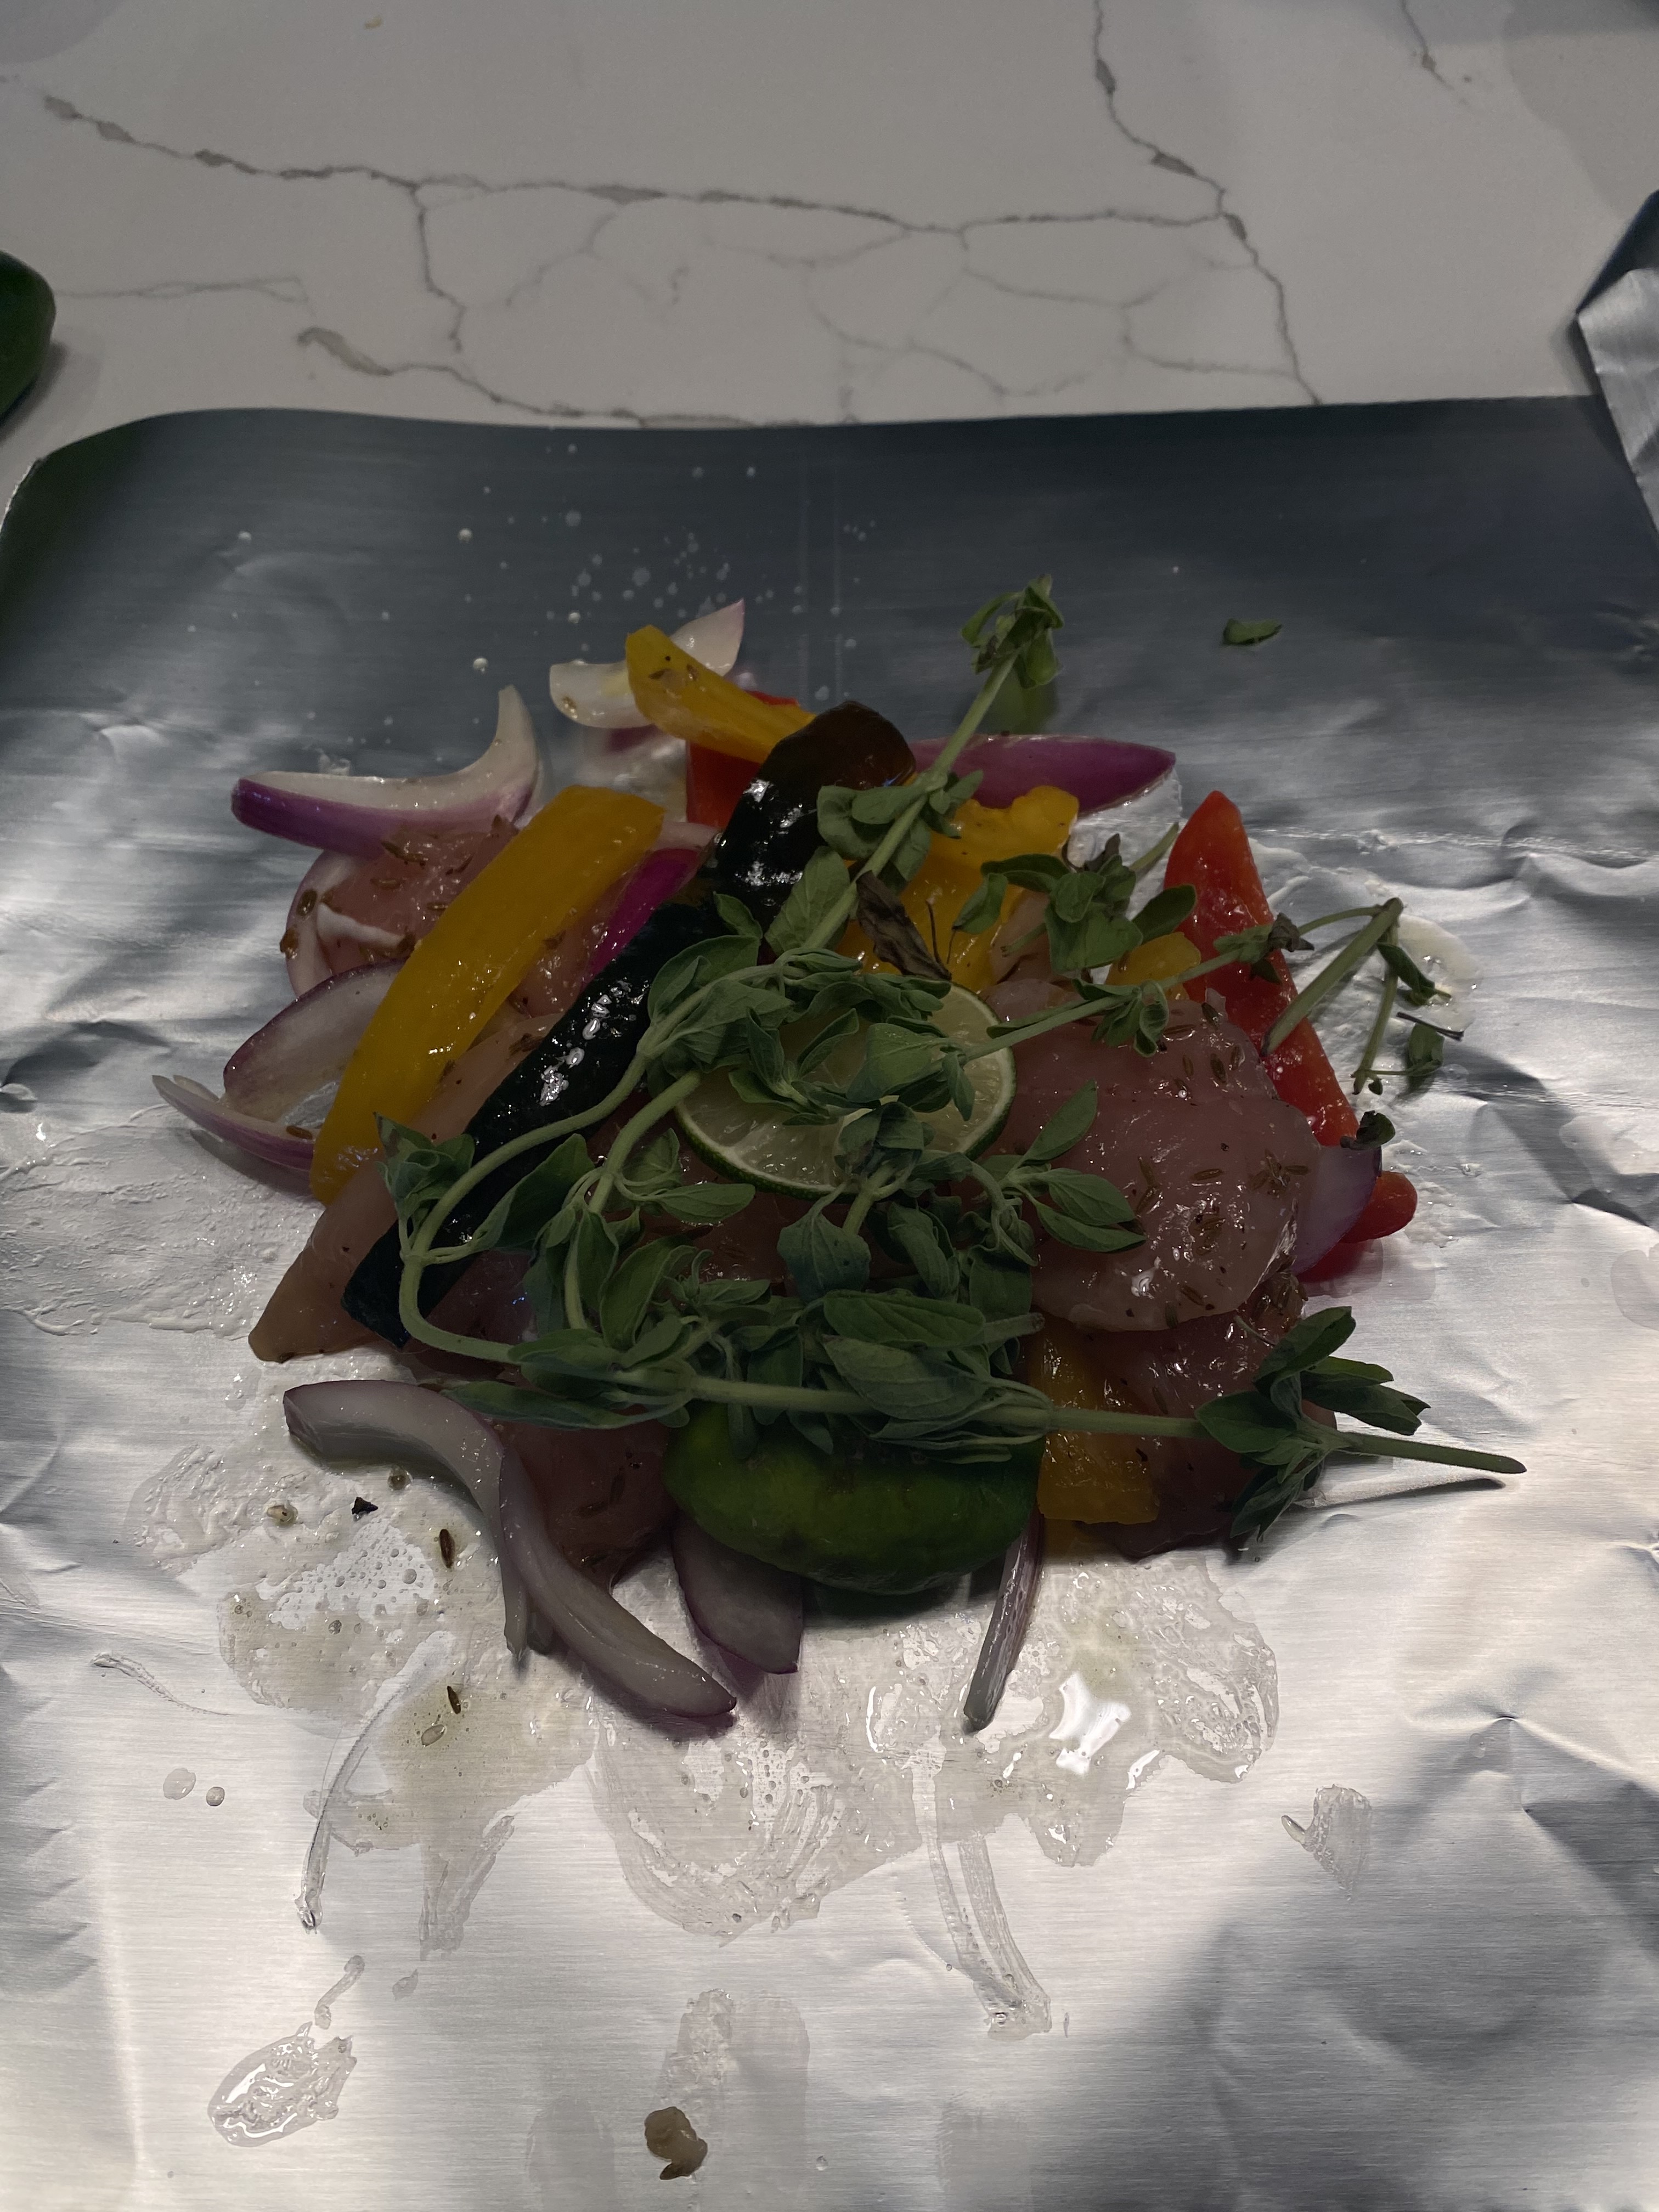
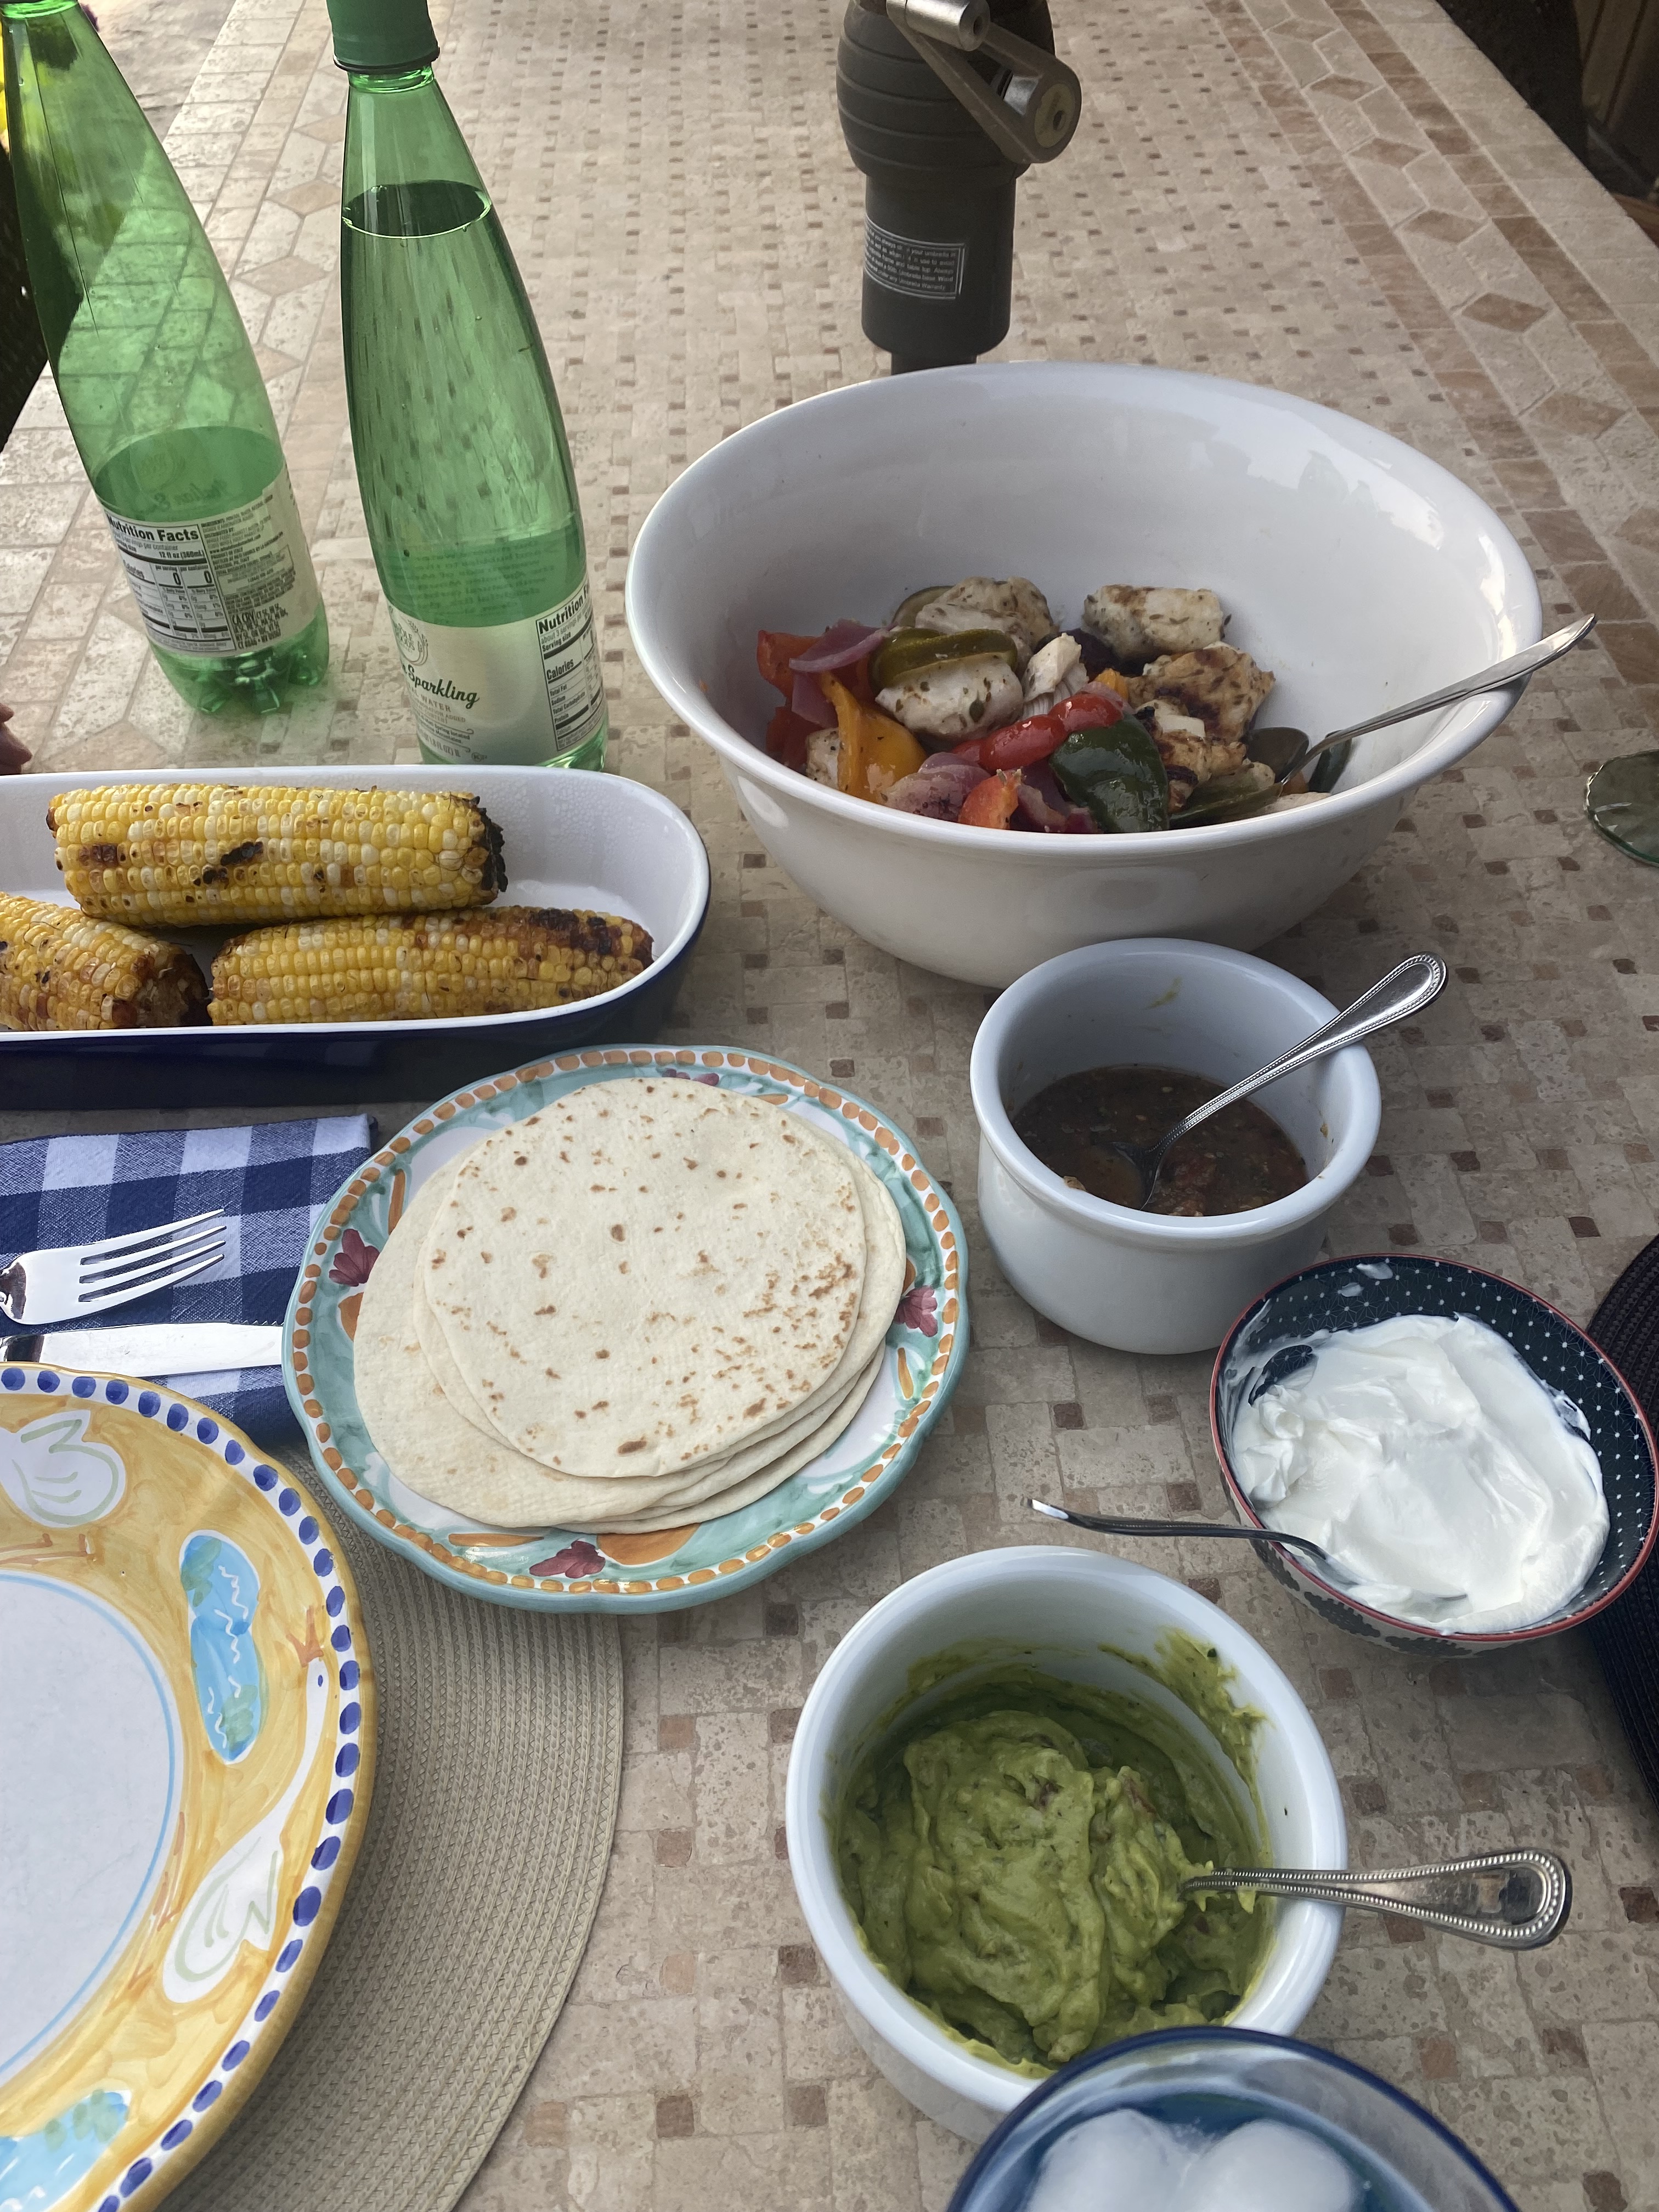
Wow–Fajitas on the Grill and the best part is there were no pots and pans to clean up! Cooked in Aluminum Foil Packs right on the grill! They’re called Hobo Packs. This is so easy to make and so delicious to eat. Definitely one of our favorite go to meals in the summer. If you don’t have a grill you can make in the oven on a large rimmed baking sheet.
Very quick prep and delicious ingredients. Feel free to substitute whatever peppers you would prefer. This is what I did.
You’ll need heavy-duty aluminum foil for the grill.
If you double up the recipe you’ll need more hobo packs and feel free to experiment with the ingredients.
1 lb. chicken tenders–I cut them in 1/2 so they’re still thick enough that they don’t over-cook in the 15 minutes it takes to cook. If the pieces are too too thin they’ll over-cook.
1 medium red onion, halved and sliced 1/4 inch thick (approximately)
1 poblano chile or serrano chile whatever you can get. Stemmed and cut lengthwise into 1/2 inch strips. I used both .
1 Red Bell Pepper–cut into strips lengthwise
1 Yellow Bell Pepper –cut into strips lengthwise
*you can really use any peppers that you’d like–these are the ones I used Shishito Peppers would be wonderful as well.
1/4 cup extra-virgin olive oil
1 1/2 tsp. cumin seeds
Kosher Salt and Freshly Ground Black Pepper- you’ll need to be fairly generous with the salt –I used about 1 1/2 teaspoons of salt and a few grinds of the pepper mill.
4 -6 fresh oregano sprigs–at least 1 in each packet–I used 2 in each packet. This is an optional option if no oregano– I like the flavor.
1 lime, thinly sliced crosswise
Warm flour or corn tortillas, sour cream , guacamole and salsa and some hot sauce for serving. I used small tortillas but any kind will work out nicely. This is a very easy Summer Meal. I also like to serve with rice and beans.
Directions:
Cut up all the veggies, onions and chicken and light the grill, I had the grill turned up high , it should be medium to high. I put it to high to pre-heat and then lowered to a more medium – high, if you are unable to do this step just check on them after 12 minutes to make sure the bottom isn’t burning.
In a large bowl, toss the chicken, onion and all the peppers with the olive oil and cumin seeds. Season generously with salt and pepper and toss again. I like it to sit for about 15 minutes while grill is heating up.
Arrange 4 14 inch sheets of heavy duty foil on a work surface ( see pics) app. 14 inches don’t get the ruler out you can eyeball it, it needs to fit a pile of veggies and chicken. Last night I increased the chicken so we had about 6 packs.
Pile the chicken and veggies evenly on one 1/2 of each foil sheet and top with the oregano and lime slices. Fold the foil over the ingredients and pinch the edges to seal.
Place the foil packets on the grill, close the lid and cook over moderately high heat until the chicken is cooked through, anywhere from 12 to 15 minutes.
Open the packets and serve with warm flour fajitas, sour cream , guacamole, salsa and hot sauce.
*Packets can be made a night ahead of time and kept in the refrigerator.
I usually place all ingredients after cooking in a large serving dish/bowl and let everyone take for themselves.
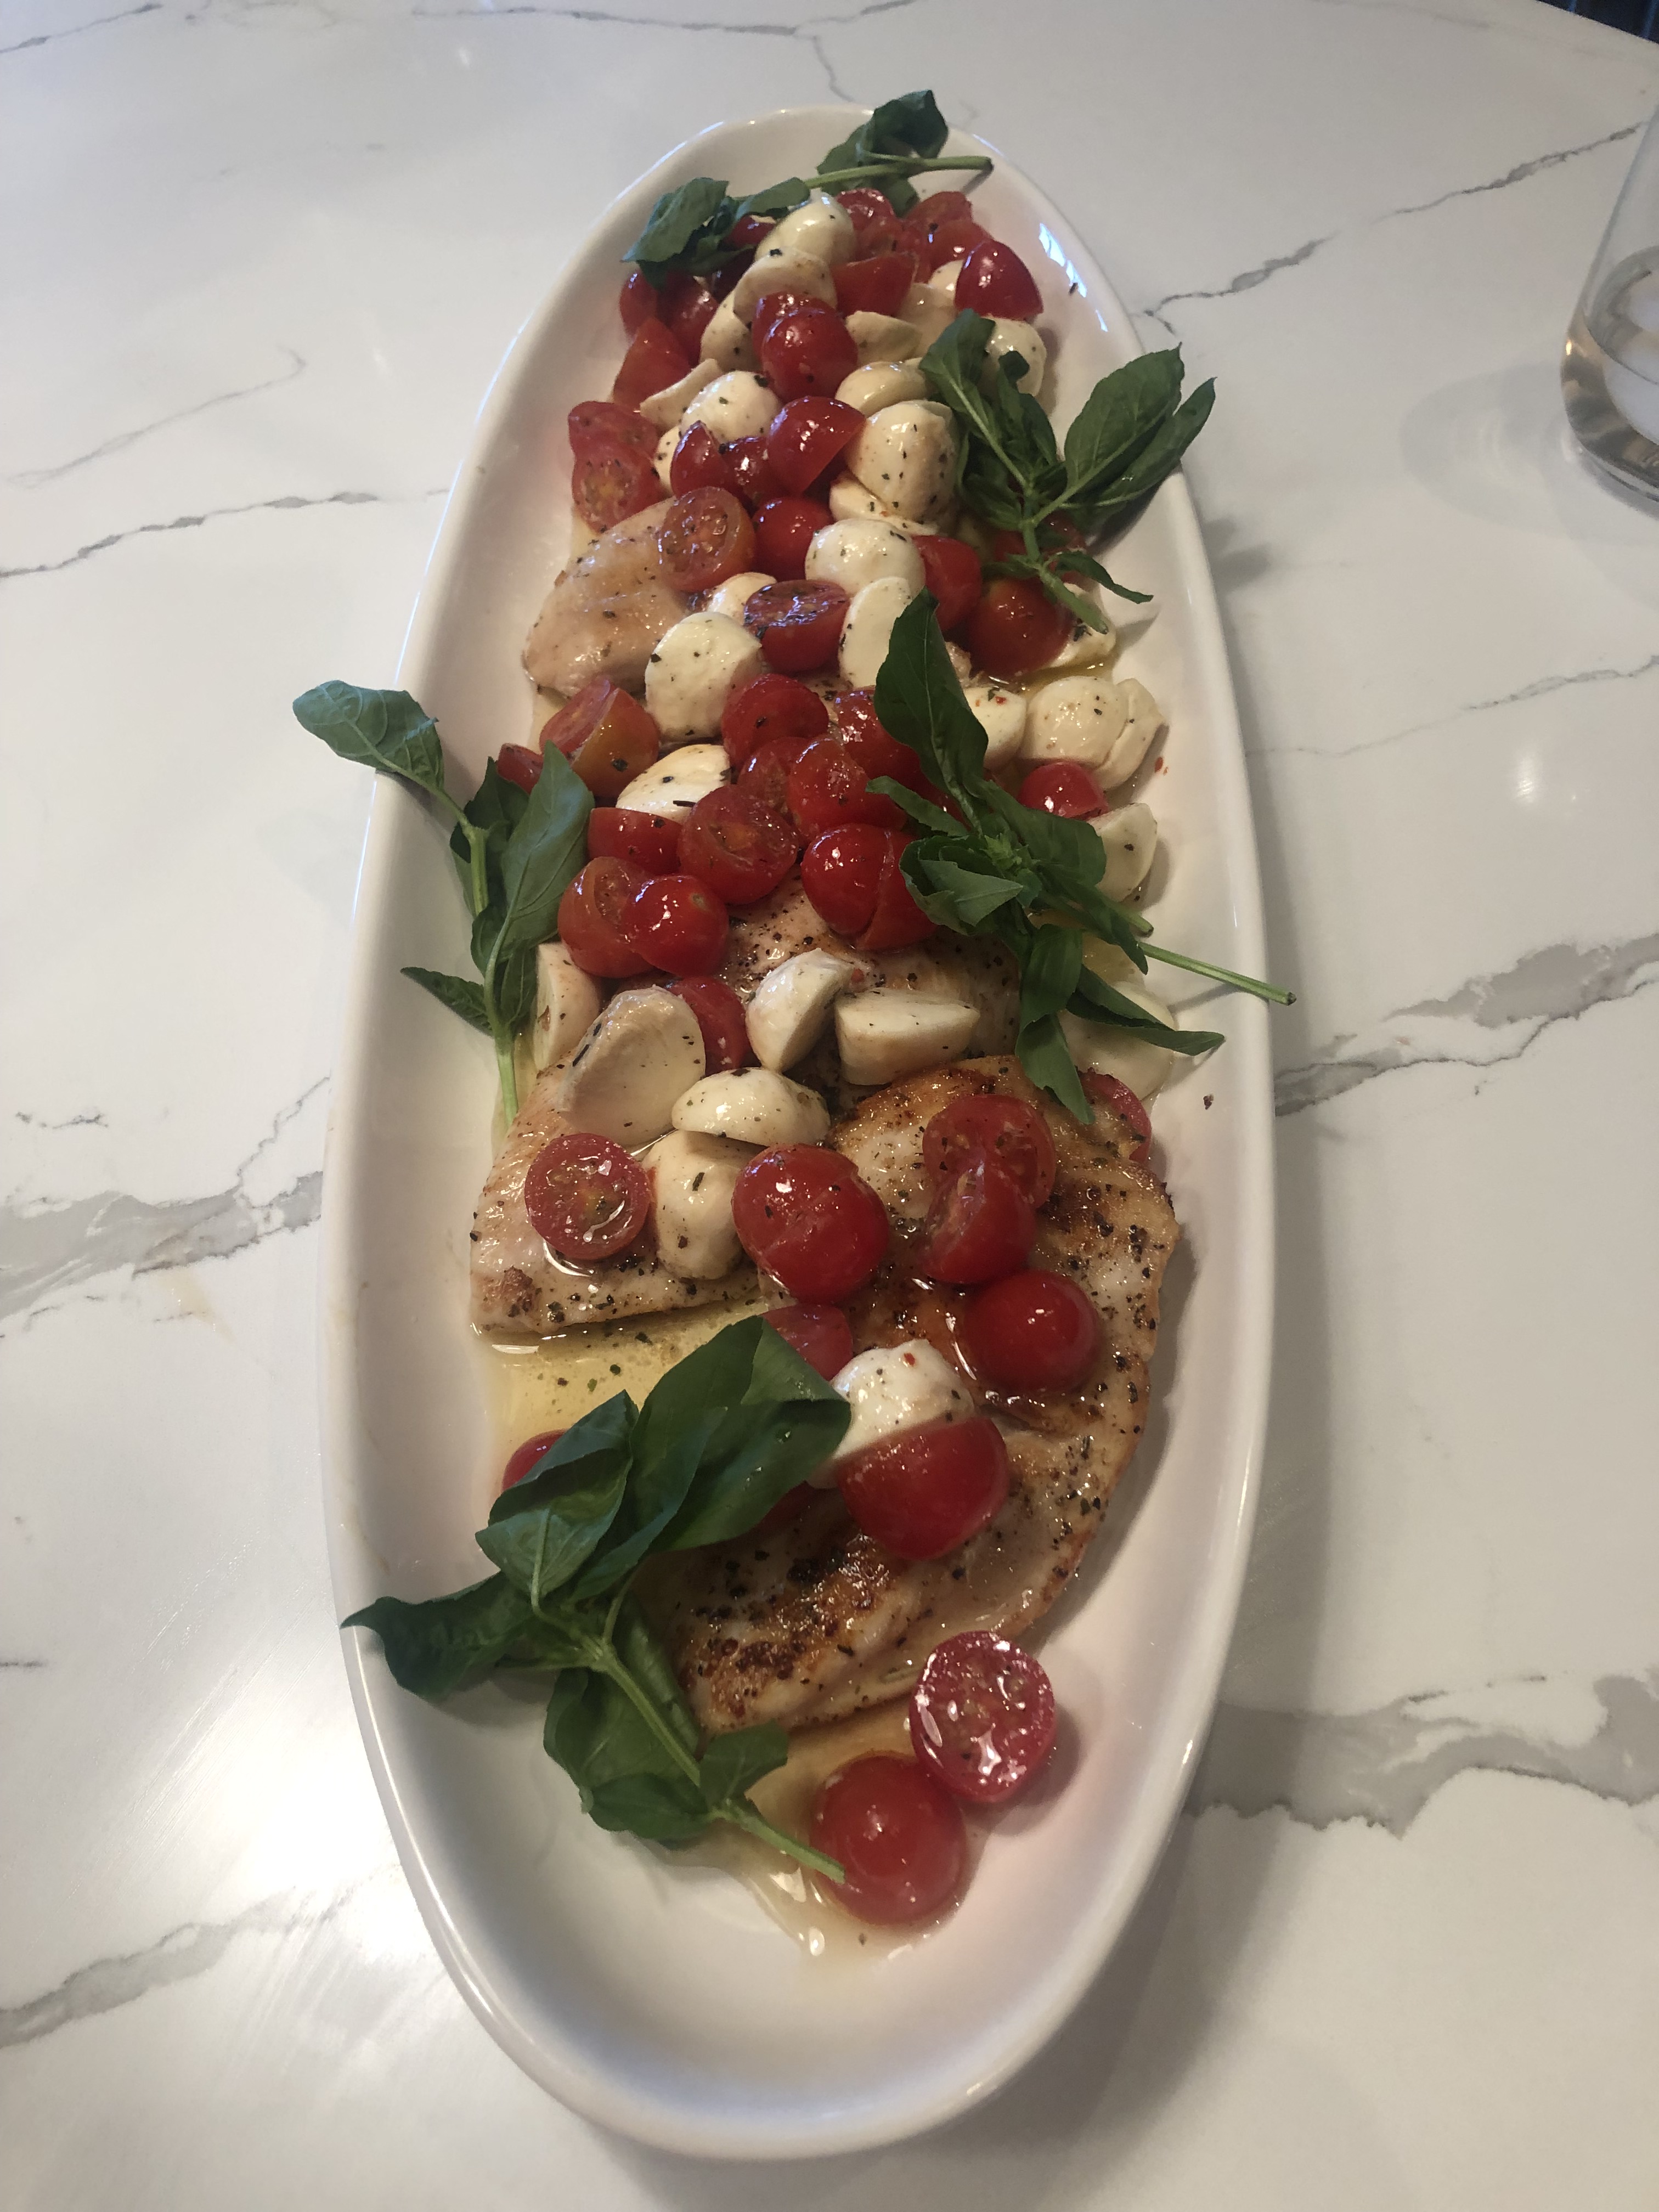
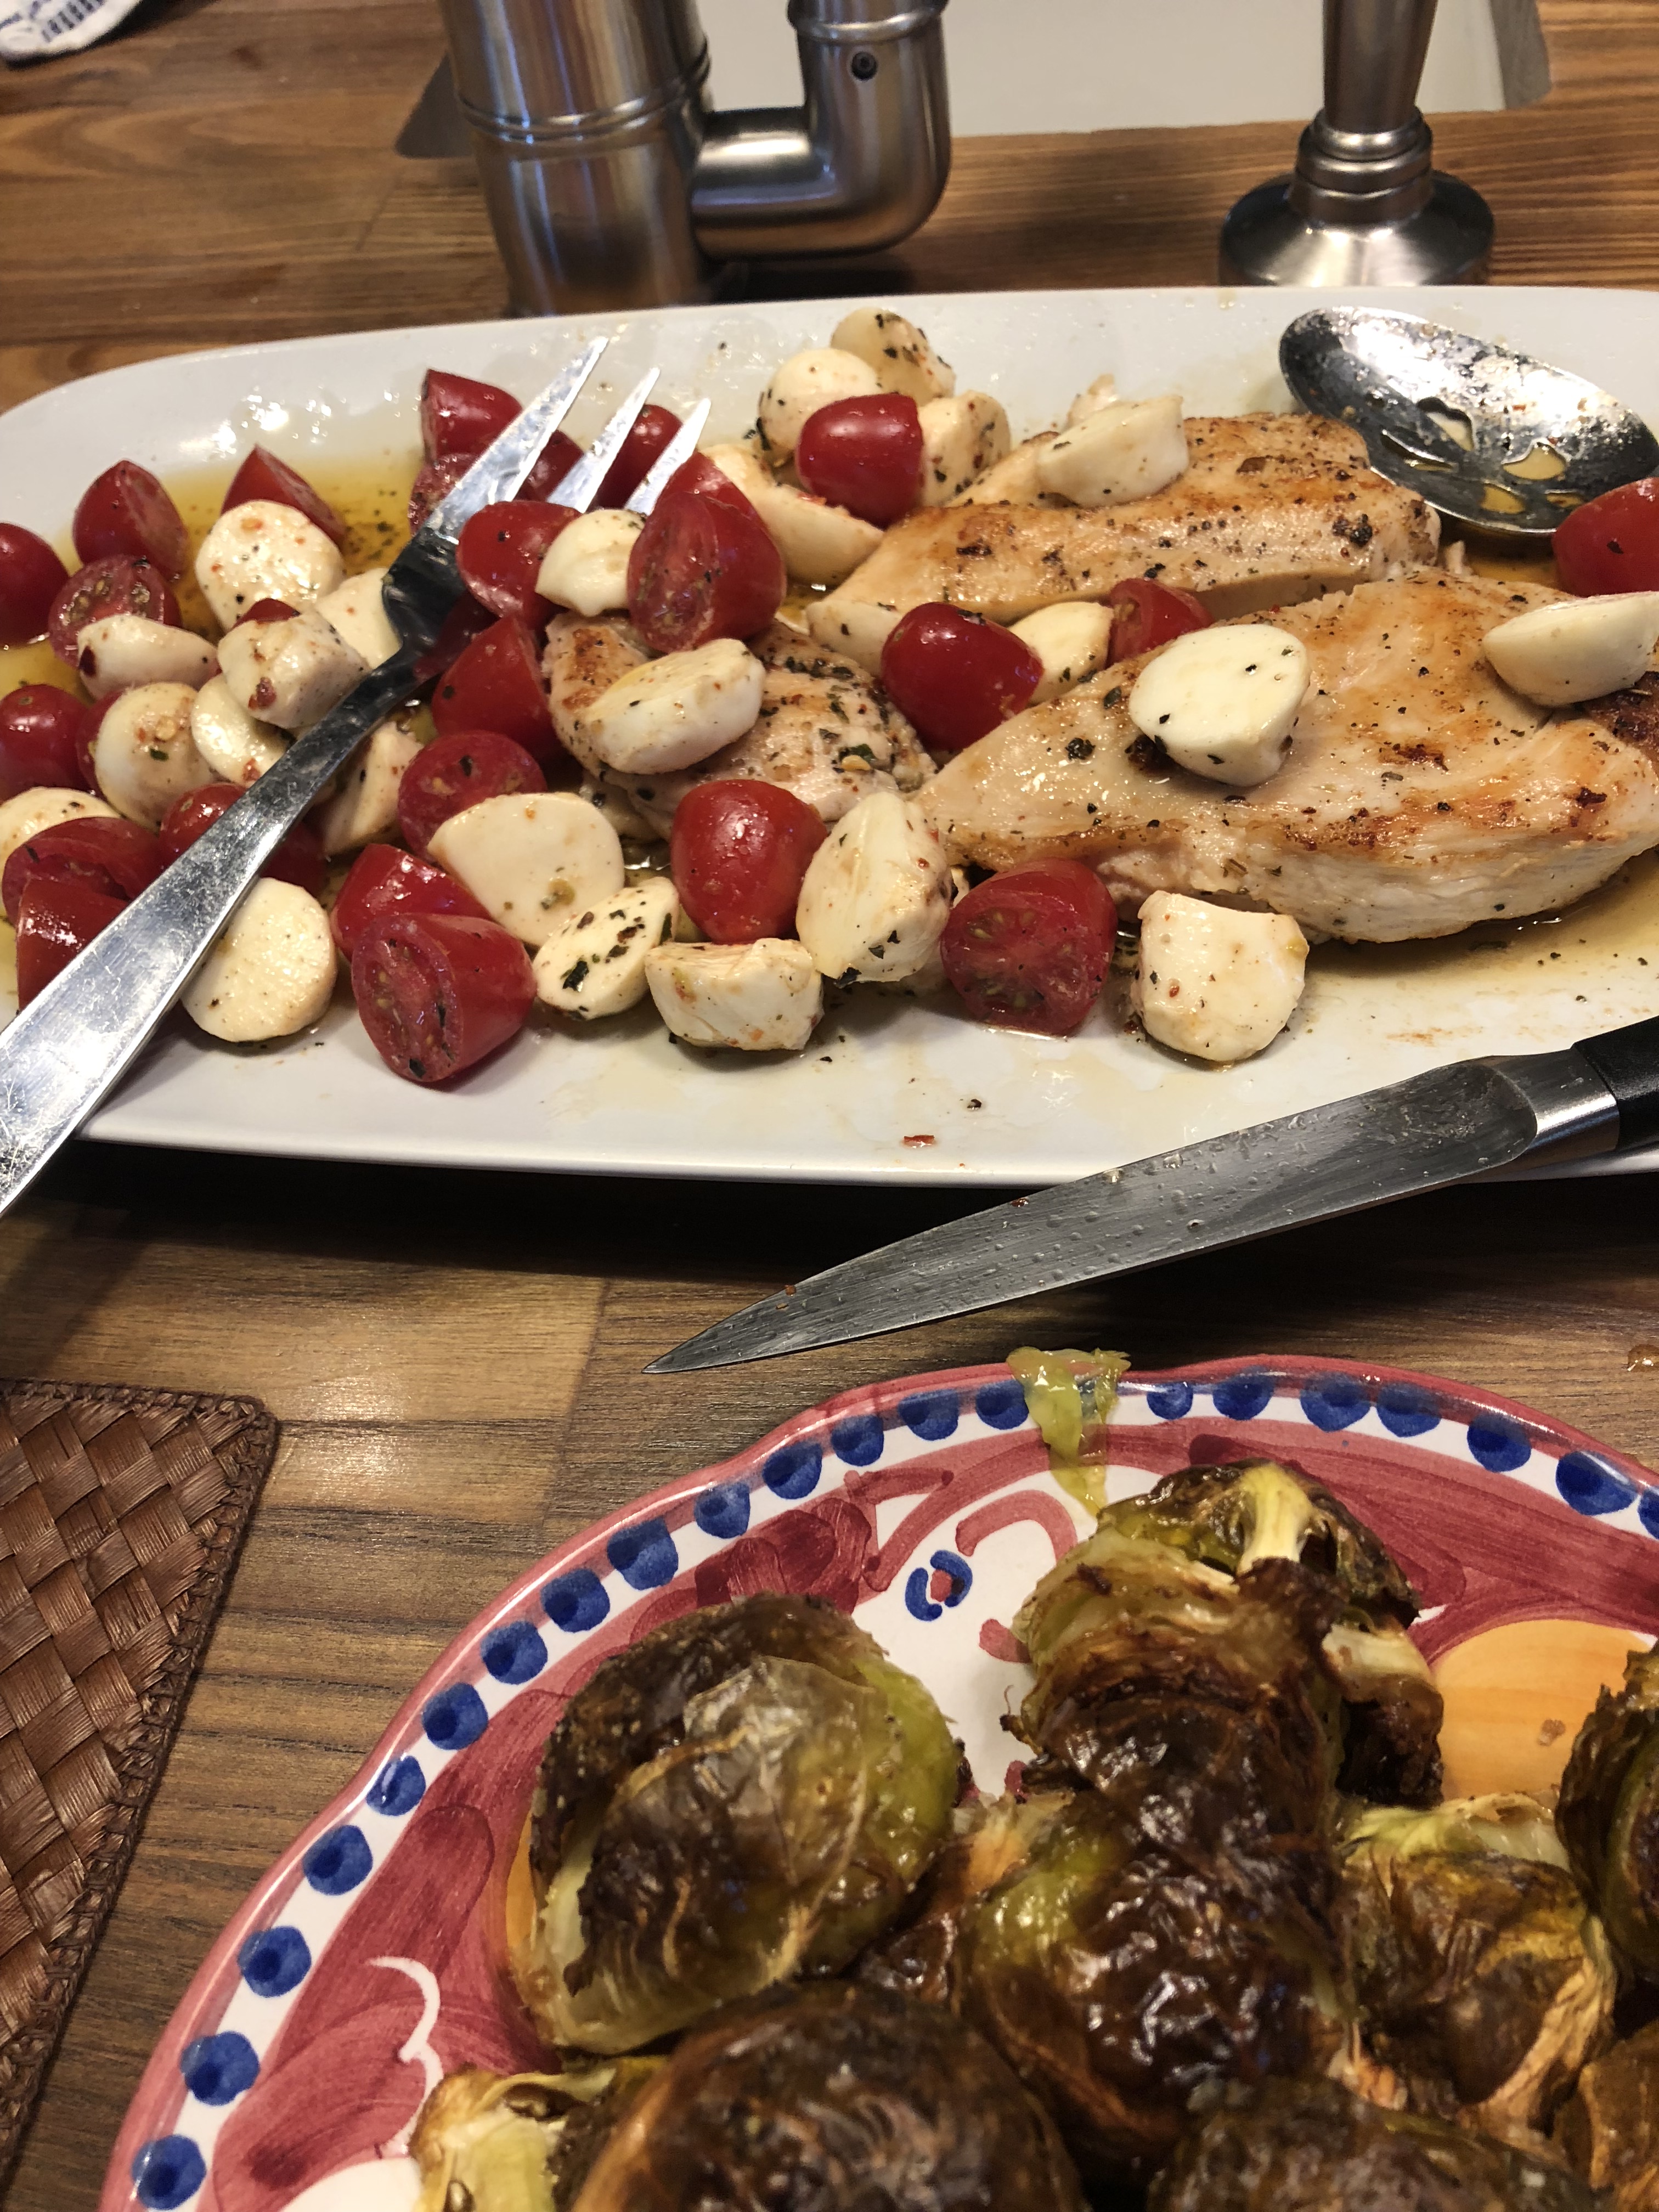
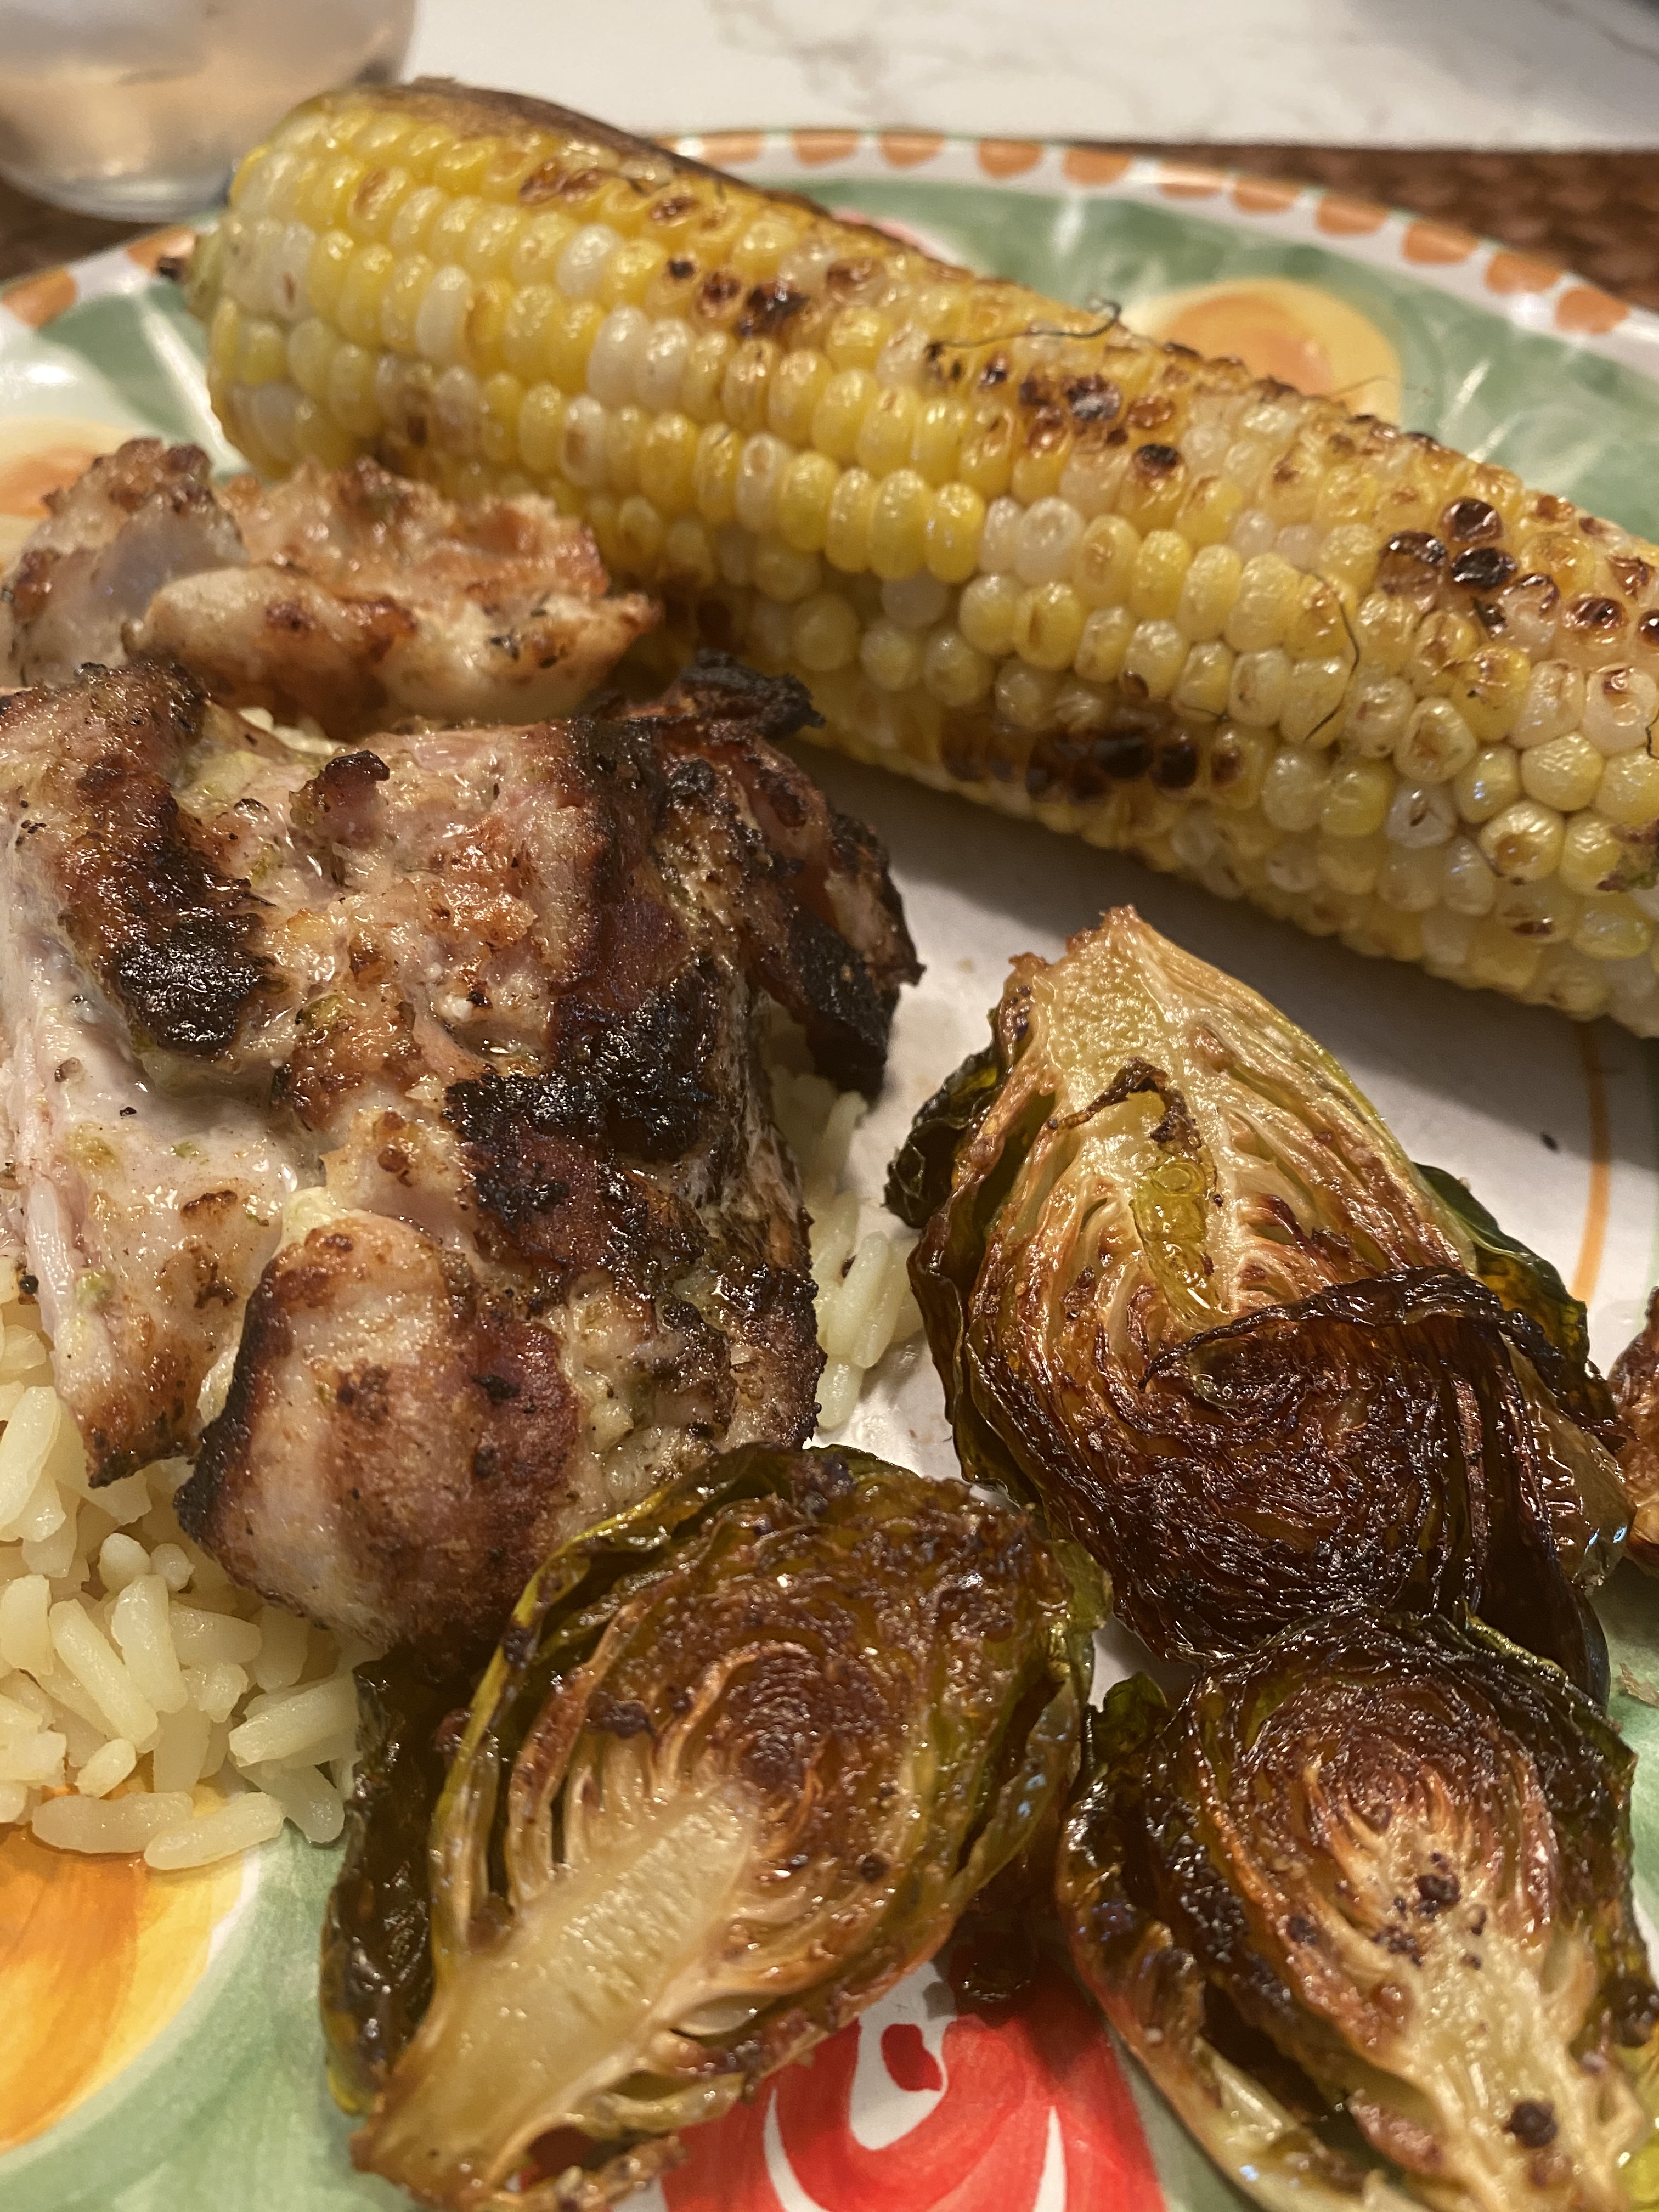
This is one of those recipes that I make that is so super easy. Very few ingredients and other than cutting tomatoes and mozzarella balls, there is very little prep. You gotta love meals like this, especially in the summer when these beautiful heirloom tomatoes are abundant. I really only make this in the summer . It is light and delicious and makes for a beautiful salad as well and you can serve it at room temperature. I made this last night with burnt brussel sprouts on the side . You’re not going to believe how easy this is. It’s amazing!
1 container marinated bocconcini ( mozzarella balls) you will need the oil from the container to marinate chicken ( it comes in an olive oil marinade with spices) available in most cheese sections of the supermarket ( Whole Foods)
4 skinless, boneless chicken breast halves , I buy them pounded thin or use chicken tenderloins –you just don’t want them too too thick
Kosher Salt and Freshly Ground Black Pepper
1 pint heirloom ( if you can get them) cherry or grape tomatoes, halved
*a little cut up basil is always a good idea!
Directions:
Take bocconcini balls out of the marinade. Cut bocconcini balls in quarters. Transfer about 1/2 of the marinade from bocconcini to a medium size baking dish , add the chicken , salt and pepper the chicken and let it sit at room temperature for about an hour before cooking. If you’d like you can refrigerate , and take out and bring to room temperature before grilling.
Put cheese in a bowl, add the remaining oil marinade and add the cut tomatoes to this bowl. Salt and Pepper to taste, give it a good stir and put in refrigerator till you’re ready to cook chicken. I removed from fridge about 1/2 hour before I cooked the chicken. Just bring it to room temperature.
Grill the chicken over medium high heat , till you get nice grill marks, probably about 8 minutes. You can cut the chicken into smaller pieces and mix with tomatoes and cheese. I just plated up the chicken and put tomato/cheese mixture on the plate. Perfect summer meal.
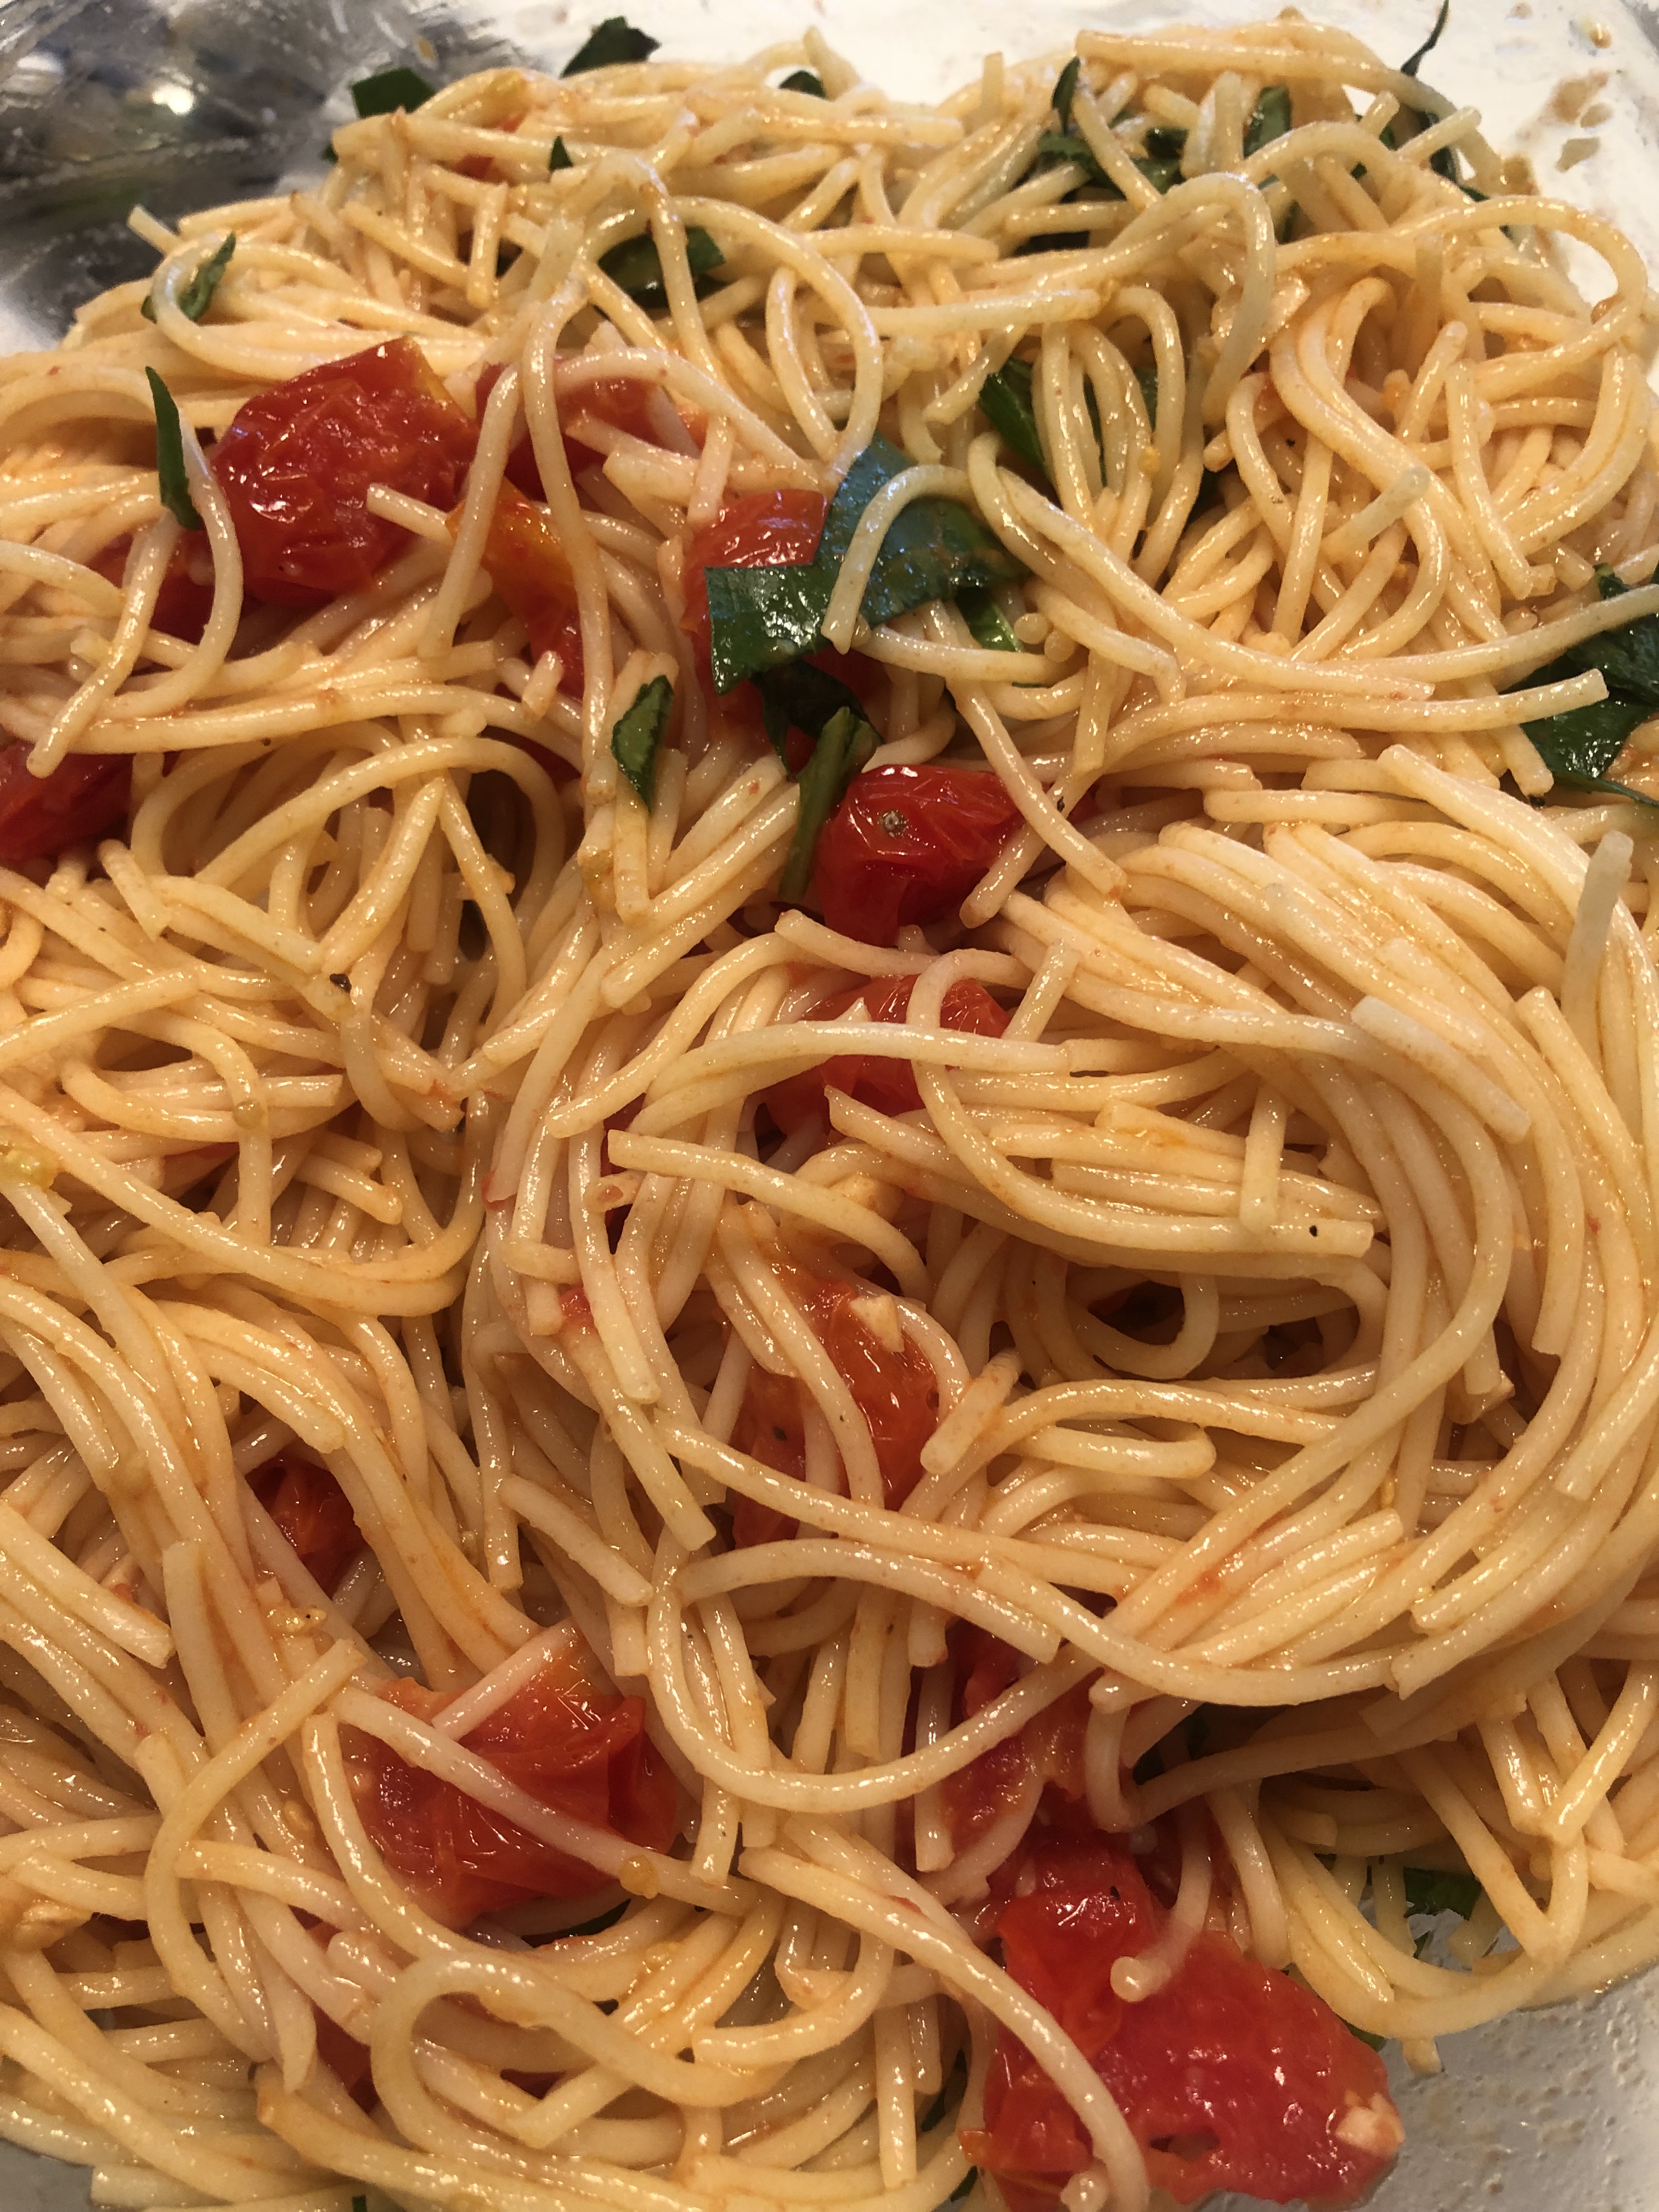
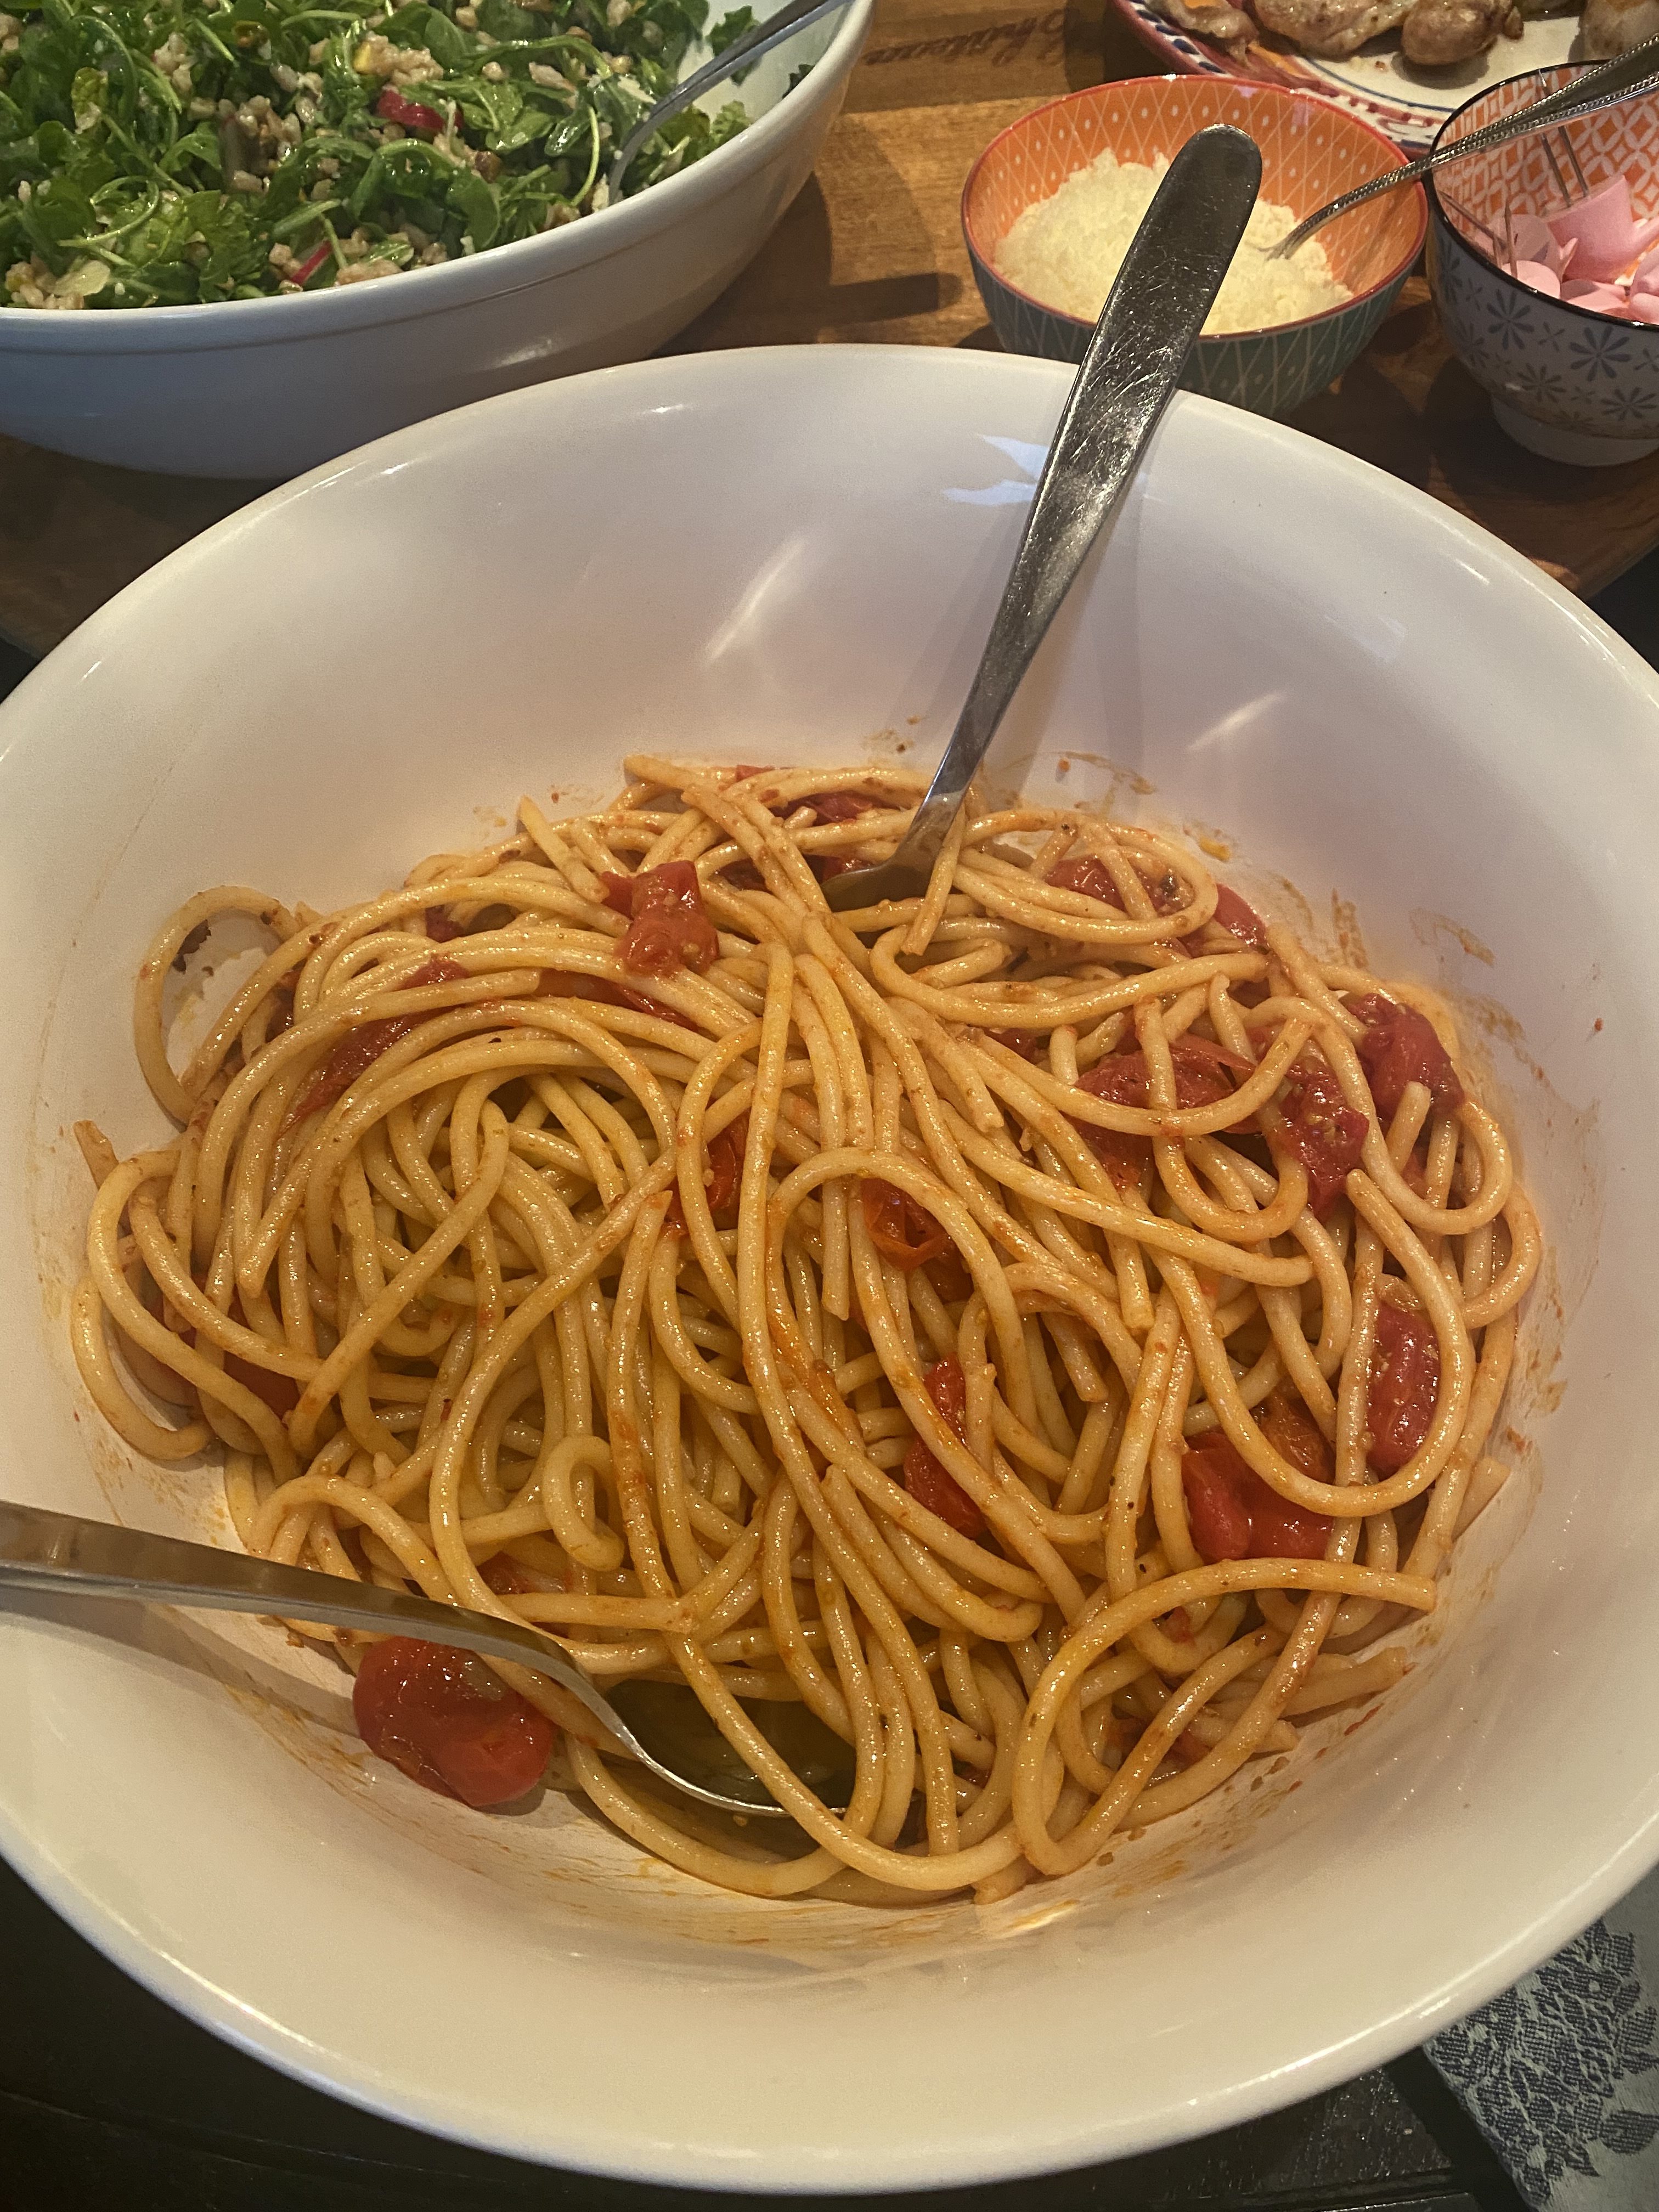
Nothing but beautiful tomatoes out there begging to be eaten in a million different ways. Perfect for a “Meatless Monday” dish or any night of the week . There are tons of local tomatoes out there now. At any local farmers market you can pick up pints of these beautiful babies. This is a lovely light pasta.
I had bought 2 pints of those beautiful little cherry tomatoes and right now there are those gorgeous yellow sunburst tomatoes also available. I wasn’t sure what I would do with them. They varied in size so I knew if I made a sauce some were getting cut and some would stay whole. Nothing ever sounds better than a plate of pasta to me, nothing. These beautiful tomatoes are only out for such a limited time you have to get them while the getting is good. Some of the tomatoes were super small and I left them whole while I halved the larger ones. There are so many variations of this sauce and feel free to improvise. We love it this way. So simple and so delicious.
1 lb. spaghetti , any kind of long spaghetti is good for this — sometimes I use bucatini type and sometimes I use thin type long spaghetti– use whatever you’d like
1/4 cup extra-virgin olive oil plus more as needed
4 cloves garlic, peeled and minced.
1/2 teaspoon crushed red pepper* we like it spicy so if you don’t want it that spicy cut to 1/4, I actually used 1 whole teaspoon and it packed a lot of kick.
2 pints of cherry tomatoes or little plum tomatoes or you can use about 3 cups of chopped fresh tomatoes of any type. I cut the larger tomatoes in 1/2 and I left the little ones whole.
app. 20 leaves of fresh basil, I just cut them up into small slivers–this is totally optional if your kids don’t like green stuff– but it looks pretty
Kosher Salt and Freshly Ground Black Pepper to taste –I used app. 1 teaspoon on tomatoes and added towards the end as needed
freshly grated parmesan at your discretion
Directions:
Cook pasta according to directions on box for al dente. Reserve a cup of pasta water in the event you may need a little more liquid in your sauce. Add 2 tablespoons of salt to cooking water for pasta. The Italians like to say that their pasta water should be like sea water good and salty. After finished cooking pasta — reserve 1 cup of pasta water and set aside before you drain pasta.
Heat a large sauté pan over medium heat add 4 tablespoons of olive oil and garlic, cook until garlic is golden about 2 minutes. Be careful you don’t want to burn this garlic. Add the crushed red pepper now and the tomatoes, and cook over medium heat. I also added some kosher salt (about 1/2 teaspoon to start, you can always add more) and a little freshly ground black pepper. Stir for a while to make sure garlic doesn’t burn and tomatoes start to burst and deflate about 5 minutes and if you think you need a little more olive oil add it now . I let the tomatoes simmer in the pan for about 15 minutes to 1/2 hour for the best consistency. I smashed down stubborn little tomatoes at the end with the back of a wooden spoon. A very low simmer at the end. Taste for Salt and Pepper. The longer the tomatoes sit in the oil and cook down on a low simmer the better the sauce will be so if you have a little time let it sit.
Once the spaghetti is cooked and you’ve drained it ( remember to reserve a cup of pasta water). Add it to the pan with tomatoes and over medium-high heat toss the pasta with the tomatoes well. Add the basil . I let everyone add their own cheese at the table.


 Wow–Fajitas on the Grill and the best part is there were no pots and pans to clean up! Cooked in Aluminum Foil Packs right on the grill! They’re called Hobo Packs. This is so easy to make and so delicious to eat. Definitely one of our favorite go to meals in the summer. If you don’t have a grill you can make in the oven on a large rimmed baking sheet.