Maple – Dijon Chicken with Brussels Sprouts and Butternut Squash.

Here’s a recipe that I absolutely loved making and loved eating! Tasty and Easy and anyone can do it. All it took was a few pantry ingredients that almost everyone has in their home.

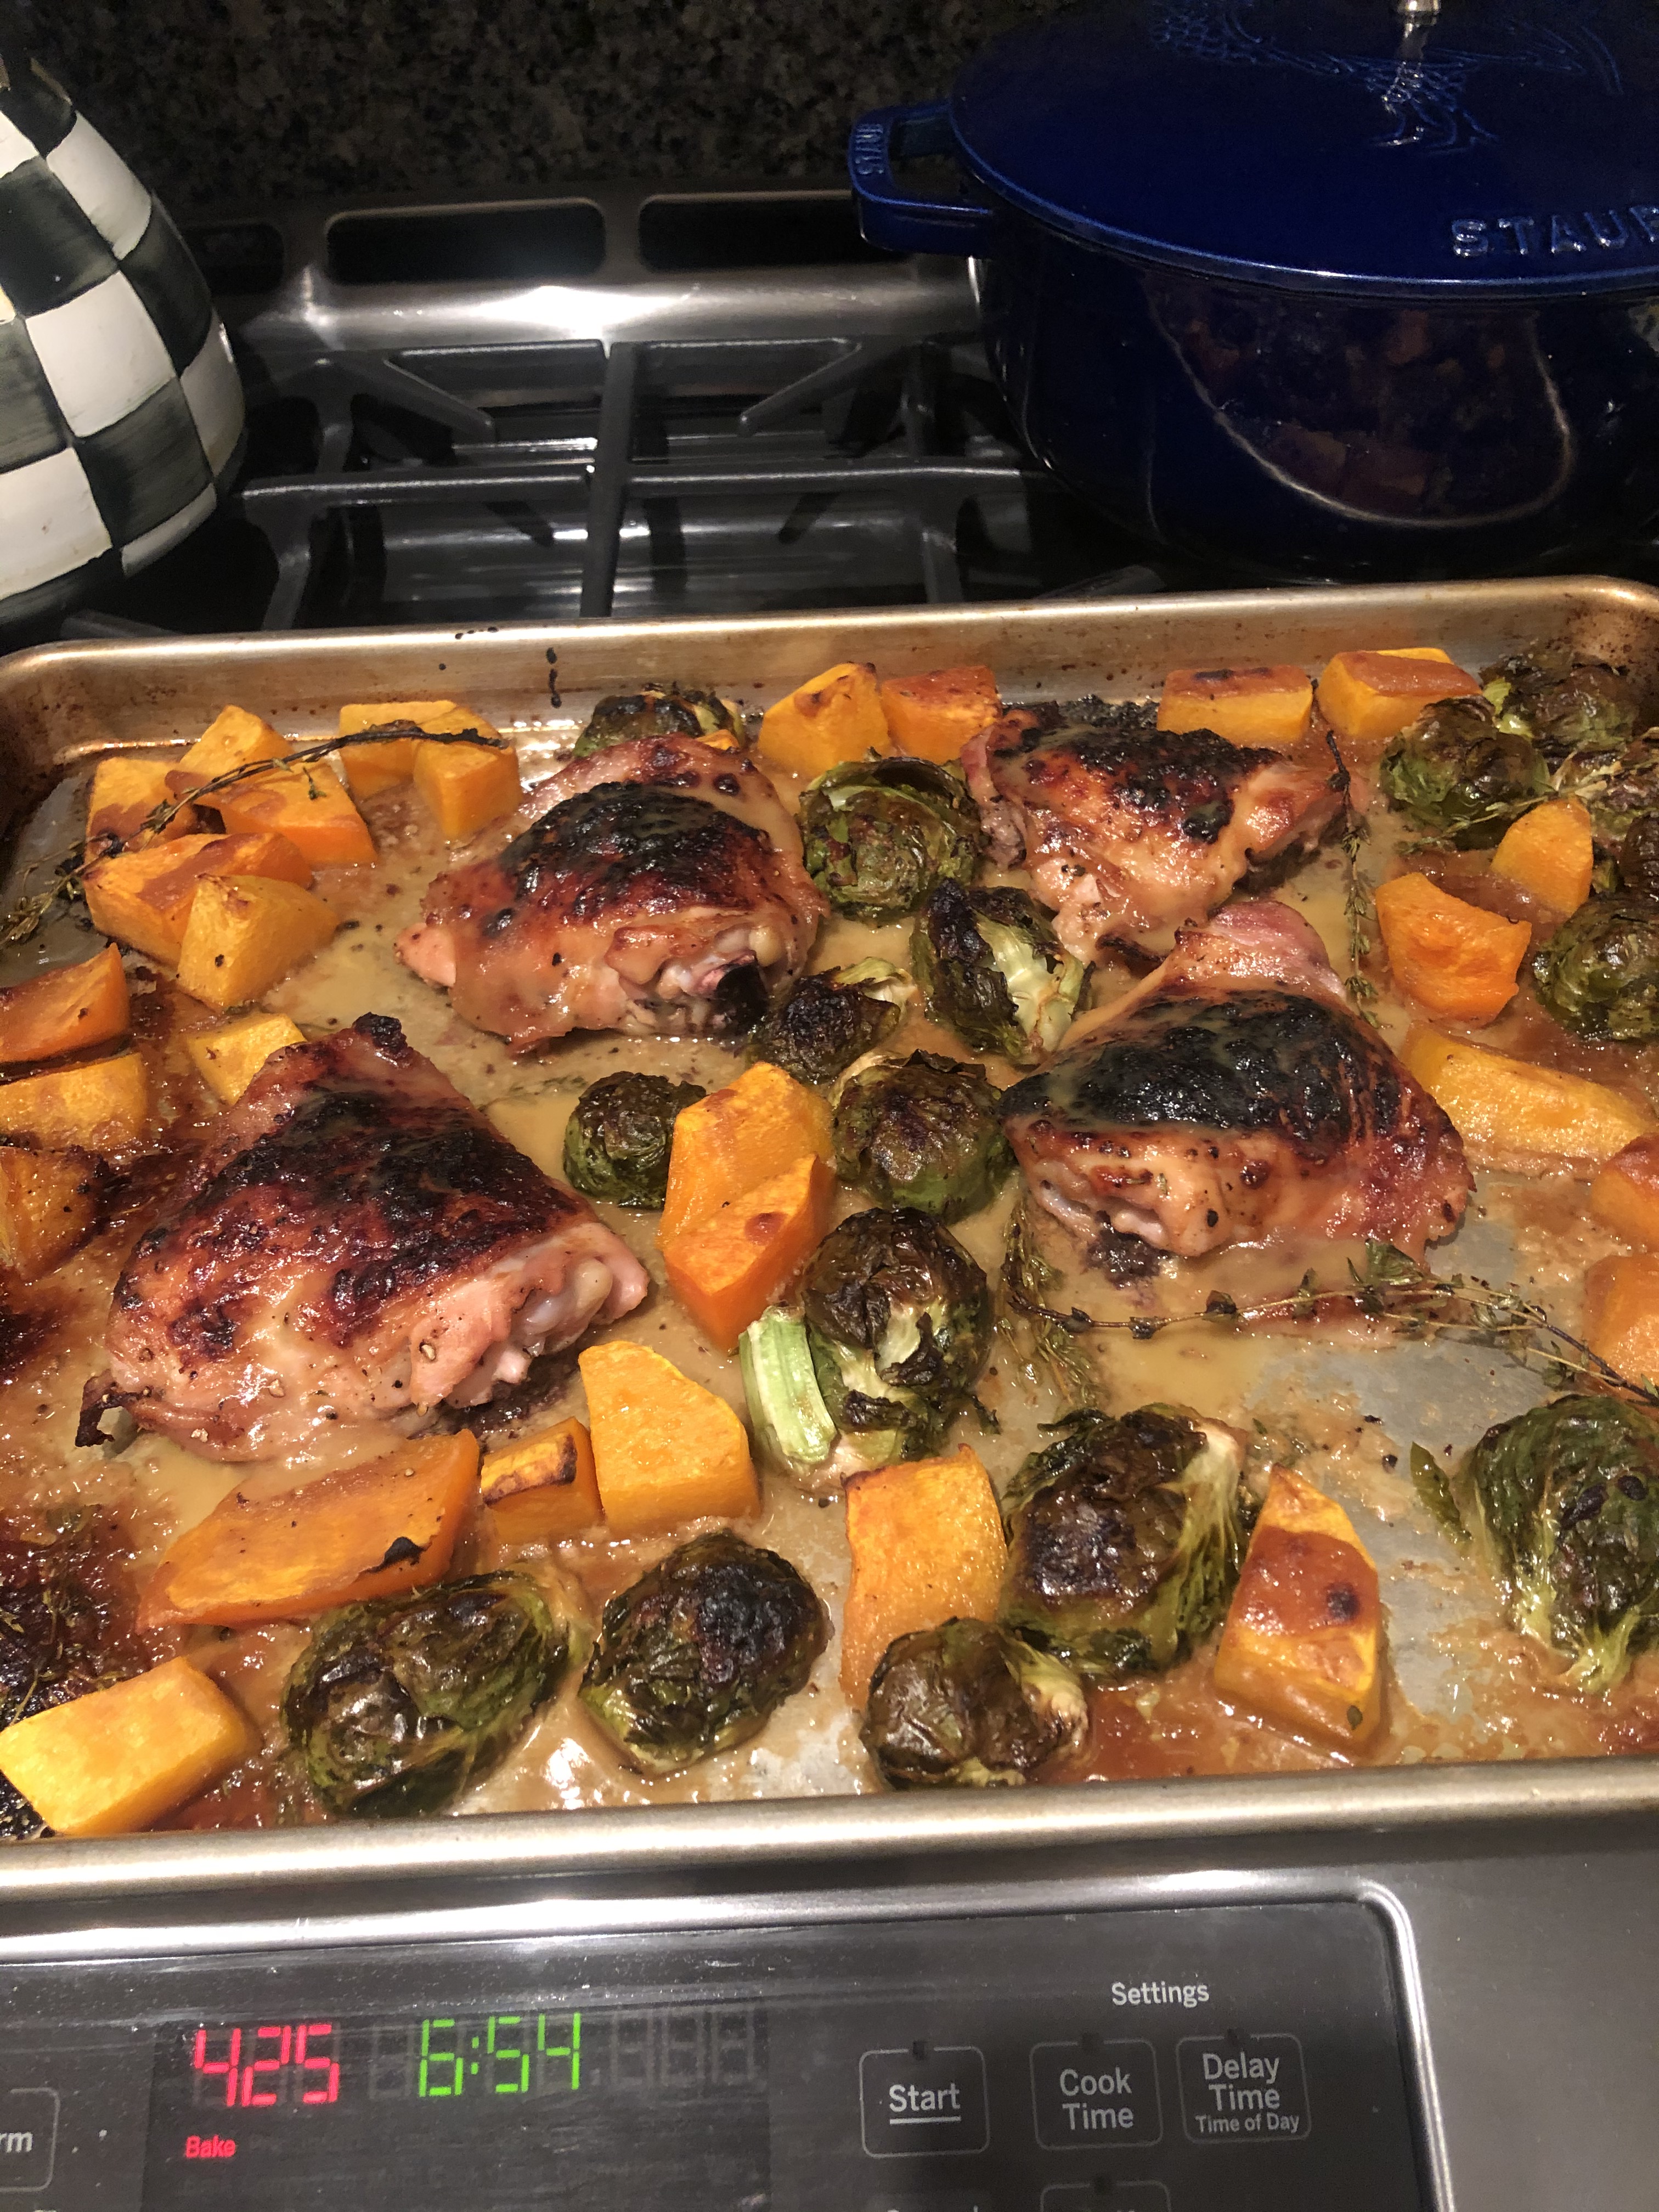
I just love one sheet meals — another reason to go out and buy a large sheet pan if you haven’t done so already. 18 x 13 is the size you’ll need because if you crowd the ingredients they end up steaming and not really roasting. Roasting is what you’re after here.

I chose Chicken Thighs because they can stand up to the cooking time along with the veggies. I didn’t use Drumsticks but you certainly can use both. If you insist on white meat you’ll have to remove chicken earlier than veggies or you’ll have dried out chicken for sure.

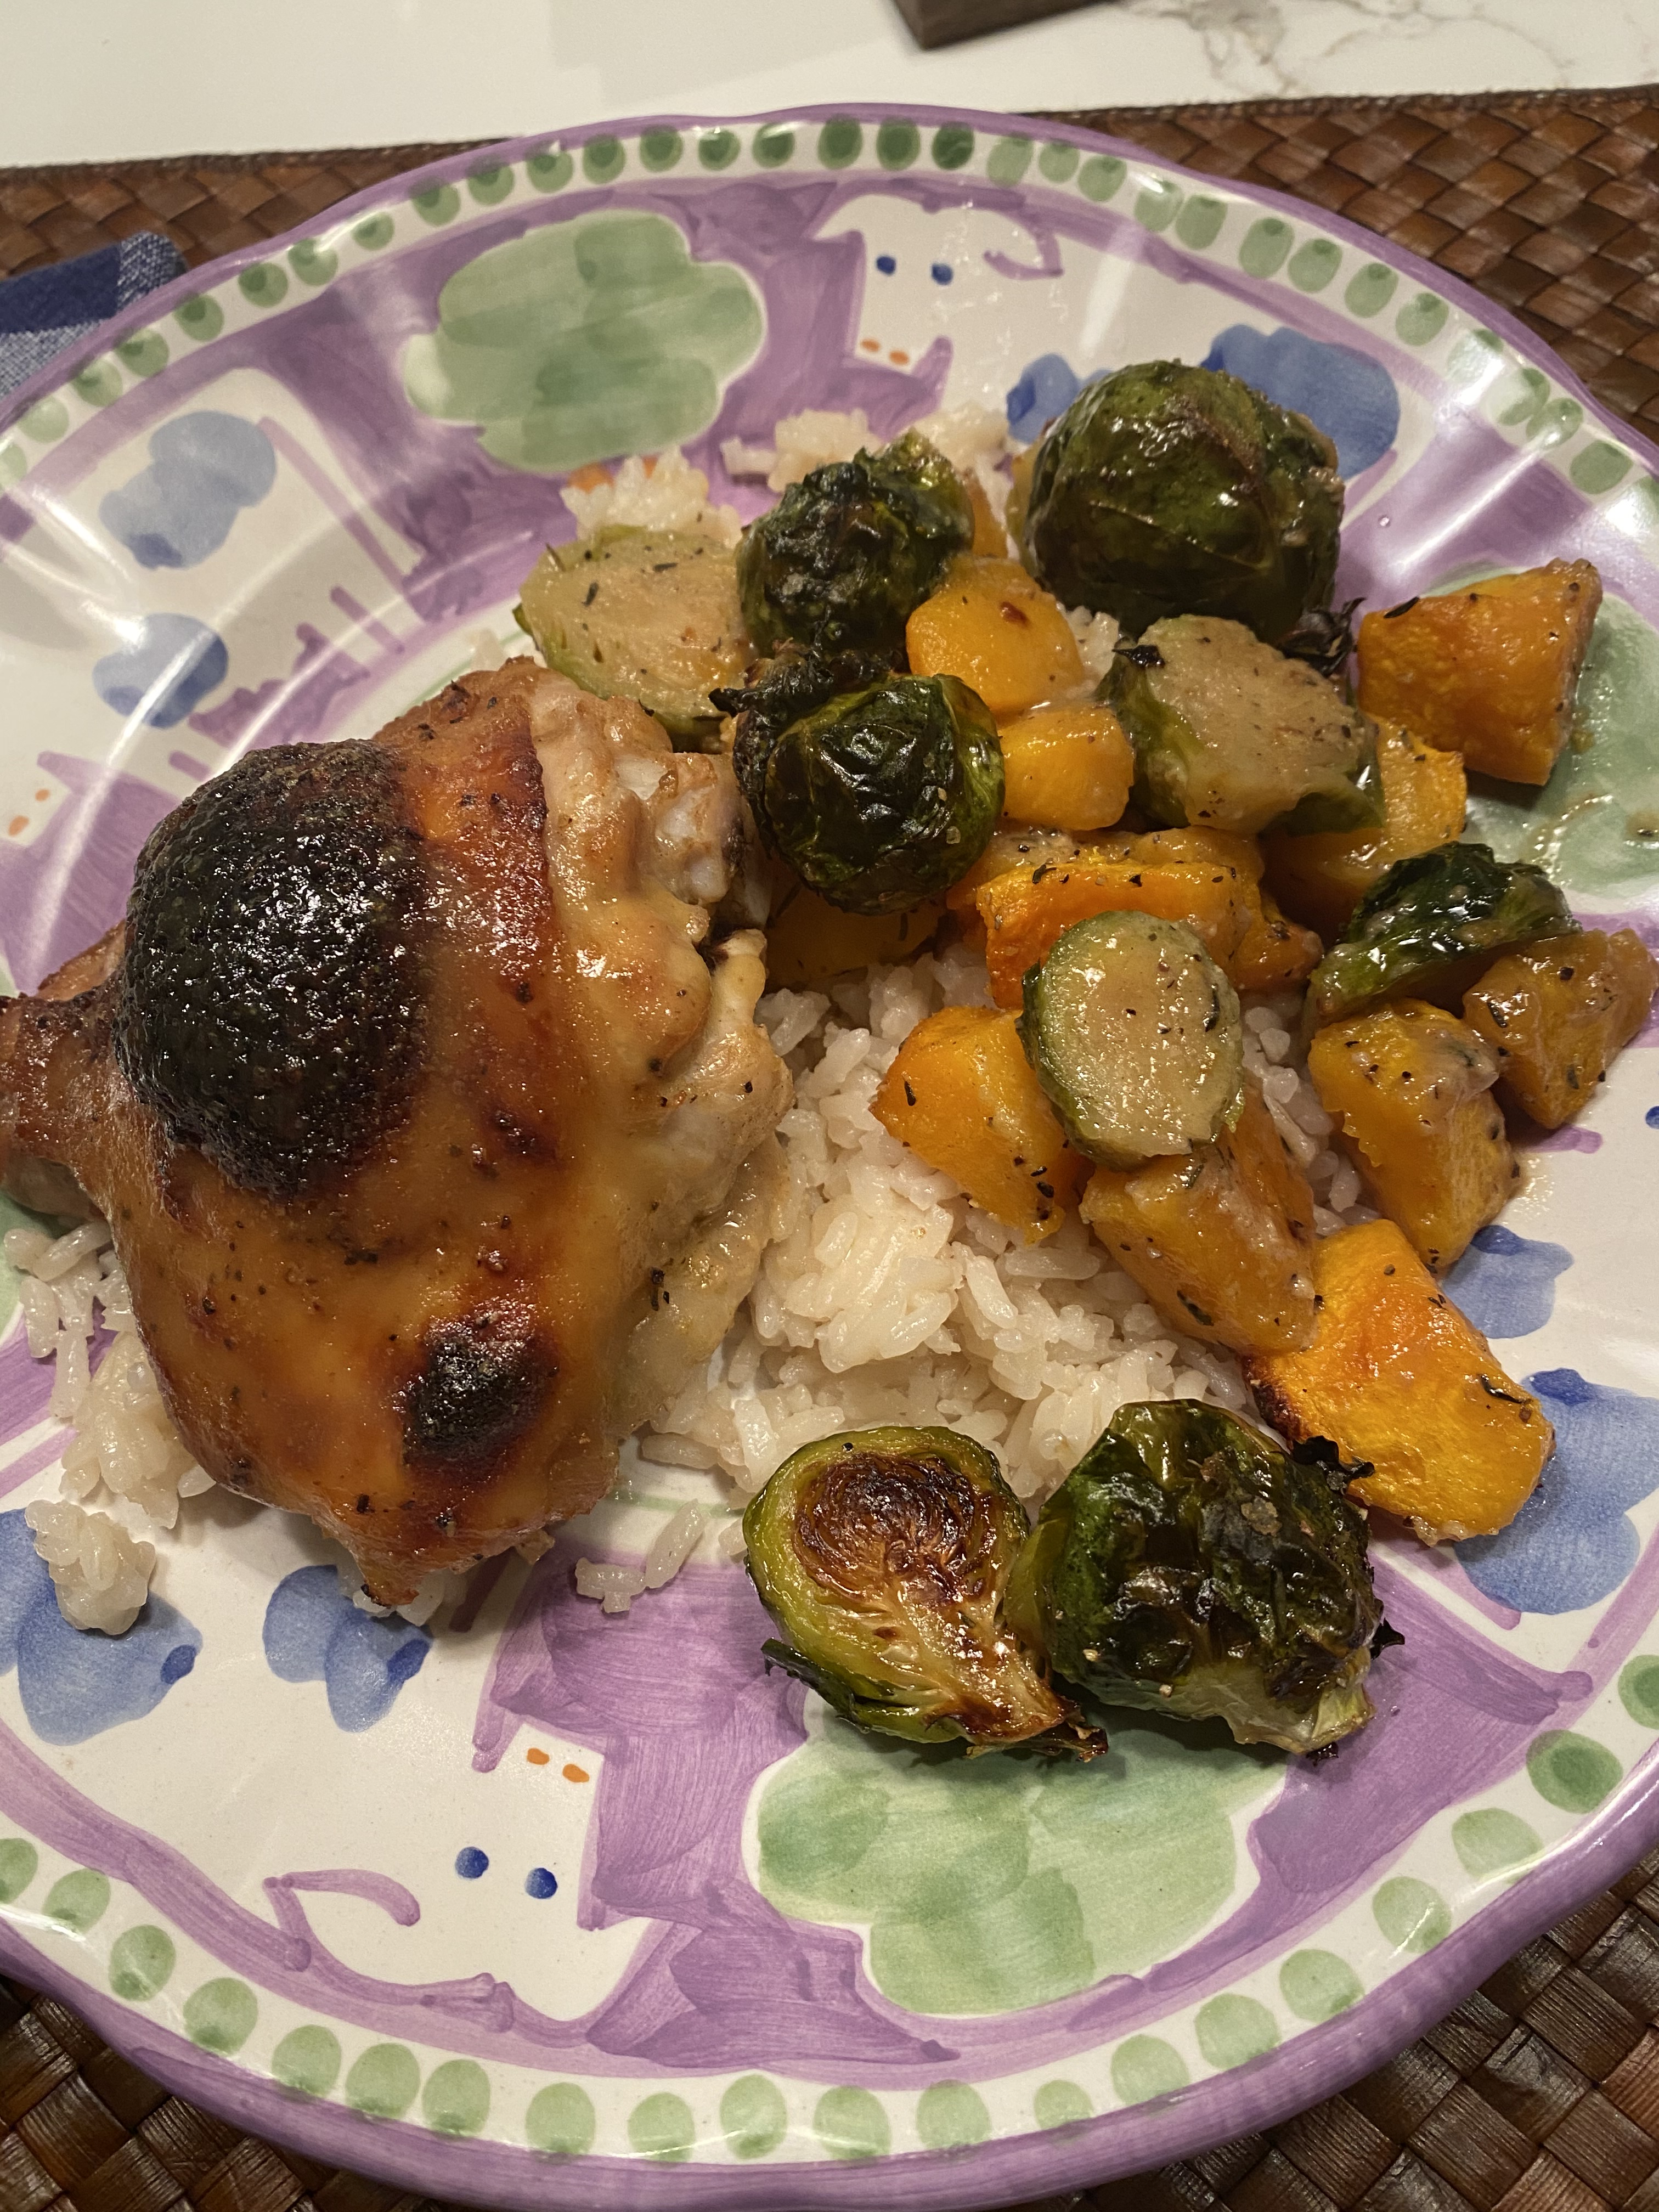
Enjoy this lovely sheet pan meal and add Brown Rice or White Rice or Rice Pilaf or any rice is kind of perfect here. Basmati and Jasmine are also perfect.

Please follow my blog on Instagram @cookingwithcandi— thanks

Ingredients:

2 Tablespoons Reduced Sodium Soy Sauce

4 Tablespoons Dijon Mustard, plus 1 Tablespoon

3 Tablespoons Pure Maple Syrup, plus 1 Tablespoon

6 large bone in chicken thighs skin on ,or use 4 thighs and 4 drumsticks or whatever pieces you’d like

Kosher Salt and Freshly Ground Black Pepper

app. 12 ounces butternut squash, peeled, seeded and cut into 3/4 inch cubes

app. 12 ounce Brussels Sprouts, trimmed and halved

6 sprigs of fresh thyme or dry thyme if you don’t have fresh

2 Tablespoons Olive Oil

and you’ll need some cooking spray — you can use Olive Oil spray or just regular spray

Directions:

Preheat the oven to 425 degrees. Spray an 18 x 13 inch large rimmed sheet pan

In a bowl that is large enough to put the chicken thigh in combine the soy sauce, 4 Tbsp. of the Dijon Mustard and 3 Tbsp. of the pure Maple Syrup and 2 Tablespoons of Soy Sauce

Season the chicken all over with Salt and Pepper and then I like to dip my chicken into the mustard mixture and place on prepared baking sheet

In a large bowl combine the Brussels sprouts, butternut squash, thyme, and olive oil, season with a sprinkling  of salt and pepper here too. (lightly)

Arrange the vegetables on the baking sheet around the chicken. Pour any left over Dijon-Maple -Soy sauce over the chicken and pour any remaining sauce over the veggies.

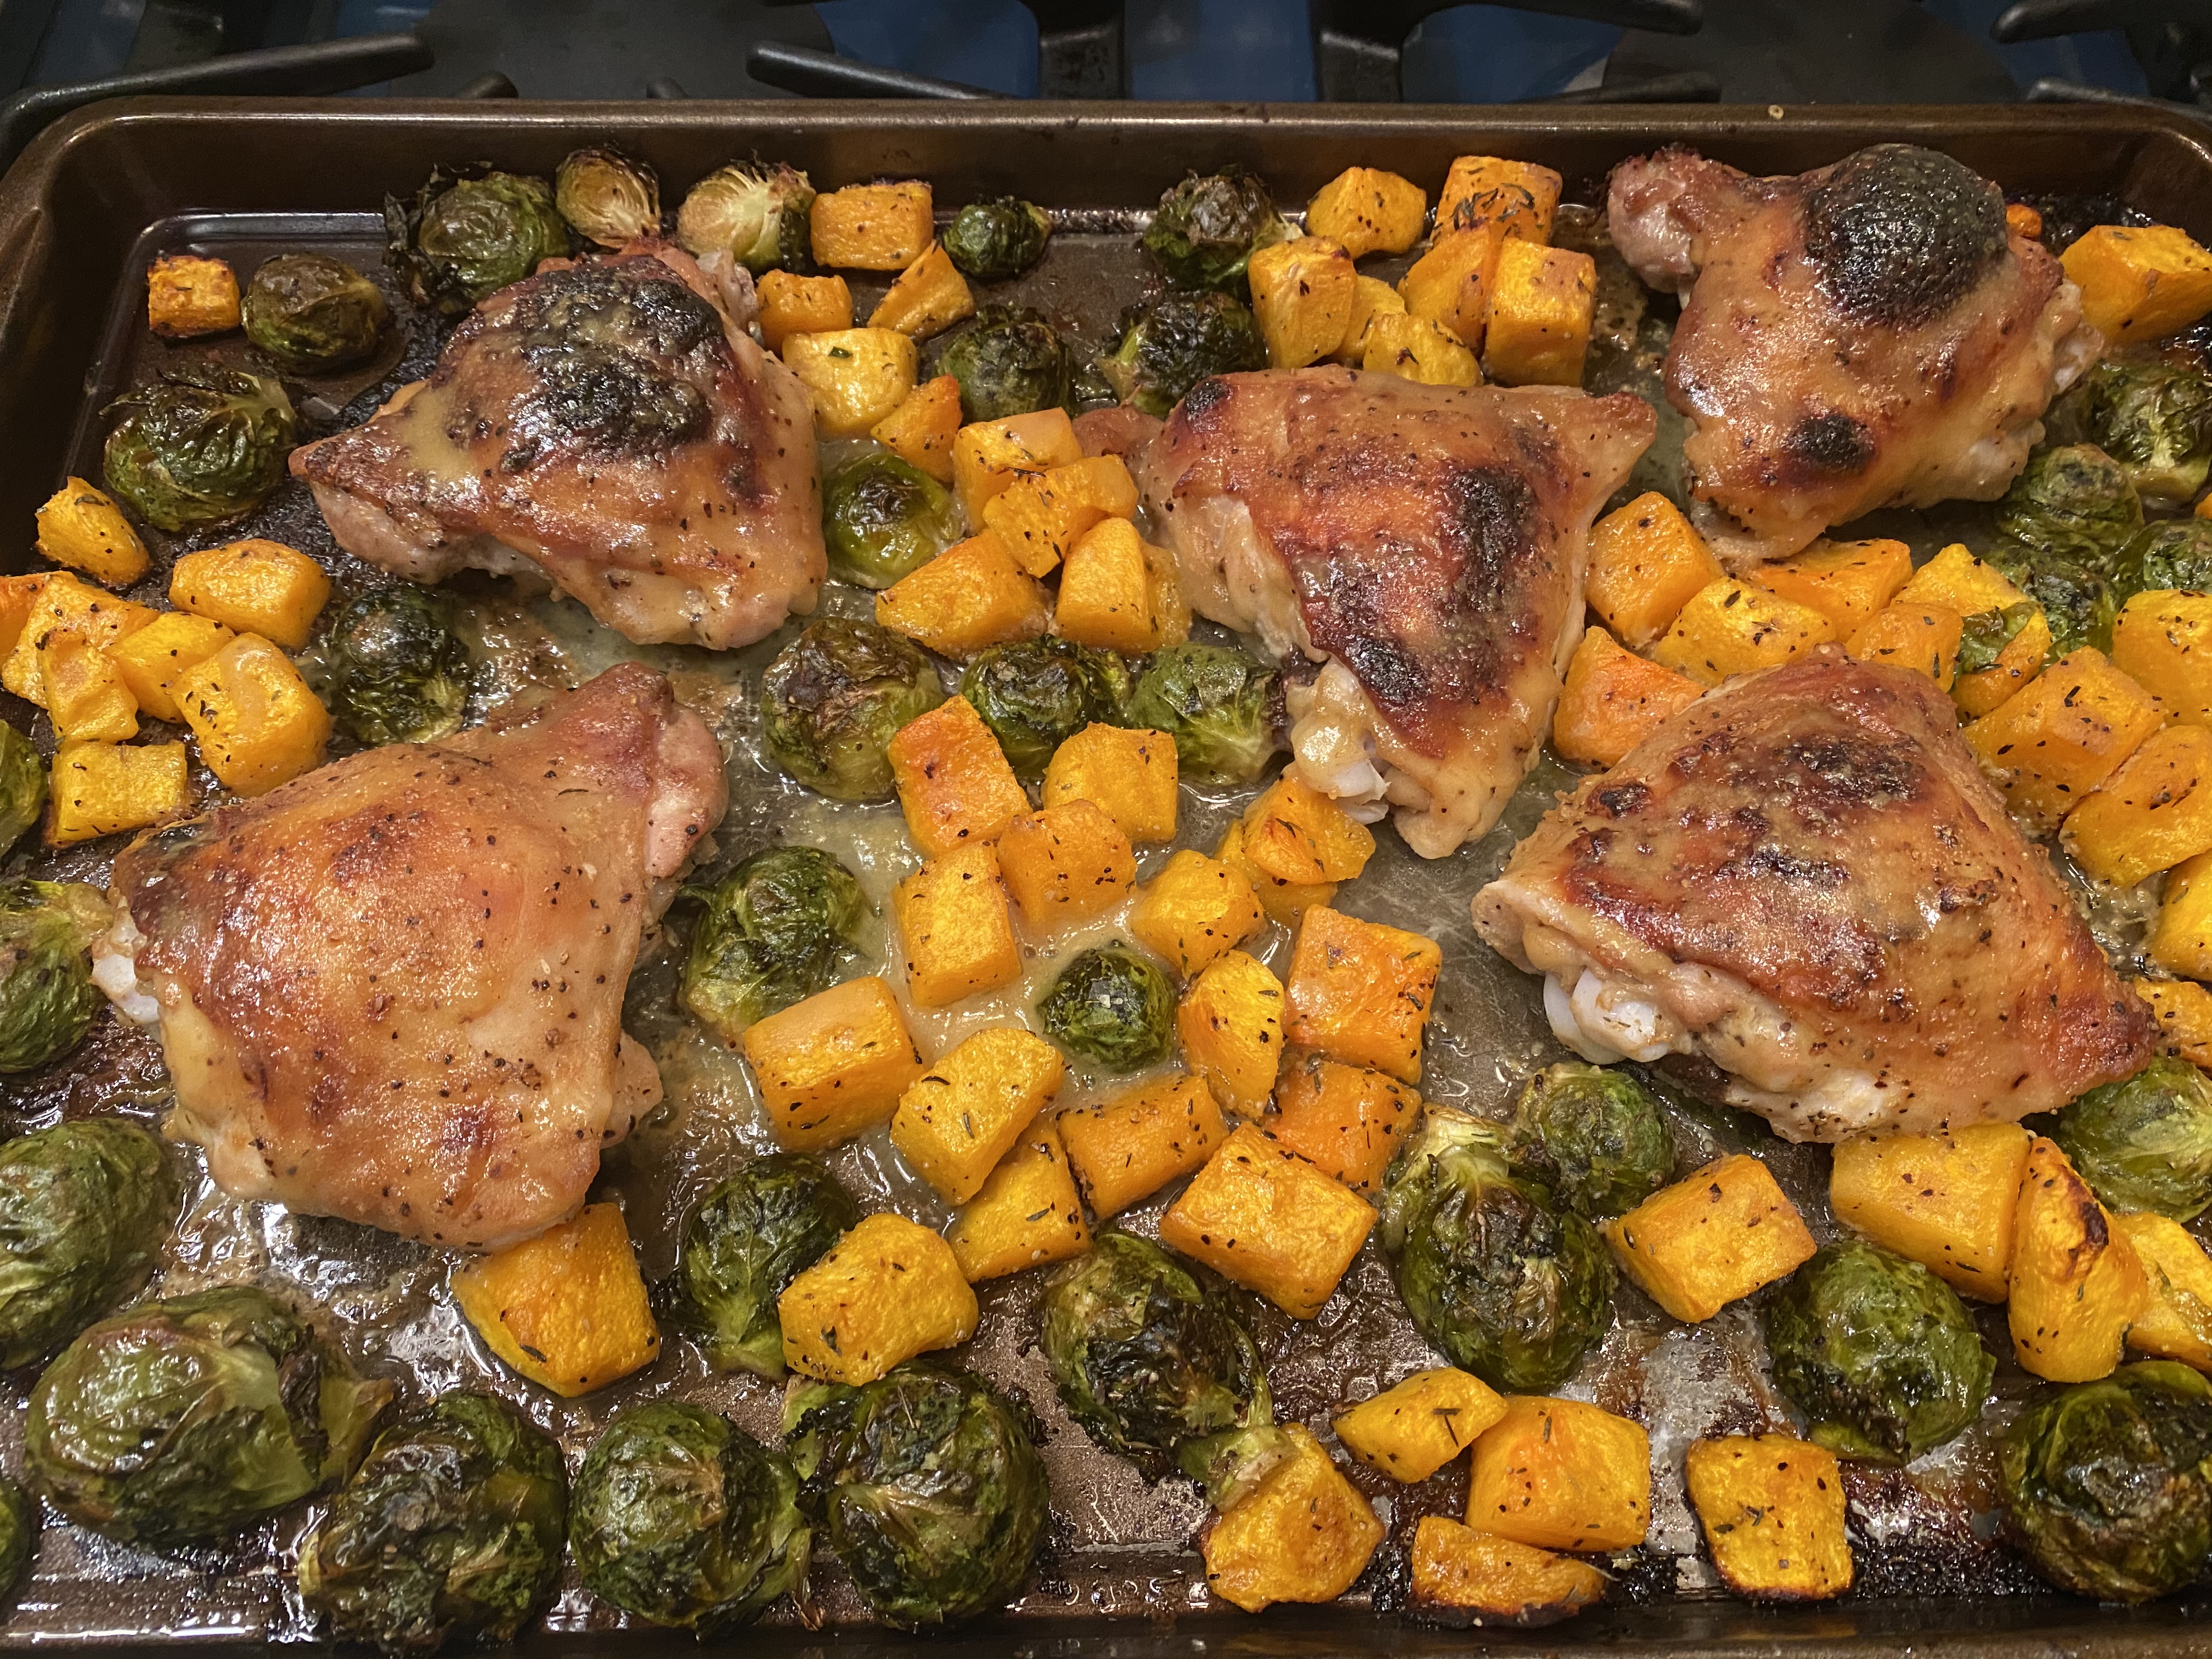
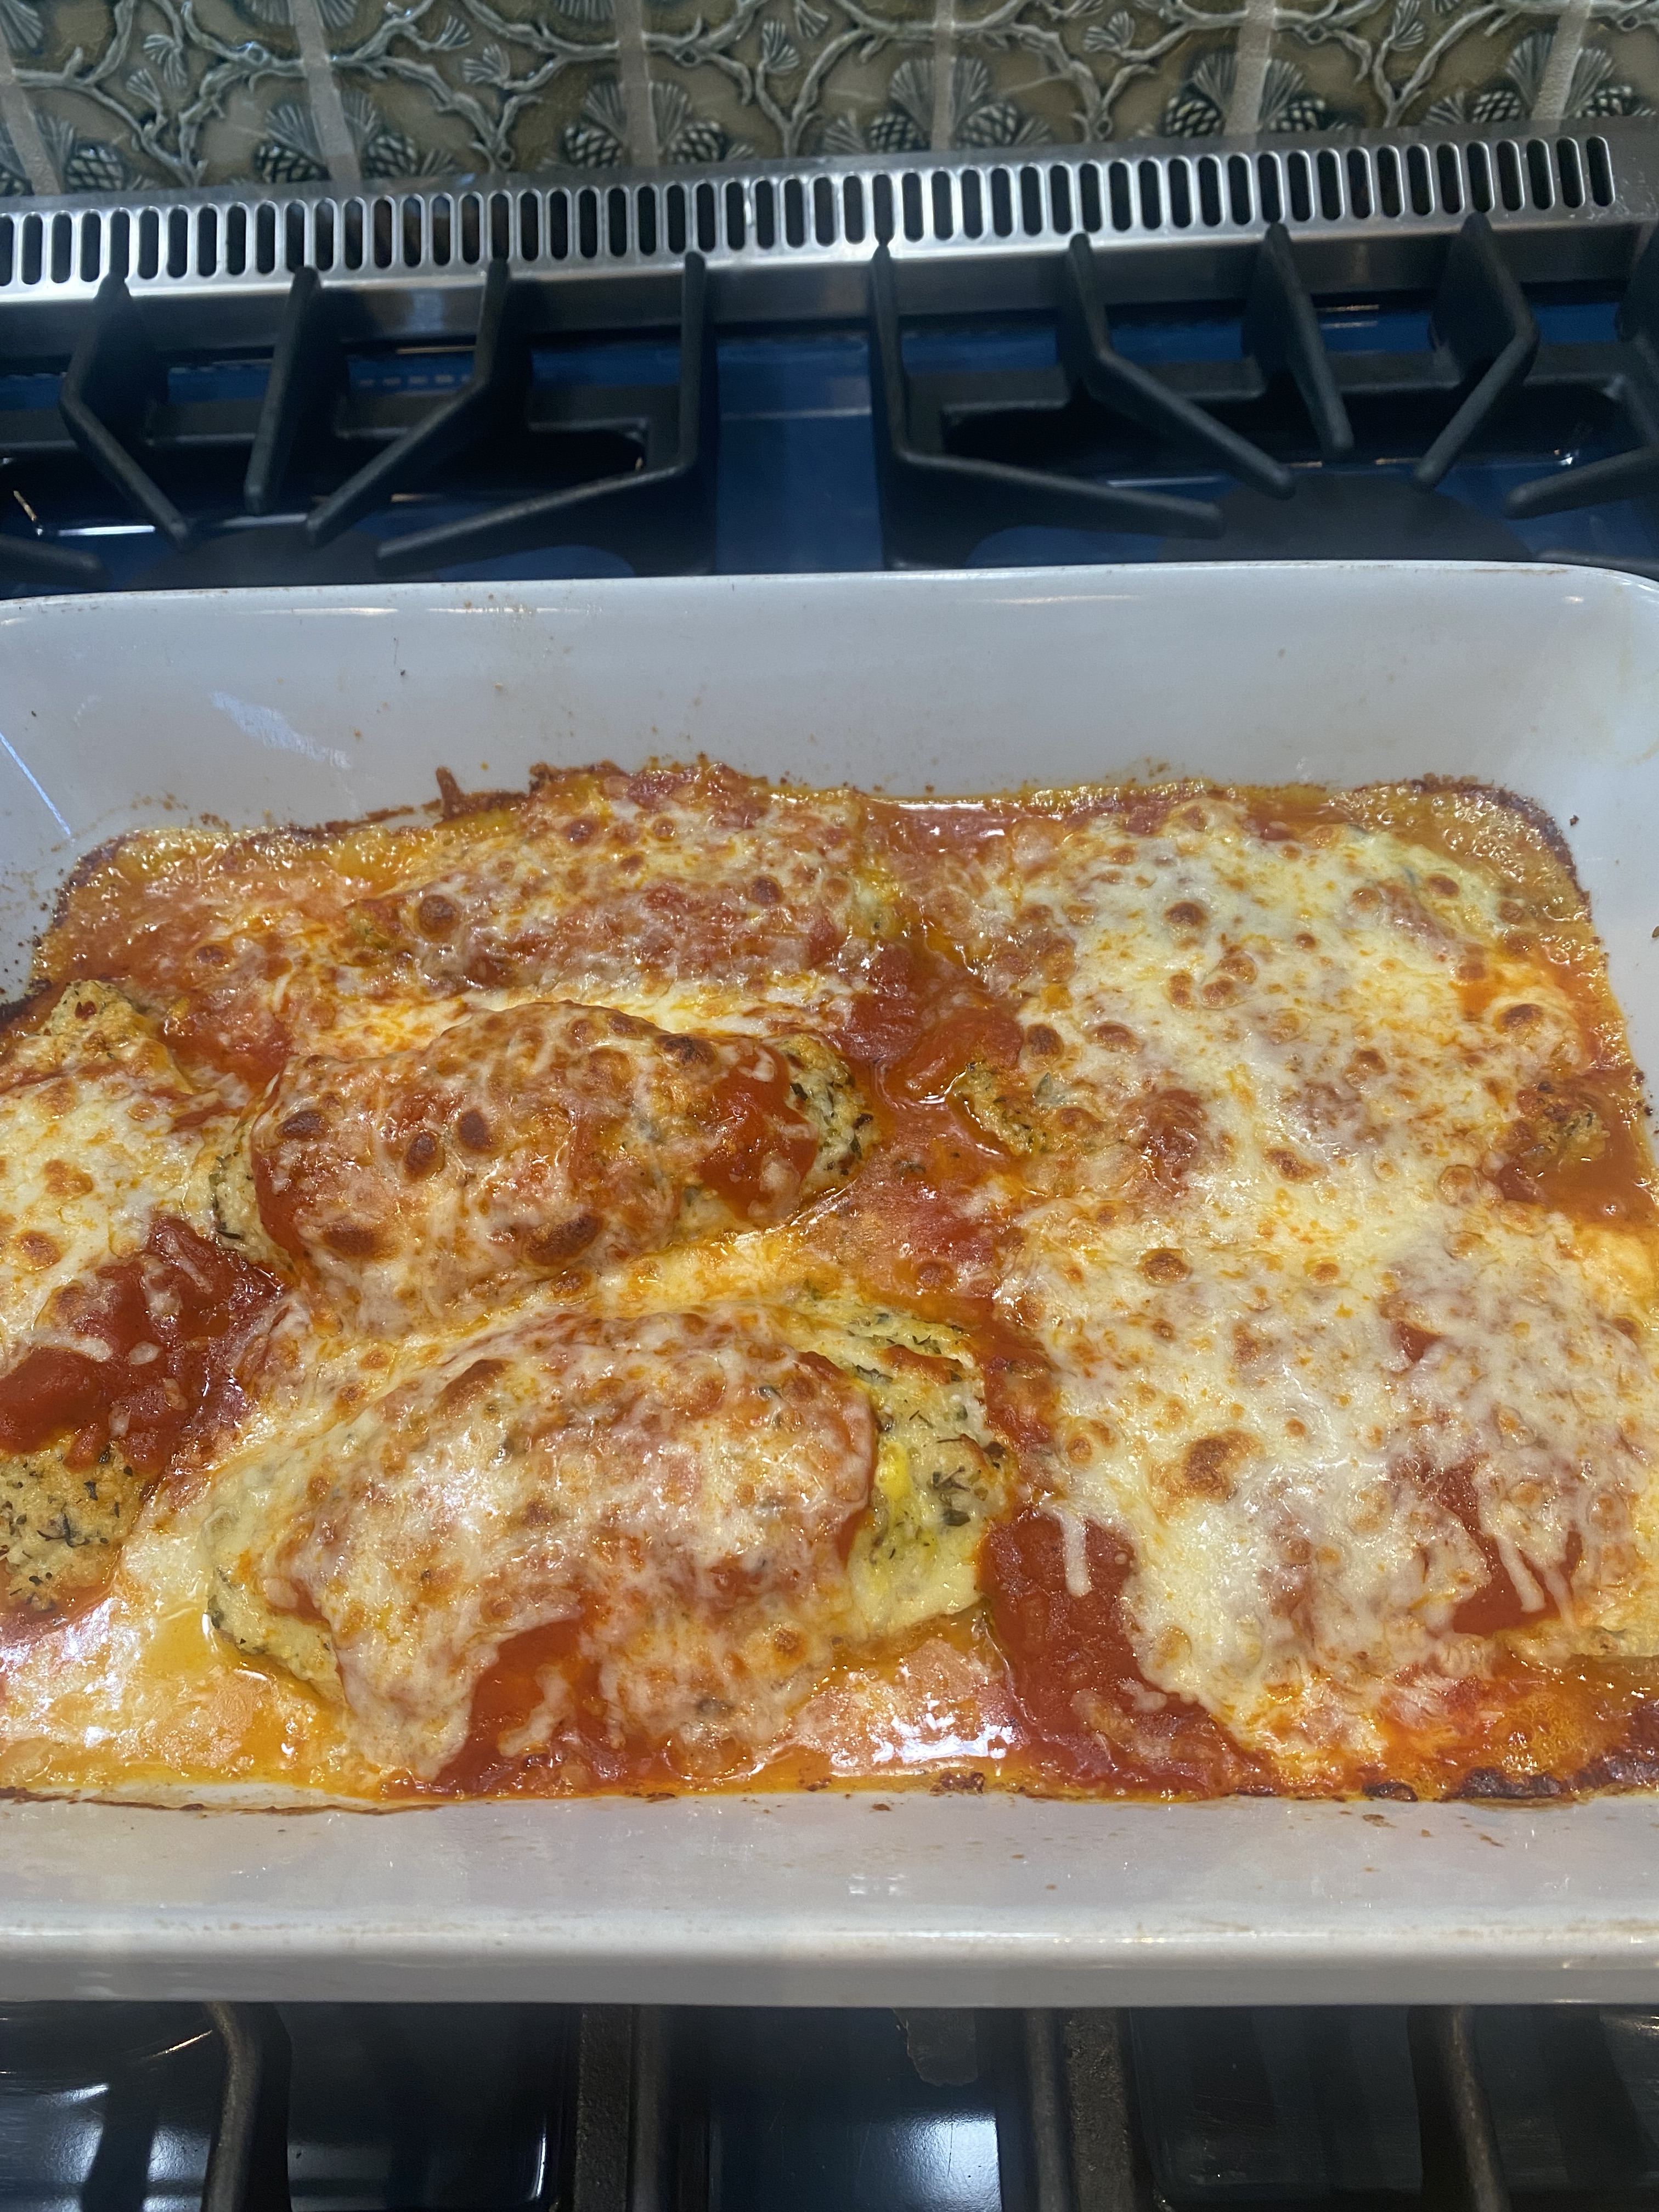
Bake until the chicken is cooked through and the veggies are tender, app. 35-40 minutes. Look at the chicken after 30 mins. I cooked for 35 minutes and it was browned up rather nicely.

Meanwhile, whisk together the remaining 1 Tbsp. Dijon and 1 Tbsp. Maple Syrup and remove chicken from oven.

Brush the remaining mixture over the chicken. Bake a few more minutes till browned and perfect looking if not browned nicely you can place under broiler for a minute or so. I have never had to do this but some ovens are different than others.

*next time out I am going to try this sauce on boneless , skinless chicken thighs — it’s gotta be good!

Serve alongside some brown rice or any rice you’d like.

Amazingly Delicious.

Maple Dijon Chicken with Brussels and Butternut Squash

Making Pizza at Home with store bought dough in a sheet pan

Making pizza at home with store bought dough is one of my favorite things to do. It’s easy once you get the hang of the dough and I found a few tricks along the way which help make it easier. The real trick to the dough is letting it rise and come to room temperature. If you try to work with cold dough out of the fridge it won’t work . You will need a rimmed sheet pan as well. I keep some dough in the freezer and take it out the night before and let it defrost in the fridge and the next day about 4 hours before I am using I place it on the counter ( in the sun even better) and let it rise and come to room temperature. There are many places to buy dough and you’ll have to find the best one by your home. I buy in Whole Foods when I am in Colorado and in NY Trader Joes , Whole Foods and your local pizza place or bakery will probably be happy to sell you a ball of dough. .Dough will need at least 3 – 4 hours to rise outside of the fridge. Nothing will happen to it so just set it out on the counter — I open the bag and let it rise away. My ingredients are simple and if you follow instructions you should be fine. Don’t be discouraged if the first few times it doesn’t come out perfectly — it took me a few times with the dough to really get the hang of it. Give it a try!

This is what I do and these are my instructions:

Ingredients:

1 bag Pizza Dough — for 4 people I make for 2 and we always have extra slices

16 oz. Pizza Sauce — if I have homemade I use that if not I always have a jar of Raos Arrabiata or Marinara on hand

Italian Seasonings — dry app. 2 tsp. you’ll have to eyeball it

flour for stretching dough — this is a must

Olive Oil Spray for spraying baking sheet — I like this better than using olive oil — either one will work on baking sheet

Parmesan Cheese

Shredded Mozzarella — app. 8 oz. more or less

Directions:

Let dough rise. Read notes above. Keeping the store bought dough on a counter for at least 3 hours or more. It will keep rising in the bag so I usually open the bag to give it room to rise. If you’re defrosting it do so overnight in fridge and then take it out the next day. You’ll notice it rising in fridge ( at least it should)

Pre-heat oven to 450 degrees — very important to get oven hot so make sure you’re oven is pre-heated

Spray baking sheet with Olive Oil Cooking Spray or using a brush lightly coat bottom of baking sheet with Olive Oil . I use a 12x 17 rimmed baking sheet . You don’t need a pizza stone.

Stretch the dough. On a clean surface ( counter top ) I put down a light amount of flour (enough for both sides) and you can always add more , the flour will help to expand the dough. Place raw dough on top of flour, coating each side. Begin stretching the dough by pinching the outside in a circular motion to spread it out. I put my fists under the dough to stretch ( you don’t need a rolling pin) You can alternate between pinching the dough with your finger, pressing it out on your work surface, and using your knuckles to pull the dough from underneath in circular motions. Usually a few motions will get the dough stretching. When it’s large enough gently transfer to the prepared sheet pan. I spread it out thin in center and more dough around perimeter ( crust) if there are holes in your dough pinch together dough or fold over the dough in that spot and get rid of them . I spread it out all the way to cover entire baking sheet . Don’t worry about your dough being a perfect shape. All pizza is delicious and beautiful.

Bake the naked pizza dough in the oven at 450 degrees for 7 minutes. During this time prep your toppings. I am sort of a purist so it’s sauce, cheese , and seasoning. Never add the toppings to raw pizza dough.

After par-baking the pizza dough, remove from oven and raise temperature of oven to 500 degrees. ( make sure it gets to 500) I add my sauce — spreading it out on dough, I leave a little room around perimeter ( see photo) , dried Italian seasoning ( if you’re using) parmesan cheese and mozzarella cheese . Obviously if you have other toppings you want to use this is the time to add.

Bake the pizza at 500 for another 10 minutes — all ovens vary so check on it after 7 minutes.

I like my cheese fully melted and a little brown in spots. Let it cool off for a few minutes before slicing .

I use a pizza cutter and get 8 slices .

Let me know how this comes out — tag me on Instagram story — I would love that.

these are some photos from current pizzas and past pizzas–sometimes they come out better looking than other times but they always taste incredible! No such thing as an ugly pizza in my book.

Couscous and Butternut Squash Salad with Kale or Arugula —

This salad is most definitely one of my top ten salads and if you added a protein it would make a delicious dinner salad.  It is just perfection on a plate. Beautiful to look at and delicious to eat. Fairly Healthy and you can keep it vegan without any dairy or add cheese for a delicious vegetarian salad .  It takes a bit of prep work but you can prep a few hours ahead and be done with it prior to the meal which is always a good thing in my book.

I prepped butternut squash and couscous and used baby arugula this time. I dressed the salad and let it sit , Kale is better when it’s soft and broken down so if you’re using Kale I suggest chopping it.  I love Kale but don’t want to feel like I’m eating my front lawn. It is delicious with kale or arugula or really any greens you prefer.

If you like a heavier dressed salad I would definitely double up the salad dressing. Or just pour a little over it and leave extra for individual dressing.

This is what I did. Enjoy and Happy Fall.

Ingredients:

1 lb . butternut squash – 1 package of pre-cut squash and then I cut into small 1/2 inch cubes

2 Tablespoons olive oil

Kosher Salt and Freshly Ground Black Pepper – to taste

1 cup dry Pearl Couscous , cook in water according to package directions

app. 2 cups chopped Kale Leaves or Arugula is also a great choice if you’re not a kale fan or really 2 cups of any kind of greens you like.

1/3-1/2  cup dried cherries–you can use craisins, raisins, cranberries whatever dried fruit you like -if you like less use 1/3 cup I tend to use more

1/3-1/2  cup chopped walnuts–same as above and you can obviously omit if you don’t like or use chopped pecans or other nuts

*app. 2 oz. crumbled goat or feta cheese if you’d like– I like the creaminess that goat cheese delivers so I use it over feta in this but use whichever you prefer

Orange Vinaigrette Dressing:

2 Tbsp. Apple Cider Vinegar

2 Tbsp. Extra Virgin Olive Oil

2 Tbsp. Freshly-Squeezed Orange Juice –this is a must

pinch of salt and black pepper, to taste

Directions:

To make the salad:

Pre-heat oven to 425 degrees and cut butternut squash into 1/2 inch cubes.

Spread the butternut squash out in an even layer on a baking sheet that’s been sprayed with cooking spray add 2 Tbsp. Olive Oil to squash to coat, sprinkle a little kosher salt and freshly ground black pepper to the squash .  Bake for 15 minutes then flip squash over (as best you can) Bake for an additional 10-15 minutes or until the squash is tender and slightly browned around the edges. Remove from oven and transfer back to the large mixing bowl. Depending on your oven the squash could take a little longer to cook, you just want it soft enough that it’s cooked through and a little browned up

Couscous: buy pearled Israeli Couscous –available everywhere Bring 1 1/4 cups water to a boil add 1 cup Couscous a sprinkle of salt and return to a boil . Reduce heat and simmer covered till tender about 15 minutes.

To make the vinaigrette:

Whisk all ingredients, (orange juice, olive oil, apple cider vinegar and pinch of salt and pepper to taste. I used all of the vinaigrette and it was very lightly dressed and rather tasty. If you prefer more dressing on the side , double the recipe.

Add cooked couscous, kale, cherries, walnuts, goat cheese* and vinaigrette,  toss to combine. Taste for Salt and Pepper after all combined.img_2936img_2933img_2929img_2928

Serve Warm, or refrigerate and this will keep for app. 3 days in fridge.

It’s a very light salad dressing so the kale absorbs it and it will keep nicely in fridge.

Shrimp Scampi–Classic

IMG_0556

IMG_0558

Finished Product

IMG_0554

Getting Ready to Cook

This is one of my all time favorite recipes and the easiest, quickest to prepare. Buy shrimp from a reputable fish store or Whole Foods type of market and have them clean and de-vein them. My husband Joel is an ex-seafood guy and he always cleans and de-veins the shrimp. It is a collaborative effort in our house.  Once the shrimp and prep is done this recipe takes all of 15 minutes to cook.

Ingredients are simple and you probably have most of the ingredients in your pantry. Directions are super simple and so easy to follow, you will look like a “super chef” and impress the pants off of everybody!

This is a wonderful meal for a special occasion or just for yourself! Enjoy and Happy Healthy New Year to all of my subscribers, friends and readers.

Ingredients:

2 Tablespoons unsalted butter

2 Tablespoons olive oil

4 minced garlic cloves

1/2 cup dry white wine–use whatever you have open as long as it’s not too fruity, if you don’t want to use wine use chicken broth or vegetable broth

1 teaspoon kosher salt

Freshly ground black pepper– about 10-12 turns on the pepper mill

1 1/2 lbs. large or extra large shrimp .shelled– we are big fans of Mexican White Shrimp and I used under 10’s which means there are approximately 10 to a pound.

1/2 cup ( app.) chopped fresh Italian parsley

Freshly squeezed juice of half a lemon

*pinch of crushed red pepper flakes

Cooked Pasta or Rice — I used brown rice this time around

Directions:

In a large skillet, melt butter along with olive oil. Add garlic and saute until fragrant , app. 2 mins.

Add wine or broth, salt, red pepper flakes, and black pepper and bring to a simmer.

Let wine reduce by half, app. 3 minutes.

Add shrimp and saute until the shrimp just turn pink, 2-4 mins. on each side depending on their size. Squeeze the lemon over the shrimp, I stirred the shrimp in the sauce one final time and served over brown rice with a sprinkling of parsly.

This shrimp would be delicious served over pasta as well.

Enjoy!

Baked Salami (Oldie but Goodie)

Here is an amazing appetizer if you are looking for something to hold everyone over till dinner. This is an oldie but goodie recipe, and everyone loves it always. Rarely is there a piece left over. Good Old Fashioned Kosher Salami. (the kind in the package from Hebrew National is what I’m talking about)   A-Mazing!

I have to say this is my #1 post on my blog hands down since 2011. People love this recipe.

*you will want to double recipe for the larger salami shown. Recipe below is for the smaller one.

Ingredients:

1 Kosher Salami (this is a larger one for a larger crowd)

1/2 cup Marmalade ( I like orange) but can be Lemon or Ginger

2 tablespoons Brown Sugar

1 tablespoon Dijon Mustard- I used Maille Dijon Mustard

Directions:

Preheat oven to 375 degrees. Score into Salami, cut into Salami in narrow slices but not completely through to bottom. Just make slices almost to the bottom. Mix all ingredients together and spread on Salami, place on a lightly sprayed baking sheet and cook for about 1 – 1 1/2 hours. Serve on a plate with sliced pumpernickle or rye bread or crackers. I buy that party pumpernickle bread which is already cut into small pieces and available almost everywhere.

*this may get very sticky so you can also cover tray with aluminum foil


No Breading Chicken Parmesan

So delicious and so perfect. I used thin chicken breasts to start , if you’re using thicker ones you’ll have to monitor the timing of them a bit more and you can just use a meat thermometer to do so. This really couldn’t be easier and it was super tasty and is a cheese lovers delight. It’s lightened up from traditional breaded and fried chicken parm. *if you’re chicken breasts are too thick you can pound them with a meat mallet to the desired thickness — this is a very useful tool. Just place chicken cutlet between 2 pieces of parchment paper or plastic wrap and pound to desired thickness.

Prep and ingredients are super easy .

This recipe is for 4.

Ingredients:

1 1/2 – 2 pounds of thin chicken breasts — you can use thicker ones –read directions above for pounding chicken breasts

1 egg

3/4 cup grated Parmesan Cheese

1/2 tbsp. garlic powder

1/2 tbsp. onion powder

1 Tablespoon Italian Seasonings — It comes in one jar and is available in most spice sections in supermarkets —

pinch kosher salt

1/4 tbsp. freshly ground black pepper

and because we like a little extra kick I add a sprinkle of crushed red pepper flakes

3/4 -1 cup Jarred Marinara or if you have home made that’s good too . I prefer Raos Arabiata or Marinara for jarred sauce.

Shredded Mozzarella — probably 1/2 cup to 1 cup depending on how much cheese you like — I like a good sprinkle of cheese — see pics.

A little olive oil for drizzle in pan before cooking

Directions:

Pre heat oven to 400 degrees

I used a large baking dish and sprayed with cooking spray and drizzled a bit of olive oil to bottom of pan — just a little

Beat egg in a wide enough bowl for dipping chicken

In a second wide bowl combine the parm cheese and spices and mix

Dip each piece of chicken in the egg and then the cheese, coating both sides. Place in prepared baking dish.

Bake for 20 minutes — since cutlets are thin this should be fine because you’ll be cooking more with sauce and cheese. If thicker cutlets you may need a bit more time.

Top each piece with sauce and shredded mozzarella. ( you can spread a little sauce in between chicken as well . I served over spaghetti and needed a little more sauce so this was enough. If you want you can heat up extra sauce in a small saucepan for spaghetti. Bake for another 10-20 minutes till chicken is 160 degrees when checked with meat thermometer and cheese is melted and bubbly. I like my cheese just slightly browned so you can turn to broil for a minute or so depending on your broiler but be careful you don’t want to burn the whole thing.

I served over pasta and had enough sauce for us.

That’s it folks — enjoy!

Clams and Spaghetti–White Sauce

I made this recipe for the first time back in 2014 and highly recommend it for a quick and delicious meal.IMG_6286IMG_6287 (2)IMG_6283 (2)It is super easy and not intimidating at all. I got the recipe from Jessica’s Seinfeld’s book The Can’t Cookbook even though I know how to cook.  

Pick up Clams at your local fish store and just follow instructions for cleaning. I love Clams and Spaghetti and this is so easy to make you won’t believe it!

Perfect for Christmas dinner or any time —

http://www.doitdelicious.com this is Jessica Seinfeld’s site or you can just buy the book “The Can’t Cookbook”.

Ingredients:

2 dozen littleneck clams

3 cloves garlic

app. 1/4 cup chopped fresh flat-leaf parsley

1 cup dry white wine, such as Sauvignon blanc. I actually used what I had open which was a Pinot Grigio

1 box spaghetti, you can use any kind of spaghetti you like. I actually had bucatini style in the house so that’s what I used

3 Tbsp. Olive Oil

*if you’d like a little heat and you should know your audience because mine didn’t so I put on table for those who wanted to add heat. If you are adding add app. 1/4 tsp. crushed red pepper

Kosher Salt , to taste. I have to say I added almost no extra salt at all.

You’ll need a large deep pot to cook clams in. I used my Le Creuset Pot.

Directions:

I placed my clams in a colander and I put the colander in a larger bowl in the sink and I filled the bowl with cold water. I let the clams soak for a few minutes, then rubbed with my fingers to dislodge any dirt; then drained the clams. Throw away any clams that remain open or were smashed. ( my clams were pretty clean) I purchased them clean from Whole Foods. Any Fish Store will clean them for you, but always run them through this process to remove any residual sand, etc.

Smash the garlic and chop it . Chop the Parsley. Measure the Wine. Place all your ingredients near to the stove.

Cook Pasta according to directions on box.

Place a large pot on the stove and turn the heat to medium. Pour in 2 Tbsp. of Olive Oil until it heats up and shimmers ( a few minutes) Add chopped garlic to the pot, and cook , stirring , for at least a minute, until you can actually smell the garlic breaking down. Don’t Burn!!!! Now add the wine and the clams and cover the pot with a tight-fitting lid and you’ll want a fairly high flame, probably medium-high . Cook clams until they open, I probably cooked for about 10 – 12 minutes. Looked so beautiful! Add the parsley and the red pepper now if you’re using. Throw away any unopened clams, they are no good.

Once pasta is al dente and drained I transferred to a large serving bowl and added 1 Tbsp. of Olive Oil to pasta, top with clams. Sprinkle if you’d like a tiny bit of coarse salt now if you feel it needs it. I did not need to add any additional salt or pepper. Adjust to your taste.

Amazing!!!! and did I mention Super Easy!!!!!

Pure Wow Dump Cake aka Chocolate Bundt Cake

IMG_5877 pre glaze
IMG_6406 Heavier Type Glaze–same glaze just waited till cake was completely cooled down for a few hours. Yum!
IMG_5879 post glaze but most of the glaze will disappear into the cake unless you make a heavier frosting type glaze.

IMG_5875  If you’re looking for a last minute easy delicious cake for the holidays this could be the one. I love a great bundt cake and I love that they are now calling Bundt Cakes Dump Cakes. You really just throw it all together and bake it! It’s so easy anyone can do it and look good doing so. I got this particular Dump Cake from a blog I love to follow–Pure Wow so that’s why the name pure wow dump cake. Originally posted a few years back and am re-posting for those of you who haven’t seen it.   I made a change in that I added my vanilla glaze because I love a good chocolate cake infused with a glaze. It’s not really a frosting and it sinks into the cake which just gives it a little more “pure wow ” factor.  I included recipe for my Vanilla Glaze.

Just go out and buy a really good Bundt Pan, it’s a worthwhile investment. You’ll also need a cooling rack while you’re at it.

Happy Holidays from my kitchen to yours.

http://www.purewow.com

Ingredients:

2 cups sugar

3/4 cup brewed coffee

2 ounces unsweetened chocolate

1/4 cup cocoa powder

1 stick unsalted butter

2 cups all-purpose flour

1 1/2 teaspoons baking soda

1 1/2 teaspoons baking powder

1 teaspoon salt

1 cup buttermilk ( I do buy low-fat buttermilk, if you can find it)

2 eggs — room temperature for baking always (unless otherwise specified)

1 1/2 teaspoons pure vanilla extract

Vanilla Glaze Ingredients:this is totally optional

2/3 cup of confectioners sugar

4 teaspoons whole milk ( and maybe a touch more)

1 teaspoon vanilla extract

Directions:

Preheat the oven to 350 degrees.

Grease a Bundt Pan with non-stick spray ( I love Baker’s Joy)

In a medium size heat safe bowl, combine the sugar with the coffee, chocolate, cocoa powder and butter. You can heat in the microwave or on the stove top over a pot of simmering water ( about 5 minutes) that’s what I do. I mix occasionally until the butter and the chocolate are fully melted and the sugar dissolves.

In a large bowl, whisk the flour with the baking soda, baking powder, and salt to combine. Add the chocolate mixture to the dry ingredients and mix to combine. I let the chocolate mixture cool just a touch first.

Now add the buttermilk, eggs and vanilla and mix with a spoon until the batter is smooth and fully combined.

Pour the mixture into the prepared bundt pan and bake until a toothpick inserted into the center comes out clean, 40- 50 minutes. I let the cake sit for at least 15 minutes and while it’s still warm I inverted it onto a cooling rack ( which is essential to baking , so if you don’t own one get one)

I let the cake cool completely before glazing it. The glaze will melt right into the cake if you do too early. This cake was super light and super moist. I served with raspberries/strawberries and it would be awesome with some home-made whipped cream.

Saucy Stuffed Shells – Baked and Meatless

Shells 007
Shells 009

  I just love a baked pasta — nothing like it for good old fashioned comfort food. This recipe is delicious and perfect comfort food for those cold winter nights. I wanted a crowd pleaser that was vegetarian and something that can easily be made ahead and frozen and that would appeal to both kids and adults equally.

     I served with a salad with my Homemade Maple Syrup Salad Dressing ( see on blog) and it was really pretty awesome. Took a few hours to prepare, mostly because I made my own sauce ( Sunday night sauce) but feel free to use a jar of prepared sauce if you’d like. This is a perfect meal to make ahead of time, and just pop into oven.

*This dish will stay fresh in the freezer for up to 3 months. Assemble the shells with the cheese and cover tightly and freeze. When you’re ready to eat, you can bake from frozen but be sure to add another 30 minutes to the cooking time. You can also freeze individual sized portions of leftover shells that have already been cooked. Reheat previously baked shells in the microwave in 90 second intervals until heated through. 

Perfect for Christmas and New Years.

Of course if you love it with meat you can make a meat sauce and follow same directions.

Happy Holidays to all — and visit me on Instagram @cookingwithcandi

Ingredients:

1 box Jumbo Shells ( you won’t use all but a lot of them break, etc.)

1 lb. Ricotta ( I used Part Skim)

1 Egg

1 lb. Mozzarella Shredded ( I used Part Skim) if you can obtain fresh mozzarella and shred it that would make it even better! whatever works for you

1 cup grated Parmesan ( any kind you like)

1/4 cup chopped flat leaf parsley

Salt and Freshly Ground Black Pepper

*marinara sauce or any red sauce I made my own and use my own recipe. If buying sauce and there are some delicious good sauces out there, you’ll need at least 1 large jar of Sauce and my go-to if not using my own is Raos Marinara.   It’s nice to have a little extra sauce in case you need it when you re-heat the stuffed shells. 

Directions:

Preheat oven to 375 degrees.

Prepare Pasta , cook for between 12 and 15 minutes, you’ll want them soft but not undercooked at the center. Drain pasta and cool for easy handling.

Combine ricotta, 1/2 of the mozzarella, 1/2 of the Parmesan, parsley and egg in a bowl. Taste for Salt and Pepper.

When shells have cooled down, fill them with rounded spoonfuls of cheese mixture and arrange them seam side down in casserole dish. I used a 9 x 13 Pyrex and spray with cooking spray. Top Shells with remaining sauce and remaining mozzarella and grated cheese. Place shells in very hot oven . You can turn on broiler for last few minutes , it should be slightly browned and bubbly. Let cool for a few minutes before serving.

Delicious!

Bolognese Sauce — Turkey or Beef

I must say Pasta is probably my most favorite food to eat. Bolognese sauce is one of my most favorites and this is my easy version.  There are different variations of this recipe that I use. One is with beef and pork sausage, another is dark meat turkey with turkey or chicken sausage. I do use dark meat turkey because I think it is much more flavorful, it is ideal but if you really don’t want to use the dark meat use 1/2 white and 1/2 dark or all white meat it’s up to you . The only negative to this sauce is that it really needs 3- 4 hours for the sauce to cook down and if you want to shorten the simmer use crushed tomatoes and probably 2 hours would be fine. The longer the sauce cooks the more flavorful it will be.  This sauce would probably serve 4 nicely with 1 lb. of pasta. You can easily double it and freeze the leftover sauce. So nice to have it in the freezer and just have to make the pasta and you have a wonderful homemade meal. I have now started serving the sauce over shredded zucchini as well.  It is so delicious and you may feel a little bit better eating it over zucchini or spaghetti squash than noodles.  Pasta or Vegetable it’s pretty awesome. Look on my blog for Zucchini  Bolognese.  And  it  freezes  beautifully.

Should serve 6-8 and it freezes beautifully so put sauce in the freezer for the next time.

Ingredients:

6 Tablespoons Olive Oil, plus more if necessary

1- 1 1/2 lbs. Italian style Turkey or Chicken Sausage, removed from casings. You can also mix in hot or sweet Italian pork sausage if you don’t mind using the pork. I think the pork has the best flavor — just saying

1 1/2 pounds ground Turkey ( I used dark meat ) or 1 lb. ground beef — I don’t love to cook with the lean version because it’s very dry so if using any ground meat use 85/15 at least.

Kosher Salt

Freshly Ground Black Pepper

2 medium yellow onions, peeled and finely diced ( app. 2 cups)

3 large cloves garlic, peeled and minced

2 28 oz. cans whole peeled tomatoes with their juice or you can used diced tomatoes which break down much quicker but you’ll definitely be adding liquid to that. Just keep an eye on it. If you’re in a real hurry and don’t have time for a 4 hour simmer use 2 cans of crushed tomatoes.

1/3 cup tomato paste

1 box. Rigatoni ( or any other macaroni you like ) or spaghetti or if you like use *shredded zucchini or *spaghetti squash

Grated Parmesan Cheese for serving

Directions:

Heat 3 tablespoons of the olive oil in a large heavy pan over medium high heat. ( I use my Le Creuset ) Add the sausage meat and break it up as it cooks, turning now and then, until browned all over, about 10 minutes. Remove the sausage with a slotted spoon to a bowl and set aside, add the ground turkey to the pan along with a good pinch of salt and a few fresh grind of pepper. Cook the meat stirring here and there, for 10 minutes as well, till meat is nicely browned. I remove and put in bowl with the sausage which was set aside. Add another 3 tablespoons of olive oil to the pan and add the onions and garlic. Cook until onion breaks down and gets soft, another good 10 minutes. Add the tomatoes and their juice along with 1/2 cup of water. ( You may need more water as you go) Add the sausage and ground turkey, stir the sauce well. Bring the sauce to a boil, season to taste with salt and pepper and turn the heat to low. Cover almost completely with a lid (allowing a little steam to escape) and gently simmer for 4 hours. You may want to add splashes of water if sauce is drying out. After 2 hours I added the 1/3 cup of Tomato Paste, and replace lid and continue simmering for 2 more hours. I added water as it cooked, you’ll have to judge for yourself how much water you add. I added 1/4 cup at a time. The longer this sauce cooks for the better it is.  You will have to continually stir and check for water which I do at least once an hour if not more often. Also a splash of red wine works well here too if you have an open bottle of a medium dry red wine — chianti or malbec or pinot — you know what I mean.

When the sauce is ready for serving, bring a large pot of water and prepare pasta according to package directions. You may want to reserve a little pasta water if you still need to thin it out.

serve with sauce over the rigatoni ( or any pasta you like) with a nice grating of Parmesan.

Yum!

*so many stores now sell zucchini already shredded and it’s dry and ready to go.