Basic Corn Salad

It’s Summer (well almost)  and the living is easy –and the corn is delicious.  There are times I buy fresh corn but don’t feel like serving it on the cob even though it is perfectly delicious this way. This corn salad is a suggestion for you as a side dish with very little ingredients and pretty much all corn. I like to serve as a side dish in the summer because it can be made ahead and served at room temperature. It’s a most perfect side dish. It doesn’t get more basic or easier than this recipe.  My absolute go-to summer side dish. Super Easy.

Enjoy the rest of the summer and keep on Cooking with Candi.

Ingredients:

5-6 ears of corn , shucked

1/2 cup small diced red onion

3 Tablespoons cider vinegar

3 Tablespoons good olive oil

1/4 Teaspoon Kosher Salt – you can always add more salt after you finish and taste for salt

1/4 Teaspoon Freshly Ground Black Pepper the same applies for the pepper as for the salt

app. 1/2 cup cut up fresh basil leaves–use as much or as little as you like –it adds wonderful flavor

*add a few small cut up grape tomatoes for another variety on this

Directions:

In a large pot of boiling water, cook the corn for app. 3 minutes (just to let go of the starchiness) Drain and immerse in ice water to stop the cooking and set the color. When the corn cools down , cut the kernels off the cob , cutting close to the cob to get the whole kernel. I use a bundt pan to catch all the kernels.

Toss the corn kernels in a large bowl with the red onions, vinegar, olive oil, salt and pepper. Just before serving, toss in the fresh basil. Taste for seasonings and serve cold or at room temperature.

How simple and easy is this?IMG_5739

Cucumber Avocado Salad

Light and easy — Cucumbers and Avocado Salad with a light lime dressing. This side salad will disappear very quickly and you’ll be wanting more.

I made it without the green onion so feel free to add it or not it was just as yummy without. Just happen to have avocado and cucumber in the house but next time I will make sure to add a little green onion!

Ingredients:

2 English Cucumbers –Slice Cuke in 1/2 — scoop out seeds and slice or use any cucumbers you like I just like to remove seeds and cut smaller cukes into smaller pieces — it really doesn’t matter how you slice them up– if I use kirby type cucumbers (as pictured) I cut into smaller pieces — totally up to you– it’s all good — small Persians work well here and you’ll probably need 3 or 4 — I don’t scoop out seeds from the Persian cucumbers

1 large avocado pitted, peeled and cut into chunks or slices whichever you prefer

*1/3 cup green onion , chopped

2 Tbsp. Lime Juice from 1 medium lime

2 Tbsp. Olive Oil

1 tsp. Kosher Salt or Sea Salt

1/8 tsp. black pepper

Directions:

In a medium sized salad type bowl, combine sliced cucumbers , avocado and if you’re adding green onions.

Drizzle with lime juice, olive oil and season with salt and pepper to taste. I sliced cucumbers and dressing earlier than right before I served it added the avocado so it wouldn’t brown. The lime juice should prevent it from turning brown though.

That’s it and very delicious side salad .

Lime Shrimp with Corn and Avocado

IMG_8249 (2) IMG_8233 IMG_8228 (2)
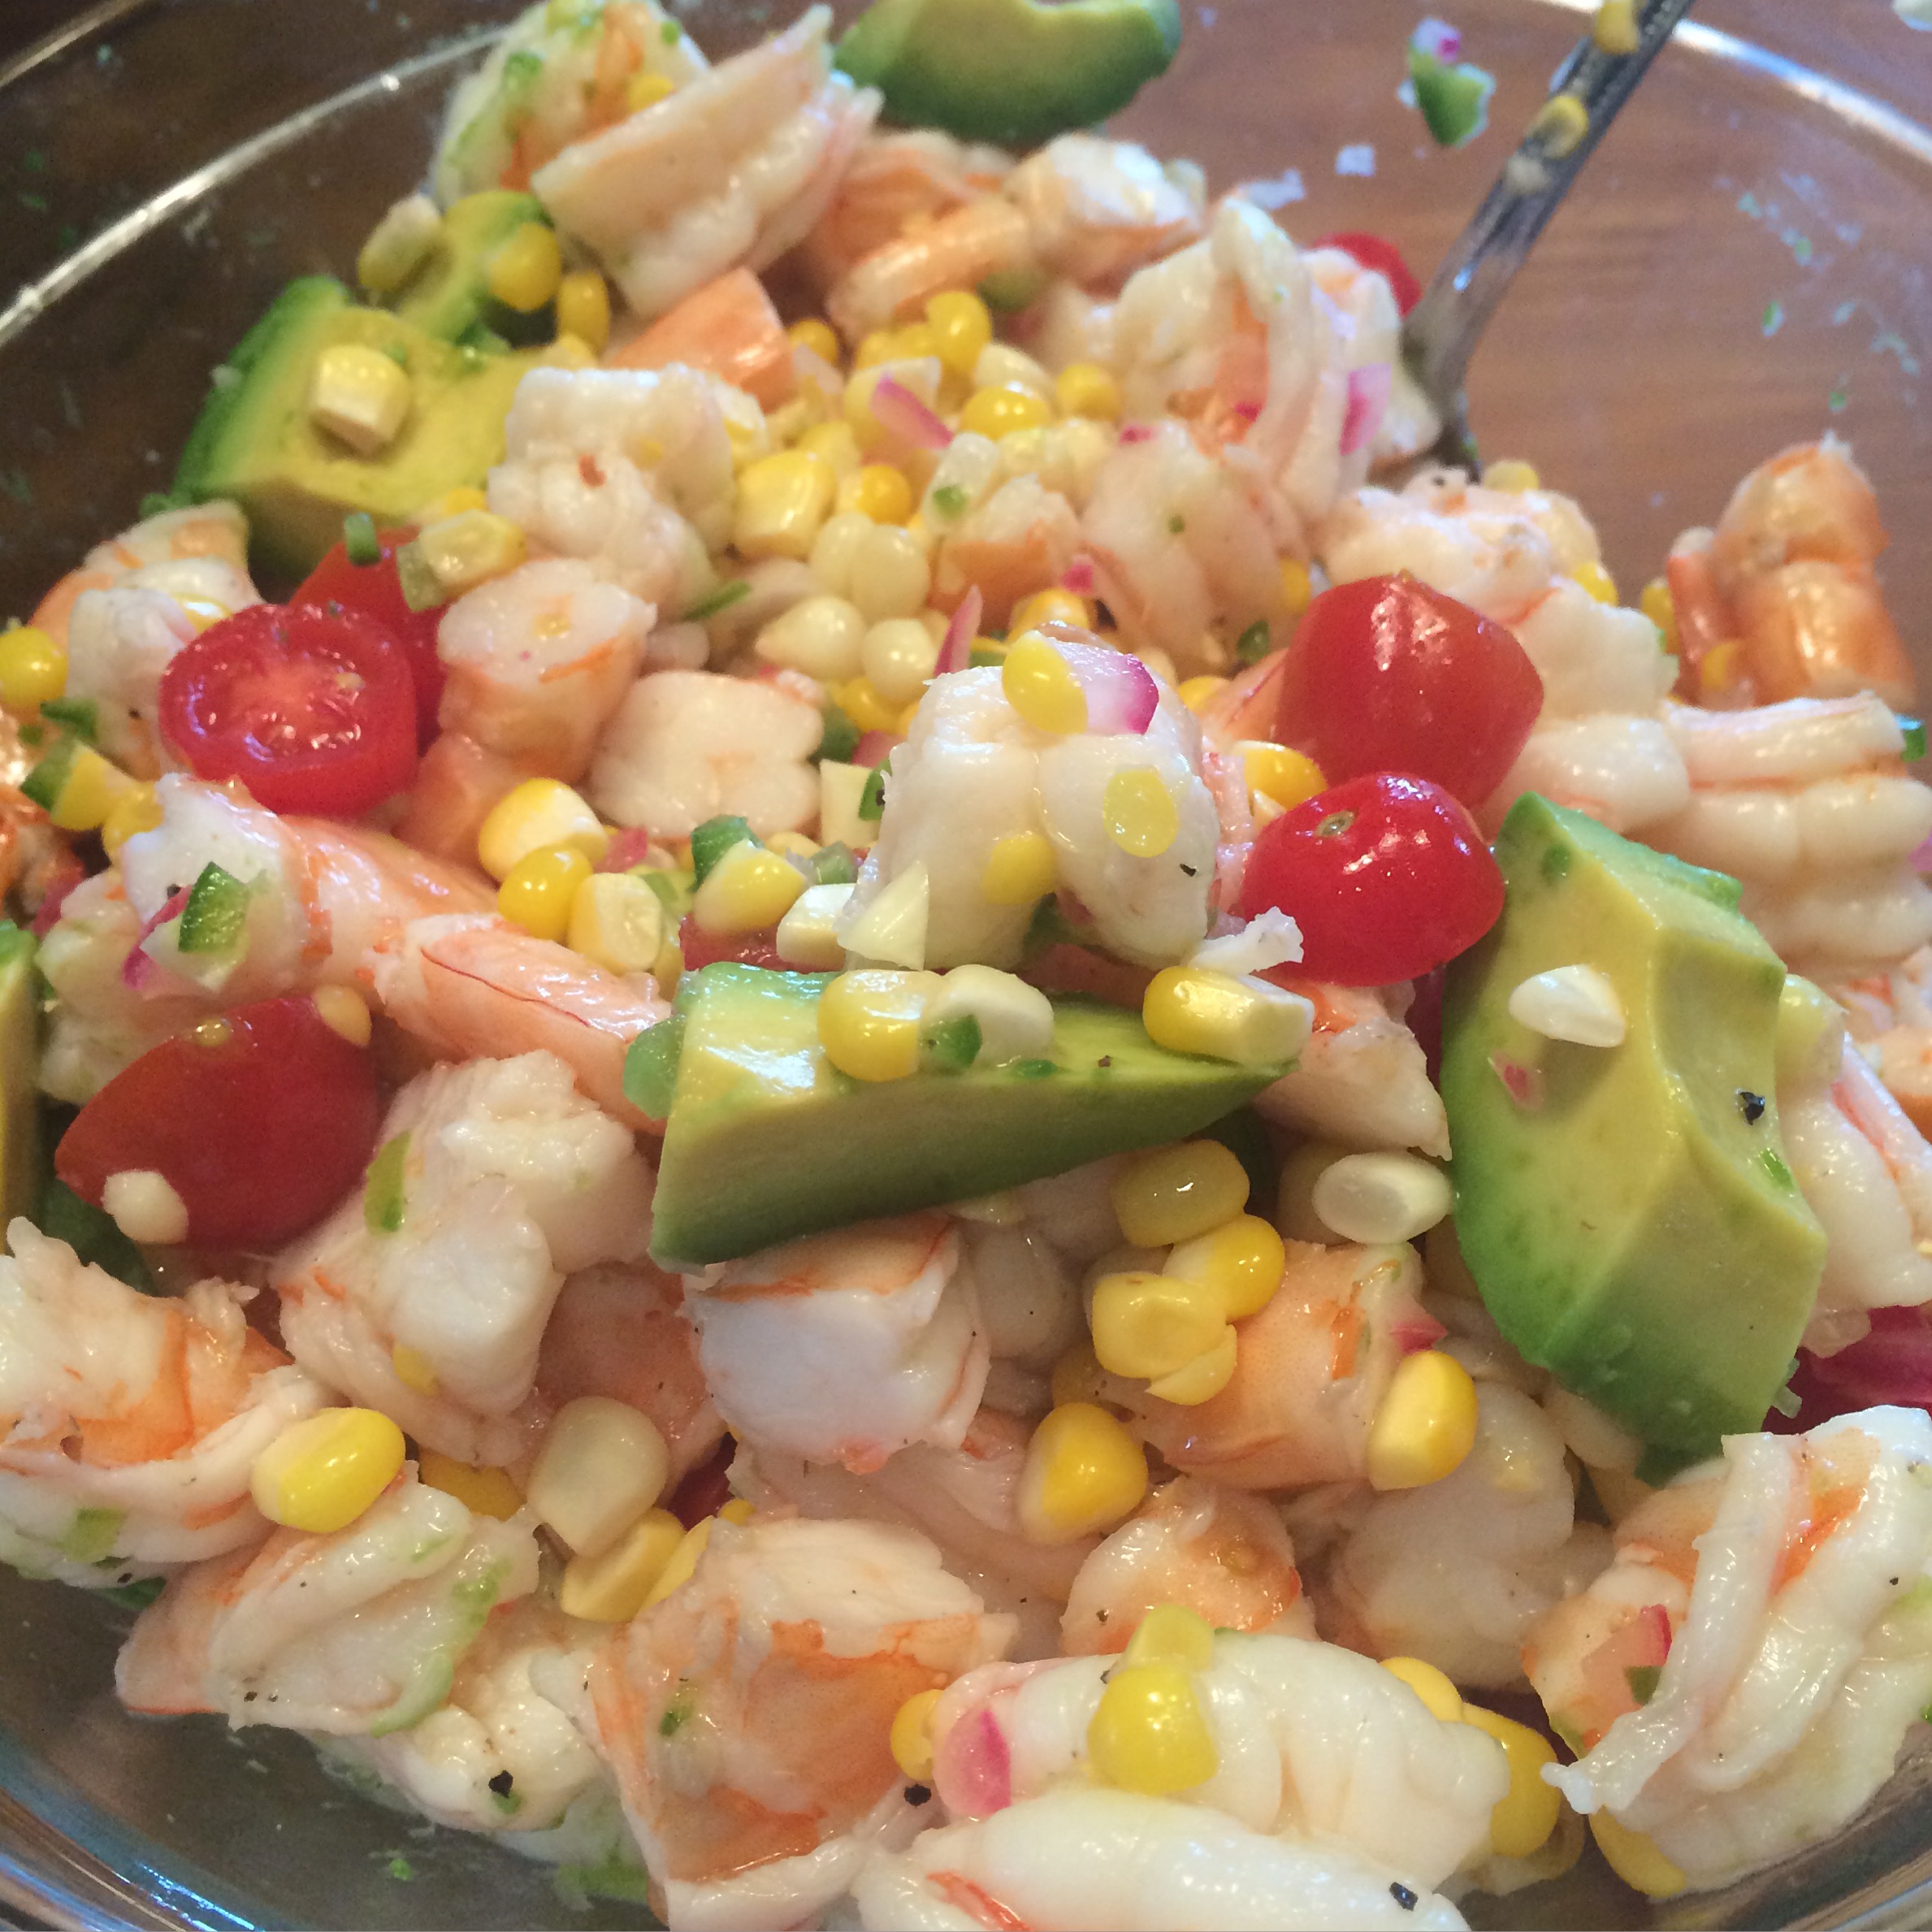
All I can say is Wow!!!! This is truly one of my most favorite recipes ever.   I cooked about a pound of beautiful shrimp and I wanted to use it in a delicious light salad incorporating some fresh corn and avocados. This salad has some of my most favorite ingredients in it.  I used fresh corn, fresh tomatoes, jalapeno, red onion, and shrimp! Limes are the secret ingredient here because they add all the flavor to this super light dressing.  This has got to be one of the healthiest most delicious salads.  Totally not fattening but filling because of the shrimp , corn and avocados. If you’re into these ingredients this is a must go to for summer entertaining. Light and Fresh , low in calories and so so easy to make.

If you like cilantro I would chop some up and add it, but a lot of people hate it so much I chose to not add. I removed all the seeds from the jalapeno and probably used 3/4 of a large one. One small seeded jalapeno is perfect and not hot at all. Be careful handling the peppers and the seeds,  I’ve taken to wearing surgical gloves to cut up the peppers.

This is a perfect salad just don’t add avocados till you’re ready to serve,  everything else can be assembled ahead of time. I put together in the morning of the day I was serving and then added my avocados right before I served. This is what I did.

Honestly one of my most favorite salads.

Happy Father’s Day!

Ingredients:

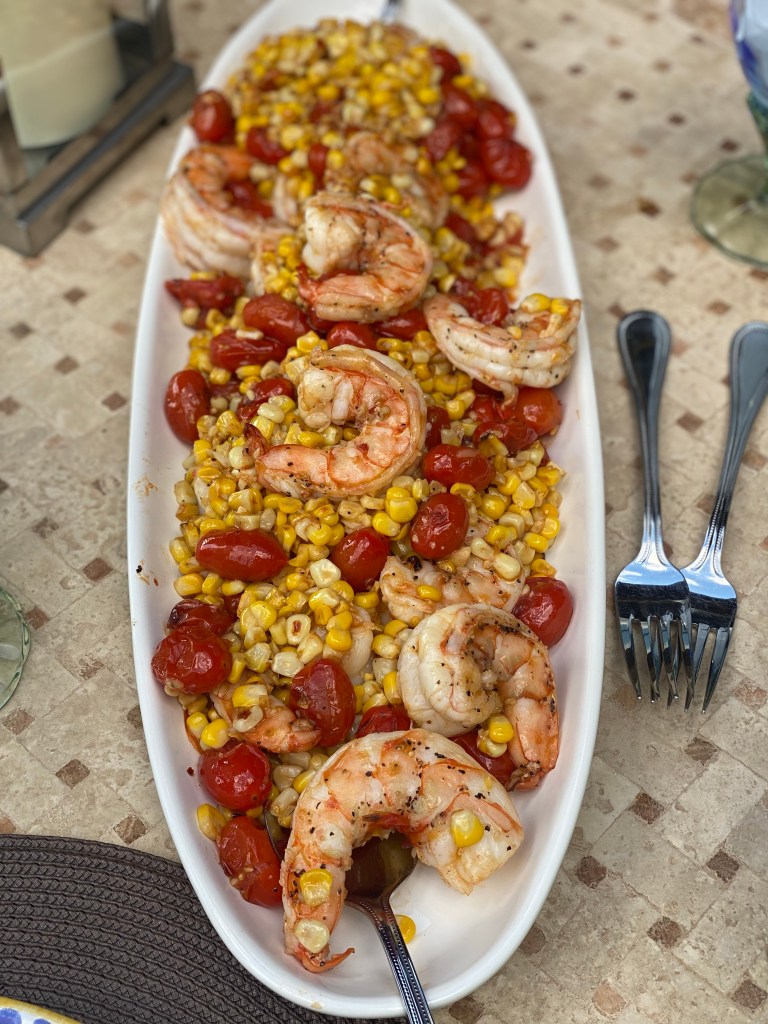
1 lb. cooked shrimp (after cooking it should be 1 lb.) I then cut it up into smaller pieces. I probably cut each shrimp into 4 pieces. Remember I used under 10’s. So that’s 10 shrimp to a pound. You want the shrimp pieces to be bite size but not too small.

1/4 cup chopped red onion

3 cobs of fresh cooked corn ( just put cobs in boiling salted water, bring to a second boil and remove and plunge into an ice bath) let corn cool and remove kernels from cobs.

2 limes-juiced , I use my juicer to juice because it’s tough with limes and you need as much lime juice as possible from 2 limes. I squeezed a third lime over at the end, but it’s probably not necessary. The citrus helps keep avocado from turning brown as well.

1 Teaspoon Olive Oil

1/4 teaspoon kosher salt

a few grinds on the pepper mill–to taste

I put in about 1/2 pint of small grape tomatoes, but you can eyeball if using larger tomatoes, I didn’t want tomatoes to over power the other outstanding flavors –if you prefer you can cut tomatoes in 1/2. I sometimes do this if I am not using the small grape tomatoes.

2 avocados–sliced and cut into cubes

1 small-medium jalapeno–seeded and minced

*a handful of chopped fresh cilantro if you love it

Directions:

  •  Cook shrimp- peel and de-vein or buy it cleaned and de-veined whichever works best for you. I like cooking my own shrimp but you can certainly use a “cooked shrimp” readily available in most markets. I cut shrimp up into bite size pieces but not too small.

Cook corn and allow to cool down. When corn is cooled completely down I cut kernels off.

In a separate small bowl, place chopped red onion, lime juice, olive oil and salt and a little black pepper. Whisk together .

I placed Shrimp, Corn, Jalapeno and Tomatoes into a large bowl. About an hour prior to serving I poured the lime juice combination over the bowl of Shrimp.

Mix well and allow to sit and marinade. You’ll want to mix a few times before adding avocados to circulate the marinade.

Taste for Salt and Pepper but it should be good.

I added the 2 Avocados right before serving and squeezed a little more lime over it, probably not necessary but I did. If you’re adding the cilantro go ahead and add it now.

That’s it–perfect summer salad.

Chicken thighs with Hot Honey and Lime

I used bone-in skin on but you can easily make this with boneless skinless chicken thighs just watch your timing it may vary. Chicken thighs pack a lot of flavor and this was a perfect weeknight meal using a few pantry staples. This is a spicy chicken recipe and if you don’t like it “hot” and spicy it’s not for you. Original recipe is from. Vallery Lomas on NYT cooking site. I made a few changes to suit myself but basically followed the recipe. I would maybe try olive oil instead of butter next time but this was delicious. I would also double down on the sauce —

You can serve hot out of oven with rice/potatoes a vegetable or Cole Slaw or any salad to compliment this tasty dish.

Ingredients:

3lbs. bone-in skin on chicken thighs

Kosher Salt and Freshly Ground Black Pepper

1/2 teaspoon onion powder

1/2 teaspoon garlic powder

2 Tablespoons unsalted butter melted

2 Tablespoons Hot Sauce — I used Cholula Hot sauce

1 lime for zesting and juicing

2 Tablespoons mild honey

Directions:

Pre-heat the oven to 450 degrees. I sprayed a baking sheet with Pam cooking spray for easier clean up or you can cover with foil whichever you prefer.

Pat chicken thighs dry and then season all over with spices — Salt , Pepper, Onion Powder and Garlic Powder — fresh garlic will burn here as oven is very hot

Arrange the chicken skin side up then post until browned for 20 minutes.

While the chicken is roasting, combine the melted butter and hot sauce and whisk to combine.

transfer 1/2 of it to a separate bowl and set aside for later. After the chicken has roasted for 20 minutes, brush the chicken all over with the butter mixture. Continue to roast until chicken is golden brown and cooked through, probably 10-15 more minutes — keep an eye on it after 10 minutes. Remove the chicken from the oven when done.

Zest the lime, then cut in 1/2. Add the honey and zest to the remaining butter-hot sauce mixture and whisk to combine, then brush over the hot chicken thighs and squeeze the lime over the chicken.

Serve immediately.

Pan roasted chicken with herb tomatoes

I love to use fresh tomatoes and herbs in my cooking, they are sweet and the roasting just intensifies their sweet flavor. I try to use fresh ingredients whenever possible, and during the summer there is so much to choose from. This is a light dish cooked in the oven, I used dry Herbes de Provence which is something everyone should have in their spice drawer. I used fresh tarragon which gave this dish amazing flavor, if you’re not into the tarragon flavor or just can’t get it I am sure fresh basil will work here just fine. I served over jasmine rice. This is a keeper for sure. I got it from Bon Appetit magazine which has a treasure trove of delicious recipes.

*for just the two of us I cut the tomatoes to 1 lb. and the chicken to 1 lb.

Ingredients:

1 1/2 lb.-2 lb. cherry tomatoes or any small tomatoes

6 Tbsp. olive oil, divided

1 Tbsp. herbes de Provence

kosher salt

freshly ground black pepper

1 Tbsp. Worcestershire sauce

1 -2 lb. skinless, boneless chicken breasts

1 small shallot, minced

2 Tbsp. red-wine vinegar

3 Tbsp. flat-leaf parsley leaves

3 Tbsp. fresh tarragon leaves

Directions:

Preheat oven to 450 degrees. Combine tomatoes, 2 Tbsp. oil and herbes de Provence in a large bowl. Season with some salt and pepper, toss to coat the tomatoes. Heat 1 tbsp. oil in a large heavy ovenproof skillet , carefully add tomatoes to pan, oil may splatter. Transfer skillet to oven and roast tomatoes, give tomatoes a turn in about 10 minutes, you want tomatoes to burst and release some of their juices, total time should be 15 – 20 minutes. Remove from oven and transfer to a bowl and drizzle with Worcestershire sauce.

Meanwhile, season chicken with app. 1 tsp. kosher salt and pepper. Heat 2 Tbsp. oil in a large ovenproof skillet over medium high heat. Sear chicken on both sides until golden brown, about 4 minutes on each side. Transfer pan to oven and roast chicken until cooked through, another 10 minutes or so. Transfer chicken to a cutting board and let rest .

Add remaining 1 tbsp. oil to same skillet, heat over medium heart. Add shallot and cook, stirring often , until softened , about 3 minutes. Deglaze pan with vinegar ( just put in vinegar) scraping up whatever browned bits are in the bottom of the pan, then add tomatoes and their juices and bring to a simmer , sauce will begin to thicken up, about 2 minutes or so. Season sauce to taste with salt and pepper to your liking.

Slice chicken, divide among plates. Spoon tomatoes and sauce over, garnish with fresh herbs ( tarragon and parsley) . I served over rice (any kind you like) but it will stand on it’s own. Roasted Potatoes would also work well here.

Summer Bolognese

I call this summer bolognese because it’s lighter than my regular bolognese recipe . It’s made with fresh tomatoes which makes all the difference. I made this sauce the other night and I have to say it was just perfect . It cooked up in no time ( about 1/2 hour) and tasted fresh and delicious. Of course if you would like it vegetarian just omit the chicken. I wanted the protein so added a pound of ground chicken you can also use turkey and if you want ground beef. This time I kept it fairly light and used ground chicken. And you know what? this pasta works all year round. It’s delicious.

*this will probably serve 4

Ingredients:

1/2 cup extra-virgin olive oil

8 garlic cloves– minced– I use a mini food processor always for mincing garlic — just makes it easy

1 lb. ground chicken, turkey or beef

Kosher Salt to taste

1/4 cup dry white wine

4 Tbsp. tomato paste if you use double concentrate use 2

1 lb. cherry tomatoes or little grape tomatoes

12 oz. Bucatini or any spaghtetti you like or rigatoni or penne would work here as well

about 1 cup of Pasta Water — which you may or not need

Finely Grated Parmesan for serving

Directions:

In a large skillet or pot heat oil then add garlic and cook till softened ( a few minutes) don’t brown it just soften it — sometimes you’ll need to turn off stove and let it just cook for a couple of minutes to soften.

With pan at medium high add chicken and cook, breaking up chicken for about 5 minutes or until chicken is no longer pink and fully cooked.

Add wine and reduce heat to medium low. Continue breaking up meat till it’s small pieces until wine is evaporated– another 5 minutes or so. Add tomato paste and cook, stirring till absorbed into chicken and cook for another few minutes.

Add tomatoes and let it cook down, stir to coat the tomatoes with the mixture — allow the tomatoes to cook till they are ready to burst — about 5 minutes. I used a masher ( see photo) and I smashed down on the tomatoes and burst all of them. You can leave some whole if you like but I didn’t because this is where the sauce will come from. Stir occasionally on medium low but don’t allow to burn. Allow sauce to thicken for about 5 minutes.

Meanwhile cook the pasta in a large pot of salted water until very al dente ( at least that’s how we like it)

Reserve about 1 cup of cooked pasta water because you may need it if sauce is too thick.

Taste sauce for salt and add accordingly. I probably added a teaspoon or more of Kosher Salt — and some crushed red pepper but that’s totally optional everyone’s taste is different for salt so add to your liking.

Drain pasta and I used tongs and transferred pasta to pan with sauce. Tossing it in and cooking at a low simmer the pasta and the sauce thickened and I added a little pasta water at a time till I reached a perfect consistency . I probably used about 1/2 cup of pasta water. ( which also contains salt so consider this and don’t over-salt sauce — you can always add salt but it’s tough to take away if you make it too salty. The sauce was creamy and delicious .

Remove from heat and if you’d like add fresh basil.

Transfer to pasta bowls and top with Parmesan.

Salmon with a Mustard Glaze

Here is another delicious Salmon recipe and so super easy. This is a light easy to make dinner perfect Spring Time Meal.  I made this for dinner last night and it was ready in no time and tasted truly delicious.It is light and easy, it doesn’t get much easier than this. The whole recipe took less than 1/2 hour to prep and cook! Depending on how thick your salmon is it could take no more than 10 minutes to fully cook right in the oven. Very few ingredients and a perfect dinner casual enough for just you and your family and can be bumped up to serve to guests. This is a winner.  Almost any side dish will do alongside this.

Roasted Brussels on another night were also perfect.

img_3593

Enjoy!

Ingredients:

3 Tablespoons Olive Oil

1 heaping Tablespoon Dijon Mustard

1 Tablespoon fresh lemon juice (app. 1 average size lemon)

Kosher Salt and Freshly Ground Black Pepper ( about 1/4 tsp. of each)

4 pieces Salmon fillets ( app. 6 oz. each) with skin on

*sprinkle a little fresh thyme if you’d like!!!

Directions:

Preheat the oven to 425 degrees. Spray a baking dish with cooking spray to facilitate removal of fish not to mention clean-up.

In a small bowl, mix together olive oil, mustard, lemon juice, and 1/4 teaspoon each kosher salt and freshly ground black pepper. I used a mini whisk and it came together beautifully.

Place Salmon, skin side down in a baking dish , and spoon mustard glaze over each piece of fish. Bake until salmon is just cooked through and no longer red, 6 – 10 minutes depending on the thickness of your fillet. I added a sprinkle of some fresh thyme right before I cooked and it added some more delicious flavor, this is totally optional.

*also now that I am an air fryer convert I would use that for this recipe as well. Probably 7-8 minutes as well –check on it after 7 depending on your air fryer and depending on thickness of salmon.

Voila! done and enjoy. I served this time with a delicious lentil side dish.

Blackberry Cobbler

before cobbler gets baked , with biscuit topping

before cobbler gets baked , with biscuit topping

finished product - Yum

finished product – Yum

photo (3) It’s the start of summer and it brings me to this delicious dessert filled with the most delicious in season blackberries.  I have posted numerous blueberry cobblers but this one has to be my personal favorite made with Blackberries.  It’s a real deal Old Fashioned Cobbler.  You can really make this with any fruit but I love Blackberries while they’re sweet, plump and delicious! Blueberries and Red Raspberries will also work  well. Or you can mix up the fruits!  I just love blackberries when they’re in season and can’t get enough of them so this time of year I go with just blackberries.

Enjoy!

Ingredients:

1 pound or about 3 1/2 – 4 cups blackberries , cleaned , rinsed and dried

1 tablespoon arrowroot or cornstarch

2 tablespoons fresh lemon juice

1 cup all-purpose flour

3/4 cup sugar, I use regular granulated sugar for cobbler inside and on top I use turbinado sugar. 1/2 cup granulated sugar for inside cobbler and 1/4 cup turbinado sugar for topping

1 teaspoon baking powder

1/4 teaspoon salt

1/2 cup whole milk or you can use low-fat buttermilk

3 tablespoons unsalted butter, melted

3/4 cup boiling water

Directions:

Preheat the oven to 350 degrees.

In a bowl I place the clean blackberries that I’ve washed and dried. I sprinkle them with the arrowroot and lemon juice and mix gently  Set aside.

In a medium size bowl, I sift the flour, 1/2 cup sugar, baking powder and salt. Add the milk and butter. Stir until just combined, don’t over stir, it shouldn’t be smooth. Then by the mound-ful drop dough onto blackberries. I spread around a little bit but don’t completely cover the top of berries. ( see photo) the dough will spread a little once it’s baked.

Pour boiling water over the dough and fruit before you bake it. Sprinkle top with 1/4 turbinado sugar or regular sugar. Raw sugar or turbinado sugar makes it a little crunchier topping. I prefer it to regular sugar for a topping.

*if you are preparing in advance which is what I did today. Prepare up till the boiling water and sugar part. Refrigerate for up to 2 days , bring to room temperature then pour boiling water and top with sugar and bake. I baked for app. 45 minutes till dough gets browned and crackly looking and blackberries are bubbling. ( see photos)

Remove from oven and let sit but serve while it’s still warm with ice-cream for extra added deliciousness!

Happy Summer from my kitchen to yours.

Shrimp with Tomatoes and Corn

I saw this recipe on the New York Times cooking site by Ali Slagle. One of my most favorite cooking sites. I made a few changes to recipe and would highly recommend checking out this recipe. Sometimes I serve with rice but this recipe stands on its own as a meal. You can use pasta or bread as well. If you love shrimp and corn and tomatoes this one’s for you.

Perfect in the summer months with all that sweet fresh corn out there. Grab some fresh corn and use it in this wonderful dish.

Enjoy!

Ingredients:

1 pound large shrimp, peeled and deveined — I used under 12 ( meaning 12 to a pound) Mexican White Shrimp– this is the shrimp I prefer but use what you can get and like

Kosher Salt and Pepper 

2 Tablespoons Extra-Virgin Olive Oil

1 pint cherry or grape tomatoes — there are so many variations out there now– I used these tiny little grape tomatoes but would use different colors as well ( heirloom grape / cherry tomatoes)

2 cups fresh or frozen corn– app. 4 ears fresh corn

5 garlic cloves–minced

1/2 teaspoon red-pepper flakes — we like the heat use at your own discretion– this was not spicy

1/4 cup dry white wine

2 Tablespoons fresh lemon juice from 1 large lemon

2 Tablespoons unsalted butter

*extra lemon wedges and cut up fresh basil for serving–totally optional

Directions:

Pat the shrimp dry and season with salt and pepper. In a large skillet heat the olive oil over medium high heat. Add the shrimp and cook until pink and lightly golden in spots, app. 1 – 2 minutes on each side. Remove with slotted spoon to a plate and set aside. You will finish cooking through at the end and you don’t want shrimp to over-cook.

Add the tomatoes to the skillet, you can season with a little salt and pepper if you’d like and cook stirring a few times just till the tomatoes to start to blister, 3-4 minutes. Add the corn, season with salt and pepper, and cook, stirring a few times to incorporate. Tomatoes will start to burst and the corn is golden , another 3- 4 minutes.

Add the minced garlic and red-pepper flakes and cook stirring another few minutes. 

Reduce heat to medium and add the wine and lemon juice, stirring any brown bits from the bottom of the pan. Cook until nearly evaporated, then add the butter and stir until melted . Add back the shrimp and stir until warmed through and shrimp is fully cooked , another 2 minutes or so. Stove was on medium-low.

Taste for Salt and Pepper . Add some fresh Basil if you’d like and you can serve with some extra lemon wedges .

Air Fryer Salmon in 15 Minutes

Last night I made this salmon and I have to say it was so delicious — served it up with a side salad and Trader Joe’s vegetable fried rice — easy peasy and delicious — all you need is an air fryer and some very basic spices. Perfect and quick and delicious! This is a very loose recipe so use as much or as little of the spices as you like. You can use whatever spices you like as well– the paprika gives it a nice color though.

Not much more to say so here’s what I did.

Ingredients:

I used 3 Salmon Fillets because I like to have a piece left over for the next day so as many filets as you like

Dijon Mustard or you prefer a different mustard use what you like I love Dijon and I slather it on

Paprika

Garlic Powder

Kosher Salt

Black Pepper — I prefer freshly ground but use what you have

Olive Oil Spray

Directions:

Pat salmon filets dry – this is important so that toppings stick to the salmon

I place salmon on a small cookie sheet and slather the salmon tops with dijon mustard use a flat knife or brush — see photo

I then sprinkle each of the spices over the salmon — eyeball it and don’t go too crazy with any one spice but be generous with garlic powder and paprika. Easy on the kosher salt just sprinkle and a few grinds of the black pepper. I then finish with a quick spray of olive oil on top to keep the salmon moist .

I like to pre-heat my air fryer so I set it to 400 and pre-heated for 5 minutes ( optional)

I can only get two filets into my air fryer at a time — I cooked the first two skin side down at 400 for 8-10 minutes depending on how you like your salmon, 9 minutes should be perfect but every air fryer is a little different. Then repeat with the rest of the salmon. Salmon doesn’t have to be served piping hot so you can wait another 9 minutes to serve. The salmon skin gets crispy when you pre-heat the air fryer which I find perfect. Pre-heating is really optional and you can remove the skin after cooking if you prefer — I don’t. The salmon gets a beautiful crust and the mustard gives it delicious flavor.

*obviously the size and thickness of your salmon will impact cooking time so always best to undercook the salmon and add time rather than over cook the salmon.