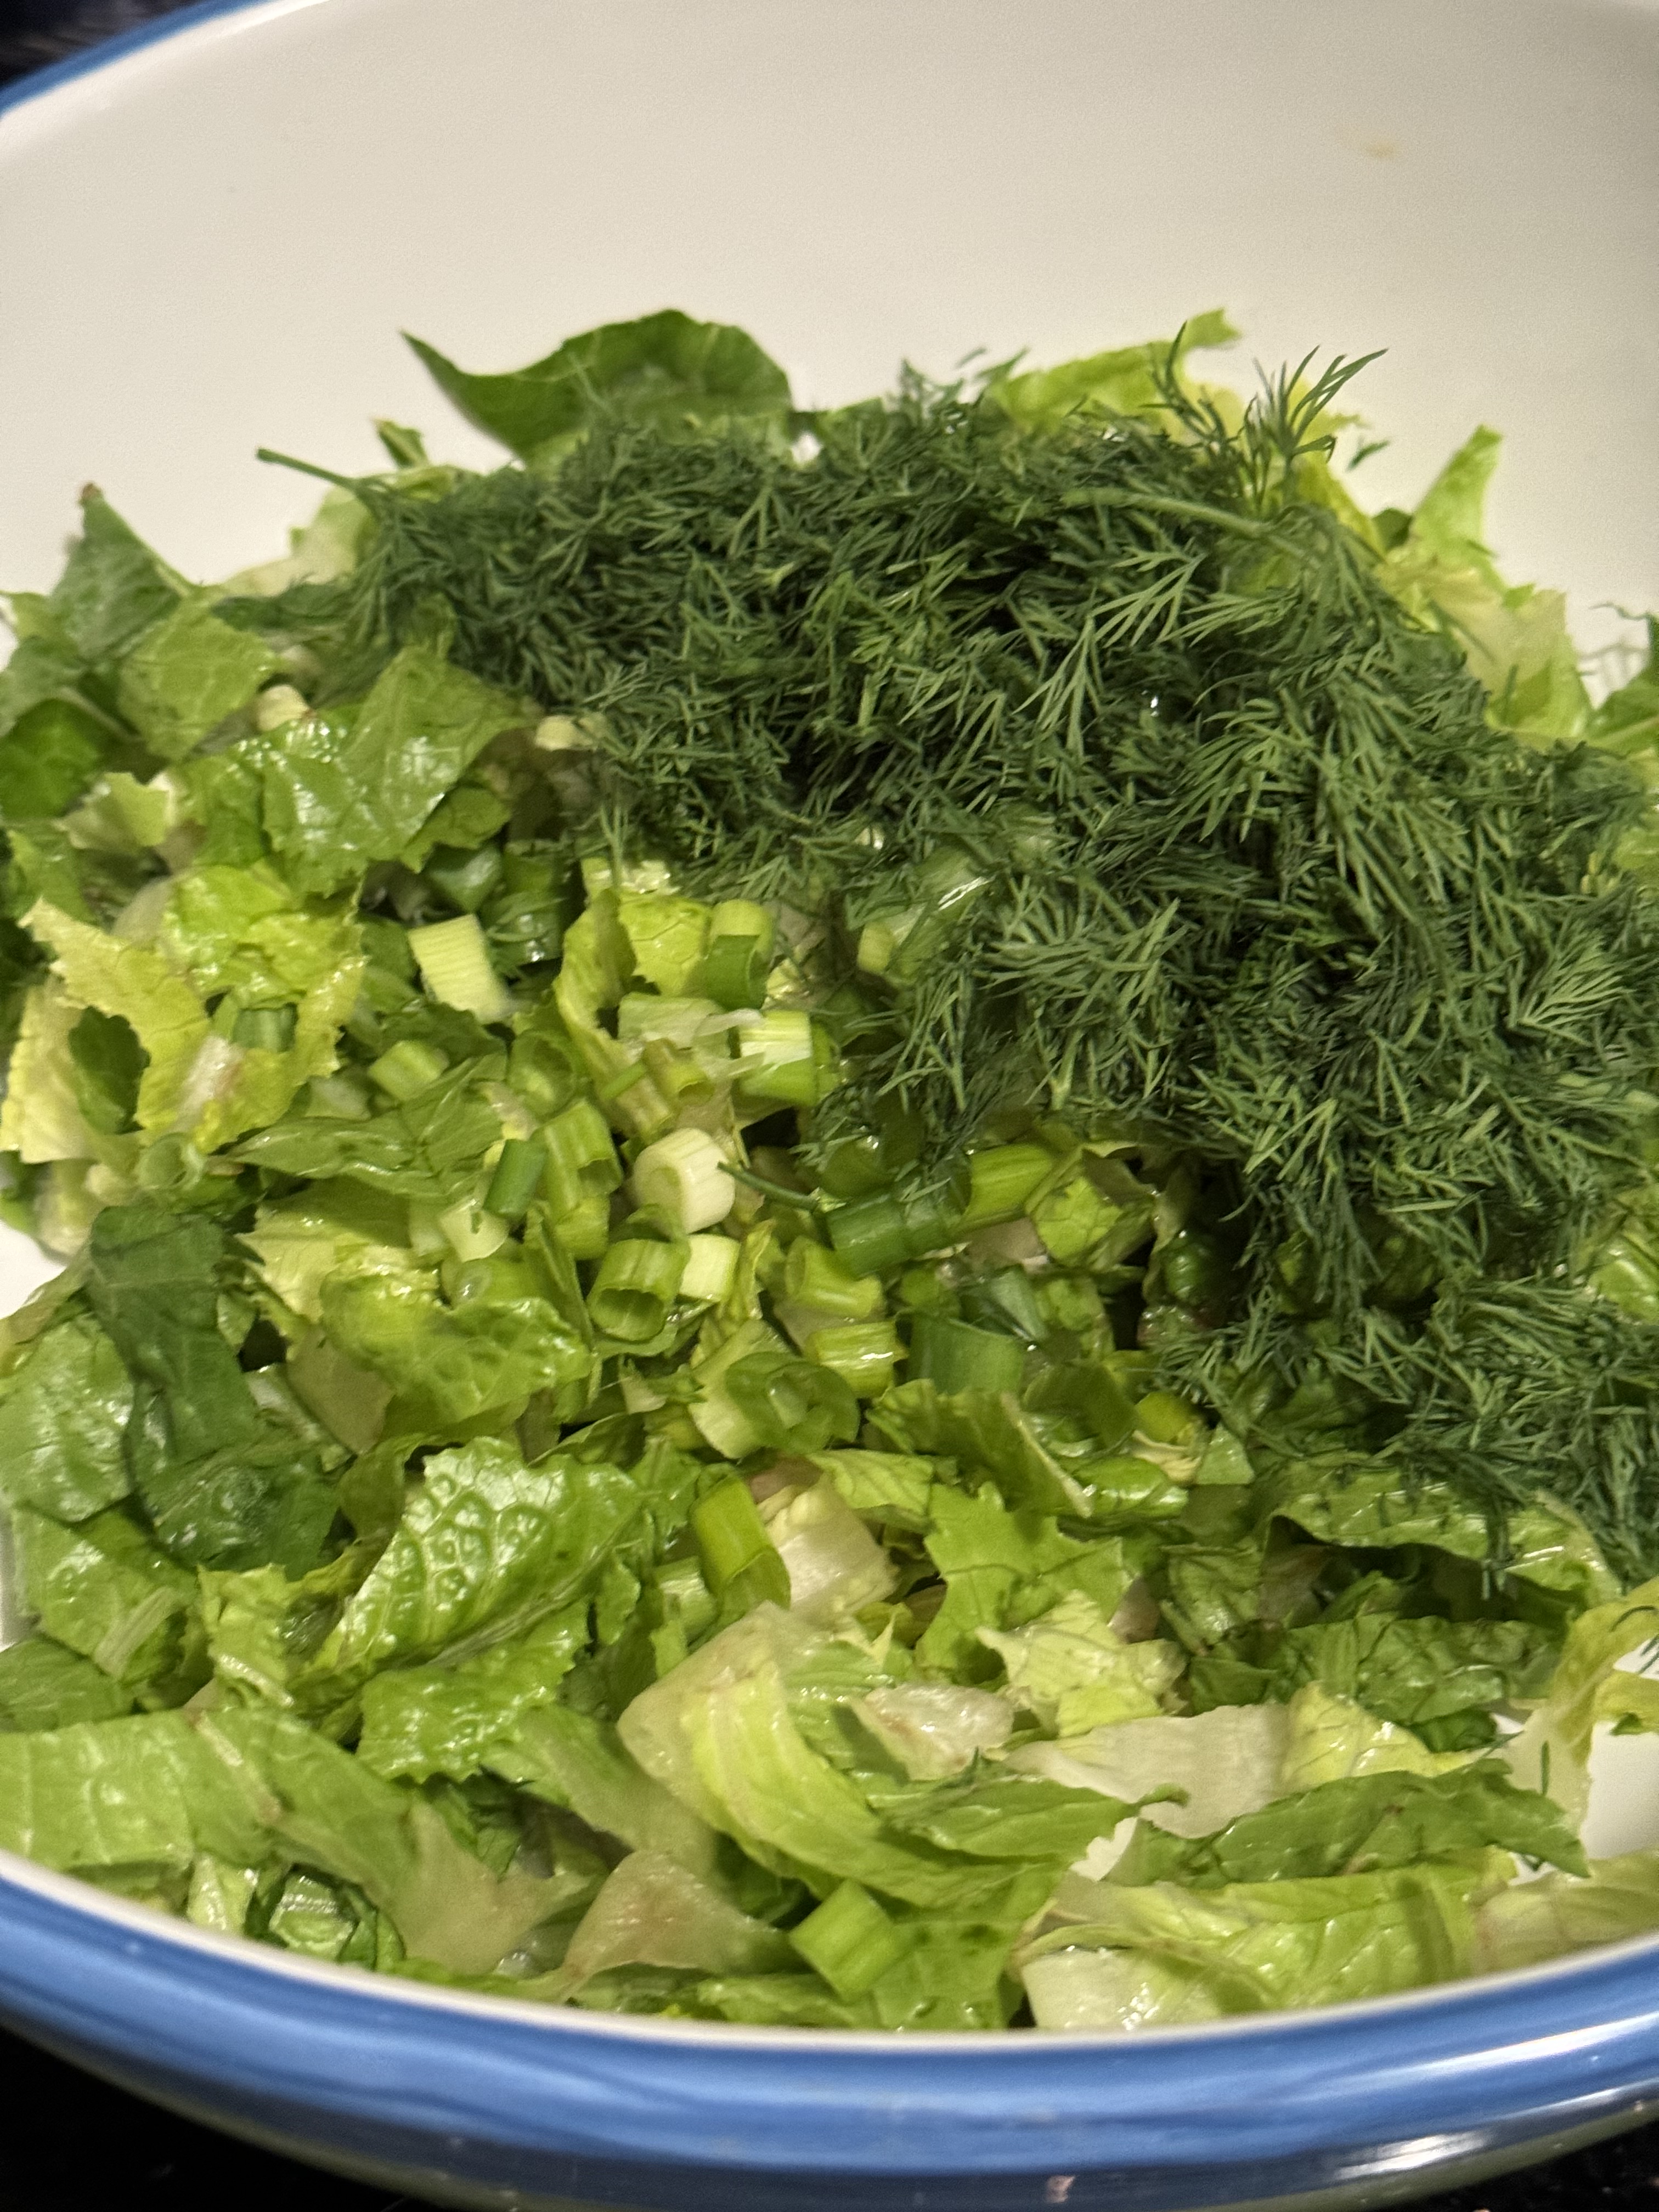
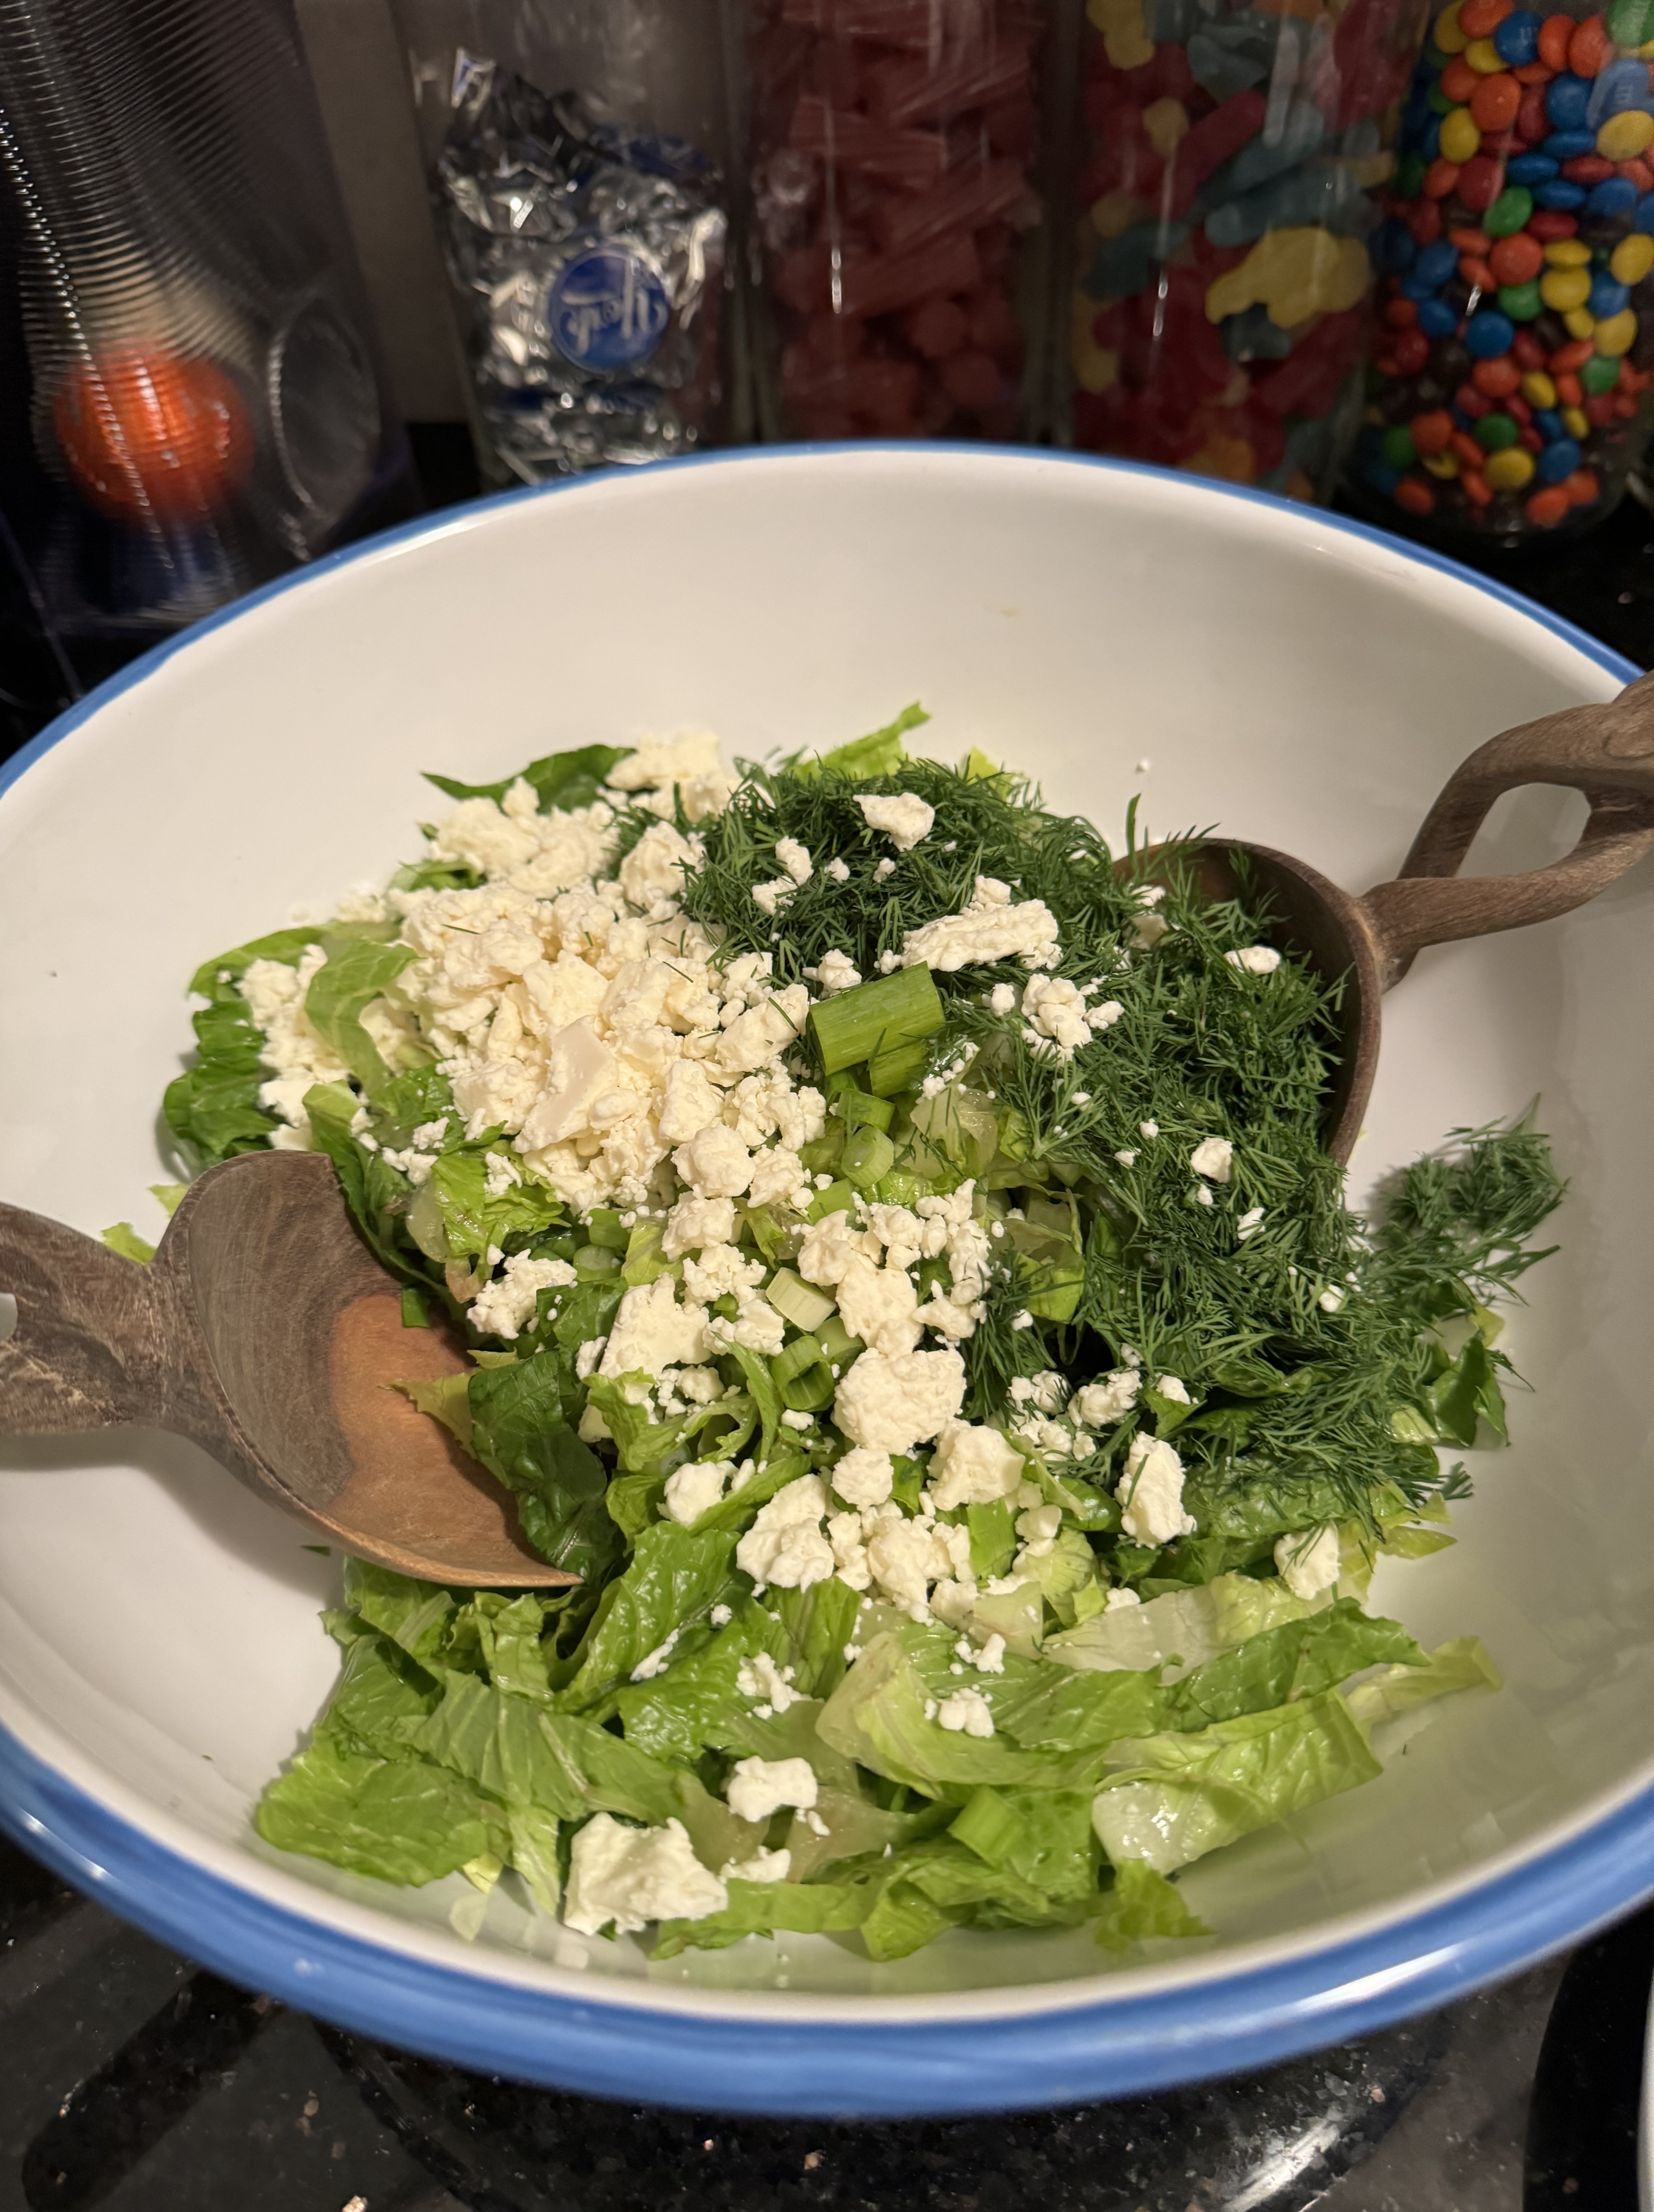
this is a traditional Greek Green lettuce salad which is simple to make with just a few key ingredients. When I eat in a traditional Greek Restaurant this is my “go-to”. While I love a good greek salad there’s something about the combo of herbs and cheese and lemon here that I love.
I love a good herb flavor and this one is packed with delicious fresh dill. If you’re not a fan of dill this one’s probably not for you and stick with my Lemon Parmesan Salad.
Enjoy!
Ingredients:
2 hearts romaine lettuce
4-5 scallions, diced
1 small bunch fresh dill, chopped — this is the flavor you’re after so don’t omit unless you hate dill then go with another salad
4 oz. Feta Cheese, crumbled
*feel free to add chopped cucumbers
Dressing:
1/2 cup olive oil
1 large lemon, juiced
1/4 tsp. kosher salt
*1 teaspoon dried oregano –also optional
*cracked black pepper to taste -also optional
Directions:
Rinse your lettuce –then thinly slice. Dry well.
whisk together the oil, lemon juice and salt until smooth. Can be made ahead .
Place the first 4 ingredients in a large enough bowl to hold salad and toss. Toss all ingredients together .
That’s it folks!
*dressing holds for a few days in the fridge – probably a week
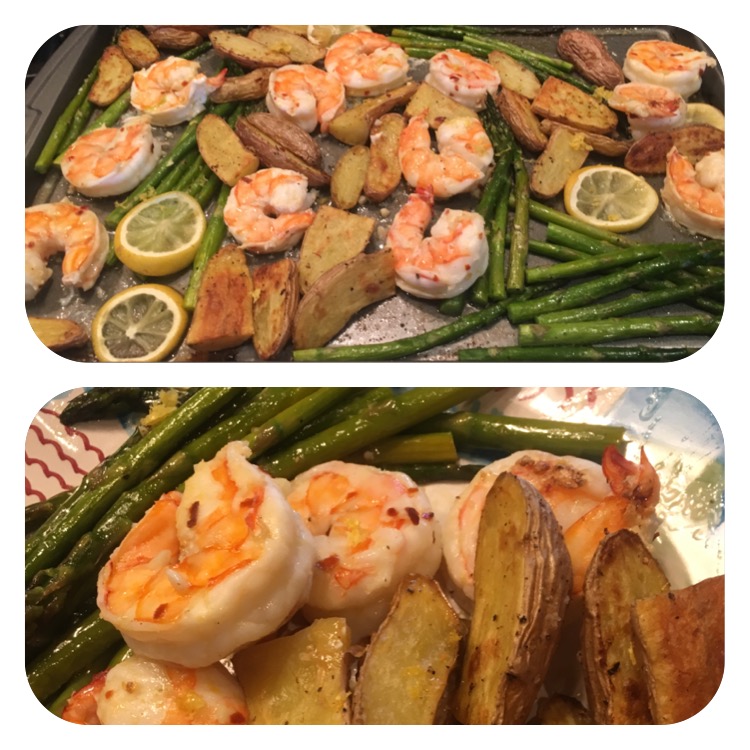
This dinner was just delicious. I used under 8 size shrimp. What this means is that there were about 8 to a pound , so rather large and the cooking times were perfect for them. You will probably have to adjust your cooking time depending on the size of your shrimp. Obviously the larger shrimp took a little longer to cook. Timing will vary depending on your oven and the size of the shrimp you use. The potatoes and asparagus times will remain pretty much the same. I just love cooking on one sheet in the oven! This recipe is a keeper and one I will re-visit often and maybe use different veggies, since I am the only one who ate the asparagus anyway.
Ingredients:
1 pound large shrimp ( anywhere from 8 – 16 count) is perfect – thawed, peeled and de-veined and leave the tails on
Extra – Virgin Olive Oil
3 cloves of garlic-minced
1/4 tsp. crushed red pepper flakes if you hate the spice you can omit it
2 Lemons, 1 for zest and juice of, the other 1 thinly sliced
1 lb. Asparagus-trimmed
1 lb. Fingerling Potatoes–halved lengthwise
Kosher Salt and Freshly Ground Pepper–read directions for amounts
Directions:
Preheat oven to 400 degrees.
Spray a large rimmed baking sheet for easy clean up
Place the shrimp in a large mixing bowl and drizzle with 2 Tbsp. Olive Oil . Add in minced garlic and crushed red pepper flakes. Stir to coat and set aside.
In another mixing bowl , toss the sliced potatoes with 1 Tbsp. Olive Oil. Season generously with Kosher Salt and Freshly Ground Black Pepper. Transfer Potatoes to the baking sheet in a single layer. Roast potatoes for anywhere between 20 and 30 minutes, or until they are almost tender.
While potatoes are roasting, toss asparagus with 1/2 Tbsp.of Olive Oil and season with Salt and Pepper, Set aside
Now add 1 Tablespoon Lemon Juice to bowl of shrimp and toss to coat. Season Shrimp pretty generously with kosher salt and freshly ground black pepper.
After 20 minutes or so remove potatoes from the oven and add asparagus and lemon slices to baking sheet. Continue to roast potatoes and asparagus for another 10 minutes, potatoes should be tender by now , pierce a potatoe with a fork to check for tenderness. If potatoes still need time you can leave them in for a few more minutes. Using a slotted spoon add shrimp to baking sheet and put back in the oven. Roast for another 10 minutes or until shrimp are pink-opaque and firm to touch. My shrimp took about 12 more minutes, this time will depend on your shrimp. I checked after 5 minutes and using tongs turned them over and continued cooking for another 7 more minutes.
When I removed from oven I sprinkled with lemon zest. Perfection on a plate!
*one added tip– after my shrimp is peeled and de-veined and before I am about to cook I always wrap my shrimp in some paper towels to dry them off. It helps with the oil and spices sticking to shrimp.
Last night I made this salmon and I have to say it was so delicious — served it up with a side salad and Trader Joe’s vegetable fried rice — easy peasy and delicious — all you need is an air fryer and some very basic spices. Perfect and quick and delicious! This is a very loose recipe so use as much or as little of the spices as you like. You can use whatever spices you like as well– the paprika gives it a nice color though.
Not much more to say so here’s what I did. Couldn’t be easier.
Ingredients:
I used 3 Salmon Fillets because I like to have a piece left over for the next day so as many filets as you like
Dijon Mustard or you prefer a different mustard use what you like I love Dijon and I slather it on
Paprika
Garlic Powder
Kosher Salt
Black Pepper — I prefer freshly ground but use what you have
Olive Oil Spray
Directions:
Pat salmon filets dry – this is important so that toppings stick to the salmon
I place salmon on a small cookie sheet and slather the salmon tops with dijon mustard use a flat knife or brush — see photo
I then sprinkle each of the spices over the salmon — eyeball it and don’t go too crazy with any one spice but be generous with garlic powder and paprika. Easy on the kosher salt just sprinkle and a few grinds of the black pepper. I then finish with a quick spray of olive oil on top to keep the salmon moist .
I like to pre-heat my air fryer so I set it to 400 and pre-heated for 5 minutes ( optional)
I can only get two filets into my air fryer at a time — I cooked the first two skin side down at 400 for 8-10 minutes depending on how you like your salmon, 9 minutes should be perfect but every air fryer is a little different. Then repeat with the rest of the salmon. Salmon doesn’t have to be served piping hot so you can wait another 9 minutes to serve. The salmon skin gets crispy when you pre-heat the air fryer which I find perfect. Pre-heating is really optional and you can remove the skin after cooking if you prefer — I don’t. The salmon gets a beautiful crust and the mustard gives it delicious flavor.
*obviously the size and thickness of your salmon will impact cooking time so always best to undercook the salmon and add time rather than over cook the salmon.
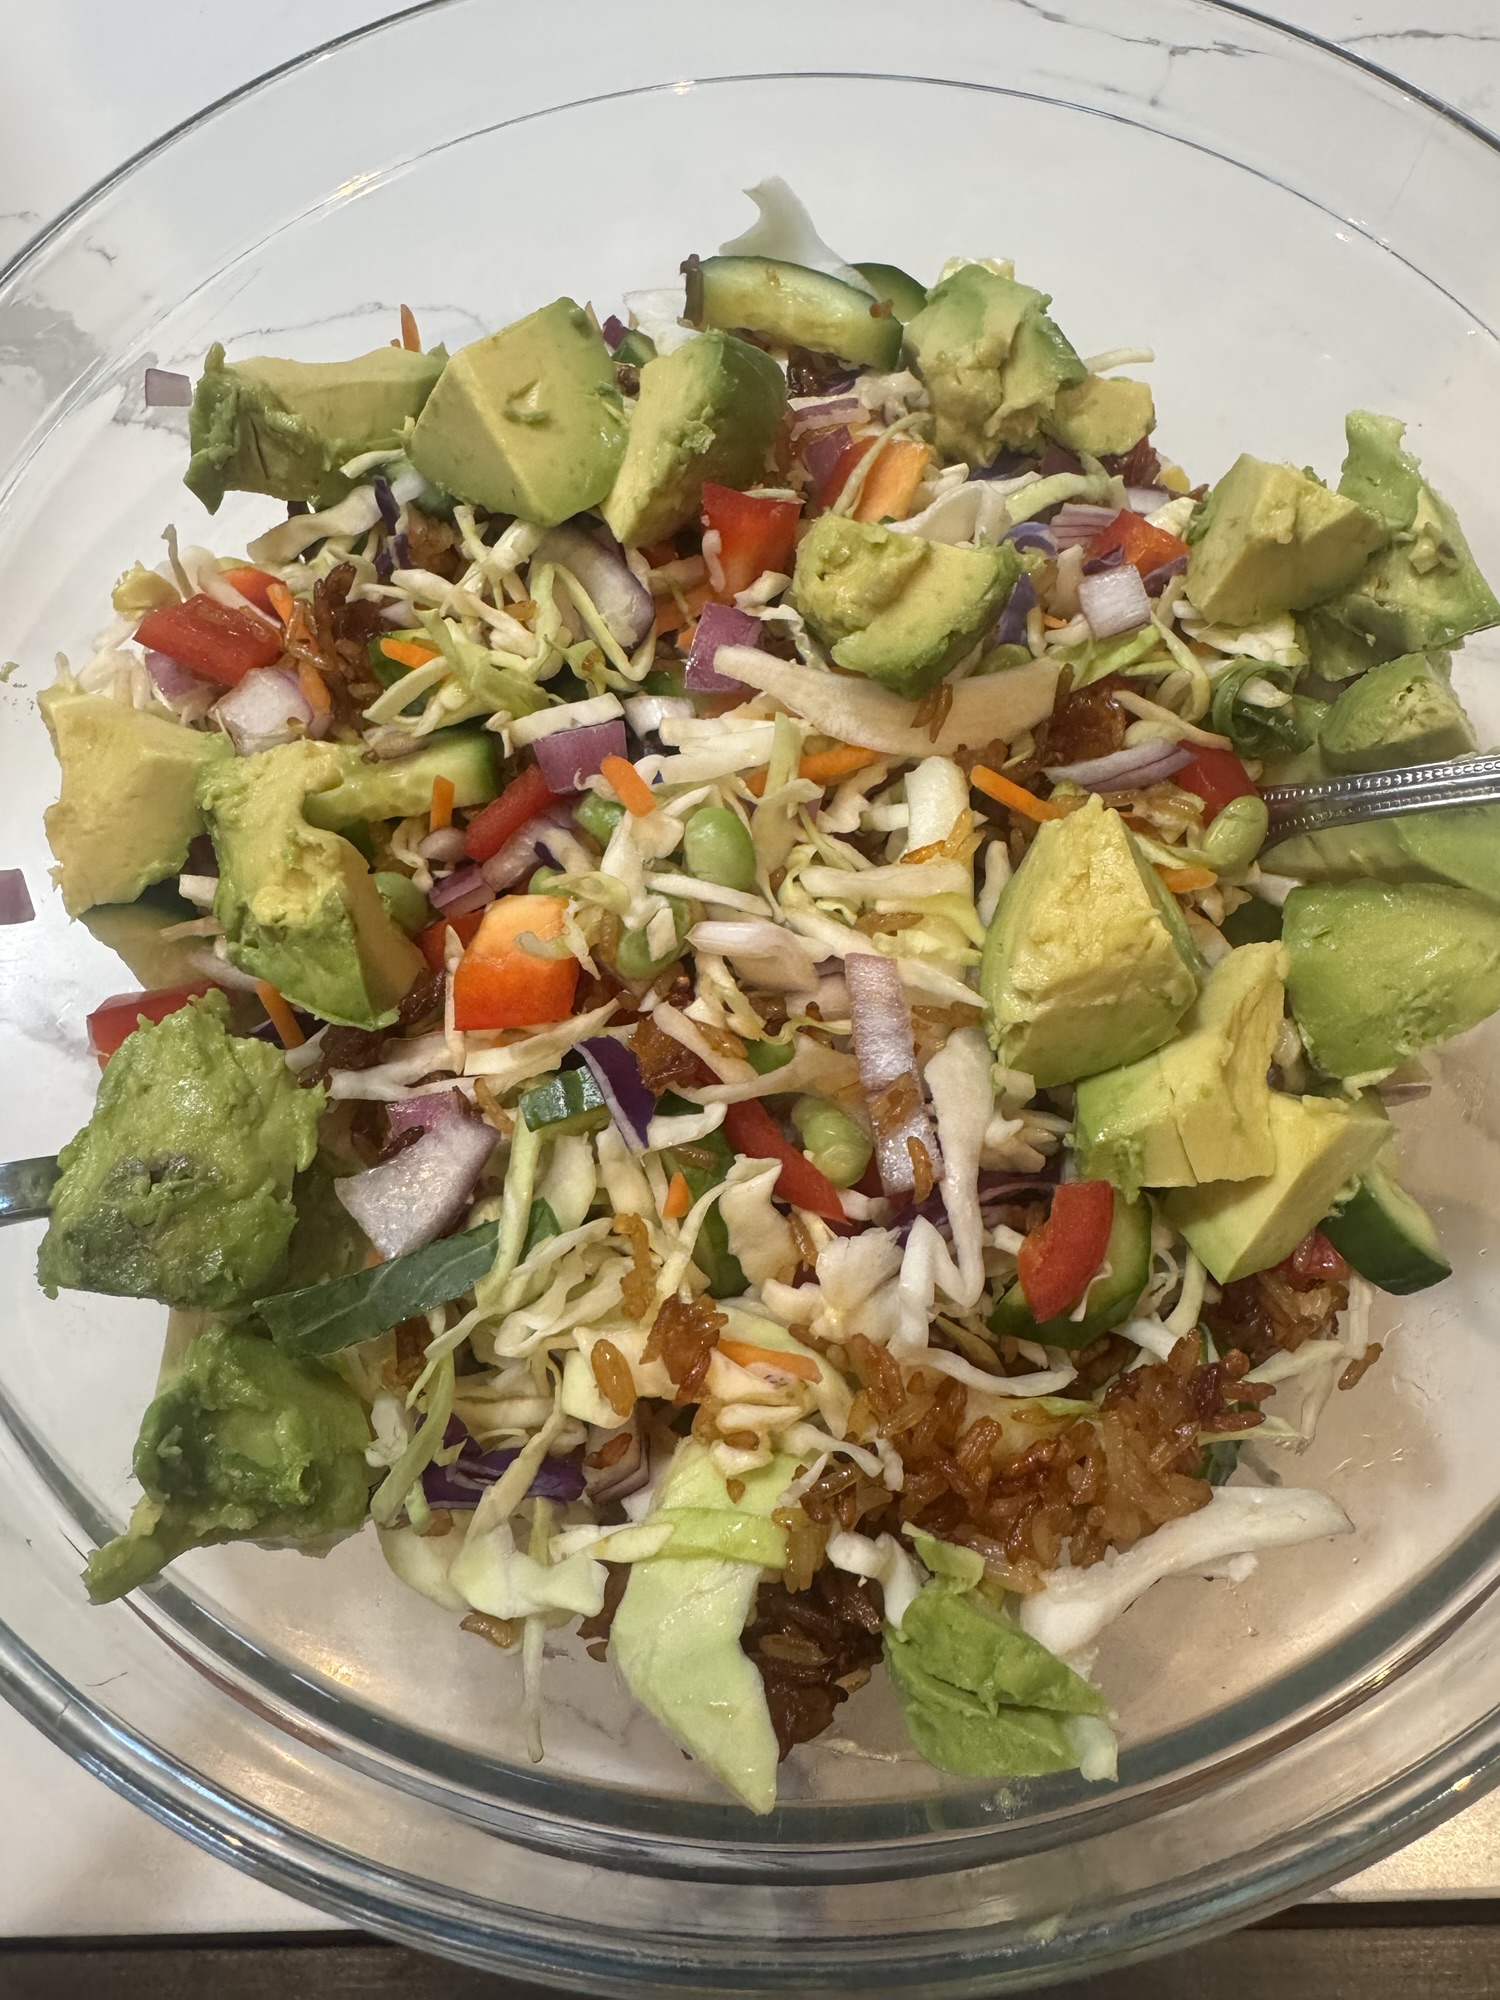
My friend Linda made this for lunch for our canasta game and it was a big hit. I loved it and knew I had to make it so thanks to Linda for passing this on to me and now I’m passing it on to you. Enjoy! it’s delicious and has that crispy rice which gives it the crunch and bite. It is a little spicy and a little sweet. Love all the flavor and texture going on here and plenty of nutrition going on here. there is some prep involved here but you can do everything ahead of time if you’d like.
Ingredients:
For the Rice:
2 cups cooked Jasmine rice, cooled — I used Uncle Ben’s rice in the microwave packet and it was perfect
1 Tbsp. low sodium soy sauce
1 Tbsp. sriracha
1 Tbsp. Vegetable Oil or Avocado Oil
2 tsps. sesame oil ( available in the asian section in most supermarkets)
For the Salad:
I used a small bag of shredded cabbage, you can use the Cole slaw mix or just plain white cabbage usually both are available
3 small Persian cucumbers, cut in 1/2 moons
1 small red bell pepper, diced
1 cup finely diced red onion
1/2 a ripe avocado, cut in small pieces
1/3 cup shelled edamame (available shelled in the frozen vegetable section of most supermarkets)
1/4 cup fresh chopped parsley
For the Dressing:
1/2 cup mayonnaise
2 Tbsps. Rice Vinegar
1 Tbsp. low sodium soy sauce
1 Tbsp. Honey
1 Tbsp. sesame oil
1/2 tsp. sriracha
Topping:
diced scallions
white sesame seeds- toast on a small sheet pan or piece of aluminum for about 2 to 3 minutes, watch carefully once you smell them it’s usually too late, so keep an eye on them
Directions:
Make the rice:
Preheat the oven to 400 degrees F.
In large bowl, combine the cooked and cooled Jasmine rice with the soy sauce, sriracha, vegetable oil, and sesame oil until the rice is well coated,
I sprayed a baking sheet with cooking spray and spread the seasoned rice on top in an even layer, pressing gently with a spatula
Bake for 25 to 30 minutes, stirring halfway through until the rice is golden and crispy
Let it cool completely, then break apart
Assemble the Salad:
In a large serving bowl, add the cooled crispy rice, sliced Persian cucumbers, red bell pepper, red onion, avocado, shelled edamame , and chopped parsley. Top off with scallions and toasted sesame seeds.
Make the dressing, in a small bowl combine mayonnaise, rice vinegar, soy sauce, honey , sesame oil, and sriracha until incorporated and smooth.
I don’t like to dress the salad so I can keep it for leftovers, I leave the dressing on the table in a dressing jar so everyone can help themselves. Enjoy!
some tips
customize the ingredients to your liking if don’t like the cabbage mix leave it out, Mango is a nice fresh addition, peanuts or cashews if no allergies and you know it
Cilantro if everyone likes that
Make sure rice is truly cooled off
and use Jasmine rice or a long-grain rice including brown rice , short grain rice has a different texture and is not ideal for this recipe
I also serve alongside a grilled chicken sliced up for protein for those who like vegetarian you can keep it that way
I always make my own chicken soup. It is delicious broth. I usually make a few batches and freeze them because it’s a great thing to have frozen in quart containers as stock and will last for up to six months frozen. When the holidays come—whether Rosh Hashanah or Passover—I always make my chicken soup with matzo balls. I make the soup a day ahead and skim whatever fat is on there before adding my matzo balls. Keep reading for my “secret matzo ball recipe”.
INGREDIENTS: CHICKEN STOCK:
1 5lb. organic roasting chicken (I throw away the insides)
1 package of chicken wings (this was suggested to me a long time ago by my BFF Karyn and she was oh so right. It adds some fat, which translates into a lot of flavor and you will skim off the fat the next day. Thanks, Karyn…yes, I remembered!)
1 large, yellow Spanish onion; unpeeled and quartered
A big bunch of dill
4 celery stalks with leaves, cut into thirds
4 carrots, unpeeled and halved
Bunch of flat-leaf parsley (Use this only if you want. This time, I didn’t have it so I used only the dill.)
A bunch of thyme (if you wish)
1 head of garlic, cut in half cross-wise (skin and all)
2 tbsp. kosher salt
2 tsp. whole black peppercorns
DIRECTIONS FOR SOUP:
I place the chicken, chicken wings, onion, carrots, celery, whatever herbs I’m using, garlic, salt and pepper in as large a pot as I can find (usually about a 16-20 qt. stockpot.) Add cold water to cover chicken by at least 2 inches above the chicken but not to the top of the pot because it will boil over (very messy). Bring to a boil and then simmer, uncovered, for about 3 hours. I skim the soup skum (sounds lovely) off for the first half hour or so—after that, you shouldn’t have much more. I remove the chicken from the broth after an hour or so, because it is cooked and it will taste like a rubber chicken if you plan on eating it. Sometimes, I like to shred it and return it to the soup. If you are not using the chicken (what a waste of good chicken), just leave it in. It will fall apart in there. I leave the wings and discard them at the end of the 3 hours. Next, I strain all of the soup, discard all remnants, fill my containers and put in the fridge. The next day (or the day of the holiday), I usually skim off the fat that has risen to the top and make my matzo balls (recipe below).
MATZO BALLS:
This has always been my secret, but now it’s out. Okay, I own it. After years of making matzo balls from scratch, my mother (yes, my mother, the cook) turned me on to Manischewitz boxed matzo ball mix! It just wasn’t worth it. My balls weren’t as consistent as I would have liked, whereas these are always perfection! Light and fluffy and everyone always loves them. No sinkers here!
I follow the directions on the box carefully. They sell just the mix box. You will need vegetable oil and 2 eggs per box. I do add a little piece of dill inside each ball, but that’s it! Now my secret is out. Sometimes this is really the only way to go. It saves time and ingredients and is really good. No MSG or trans-fats either! So make the soup, cheat with the balls, and enjoy. There is no substitute for homemade chicken soup, though.
*You can also add thin soup noodles to this recipe, if you like. (obviously not on Passover)
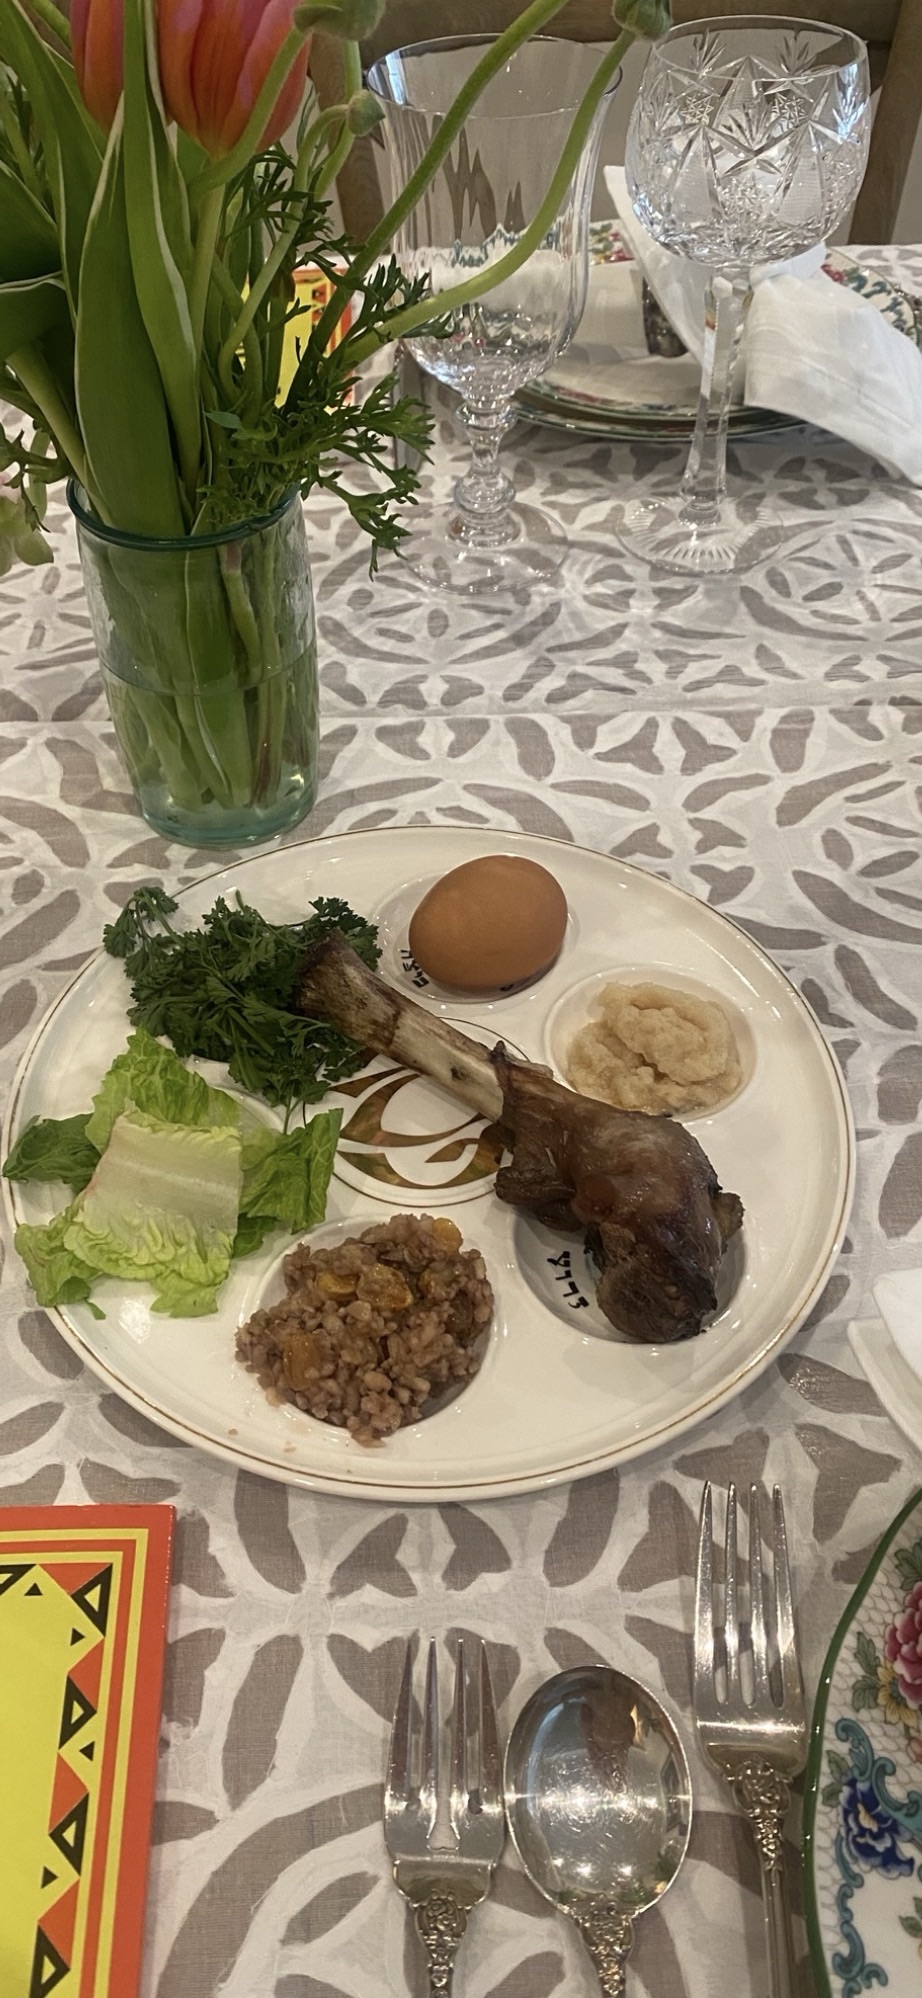
Passover is very early this year , it starts on the evening of Wednesday April 1 and lasts through Thursday April 9. Last year Passover was April 12 . I am going to post my traditional Passover recipes as it is right around the corner. It’s always a wonderful time of year to sit down with family and friends to celebrate the holiday commemorating the emancipation of Jewish People from slavery in ancient Egypt.
There are so very many traditional foods during Passover and once again I will share my recipes with you. Everyone has special food and traditions that they like to follow.
I will be posting my favorite tried and true recipes for the rest of the week. If you have any questions or thoughts please email me or DM me on Instagram or FB. My email is through my blog . I will be as helpful as possible.
Happy Holidays and Enjoy Pesach!
These are some of my go-to’s and all of my recipes are on my website @cookingwithcandi
If you have trouble you can always google the name of the recipe along with cookingwithcandi
Recipes:
Homemade Chicken Soup with not so homemade Matzoh Balls
Traditional Ashkenazi Charoset
Passover Popovers
Slow Cooked Brisket
Happy New Year Brisket
Un-stuffed cabbage which cooks on the stove-top and frees up the oven–a personal family fav
Grandma Regina’s Farfel-my grandma Regina lives on through this recipe and it is always on our Seder Table–it’s a little tricky and requires some “extra”loving but totally worth the effort
Honey Roasted Chicken
Chicken Marbella–we love this Silver Palate staple and it is almost always on our Seder Table
Old School Meatballs–another delicious fav cooked on the stovetop
Apricot Honey Mustard Chicken
Peach Farfel-an absolute must -just ask anyone who’s ever made it
Bree’s slow cooked skirt steaks– in place of brisket my steak gang loves this recipe and I use my slow cooker which frees up my oven
Judy’s Apple Matzoh Kugel for Passover
Sweet Matzoh Pudding
Spinach Souffle for Passover–so very easy and vegetarian but it contains dairy so if you’re kosher this won’t work for you
Passover Cobbler
My favorite macaroons– traditional style for Passover and always on the table for dessert
Julie’s brownies for Passover
Chocolate Bark Surprise
Matzoh Crunch Candy– super delicious and easy to make and very addictive
Meringue Cookies
Ellen’s Passover Apple Cake
Matzoh Brei for breakfast or even dinner
Enjoy! and watch for my recipes but feel free to peek ahead and check them out.
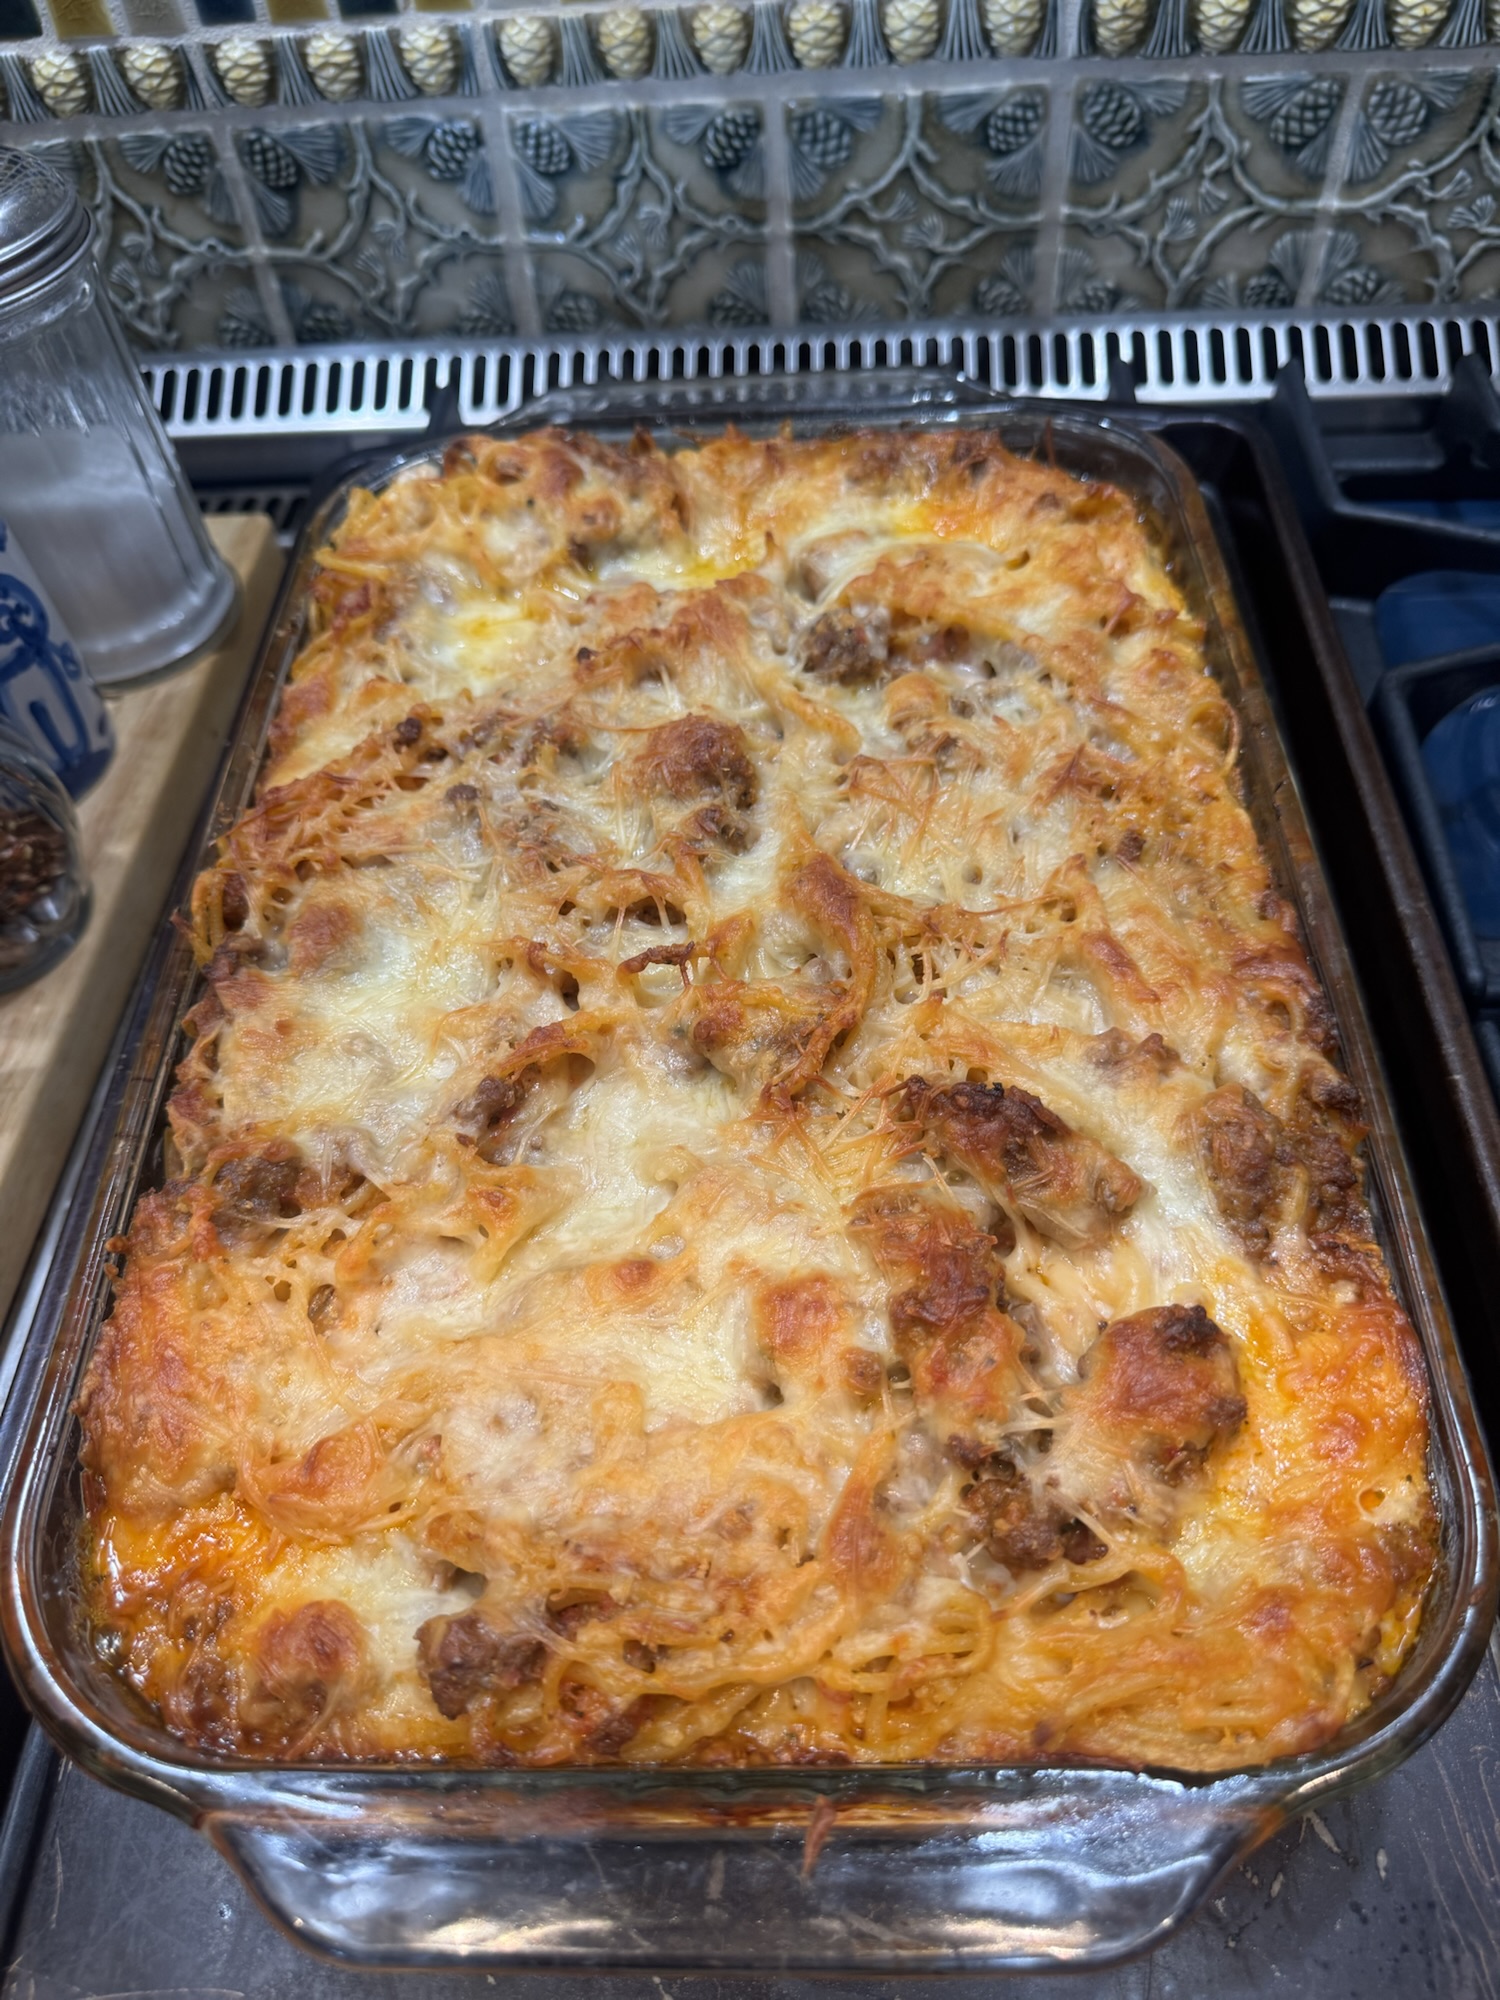
Just saying this is one of the most indulgent, rich, hearty baked pastas I have ever eaten .
I saw a lot of recipes for this over the years and decided to take from them what I wanted to do and I have to say it came out absolutely delicious.
It is related to lasagna in that it’s a casserole , and I think easier to handle and put together than lasagna.
You can prep a day in advance and refrigerate and bring to room temperature and then just cook it. You don’t need to cook twice .
I prepped and made it in the early part of the afternoon and cooked a few hours later. I like to bring casseroles to room temperature before cooking or re-heating.
I froze the leftovers and can’t wait to have them.
Enjoy!
perfect pot luck or for a large crowd serve with a green salad and you’re good to go
I did serve with some heated up marinara sauce but honestly none of us felt like we needed it.
Ingredients:
1 24 oz. jar of marinara or 2 1/2 cups homemade marinara and a little extra for serving if you’d like
1 Tbsp. Olive Oil
Salt and black pepper
1 lb. ground beef use 90% lean if you can find it
1 lb. Italian sausage, sweet or hot , casings removed – usually you can find this already out of the casing Whole Foods sells it in 1 lb. packages and butchers will do it for you
1 small yellow onion, chopped finely
4 large garlic cloves, finely chopped
2 teaspoons Italian seasoning
1/4 cup water
1 lb spaghetti ( I just used spaghetti style pasta)
3 Tablespoons unsalted butter
1 15 oz. container whole milk Ricotta cheese
8 oz. cream cheese softened ( put in microwave out of package on a plate for 10 seconds)
8 ounces low moisture shredded Mozzarella Cheese
3 ounces shredded Parmesan Cheese ( 3/4 cup)
*crushed red pepper for serving — totally optional
Directions:
Heat oven to 375 degrees. Bring a large pot of salted water to a boil. set aside 1 cup of the marinara
Heat 1 Tablespoon olive oil in a large skillet over medium-high heat. Add Beef and sausage, until browned up nicely on 1 side for 3-4 minutes app. Stir in the onion and the garlic. Cook until the meat is no longer pink and the onion has started to soften, app. 4-5 more mins. Stir in Italian seasoning, the remaining marinara and 1/4 cup water. Bring to a boil, adjust heat to med-low and simmer, stirring occasionally for 5 mins .Turn off the heat and allow to sit there on stovetop.
Meanwhile, add spaghetti to the pot when the water comes to a boil. You’ll want to cook a few minutes shy of al dente according to the package instructions. Drain pasta and return to the empty pot. Stir in the reserved 1 cup of marinara that you set aside, and add the 3 Tbsp. of Butter until melted.
In a medium size bowl, mix ricotta, cream cheese, 1/2 cup of the shredded mozzarella and 1/2 cup of the shredded Parmesan until well combined. Taste for Salt and Pepper
Have a 9×13 baking dish ready ( I sprayed with Pam cooking spray) and spread 1/2 of the spaghetti in the bottom . Layer with the ricotta mixture, followed by the remaining spaghetti, all of the meat sauce and finally the remaining mozzarella and parmesan.
Cover the baking dish tightly with aluminum foil. Bake for 25 minutes. Remove foil and bake until bubbling and golden brown, 15 minutes or so more, just check on it.
To make ahead, refrigerate the covered casserole up to overnight; bring to room temp. then bake for 1 hour. I did this so I didn’t cook with aluminum foil at all, but you still can foil for first 1/2 hour and off for last 1/2 hour.
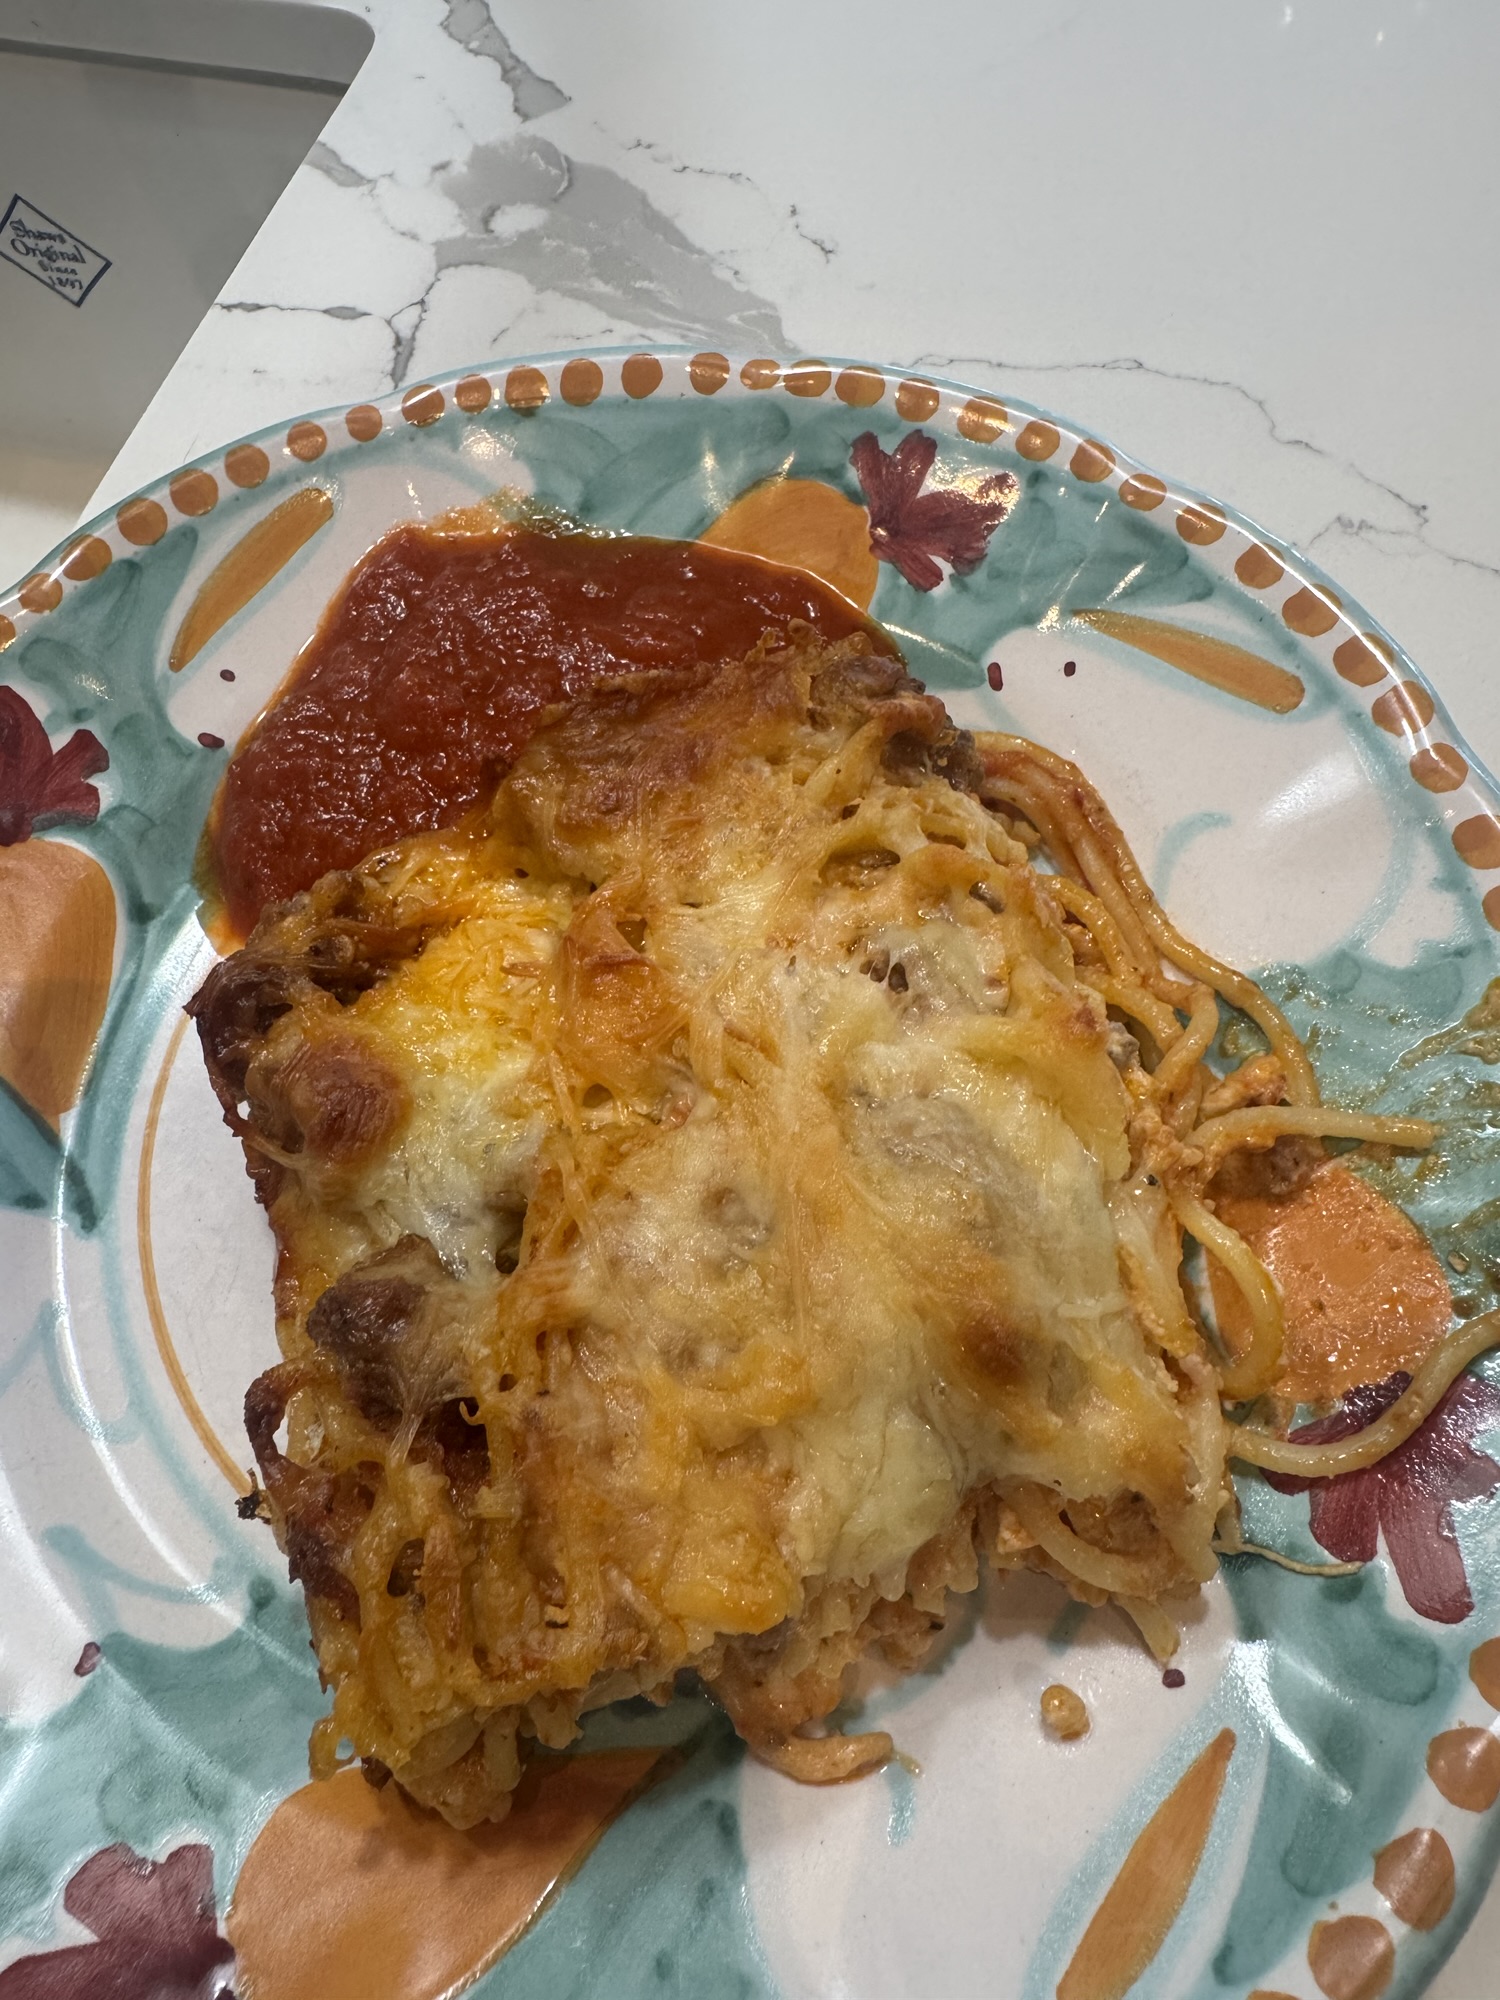
Remove from oven and, let it cool for a few minutes and then cut into with a sharp or serrated knife and serve! Enjoy!
I honestly was happy without the extra sauce but you may want it depending on how you like it.
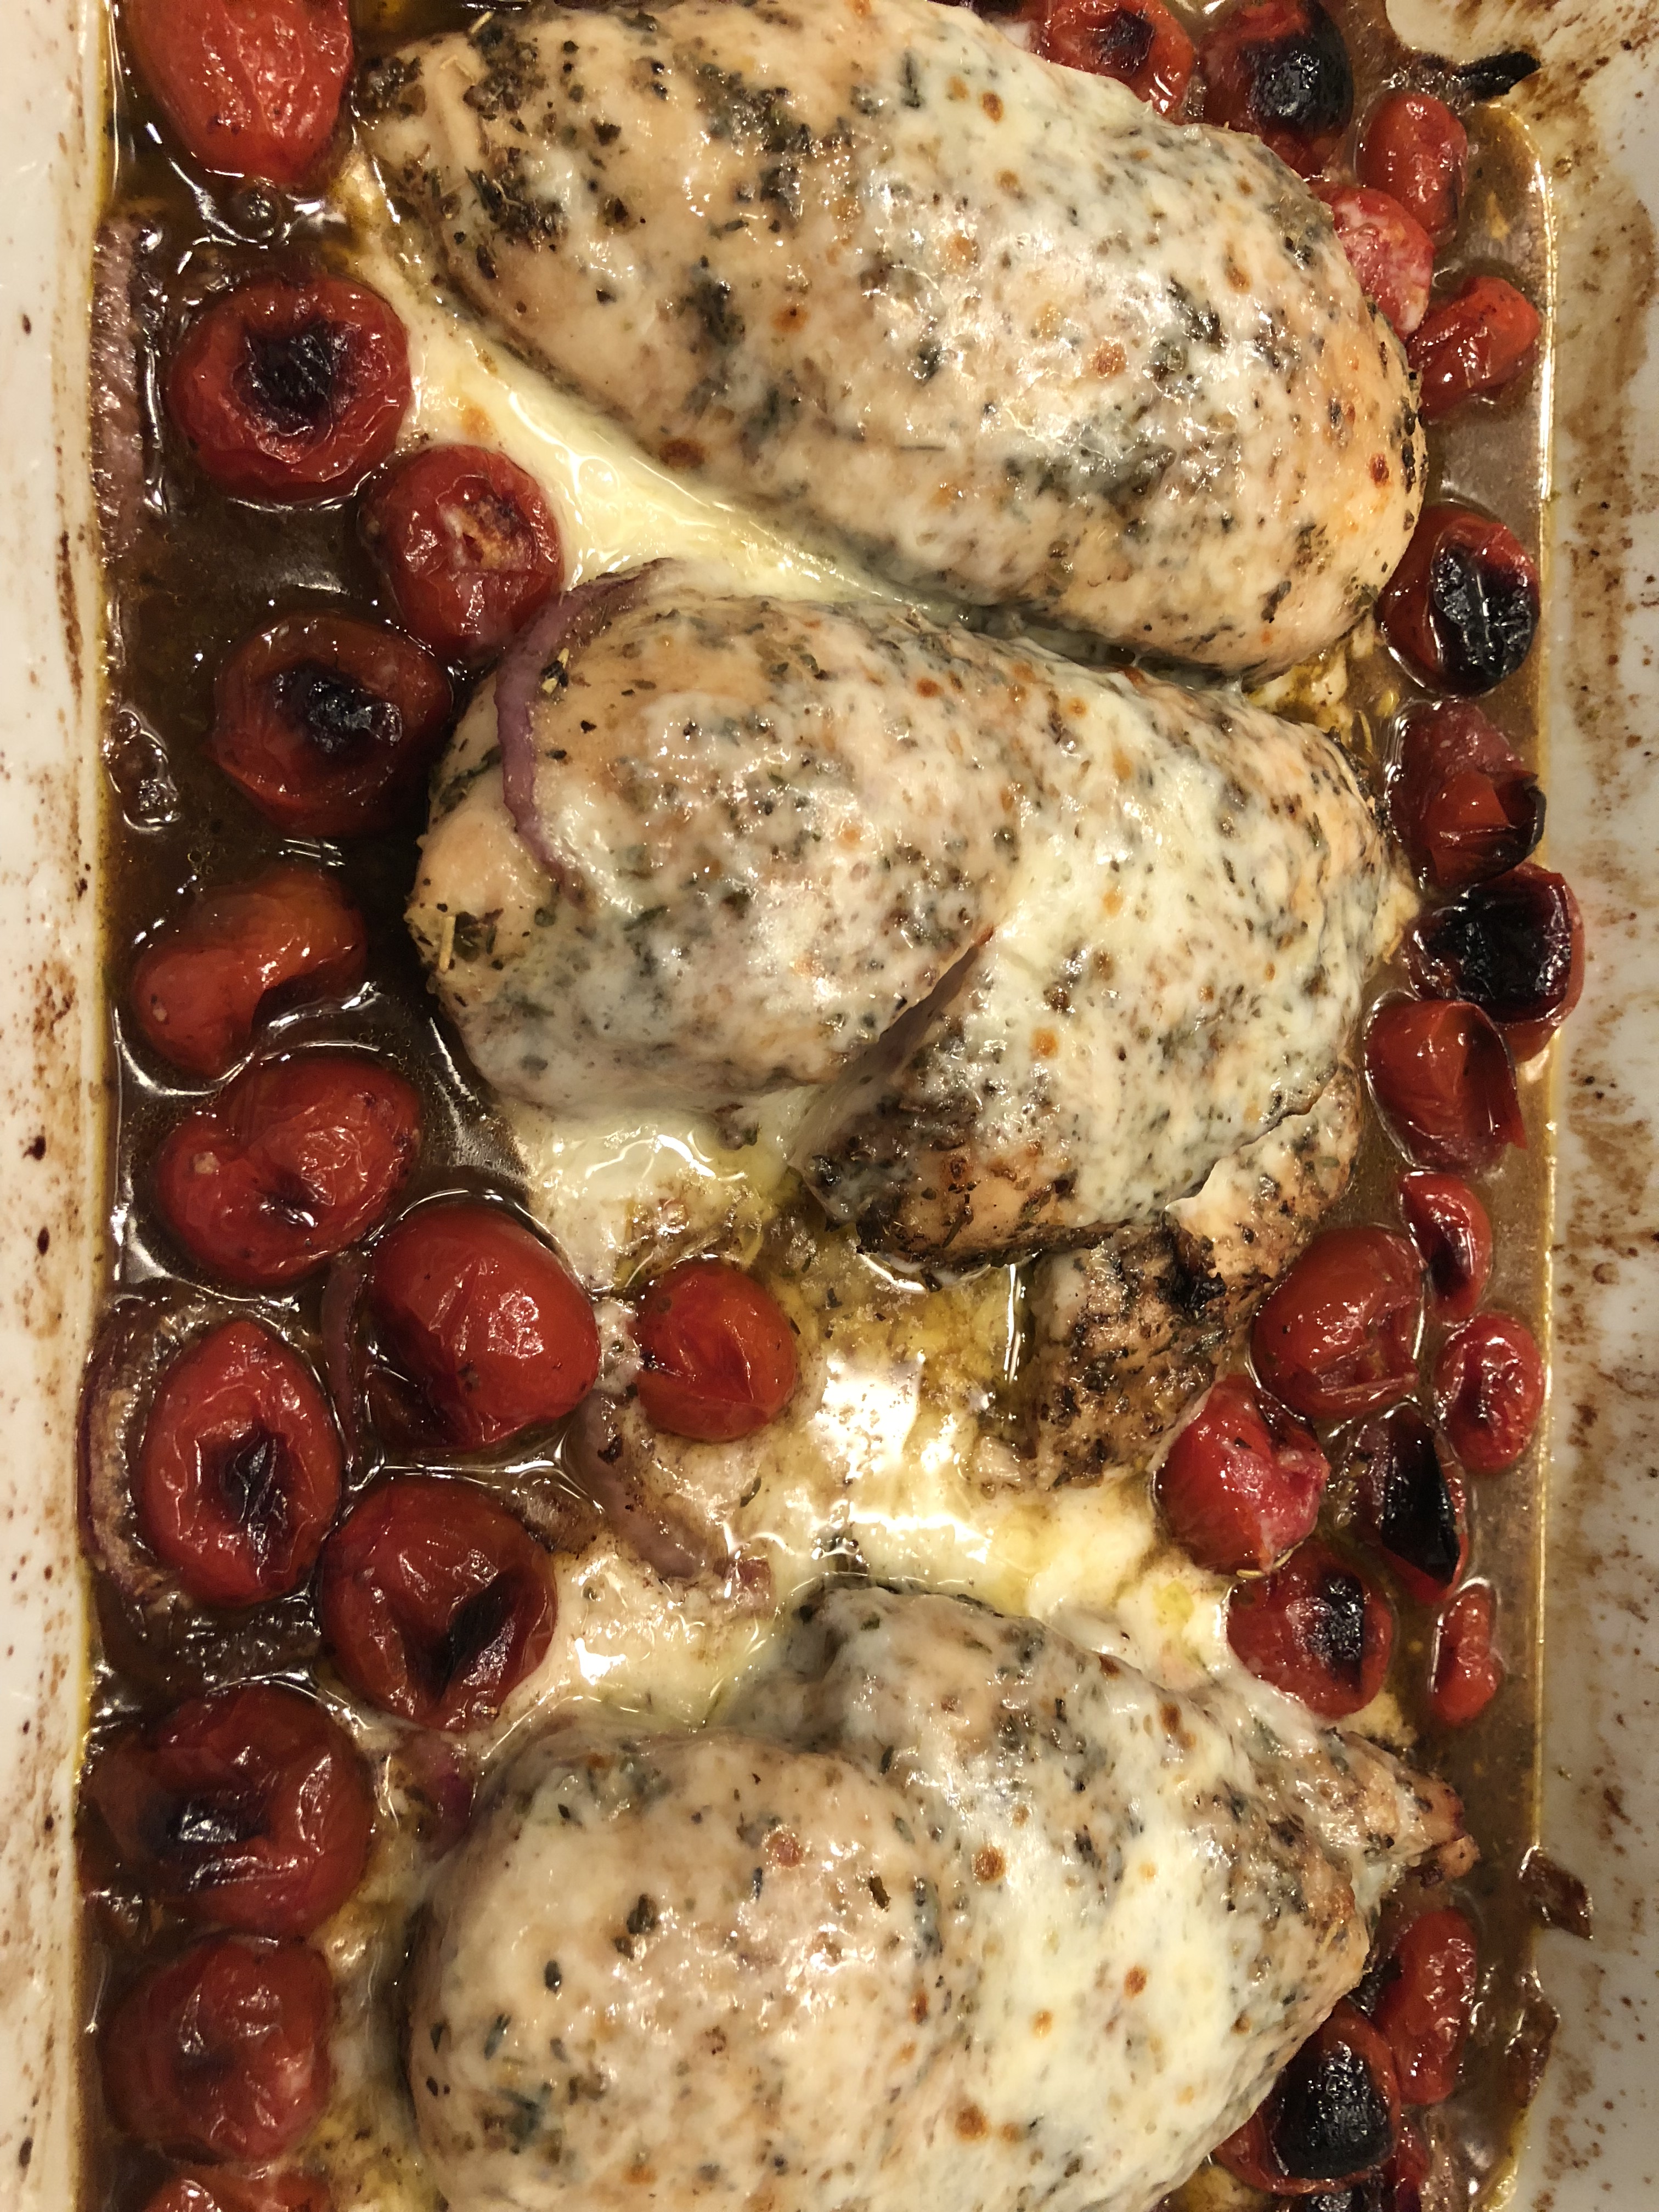
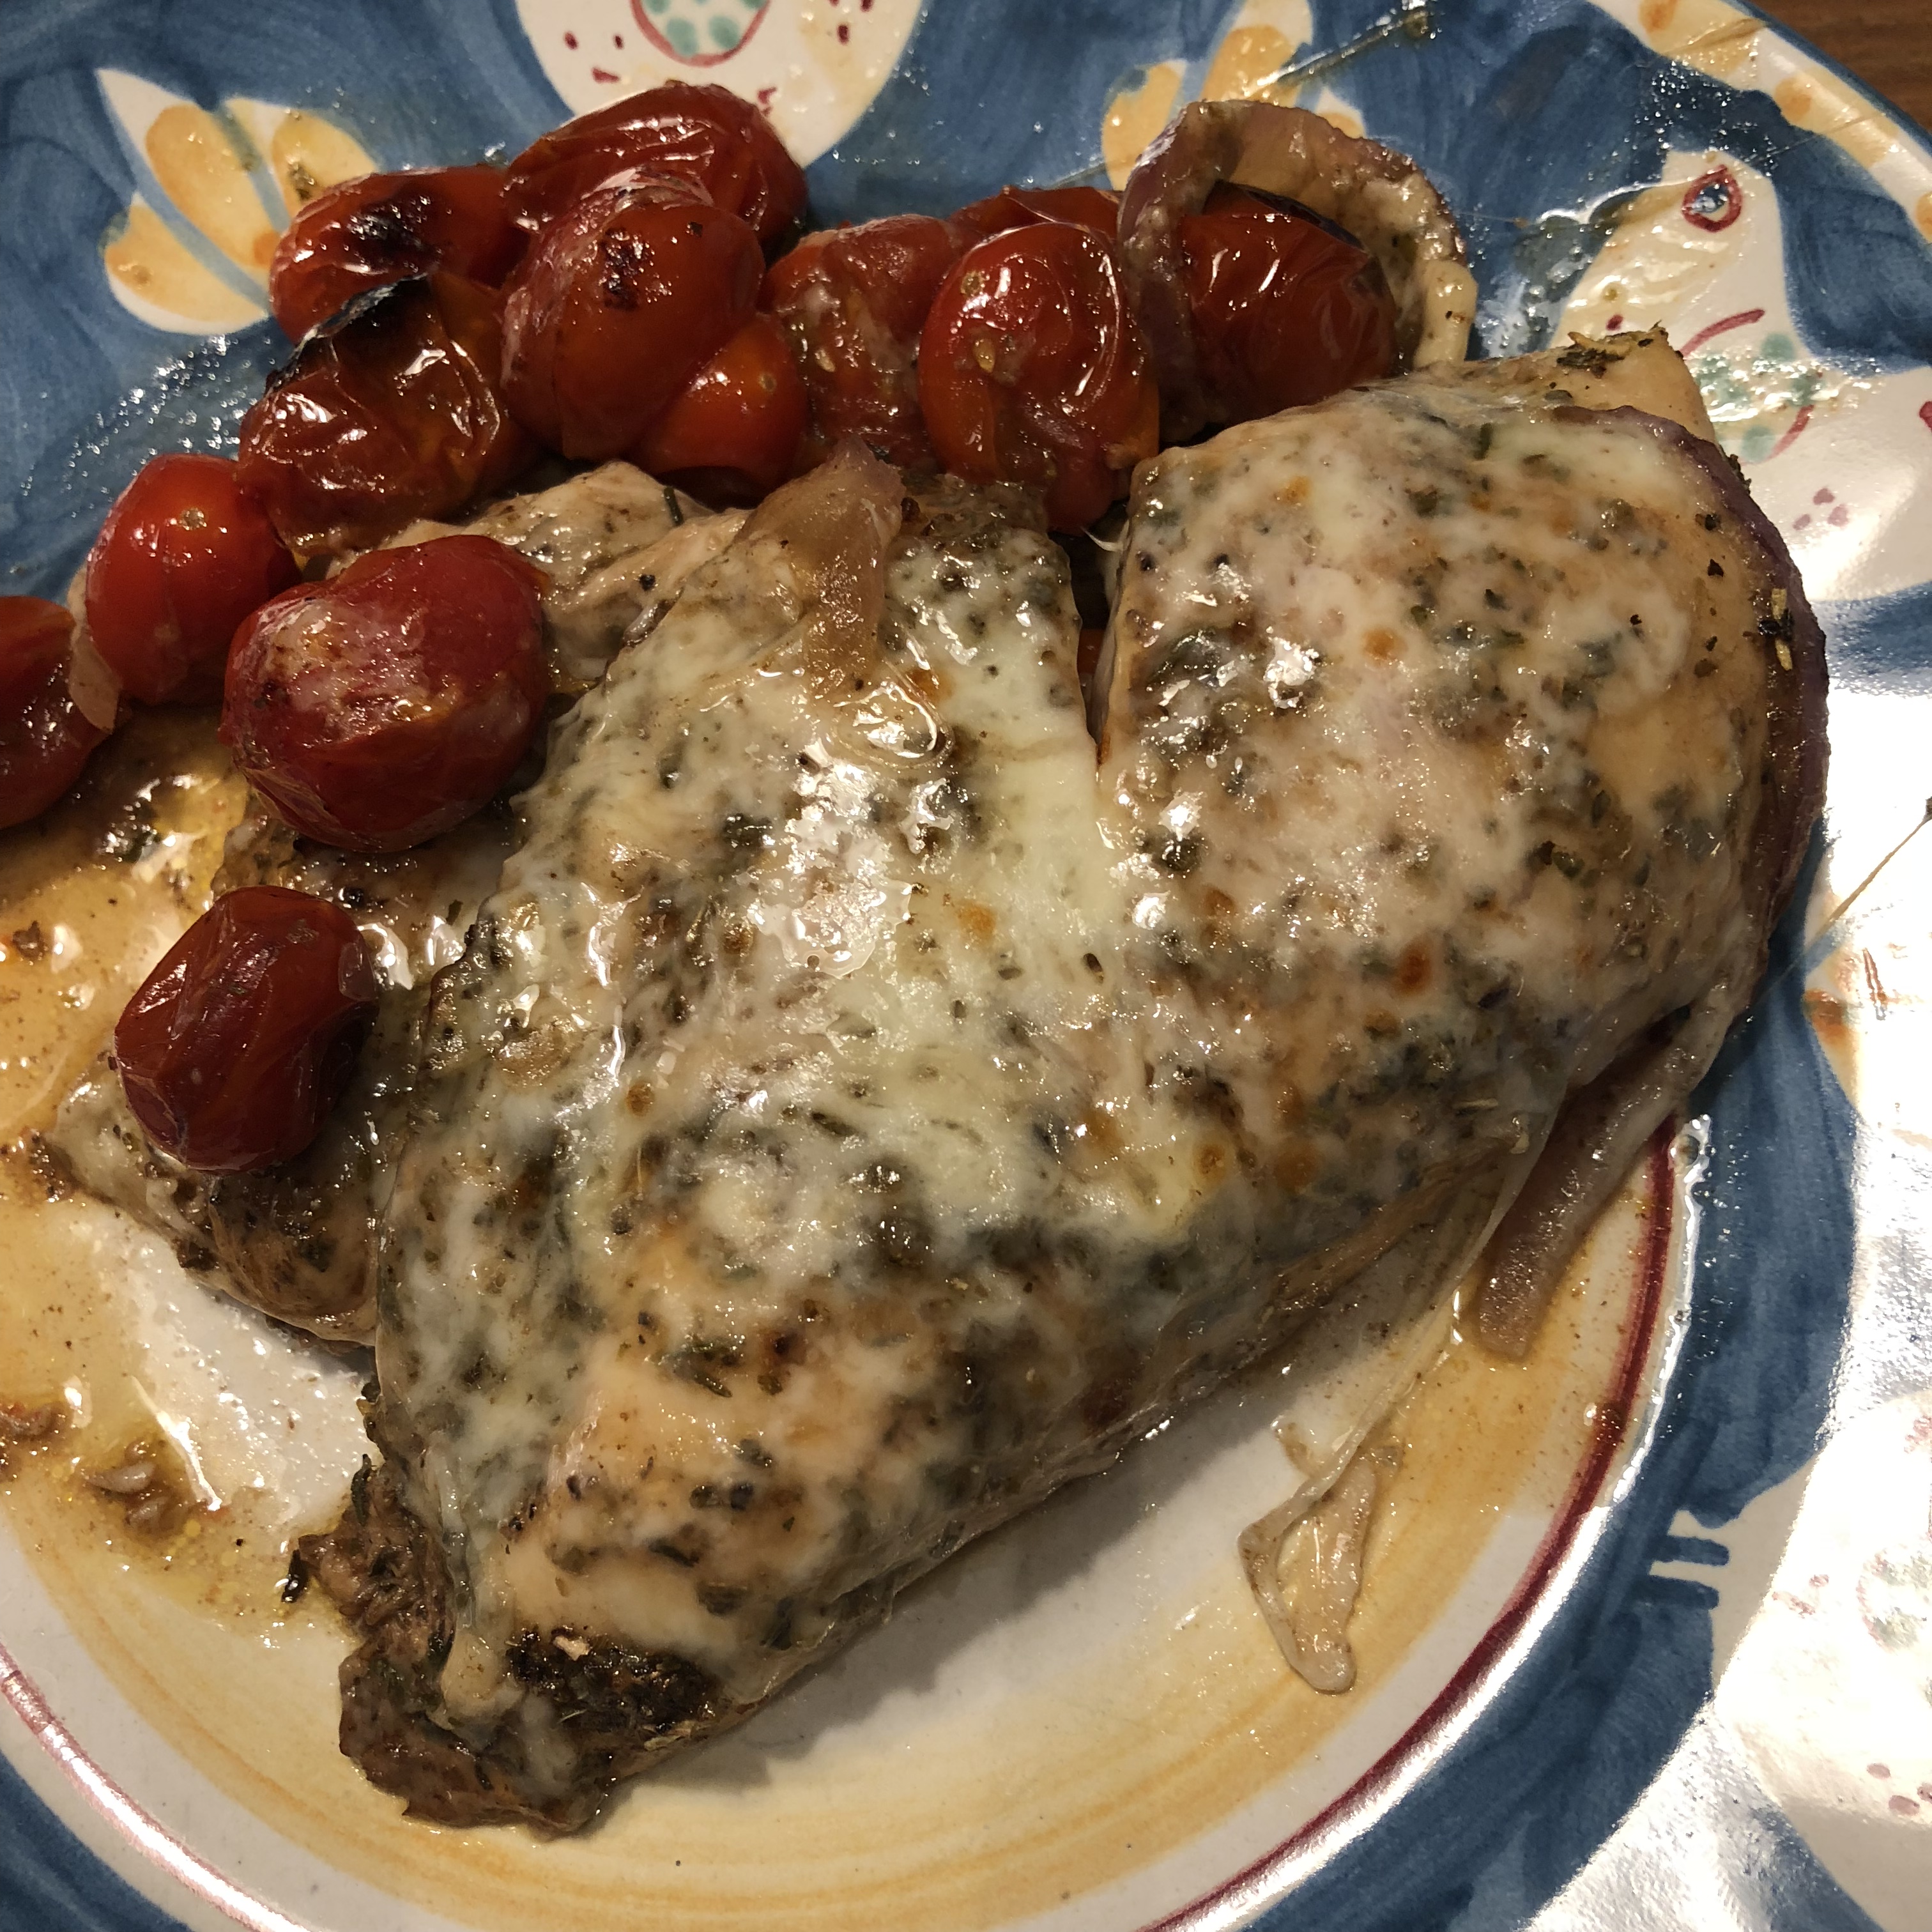
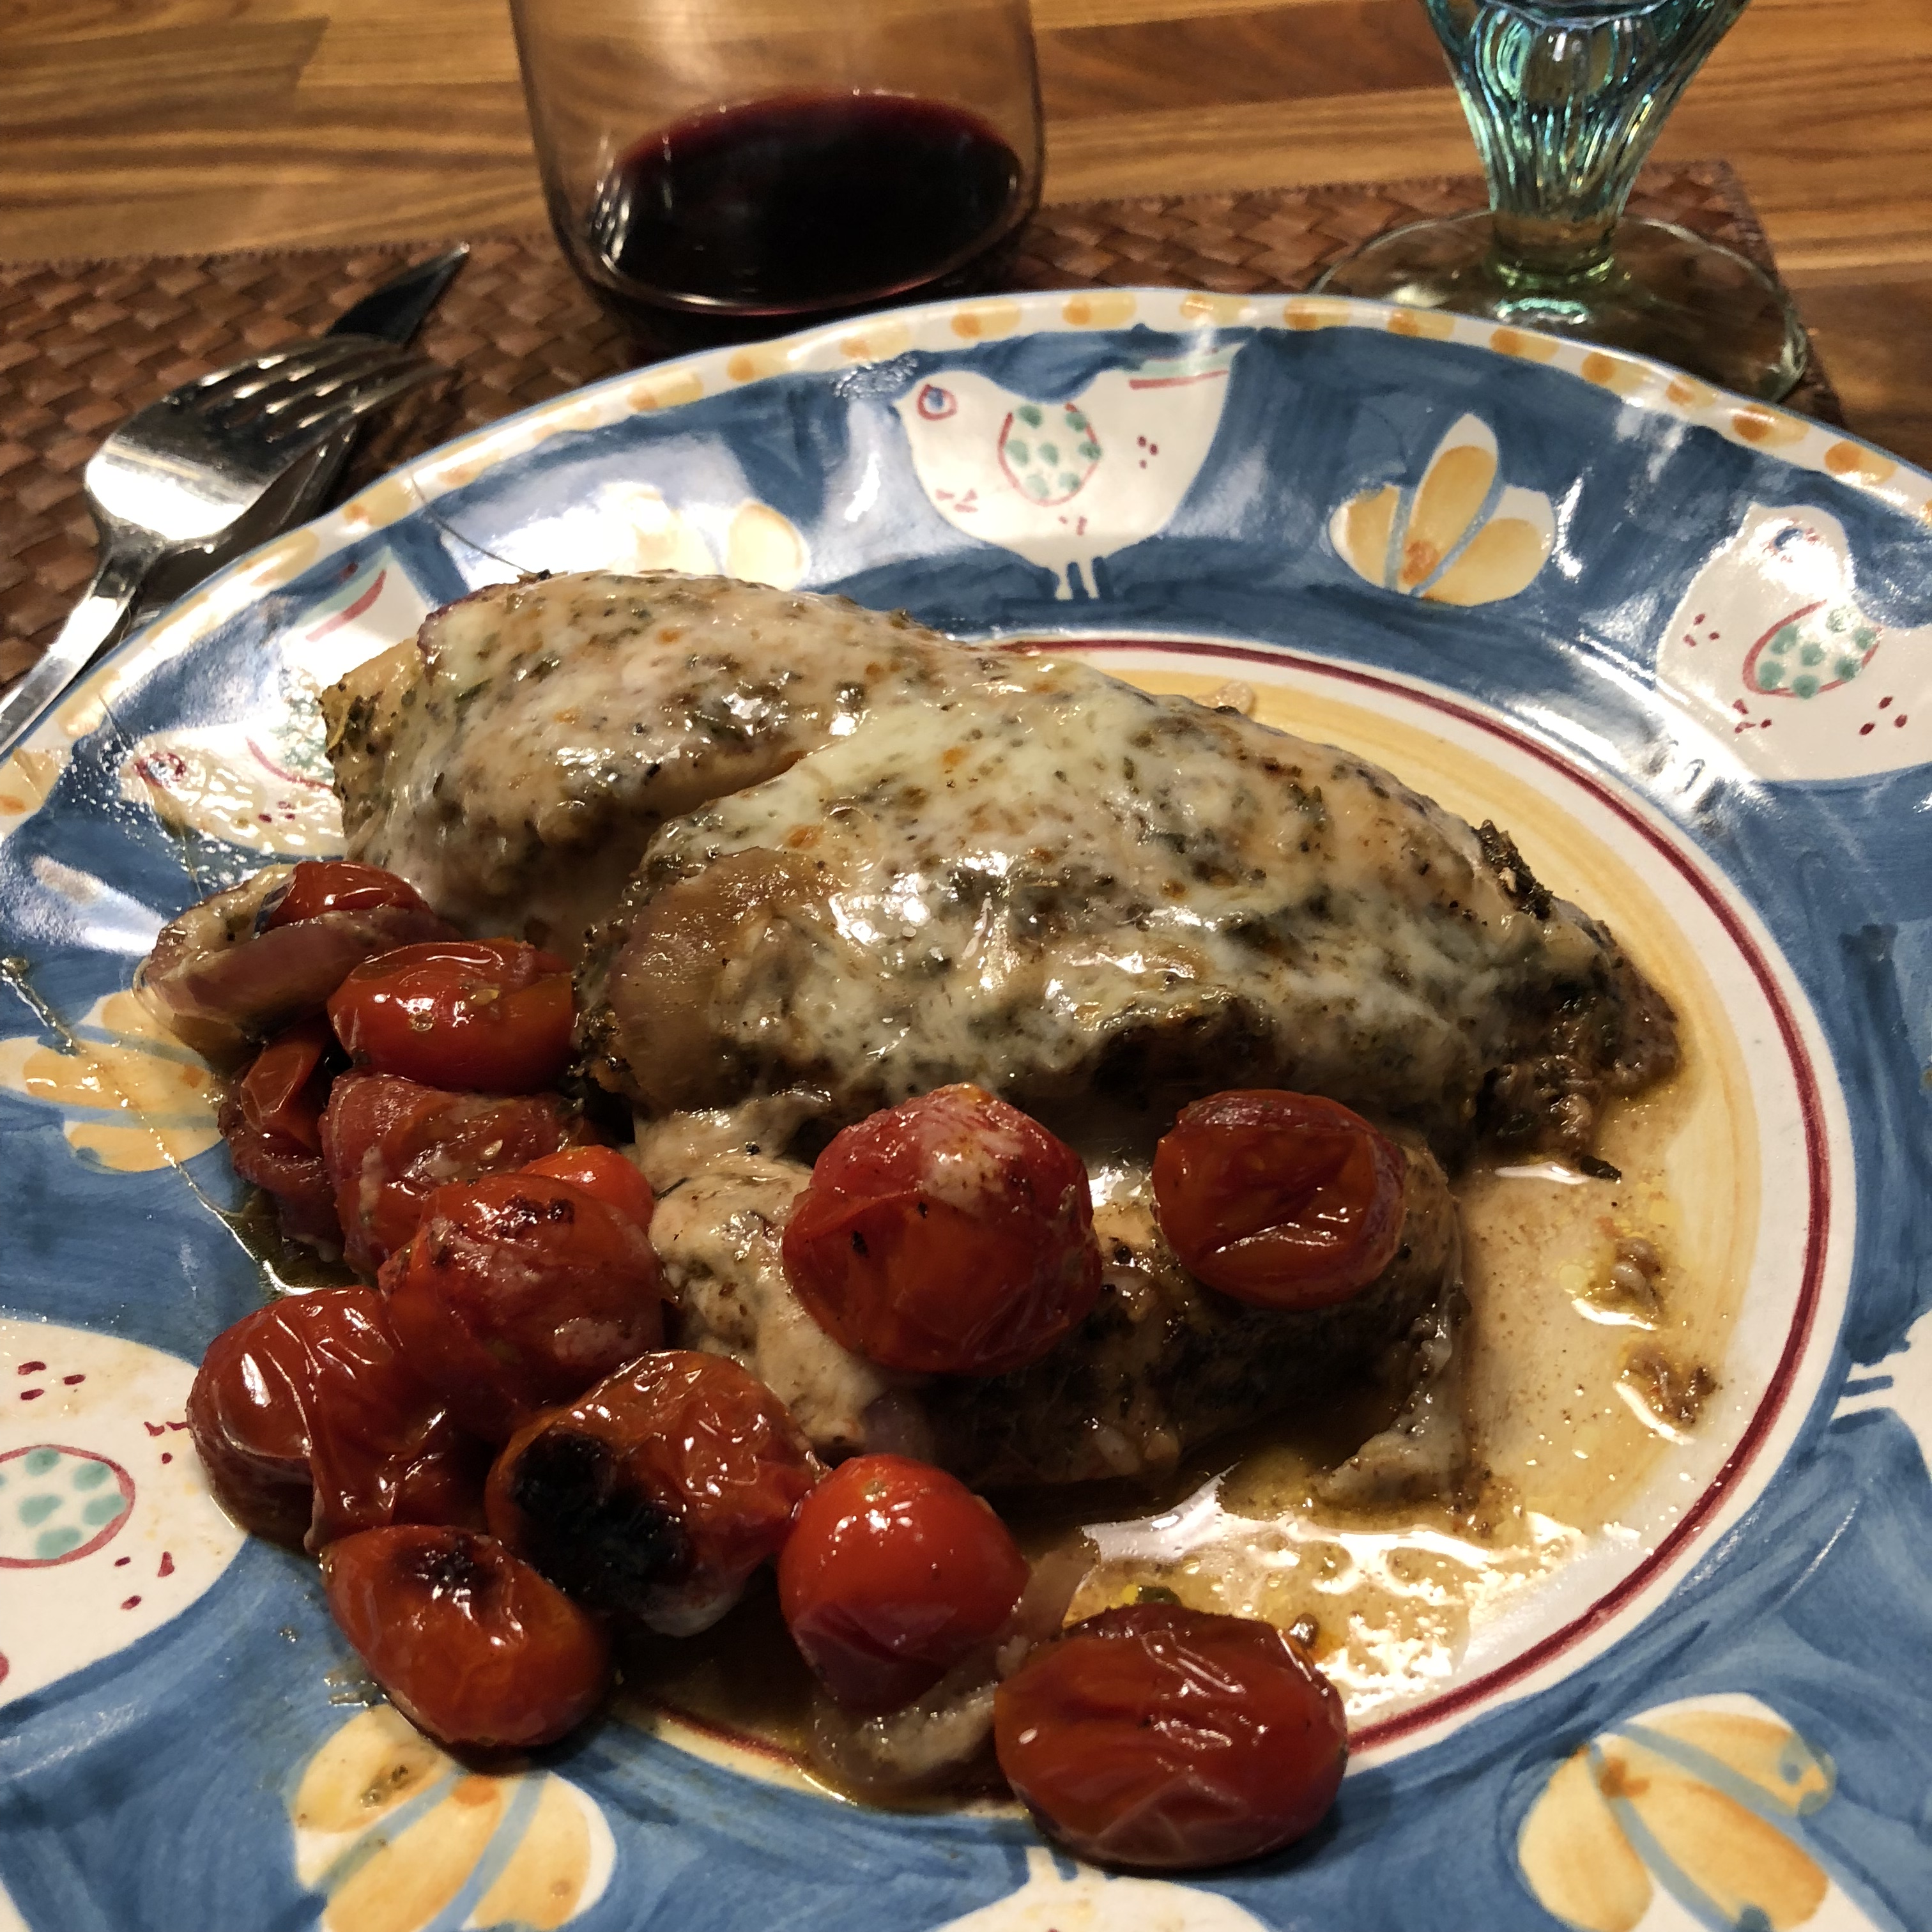
As all of you know from reading my blog and following my recipes I have truly embraced the one pan meals. They are so super easy to prepare and cook not to mention cleaning up is pretty snappy. I threw this recipe together the other night and I have to say it was pretty tasty. Juicy roasted tomatoes and balsamic vinegar act as a delicious sauce for this wonderful week-day meal but why not for the weekend as well? You’ll love the tomato balsamic sauce not to mention melted mozzarella cheese! This is a keeper and the little bit of red onion added another delicious layer of flavor to this tasty dish. This is what I did, I actually gave you all a few options in the ingredients dept. so mix and match what works best for you .
Ingredients:
3-4 skinless chicken breasts ( I used 3 breasts for the two of us) 1 nice size chicken breast per person is probably a good guess.
2 Tablespoons Olive Oil
1 Teaspoon Italian Seasonings — if you don’t have this use 1/2 tsp. dried basil and 1/2 tsp. dried oregano
1 Teaspoon Kosher Salt
Freshly Ground Black Pepper to taste
2 Teaspoons of Garlic Powder — divided or use 1 1/2 Tablespoons Fresh Garlic which would probably be 5-6 garlic cloves
1 cup cherry or grape tomatoes which I left whole if you’d like for a mushier sauce you can 1/2 the tomatoes
1/4 red onion, peeled and thinly sliced
1/4 cup balsamic vinegar
1 Tablespoon packed brown sugar–if you want to omit the sugar you can — I used it
3/4 cup to 1 cup Mozzarella Cheese — I used shredded
*you can garnish with fresh chopped parsley or fresh basil
Directions:
Preheat oven to 400 degrees.
Place chicken breasts in a sprayed ( Pam or any other baking spray you like) and drizzle with the olive oil. Season with dried seasonings and if you’re using fresh garlic 1 Tablespoon of it here.
Rub seasonings all over the chicken. Put tomatoes and red onion around the chicken in the baking dish.
Whisk together the balsamic vinegar, sugar and garlic powder or remaining 1/2 Tablespoon of fresh minced garlic. Pour over the chicken breasts and flip each breast to evenly coat.
Bake in pre-heated oven for app. 20-25 minutes depending on the thickness of your chicken breasts or until chicken is no longer pink in the middle. You can cut into a piece to check for doneness.
When chicken is cooked through sprinkle with cheese and set oven to broil for 4-5 minutes or until cheese is melted .
This would be delicious served over rice or pasta but we just ate it as is and it was pretty delicious on its own.
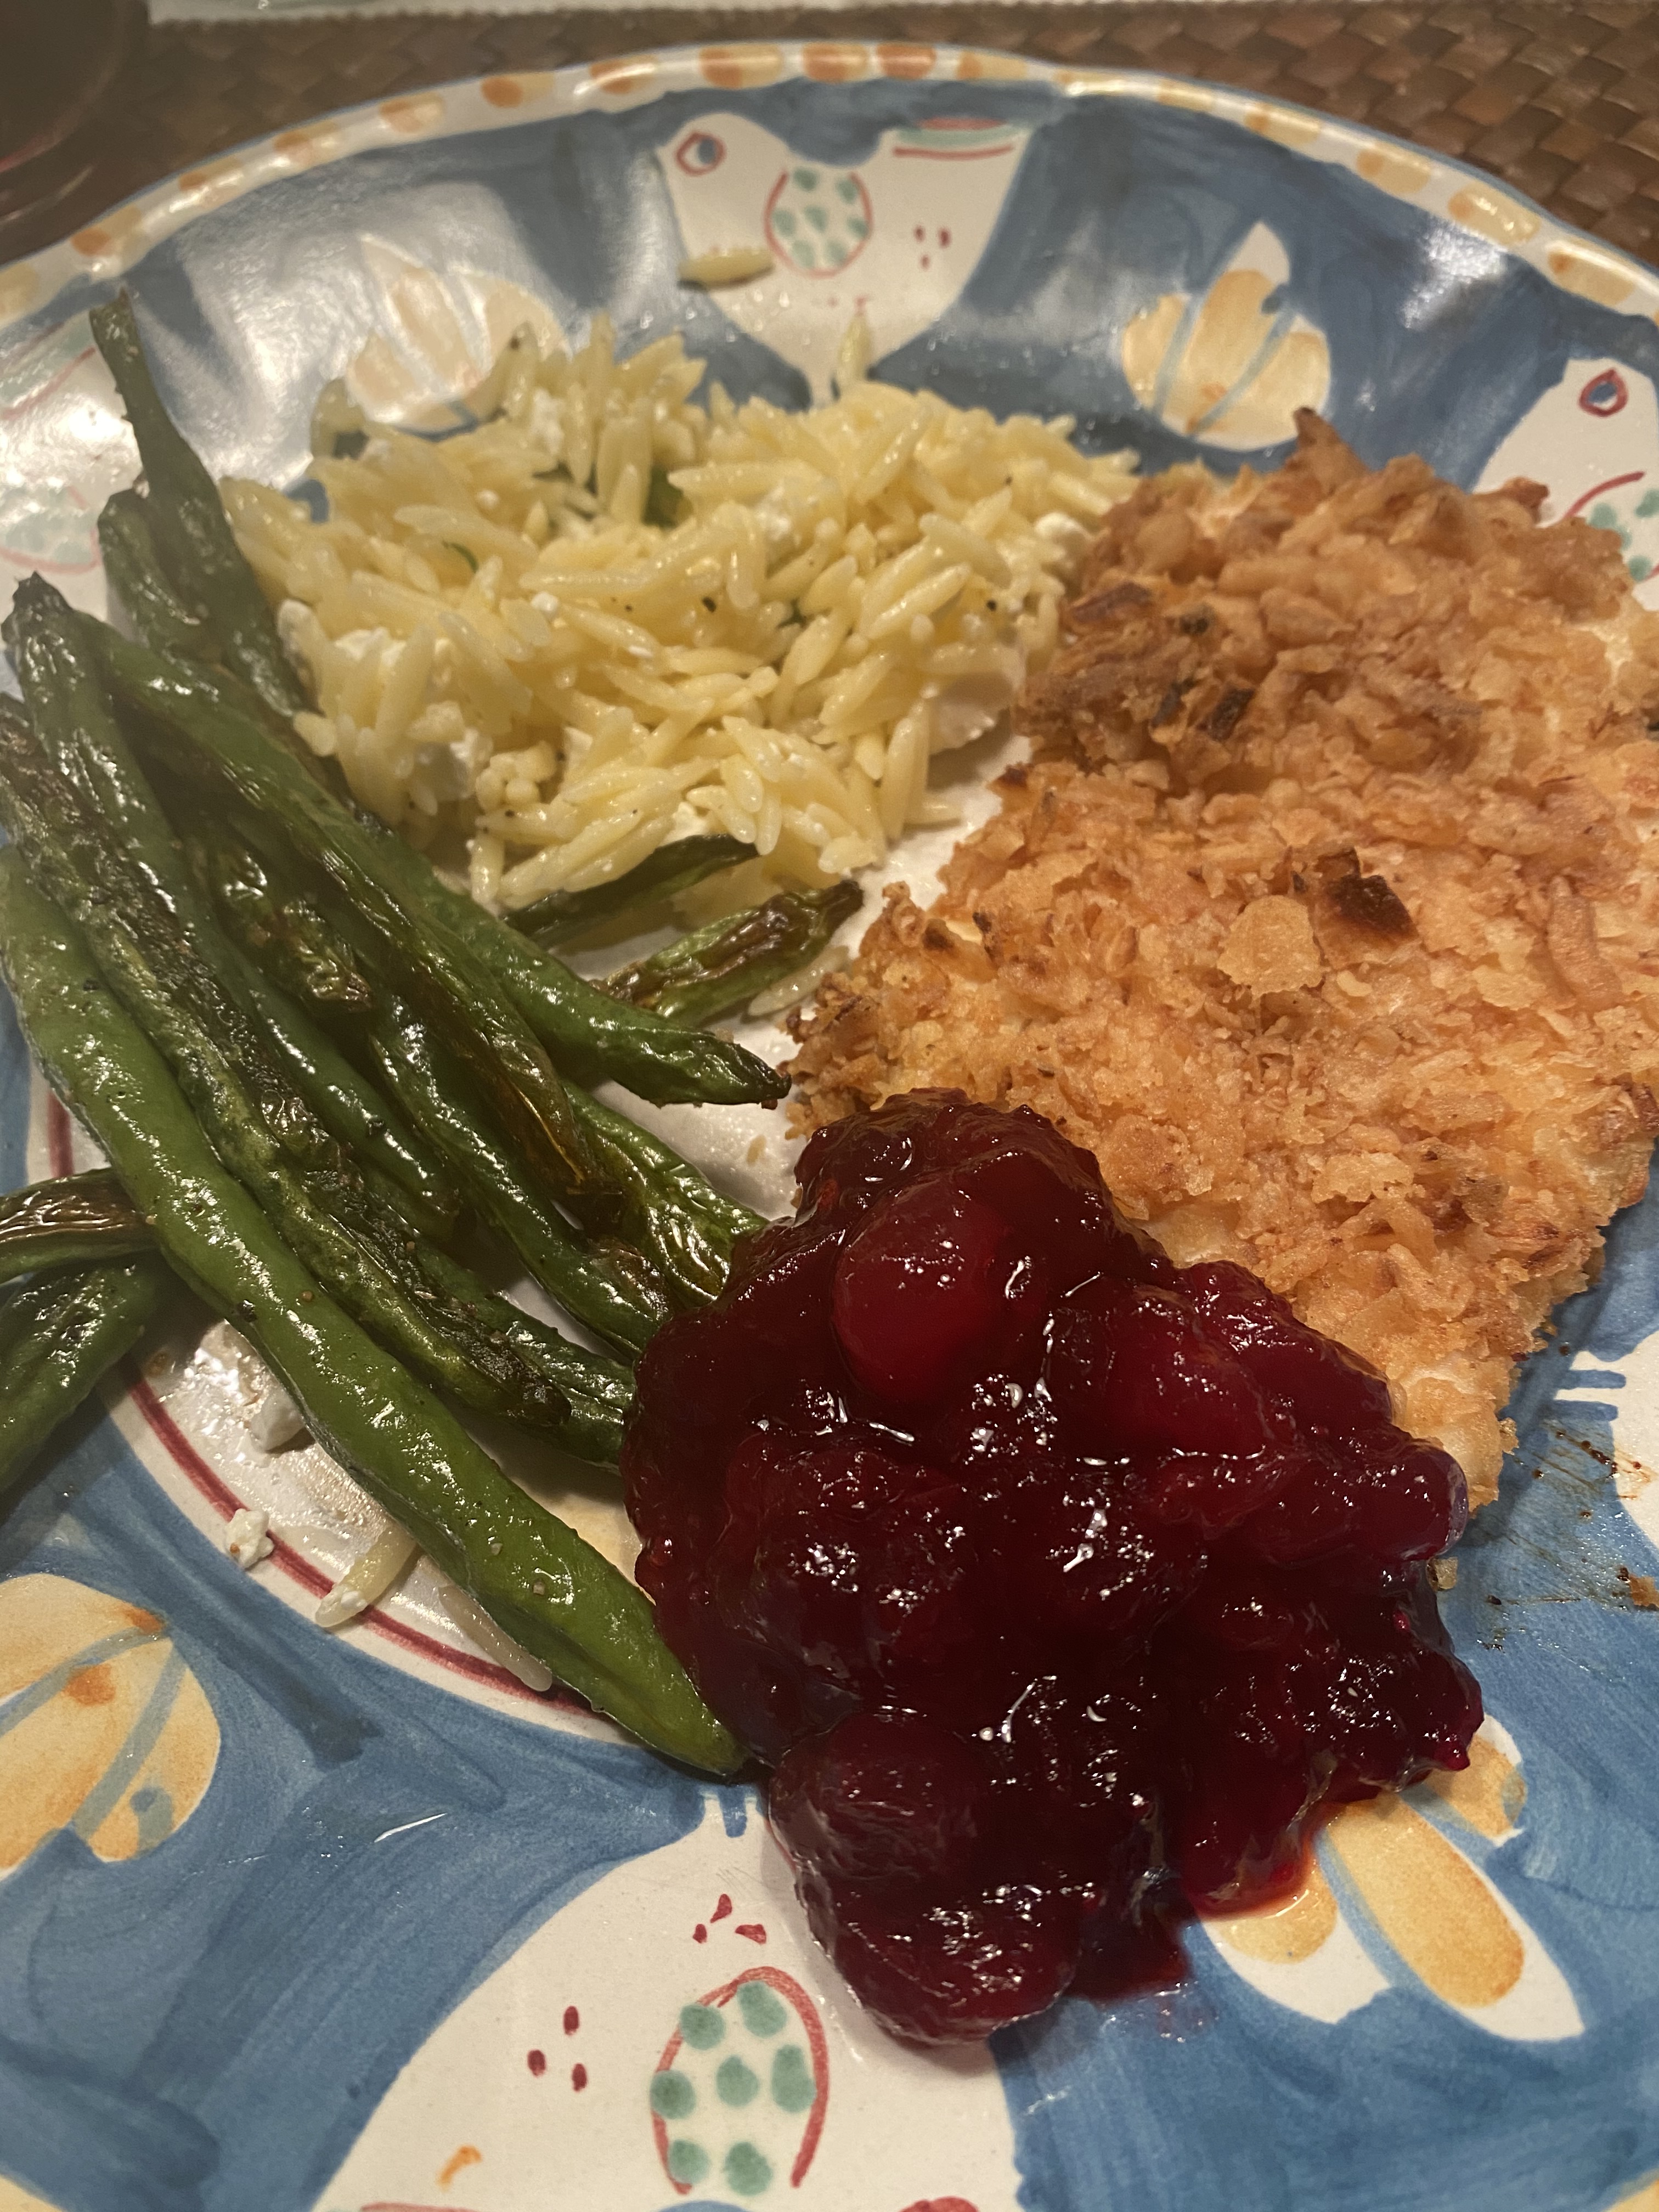
I love this recipe from Ina Garten’s Modern Comfort Food Book.
This is a delicious side dish for Chicken , fish ,and meat. I particularly like it with Roast Chicken. In the photo I posted here I served it with onion crusted chicken, oven roasted string beans, and homemade cranberry sauce. It was sort of perfect.
Get a good block of Feta or buy the crumbled one . I diced up a block of Greek Feta Cheese and it was just perfect but a nice crumbled one would work equally as well.
If you compare my recipe to Ina Garten’s original recipe you’ll notice I have omitted the salt, it was too salty for me. I tasted for Salt and Pepper when finished and added a little bit to the orzo when I cooked it. Everyone has a different palate for Salt so my suggestion is to taste at the end and add then, this recipe is easy to add at the end. Same goes for pepper just add to your own taste. Feta was plenty salty.
Simple to make and Delicious to eat .
Enjoy!
Ingredients:
1 cup Orzo
2 teaspoons grated lemon zest
2 Tablespoons Freshly squeezed Lemon Juice
2 Tablespoons good Olive Oil
1 Tablespoon minced fresh dill
1 cup small diced Feta ( try a good greek Feta ) or crumbled Feta Cheese
*kosher salt and freshly ground black pepper to taste– see note above
Directions:
In a large saucepan , bring 2 quarts of water to a boil, and cook the orzo according to package directions al dente.
Once orzo is cooked and drained transfer to a bowl and stir in the lemon zest, lemon juice, olive oil , dill, fold in the feta and taste for salt and pepper. I added no salt but about 1/4 teaspoon of freshly ground black pepper. This is up to you . Serve hot or at room temperature .
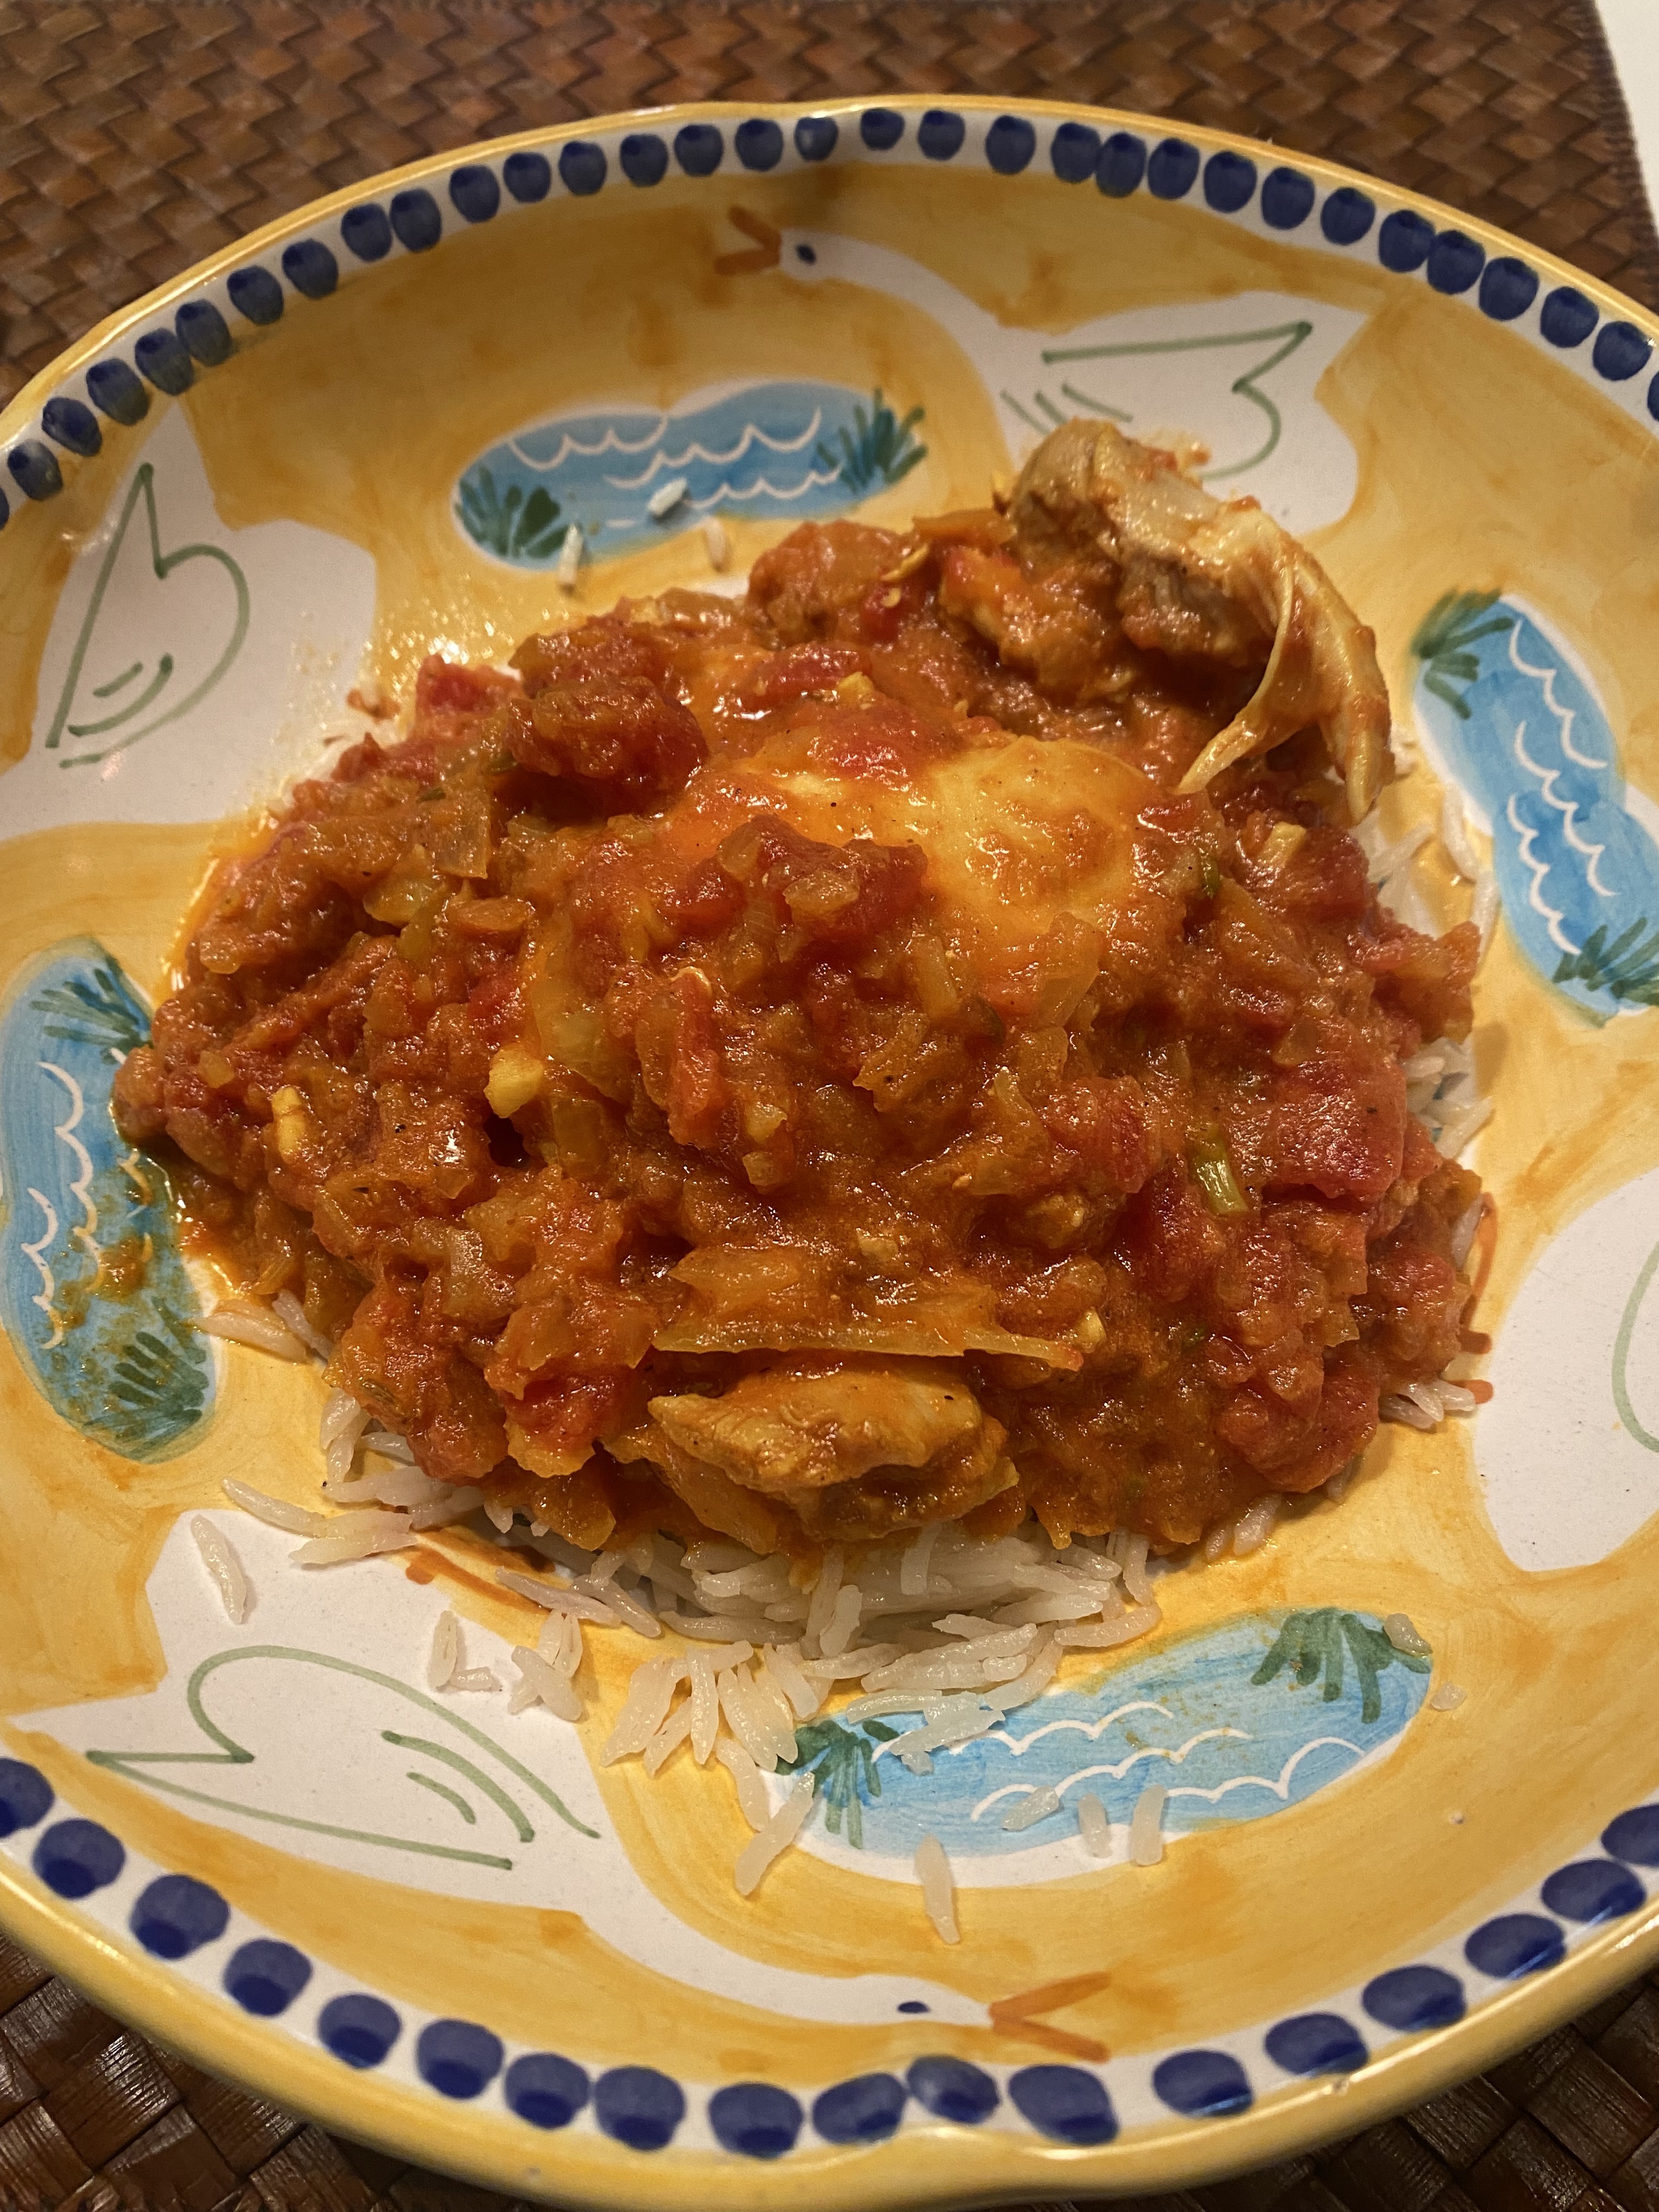
Just a little explanation of curry before we go any further. As I learned on a trip to India curry in it’s simplest form is an Indian gravy or sauce that is used with meat , tofu, or vegetables. It is usually served with rice and most popularly Basmati Rice and it contains many different kinds of spices. You can have a mild curry or a spicy curry. This recipe is a combination of different spices and actually doesn’t even use actual curry powder. So when people say they don’t like “curry” what exactly are they referring to? We loved this dish and since I am not in NY at the moment and can’t get good Indian cuisine I decided to make this recipe. Pretty easy if you have all ingredients in the house — mostly spices . Of course you control the “heat” of the curry — this was obtained with the cayenne pepper so use at your discretion. Very simple dish and I served with Basmati Rice .
This recipe as is will serve 4-6 — for the two of us I halved it — not an exact science so don’t worry about it. For instance I used 1 1/4 lb. chicken thighs. Yes I think chicken thighs yield the best flavor but if you absolutely don’t want to use them you can use breasts just cut them into smaller pieces.
Be a little adventurous and you might surprise yourself. Hope you enjoy as much as we did.
Ingredients
2 1/4 lbs. boneless, skinless chicken thighs , mine were rather small so I left whole but if they’re large cut into 2-3 inch pieces —
1 cup plain, full-fat yogurt — you can use Greek and you can use 2% as well
4 garlic cloves, minced or grated and divided
2″ piece of ginger, minced or grated and divided as well. If no fresh ginger which I recommend you can use powdered . Use app. 1/2 teaspoon of ground ginger, divided.
2 Teaspoons kosher salt, divided plus more for taste
3 Tablespoons neutral oil such as Canola or Vegetable
2 large onions, minced
1 teaspoon cumin seeds
1 15 oz. can crushed or diced tomatoes
2 Tablespoons tomato paste
1 1/2 teaspoons ground turmeric
1 teaspoon garam masala
1 Tablespoon ground coriander
1/2 to 1 teaspoon cayenne powder– this will give flavor and a bit of a kick so go with less if you like a mild curry
1/2 cup water
Directions:
Combine chicken thighs with yogurt, half of the garlic, ginger, and 1 teaspoon kosher salt in a bowl and set aside for however long you can ( up to 1 day) I did for about 5 hours and it was just fine. I refrigerated and took out while I was prepping ingredients.
In a large 4 qt. or larger heavy stock pot with a lid, heat oil. Once hot add onions and cumin seeds and cook for app. 5 minutes or more till onions break down and are translucent. Add remaining salt, turmeric, garam masala, coriander, and cayenne and cook for a few minutes. Add tomatoes and cook until they break down and add the tomato paste, cook for another few mins. Now add the chicken in yogurt marinade, plus water , stir to combine , and bring to a simmer , stirring. If you need more water add a little at a time. Simmer for 25-30 minutes stirring every once in a while and checking for consistency of gravy.
Chicken should be done when it is cooked for about 1/2 hour, you can check by cutting a larger piece to see if it is cooked through. Adjust seasoning as needed and serve over rice.