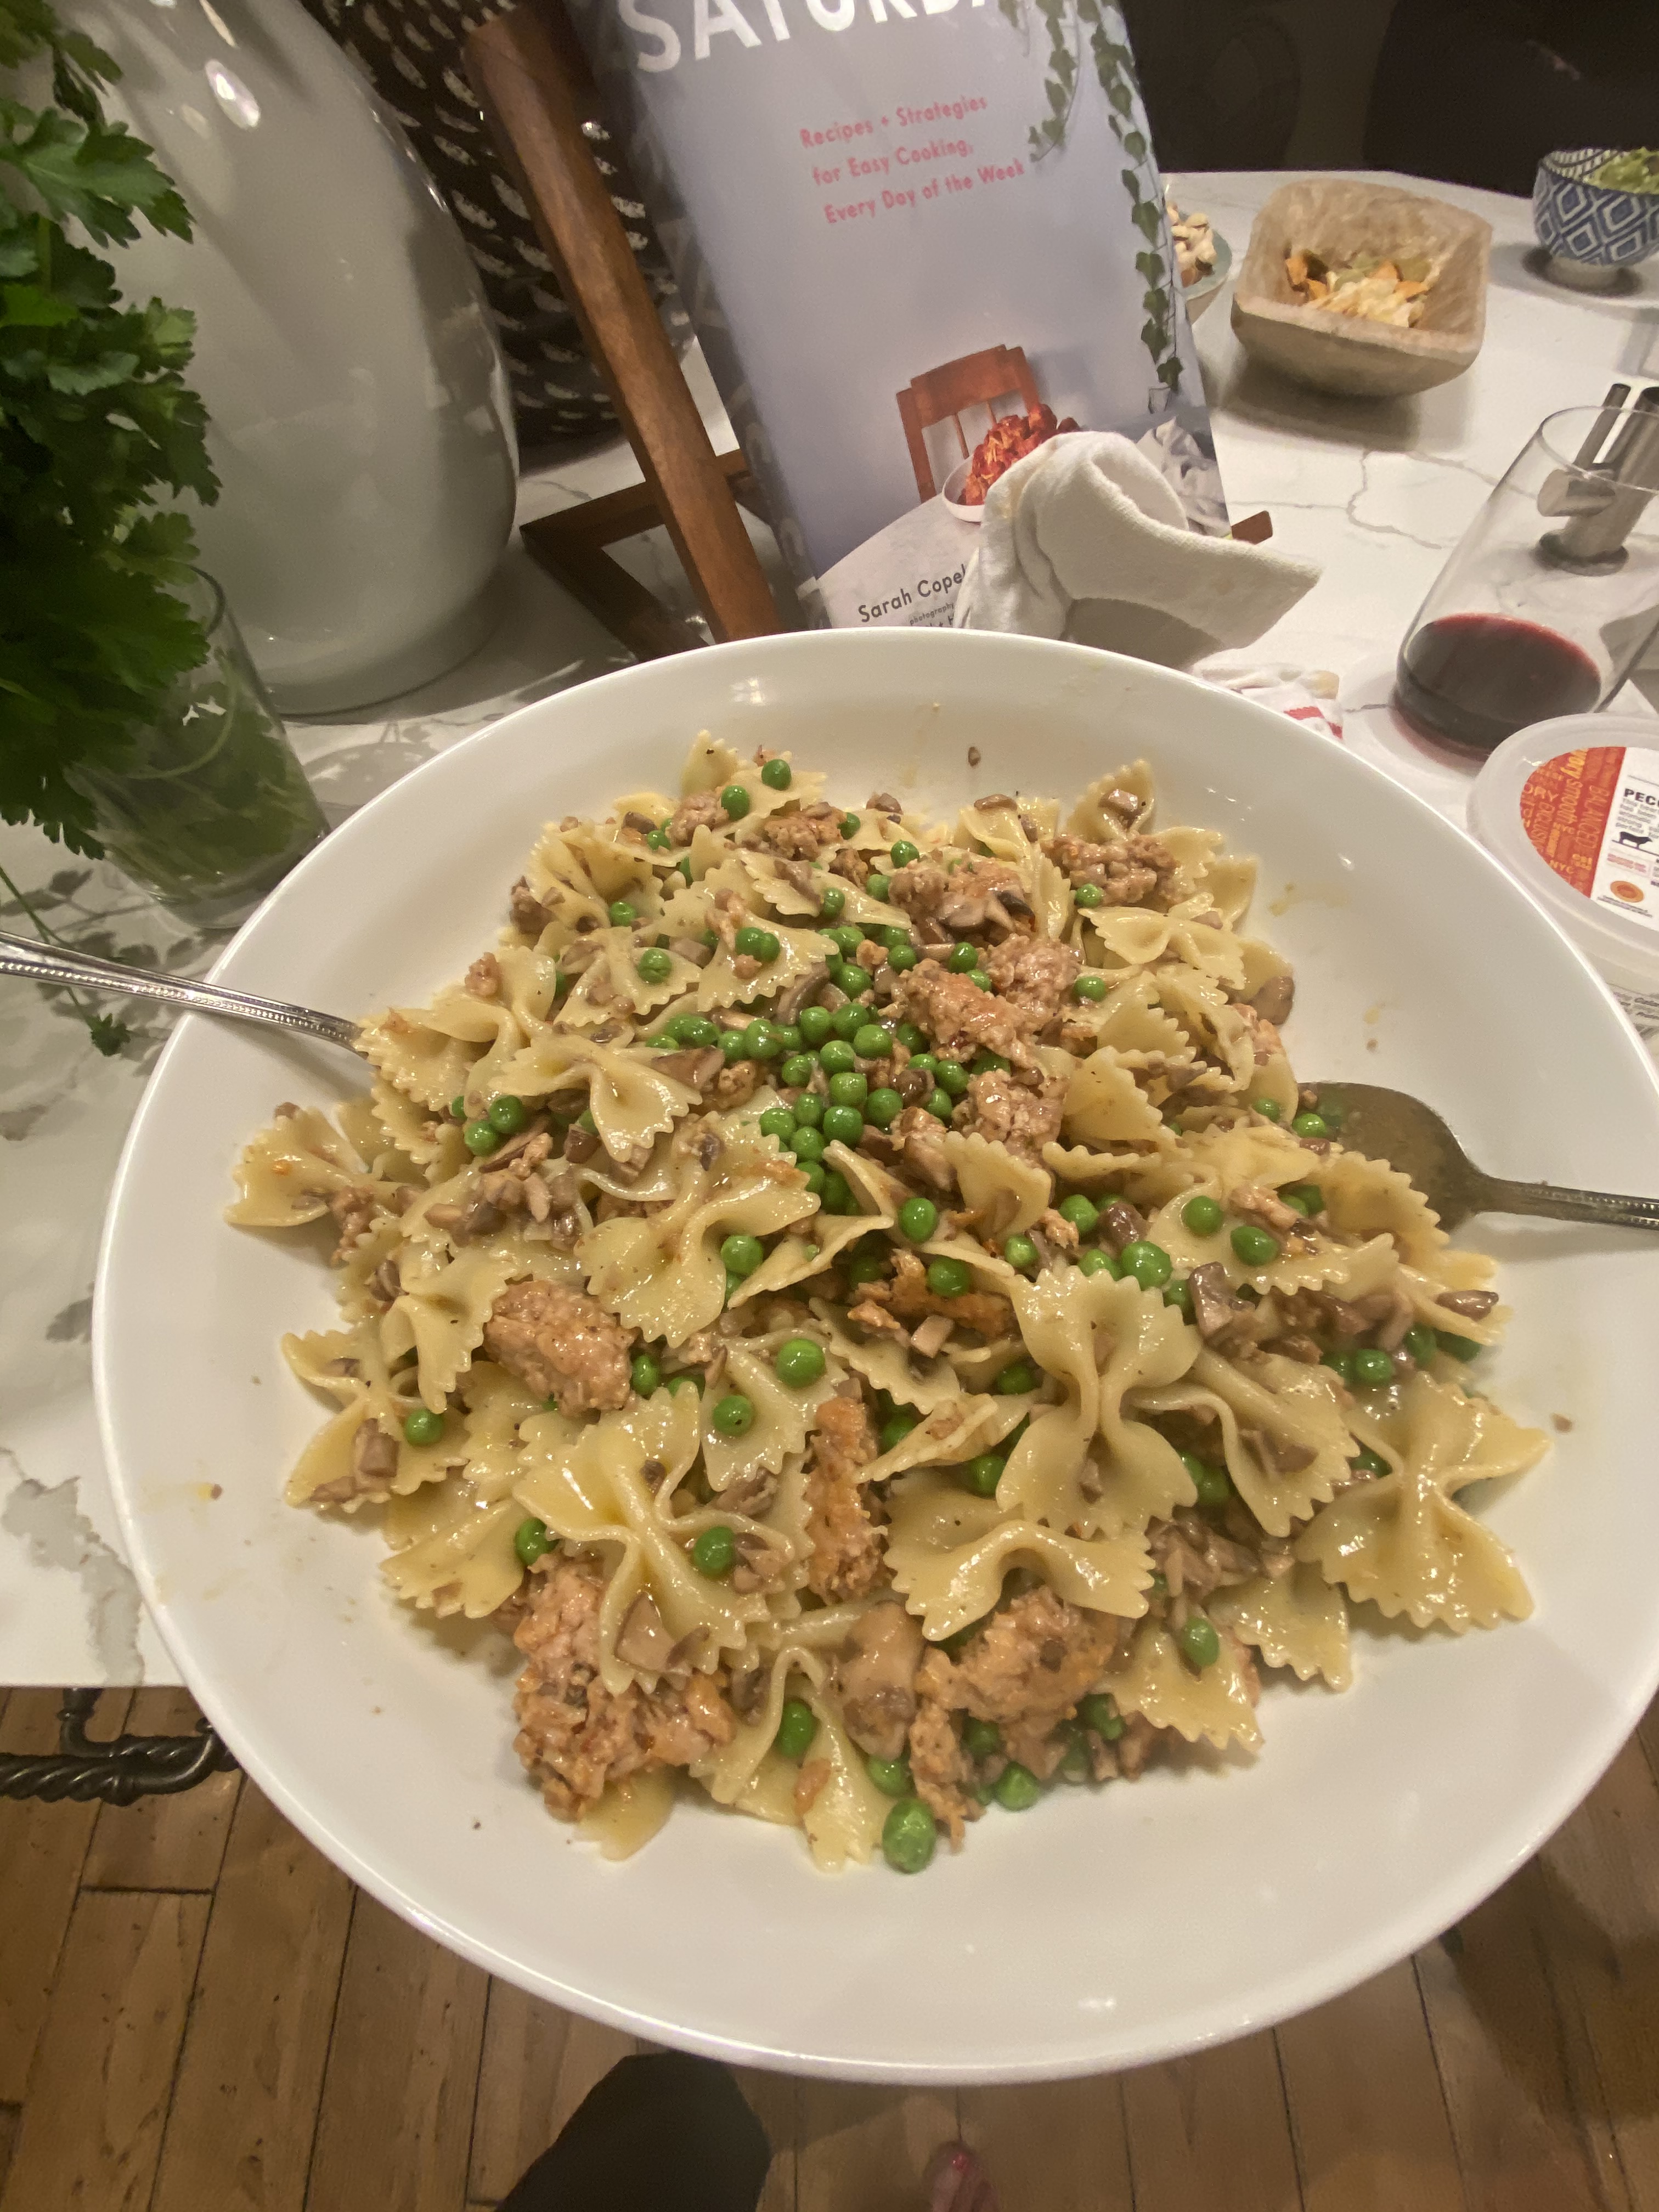
Author Archives: cookingwithcandi

Un-Stuffed Cabbage

photo 3 (4)photo 2 (2)photo 3 (4)photo 3 (5)photo 4 (3)photo 2I love stuffed cabbage and my Grandmother made the most amazing stuffed cabbage ever . I love stuffed cabbage but do not feel like dealing with the actual stuffing of the cabbage, it is way too labor intensive for me.  I have made several variations of this and found this one to my liking the best. You can play with the ingredients which is what I did . Original recipe is from Kosher by Design and it is perfect for Passover by just leaving out the rice and substituting matzoh meal in its place. Basically this is meatballs in a sweet and sour sauce with cabbage . I doubt very much that Joel would ever eat real “stuffed cabbage” but he liked this. The cabbage cooks down so much that you don’t even realize you’re eating cabbage. I also used 1/2 chicken ground meat and 1/2 beef ground meat , this is entirely up to you. I wouldn’t do all chicken because it might be a bit dry, you can definitely make this with turkey but use dark meat turkey or the balls will also be very dry. You can also make this ahead for the holidays which is always a very good thing and feel free to freeze it.  This is the original recipe , adjust amounts for how much you’re making. I made 2 lbs. of meat but made full sauce as I was testing it out. You’ll want to use a large pot for this recipe. Enjoy!

This will be on our Rosh Hashana and Passover menu this year with raisins and meat , sweet and sour, oh so perfect!

Follow me on Instagram @cookingwithcandi

Ingredients:

Meat

3 lbs. ground meat– I used chicken and beef (dark meat turkey is best here) white meat turkey tends to be very dry. Mixed with beef it’s fine but if using alone you’ll need to use dark meat ground turkey.

2 large eggs, lightly beaten. Use room temperature eggs they work best.*see my post about eggs–a little note on my blog.

3/4 cup uncooked long grain white rice, for Passover use matzoh meal and omit the rice

1/4 cup water

1 onion finely chopped

Kosher Salt to taste–app. 1/2 to 1 tablespoon

Pepper to taste–app. 10 grinds on a pepper mill, or app. 1/4 of a tablespoon

*garlic powder if you like

Sauce:

2 packages of shredded cabbage, probably about 1 head of cabbage finely shredded, no need to do it when you can buy it pre-shredded (not red cabbage)

1 Tablespoon Vegetable Oil

Kosher Salt to taste ( app. 1/2 tablespoon)

1 1/2 tablespoons Kosher Salt

1 1/2 cups tomato juice

4 8 ounce cans tomato sauce ( or 32 ounces)

1/2 cup brown sugar ( use whichever brown sugar you have in house , it won’t make a difference. Light or Dark, I actually used dark.

1 cup sugar

3 lemons squeezed , I got about 1/2 cup , they were smallish lemons

1/2 cup raisins

Directions:

In a large mixing bowl combine the meat, eggs, water, rice and onions. Season with Salt and Pepper , and if you like garlic powder. Gently mix by hand, and I do mean gently, if you over do it the meat will be like concrete. Set aside.

Heat the oil in a large pot over medium heat. Add the shredded cabbage and about 1/2 tablespoon of kosher salt. Simmer for 10 minutes. Add the tomato juice, tomato sauce, brown sugar, sugar, lemon juice and the raisins. Stir till well combined and continue cooking sauce at simmer setting.

Gently form meatballs out of the meat mixture, I made a rather nice size meatball, not too large and not too small. Make whatever size you’d like. Just do not over-handle the meat because it will cause meat to toughen. Add to cabbage mixture, just drop into the hot sauce and do not stir, you can pile them on top of one another because they will cook down.

I left it to simmer for about 1 1/2 hours . I didn’t touch the meat balls for at least the first 1/2 hour, you’ll want them to cook through and form into nice balls before you stir, so just leave them to cook. After the first 1/2 hour or so you can gently stir and move the meatballs around. They don’t require a lot of stirring around .

This dish brought back memories of my childhood and was a most satisfying main dish.

Recipes for Jewish New Year–Rosh Hashana 2020

Finished Product Apple Cake

Finished Product Apple Cake

photo 1 (3)

Un-Stuffed Cabbage

DSCN2648DSCN4230DSCN2642DSCN4225DSCN4234photo (2)

I cannot believe that the Jewish Holidays are here already and this year will be very different from years gone by. I will not be with my family for the first time in maybe my life. Time to reflect for sure. While I am not happy about the situation I am in this year I will still the mark the days with some delicious Holiday Food. Here is a list of some of the recipes that you can put in the search bar on my site or just google the recipe with cooking with candi and you should be able to get it.

I am wishing all of you who celebrate a Very Happy Healthy New Year.

Rosh Hashana starts in the evening of Friday, September 18

Yom Kippur starts Sunday, September 27

I am always open to suggestions and inquiries and general help. You can DM me on Instagram/Facebook or email me at cmk55@sopris.net

For those who celebrate have a very Happy Healthy New Year!

Homemade Chicken Soup with not so Homemade Matzo Balls ( even though this is for Passover we eat it a lot on Rosh Hashana)

Happy New Year Brisket

Unstuffed Cabbage–a great alternative to meatballs

Chicken Marbella

Honey Roasted Chicken

Old School Meatballs

A Noodle Pudding from Ellen

Another Noodle Pudding from Marcy *kosher non dairy

Noodle Pudding with Apricot Nectar–probably one of the all time best kugels ever

Noodle Pudding from Julie

Mushroom Barley

Kasha Varnishkes

Grandma Millie’s Cauliflower

Applesauce and Raisin Cake

Don’t let the Apples go Bad Cake

Julie’s Honey Cake

Plum Torte

My farewell to Norah Ephron- her Tzimmes

Tomato and Watermelon Salad

IMG_2227With the last breath of summer upon us I made this salad and it was absolutely delicious, refreshing and sweet and salty all at the same time!

The only thing is I was so busy serving my dinner that I forgot to take a photo of it! You’ll have to trust me on this one. It’s super easy and you can cut everything up and get it all ready ahead of time and put it together when you’re ready to eat it.

You’ll want to make sure that the watermelon and tomatoes are nice and cold so leave them in the fridge till you’re ready to serve! I added thinly cut red onion for a bit of a bitter taste but if you hate the onion thing you can easily omit it. I only used 1/2 red onion because I liked the flavor. I also used Basil but if you’d like you can substitute Mint very easily. Play with it.

Happy End of Summer and Enjoy Labor Day Weekend and Follow me on Instagram @cookingwithcandi

Ingredients:

I used small cherry tomatoes and used about 1 pint– I cut them in 1/2 , you can use any kind of tomatoes you like I would just cut them into small pieces about 1 -2 inch pieces

1 lb. seedless watermelon cut into small pieces about 1 -2 inches as well

red onion thinly sliced — I only used 1/2 red onion (read above)

1 teaspoon kosher salt plus a little more for sprinkling

Freshly Ground Black Pepper to taste

1/4 cup extra-virgin olive oil

2 Tablespoons Sherry Vinegar–I love the flavor of Sherry Vinegar and use it whenever I can –if no Sherry Vinegar substitute with White Balsamic Vinegar

1 cup crumbled Feta Cheese

Directions:

Combine the cubed watermelon and cut up tomatoes in a large Non-reactive bowl such as glass. Sprinkle with Kosher Salt and a few grinds of the pepper mill. I put into the fridge while I prepared my dinner. I also added the red onion at this point.

Whisk together in a small bowl the oil and vinegar with 1 teaspoon of kosher salt and a little more freshly ground black pepper to taste

Right before you’re serving take tomatoes and watermelon out of the fridge and add cheese to it, then the dressing and toss gently to combine. Let it sit for a few minutes and drain off the excess liquid because as it sat it got very liquidy. Serve with a slotted spoon.

That’s it! Totally Delicious and Refreshing!

Follow me @cookingwithcandi on Instagram


Rosh Hashana 2018 and the end of Summer

It’s Labor Day Weekend and that’s sort of the official end of Summer for everyone. The weather is still warm but the kids are back in school and everyone is back at work full-time and vacation is over. Rosh Hashana 2018 falls super early this year on Sunday September 9. I will start posting some of my standard Holiday Recipes. I hate to have to but I think it’s a week away and we have to start thinking about shopping and cooking!

If you don’t feel like waiting for me to post you can enter Rosh Hashana into the search bar on my blog and most of the recipes will pop up but I will be posting in a day or two.

*follow me on Instagram @ cookingwithcandi


Champagne Vinaigrette and Kale/Brussels Salad

photo 1 (3)

Dressed Salad

photo 1 (6)

Ingredients

photo 3 (4)

View from Deck

photo 2 (4)

Joel’s Salad with lots of Parmesan Cheese–hey he ate it!

photo 1 (4)

This Champagne Vinaigrette appeared on my blog back in 2012. It’s really perfect on any kind of greens and this is the salad that I made along with it. I love Kale but I don’t like feeling like I’m eating the front lawn. I like my kale very finely chopped and massaged with dressing. I use my food processor to chop the kale and I dress the salad ahead of eating it and let it sit for a while so that the kale can absorb as much of the dressing as possible. This salad was really delicious and I know this is almost impossible to believe but I got Joel to eat some of it! The way I did that was to add a lot of parmesan cheese to his plate and he ate it.  Enjoy this dressing it is perfection in a bottle and good on almost anything you put it on.

Follow me on Instagram @cookingwithcandi thanks and I’ll follow you back .

Happy End of Summer!

Champagne Vinaigrette:

1 tablespoon Dijon Mustard

1 teaspoon whole grain mustard (Maille makes a wonderful mustard)

1/3 cup Champagne Vinegar

1 tablespoon Rice Wine Vinegar

1 teaspoon Honey

3/4 cup extra virgin olive oil

kosher salt to taste app. 1/4 teaspoon to start

freshly ground black pepper , a few grinds of the mill to taste

Ingredients for the Salad:

1 bunch of Kale or a bag of washed and chopped kale , baby kale is great as well

1/2 lb. of Brussels Sprouts, washed and cut thinly–now you can buy brussels already sliced which makes prep super fast and easy!!!

*this is optional but it adds pretty color and some more crunch. 1/2 small head radicchio, cored and thinly sliced

1/2 cup of Grated Parmesan or Shaved Parmesan

1/2 cup of dried fruit, I used dried craisins, but raisins, cherries, any of them will do

1/2 cup pignoli nuts, I roast them in the oven for about 4 minutes till they get toasty. ( in oven at 350 degrees for about 4 mins.)

*add any seasonal fruits or vegetables or protein you may like,  this is just a basic salad idea.

Directions:

Using my blender I threw all vinaigrette ingredients  except for the olive oil which I slowly streamed in through the top of blender until dressing emulsified. Taste for Salt and Pepper and you’re good to go.

Wash and Dry the Kale, remove the stems and ribs and just use the leaves. Even better you can buy triple washed kale already chopped. I still put that through my processor because it’s not chopped enough for me.

In the food processor I chopped up kale slowly, you don’t want to over chop the kale either. As soon as it starts to break down I stopped and removed it and added more.  I do it in sections till it’s all chopped.

Slice Brussels very thinly into slices , they will fall apart as you slice and mix them into salad.  Add Brussels to Kale with all other salad ingredients except for Parmesan Cheese. I added cheese when I was ready to serve to individual plates.

photo 5 (4)

Raw Chopped Salad pre dressing

photo 5 (3)

S’Mores Baked in the Oven

IMG_8638IMG_8636IMG_8639 IMG_8641 IMG_8642IMG_8634 IMG_8633 IMG_8632Oh Wow!!! what could be better??? truly easy and very little fuss perfect with the kids and perfect for the adults. Very rich and gooey. Whole thing takes about 40 minutes from start to finish and you can re-heat the sliced bars in the microwave for about 30 seconds if you have some left-over. It’s great for a large group and I would say about 12-15 servings here. Let’s hold on to the last few weeks of summer with this delicious dessert. Perfect for Labor Day.

For a very traditional s’mores taste eat immediately, I think they tasted a little better after they cooled down for a bit. Whichever way you prefer them –this is a great recipe for a crowd. You can prepare first and then pop in the oven while you are having dinner. Enjoy!

*also I was able to obtain these amazing square marshmallows in the supermarket, if you see them –grab them otherwise just regular old marshmallows will do the trick.

Ingredients:

Crust:

18 graham crackers

1/4 cup granulated sugar

pinch of salt

8 Tablespoons unsalted butter-melted

*parchment paper — I think you’ll want to work with it for this recipe–it can get difficult once they harden to get them out of pan. Clean up was a snap with it.

Topping:

3 extra-large Hershey Bars (or 7 regular-size ones)

24 jumbo marshmallows–look for the large square ones

Directions:

Preheat the oven to 400 degrees. Lightly grease a 9×13 Pyrex type baking pan with cooking spray and then line with parchment paper , allow an extra couple of inches of paper to hang over the edge.

In the food processor bowl, pulse the graham crackers until they are finely ground. Transfer the crumbs to a medium-sized bowl.

Add the sugar and salt to the graham crackers and stir to combine. Add the melted butter and stir until the crumbs are moistened. Pour the crumb mixture into the prepared pan and press into an even layer.

Bake the crust for about 10 minutes or until the edges turn lightly golden. Let the crust cool off completely before adding chocolate. I probably let it sit off heat for about 1/2 hour.

Arrange the chocolate bars (see picture) evenly on the top of cooled crust, I had to remove 1 row of chocolate to fit it in pan and left a little uncovered crumbs around edges. Arrange the marshmallows on top of the chocolate, leaving a little space between each one (see photos) Marshmallows will expand slightly.

Bake until the chocolate is soft and beginning to melt, and the marshmallows are evenly toasted on top. Probably about 10-15 minutes depending on your oven.

I couldn’t wait to eat them but I would suggest letting them cool off for  a little bit, cutting was easier when it cooled down ( after 15-20 minutes) I was able to cleanly cut slices. It’s more like campfire s’mores when you eat them hot out of the oven and certainly messier.

You can re-heat the sliced bars in the microwave for about 20-30 seconds. If you are keeping them , cut them and store individual slices.

Vodka Sauce Recipe–Pasta a la Vodka

I have previously posted my recipe under Pasta and Vodka. This is a little different from that recipe but equally as delicious. My Grandson Brody loved the original but didn’t love the pieces of tomato in it. So this time out I gave it a spin in the food processor and got out all those little pieces of tomato that he didn’t like.

This is what I did last night and it was delicious.

Ingredients:

1 box Penne or any other pasta you would like — I like rigatoni or penne or fusilli

3 cloves garlic — minced

*1/4 teaspoon crushed red pepper–I love the heat but use at your own discretion

1/2 cup grated Parmesan –and more for serving

1 Tbsp. Olive Oil

app. 3/4 to 1 teaspoon Kosher Salt for sauce–and some more to cook the pasta

1/3 cup Vodka–I use whatever I have in the house

1 28 oz. can whole tomatoes–I prefer the San Marzano ones so look for that

1/2 cup 1/2 and 1/2 or heavy cream–I used 1/2 and 1/2 this time — if you’d like it creamier you can add more cream, I used 1/2 cup and it was fine.

Fresh Basil leaves–about 1/4 cup

Directions:

I use a large skillet pan. Add the olive oil and heat until shimmers then add the minced garlic and red pepper. Cook garlic and red pepper  and stir until fragrant but not browned, about 1 minute. Add the vodka and cook down until it is nearly evaporated there will be a little liquid in the pan. Add the tomatoes– while they are cooking I use a masher or a wooden spoon to break up the whole tomatoes. Lower heat to medium-low and simmer for at least 30 minutes.  I then let it completely cool down.   I get out the food processor and put it all in and add the fresh basil and then I puree until smooth. Return sauce to the pan and add the cream. You want it to be creamy , I used 1/2 cup and it was fine you can always add more if you’d like. Cook until warmed through and right before using stir in the parmesan cheese and then add the cooked pasta. Toss to combine in the large skillet.

Serve immediately with additional cheese on the table and you can add a little more fresh basil if you’d like.


Blueberry Crumb Bars

photo (2)photophoto (3)photo (4)photo (2)OK another blueberry recipe while the blueberries are so ripe and delicious! I combined a few recipes that I had and kept my fingers crossed and made a mess in the kitchen and used too much butter and here it goes. Sometimes I just don’t feel like using electric mixer even though I seemed to use a lot of different mixing bowls for this one. I had seen another recipe for a blueberry crumble but it called for shortening, so I substituted butter. It’s a lot of butter I know, but how much can be in one piece? My plan is to eat a little of this and freeze the rest for when my family comes out next month. As I was cutting it up to freeze I managed to eat way more than I should have and they were really beautiful and delicious. Just the right amount of sweet. I let them sit in fridge overnight, and they were way easier to cut into right out of the fridge. They are now nestled in to the freezer, except for the few pieces I left out to eat. I would keep unused and unfrozen pieces in the fridge, take out and bring to room temp. when you’re ready to eat them. You can also heat up in microwave if you prefer them warm. Either way, once you taste this buttery fruity combo you’ll be hooked.

Ingredients:

1 cup sugar plus 1/2 cup sugar

1 teaspoon baking powder

2 sticks cold unsalted butter I cut it up into small diced pieces. I sliced stick in half, and then cut up into smaller pieces which would be easier to blend in.

1 egg

3 cups all-purpose flour

1/4 teaspoon salt

4 teaspoons cornstarch

1/4 cup of lemon juice and zest of one whole lemon ( I did use a large lemon)

4 cups fresh blueberries

9 x 13 inch pan , I used a glass Pyrex and it was perfect

Directions:

Preheat the oven to 375 degrees and Spray 9 x 13 pan. I used Bakers Aid Baking Spray because there is enough butter in this already.

In a medium size bowl, stir together 1 cup sugar, 3 cups flour, and baking powder. Mix in salt and lemon zest. Using a fork or pastry cutter blend in the cold butter pieces and egg. Then with clean hands I played with the dough a bit and got a crumbly texture going. I took half the dough and patted it down gently into pan with my hands. I made as clean an edge as I could, but I wouldn’t worry too much about that.

In another bowl, stir together the sugar, cornstarch and lemon juice. Gently mix into the blueberries. Sprinkle the blueberry mixture evenly over the crust. Crumble with your clean hands the remaining dough over the berry layer.

Bake in preheated oven for about 45 minutes or until top is slightly browned. I baked for 50 minutes , then checked on them. I baked for another 5 minutes. Cool completely before cutting into squares. I actually cooled in refrigerator over night, and cut up the next day.

Fresh Basil Pesto

photo 2 (6)

Chicken and Pesto on the Grill

photo 2 (8)

Pasta Pesto

The original recipe for this delicious pesto appeared back in May 2011 on Cooking with Candi.  Yummy Pesto was the title. This is the same recipe from my BFF Suki. I have tried many pesto sauces and this remains my absolute go to favorite. It is super easy and while the basil is abundant you should make it and freeze it. When you freeze the pesto in a container, pour a thin layer of olive oil over the top . I have it frozen for up to 3 months. I use it on chicken, pasta, and it’s wonderful as a spread. This recipe is good for 2 lbs. of pasta usually. So I use 1/2 and freeze the rest if it’s just the 2 of us.

Pesto Chicken on the Grill with Grilled Peppers and Roasted Sweet Potatoes

DSCN3588

Fresh Basil

If you are going to use on chicken , just brush on the chicken sprinkle a tiny bit of  kosher salt on it and  let it marinate for a few hours at least and it can be marinated  overnight in the refrigerator. Take it out of fridge and let it sit at room temp. before putting on the grill. That’s it!

*You’ll need a food processor

Ingredients:

2 cups fresh basil (washed)

1/2 cup romano cheese (grated)

1/2 cup parmesan cheese ( grated)

1/2 cup pignolli nuts or walnuts

1 cup extra virgin olive oil–use a good one

1 – 3 tablespoons of unsalted butter (it’s good if the butter is softened before adding) you can soften in microwave

4 cloves garlic – peeled and whole

freshly ground black pepper–to taste

*kosher salt to taste if you feel you need it after finished making pesto

Directions:

I put all ingredients except for olive oil in the food processor. Give it a few grinds using the blade attachment. Then I slowly add in the olive oil through the top of processor while it’s on. Beautiful green pesto! so easy. Taste for salt and pepper

Cook pasta and drain and add pesto. Done!

Summer Blueberry Cake

I just keep finding new recipes for blueberries. I love blueberries and they are so abundant right now and in peak season. I love them right out of the containers, and I love them in muffins, pies, cakes and cobblers. Here is another delicious cake which you can freeze and a few months from now when fresh blueberries aren’t really around ,you will bring back that summer day that you baked this. I cut this in 1/2 , 1/2 for now and 1/2 for when I return in the winter. You can always make this with frozen berries but I have never done so. To me it’s all about cooking with fruits and vegetables that are seasonal.  There really is nothing like fresh seasonal fruits and vegetables, and I can’t get enough of them . This is a fairly easy cake to bake. I baked it for 45 minutes, and the tester came out clean. You’ll have to check your own oven for cooking time . It can vary from 40 – 50 minutes depending on your oven.

I found this recipe on one of my favorite cooking blogs , Smitten Kitchen. I may have made a few changes which I often do, but it is pretty much the same.


Ingredients:

2 cups all – purpose flour, plus another tablespoon to dust blueberries with

1 tablespoon baking powder

1 teaspoon table salt

2 sticks unsalted butter ( softened) YIKES

3/4 cup light brown sugar packed

1/2 cup sugar ( regular granulated sugar)

3 large eggs ( room temperature)

1 cup buttermilk ( I used low-fat buttermilk)

1/2 cup fresh blueberries

Topping:

1/2 cup fresh blueberries

1/4 cup granulated sugar

1/2 teaspoon ground cinnamon

Directions:

Adjust oven rack to middle position and preheat oven to 350 degrees. Spray and lightly flour a 9 x 13 baking pan. ( I prefer Pam baking spray)

Whisk 2 cups flour, baking powder, and salt together in a medium size bowl. With electric mixer, beat butter and sugars on medium high-speed until fluffy. Add eggs one at a time, beating until each egg is just incorporated. Don’t overbeat. Reduce speed to medium and beat in 1/3 of the flour mixture, and beat in 1/2 of the buttermilk. Beat in another 1/3 of the flour and the remaining milk, and then the remaining flour mixture. Toss  blueberries with a tablespoon of flour just lightly dust them. Using a rubber spatula, gently fold in 1/2 of the blueberries. Spread batter into prepared dish.( see photo)

For the topping:

Scatter remaining 1/2 of the blueberries over the top of the batter. Stir sugar and cinnamon together in small bowl and sprinkle all over the top of the batter. Bake until cake tester or toothpick comes out clean in center of cake. I cooked for 45 minutes. It should take anywhere between 40 – 50 minutes. Cool in pan for about 1/2 hour, then turn it out of baking dish or cut out pieces. I turned it out, cut in 1/2 and froze 1/2 of it for the cold months. This is a delightful cake served for dessert, and so perfect for breakfast and a great afternoon snack with ice coffee .