Chicken Tortilla Soup

img_3215

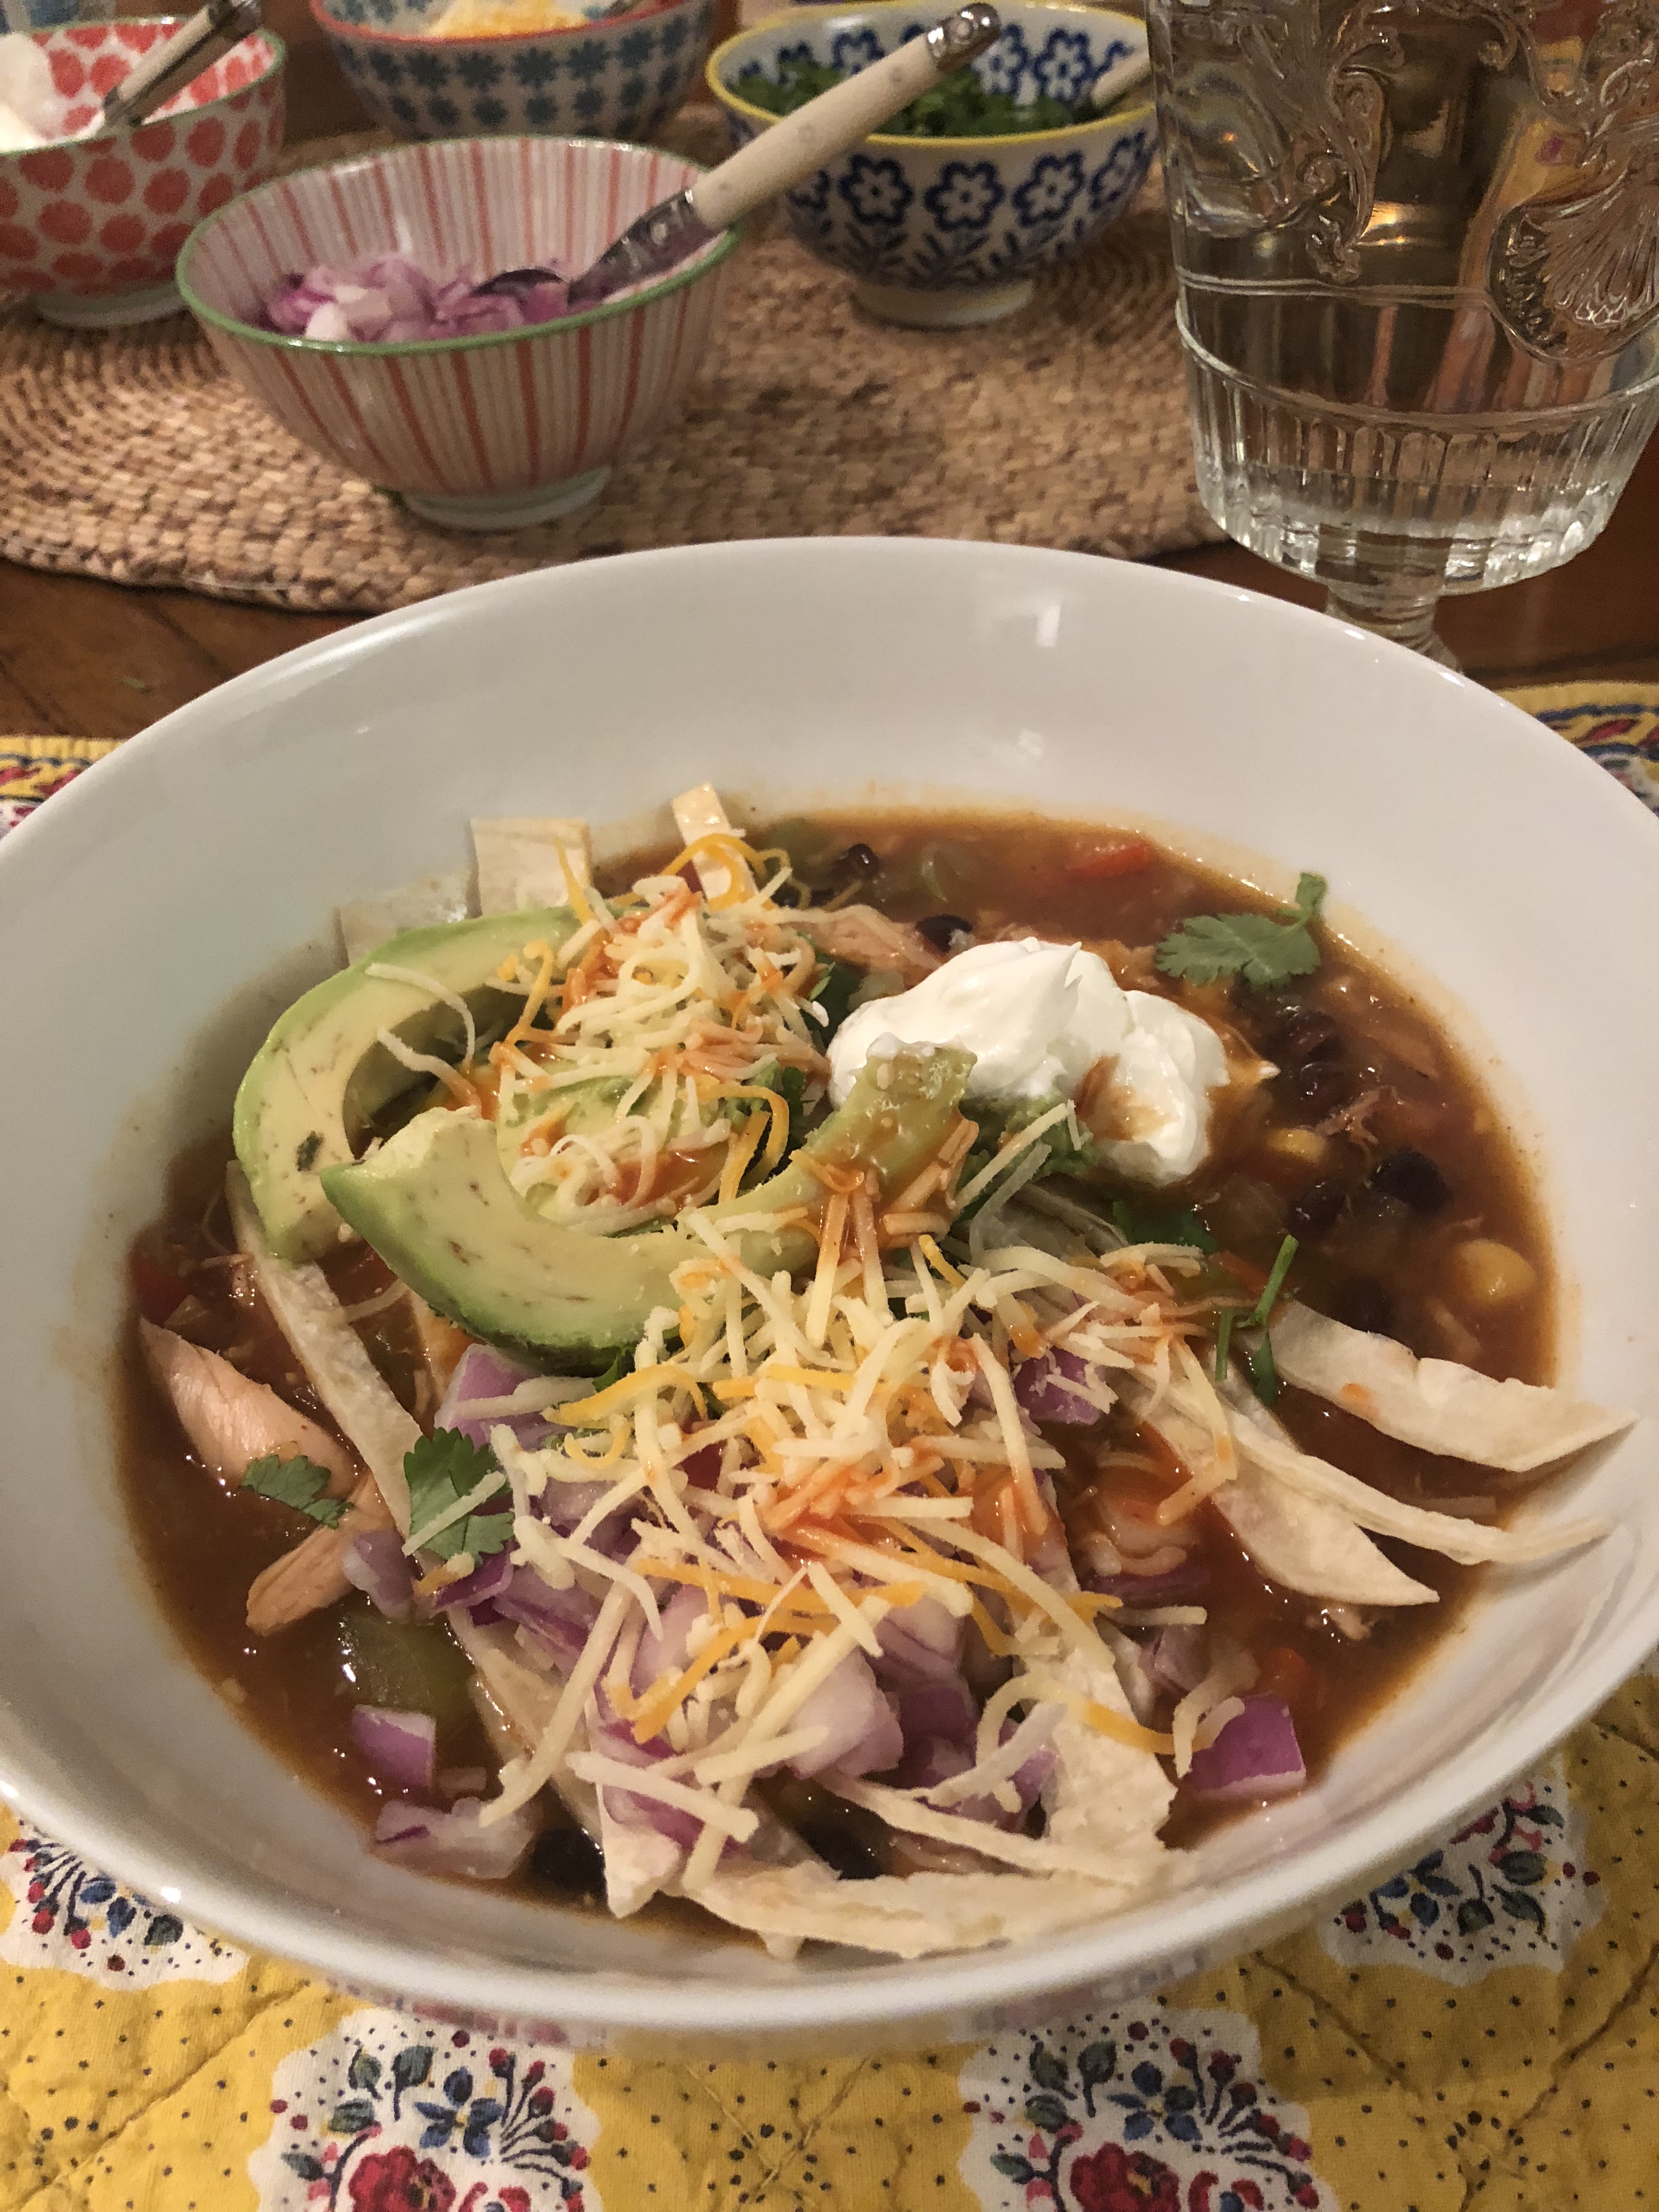
This soup has always been a favorite of mine and I usually try to order it when it’s offered on a menu. I am a big fan of Mexican Food and have always wanted to try to make my own Chicken Tortilla Soup .This is a super easy version using a store-bought rotisserie chicken and a packet of Taco Seasoning.  Now that the weather has turned super cold it’s a perfect time for heart warming meals. I started cooking soup in the afternoon, prep was pretty quick and I let it simmer for an hour and then turned off stove while we went out. When we got home I turned on the stove and continued cooking soup. I cut up avocado, chopped up some cilantro, put sour cream and cheese into some little bowls and in less than 1/2 hour we were sitting eating this delicious and tasty soup! Joel even ate the avocado!!!!  He loved the soup and it’s very filling. 

I use crispy tortillas if that’s what I have in the house. It is delicious with soft corn tortillas sliced up and added into the soup at the end also. I love when the crunchy chips go soft in the soup with the melted cheese– I could go on and on about this soup. Tonite I used soft tortillas.

If you have the time I suggest making this soup, it is so easy with a prepared chicken or you can make your own chicken .  The prep is about 15 minutes using store-bought chicken and cooking is about 1 1/2 to 2 hours for soup.  I just think soup tastes better the longer it sits. I prefer making it in the early part of the day and letting it sit on the stove for a while.

This is a big soup and will probably serve 6-8 nicely. I have a container in my freezer and 4 of us ate this soup.

Look for my slow cooker version also on my blog.

Enjoy!

Ingredients:

1 Rotisserie Chicken from your favorite supermarket

1 Tablespoon Olive Oil

1 Packet of Taco Seasoning — this is really easy , use whatever brand you like

1 cup diced onion

3 cloves garlic, peeled and minced

1 diced green pepper

1 diced yellow, red or orange pepper

1 10 oz. can  Rotel brand Tomatoes and Green Chiles–just a suggestion

1 can enchilada sauce– green or red ( in Mexican Food section of your supermarket) its a small sized can

1 15 oz. can of whole-kernel corn  – drained

32 ounces Chicken Broth

3 Tablespoons Tomato Paste

4 cups hot water

2 cans Black Beans , drained and rinsed unless they’re organic and then you don’t have to rinse but I always do anyway

3 Tablespoons Cornmeal –mixed with water ( see instructions)

5 Soft Corn Tortillas (I use the small ones) cut into uniform strips or crunchy tortilla chips–use as many or as little as you like–or skip all together for a lighter version.

Toppings:

*optional and use whatever you like — these are just some suggestions

Sour Cream

Cilantro

Grated Cheese –Monterey Jack is a good choice here or Mexican Blend Grated Cheese

Cut-Up Avocado

Salsa or Pico De Gallo

Diced Red Onion

Diced Fresh Jalapeno

Hot Sauce like Cholula is my favorite go to sauce

Directions:

I took skin off chicken and shredded most of the chicken meat.

Heat 1 Tbsp. Olive Oil in a large Pot –dutch oven is great here (Le Creuset) add onions, peppers, and minced garlic. Stir and begin cooking, then add the packet of Taco Seasonings if it’s very dry and hard to stir you can add a little more olive oil. Add in the shredded chicken and stir it all up.

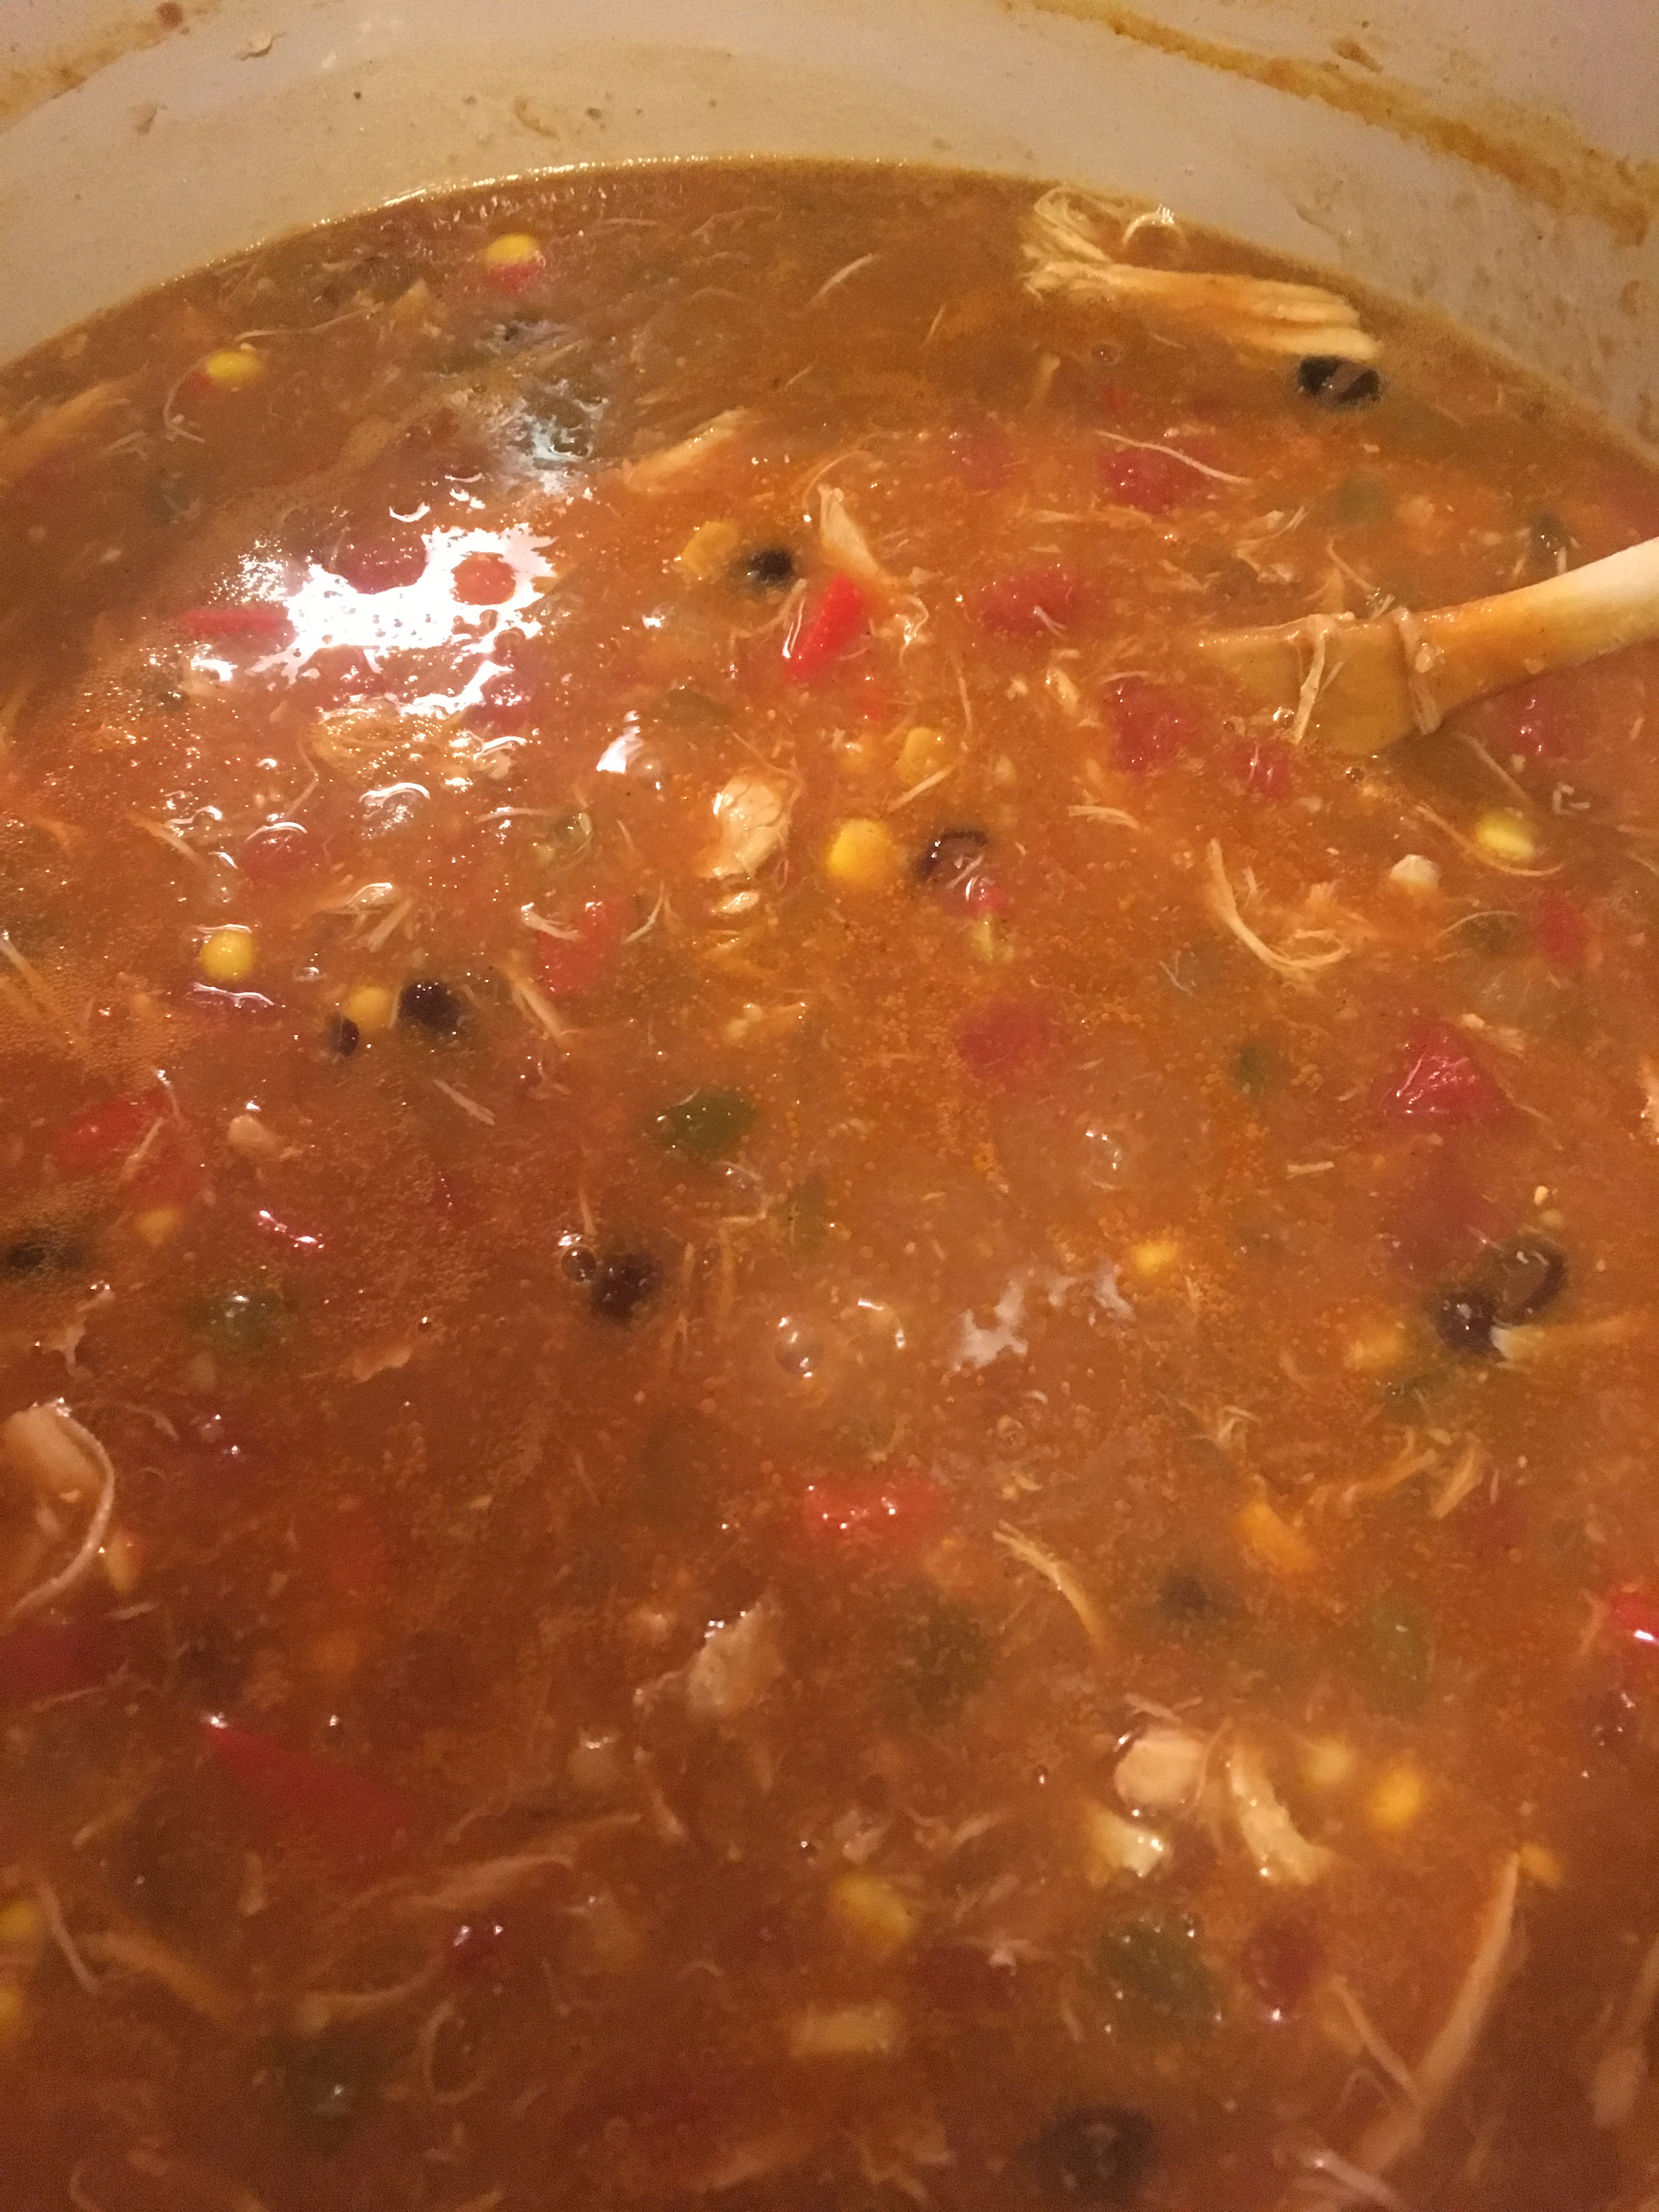
Pour in Rotel, chicken stock, tomato paste, enchilada sauce, water , black beans and corn. Bring to a boil, then reduce heat to a simmer. Simmer for app. 45 minutes to an hour, uncovered.

In a little bowl mix 3 cornmeal with a small amount of water , just enough to mix it into a paste like consistency. Pour into the soup, then simmer for an additional 30 minutes at least, I cooked for another hour. I always believe the soup is best when it sits for a long time.

Check seasonings, adding more salt if you need it , I added kosher salt because I felt it needed it. Taste has to be your guide but be sure not to undersalt, you don’t want this to be bland. Turn off heat and allow to sit for about 20 minutes.

Five minutes before serving, gently stir in the tortilla strips if you’re using them.

Ladle into bowls, then top with your favorite toppings and there you go! I think the chips/tortillas make this soup along with the cilantro and avocado. Let your taste be your guide here.


Cauliflower Fried Rice

I picked up a couple of bags of cauliflower rice last time I was in the supermarket and I made a cauliflower pizza one night and then I made this rice last night. The original recipe was posted back in October 2018. I have to admit that since you can now find  cauliflower already chopped up and ready to use there is no excuse not to make this. I used to have to chop the cauliflower in my processor which was time consuming and I would have to dry it on towels as it was always slightly watery. Now it’s available in pre-prepared cauliflower rice packages and this is a “game changer”.  Green Giant chopped cauliflower in a bag as well as at Trader Joe’s and Whole Foods and almost every supermarket now has pre-chopped cauliflower rice.  The pre-chopped bags come in 16 ounce size bags which is what I used for this recipe.  You can buy extra bags and keep them frozen!  It’s wildly popular so grab it while you can and get a few extra bags while you’re at it. Of course you can always chop your own if you don’t have access to any of these products.

This was so delicious I have added chicken and shrimp but you can certainly leave it vegetarian and add more vegetables or tofu.  There are so very many variations on this theme, feel free to go wild with it. It’s a low carb alternative to regular rice and a delicious healthy way to do so. I served it up in a large bowl and it was really a filling delicious dinner. 

Leftovers for lunch are the best part of any good recipe and this is so good the next day with a quick heat-up.

Follow me @cookingwithcandi on Instagram and if you do make one of my recipes please post and tag me .

Ingredients:

1 bag chopped cauliflower rice ( I found Green Giant brand and used it) I used a 16 oz. bag  you can use up to 24 oz. Or 1 medium head of cauliflower.

3 Tablespoons reduced sodium soy sauce- you may want to add more at the end , you’ll wait and taste–add to your own liking and you can even leave it on the table and have everyone add to their own liking

1 1/2 Tablespoon Sesame Oil

2 Tablespoons vegetable oil, plus a little bit for eggs as well. You can cut the oil down on eggs if you’d like. I felt like I needed the 2 tbsp. of oil for onions , etc. You can start 1 tbsp. and add as you need.

1/4 teaspoon ground ginger– you can use fresh if you prefer

2 large eggs-beaten

1 – 1 1/2 cup frozen peas and carrots –I had it in the house and how easy was this? you can use broccoli or corn or all. Or just plain frozen peas which works well when that’s all you have.

1 onion diced

3 cloves garlic -minced

1/8 teaspoon freshly ground black pepper , about 6 grinds on the pepper mill will do

*pinch of crushed red pepper

*chicken, shrimp whatever protein you like . I used thin chicken cutlets that I  cooked in a pan ( sprinkle with salt and pepper first) and in a little vegetable oil just cook till ready. if I were making for more people I would probably add about 1/2 lb. of cutlets diced up.  I use 1 – 1 1/2 lbs. of thin chicken cutlets .

2 green onions (scallions) thinly sliced

*salt and pepper to taste — you may want to add a little but don’t add till the end and you’ve tasted it. I added a little sprinkling of salt and pepper.

Directions:

If you must make the cauliflower rice, take out the processor, pulse cauliflower in the large bowl of a food processor until it resembles rice, about 3 minutes, set aside. If you bought the bag–you’re ready.

In a small bowl, whisk together soy sauce, sesame oil, ginger and a little black pepper

Heat about 1/2 Tbsp. of vegetable oil in a medium skillet over low heat , add beaten eggs and scramble them and then I set them aside .

I put chicken cutlets in a bowl and give them a light glaze of olive oil and lightly salt and pepper. Heat up a grill pan or any pan and pan fry the chicken. A grill pan gives it nice marks but it really doesn’t matter. Cook chicken till just cooked remove and cover with aluminum foil. I start  cooking everything else and while onions are cooking and chicken has cooled down a bit I cut it up into small pieces and return to bowl.

Heat 1- 2 Tablespoons Vegetable Oil in a large skillet or wok over medium high heat. Add garlic and onion to the skillet and cook, stirring often, until onions become translucent, at least 5 minutes. I like my onions translucent for this recipe. Lower the heat and stir in peas and carrots (and any other veggies you’d like) and cook until vegetables are tender, about 5 minutes. I ended up using the 2 Tablespoons of oil, do what works best for you.

Stir in the cauliflower, diced up eggs, green onions and soy sauce mixture. Cook, stirring constantly, until heated through and the cauliflower is tender, about 5 minutes . Taste for soy sauce and add if necessary. I didn’t add any salt because the soy sauce was salty enough. After the first five minutes of cooking I throw in the cooked protein that I am using and continue to heat it all up stirring as I go. If you ‘d like you can also add more soy sauce at this point. Just heat till hot and serve.

Taste for Salt and Pepper and Soy Sauce.

This is a very loose recipe so feel free to experiment. As you can see from photos I have made it with peas and carrots and just peas and if I have kale in the house I throw it in as well.

Fried Rice with Chicken

This recipe has a lot of ingredients but it really is pretty easy to execute. I have to say this just tasted down right delicious and pretty healthy as well. The chicken was yummy along with all the other ingredients. I used 2 pouches of Basmati Rice from Uncle Ben’s ( they’re the 8.5 oz. bags) you can also make your own rice but I opted for the easy route. I like a long grain rice and you can use brown rice if you’d like. The pouches save time and I made a few hours ahead and let it sit out to cool off. Of course you can add any vegetables you like. This really was delicious.

Ingredients:

4 cups cooked rice — like I said I used 2 pouches of Basmati Rice made it a few hours ahead and let it sit in pouch on counter . You’ll want the rice completely cooled off. Leftover rice works well here too. Or use white, long grain or brown rice.

2 Tablespoons canola or vegetable oil or peanut oil

2 Tablespoons Sesame Oil

1 cup chopped onions — yellow or white onions

3 green onions, trimmed and sliced into thin rounds

1 cup frozen peas and carrots — I don’t thaw I use straight from freezer

3 garlic cloves, finely minced

3 eggs, lightly beaten

1 lb. boneless skinless chicken breasts, diced into small pieces — cut up and sprinkle lightly with kosher salt and freshly ground black pepper

Sauce:

1/4 cup Hoisin Sauce

1/4 cup Oyster Sauce– if no oyster sauce use soy sauce

2 tsp. garlic/chili paste– worth buying Sambal Delek ground fresh chili paste — available in most supermarkets or specialty stores you can omit if you can’t find but it adds a wonderful layer of flavor

1 1/2 tsp. Sesame Oil

Mix all the ingredients with a whisk or a fork and set aside.

Directions:

In a large non-stick skillet or wok ( spray with cooking spray) add the Sesame Oil and Canola Oil and heat up ( medium high) and cook chicken. Flip chicken around so all sides get cooked evenly. Cooking time will vary depending on thickness of your chicken. When chicken is finished cooking remove with a slotted spoon allowing oil and cooking juices to remain in skillet. Put chicken in a bowl and set aside.

With pan on medium low to high add the peas, carrots, green onions and onions cook for a few minutes, or until vegetables soften , stirring occasionally.

Add the minced garlic and cook for another minute or so, stirring.

I scrambled eggs in a separate pan but if you’d like to use 1 pan push vegetables aside and add the eggs to the other side and cook to scramble.

Add the chicken and rice mix all ingredients and then add the sauce. I cooked through for another few minutes and didn’t think it needed any additional Salt and Pepper, but everyone has their own taste so taste for S and P. Cook for a few more minutes till chicken is warmed through. Serve it up!

*leftovers will keep for a few days or freeze . Re-heat gently — I think the microwave works best for re-heating.

Cauliflower Chicken Parmesan

Here it is with cheese baked on top --honestly delicious either waycheese on topI came across this recipe a while back and every time I make it and post a picture of it people request recipe again so here it is again. I pretty much followed Jennifer Fisher’s recipe on her site for this recipe. I made a few changes but basically that was it. It’s pretty easy and ingredients are easy to obtain which is so important.

Very delicious and pretty healthy and a good way to get vegetables into everyone.

Thanks to @jenniferfisher.com for this delicious recipe.

This is what I did and I think it’s the kind of recipe you may play around with yourself.

Ingredients:

1 bag Cauliflower Rice– 16 oz.

1 small onion -finely diced

1 Tablespoon Olive Oil for onions

1 cup Tomato Sauce — I actually made my own because I had so much free time but you can use Raos which is my preferred brand if using jarred sauce or any sauce you’d like

1 lb. Chicken Tenders — I happen to have them in my freezer but you can use any chicken you’d like here. I cooked up and cut up into small pieces. *see note below on the chicken

1/2 cup grated parmesan cheese — divided

1 cup shredded Mozzarella Cheese –plus more if you would like to sprinkle more on top before baking — divided 1/2 into mixture and app. 1/2 on top

Kosher Salt

Directions:

Heat the olive oil – Add the onion and cook for a few minutes till onions start to look translucent. ( app. 5 minutes) Add cauliflower rice and some kosher salt ( app. 1 teaspoon ) and cook stirring often to get this going. I sauteed for approximately 10 minutes until rice was tender (al dente), add cooked cut up chicken and 1/2 cup sauce and continue allowing to cook down. Continue stirring and cooking for a few more minutes. Taste for salt and tenderness of the rice– as I said I like rice to have a little bite not mushy. Add remaining 1/2 cup sauce and cook down a few more minutes. Toss in 1/2 cup mozzarella and 1/4 cup parmesan and mix well to combine.

I sprayed a small rectangular baking dish with cooking spray ( this is important) you can use an 8×8 or I think mine was 11 x 7 actually.

I transferred mixture to baking dish and top it off with the rest of the mozzarella and the rest of the parmesan. ( 1/2 cup more of mozzarella you can add more if you feel you need to and 1/4 cup more of the parm)

Bake at 350 degrees until it starts to bubble around edges and mozzarella starts to gets brown and the edges get crunchy . I cooked for app. 20 minutes. All ovens vary and I like it just starting to brown and edges crunchy.

It was more than enough for the two of us and I actually think this was good for 3 people. Maybe 4 if you have a substantial salad .

*pics on top show it both ways with cheese on top and without– obviously if you’re looking for a lower calorie route go without –it’s delicious either way

We had a small simple green salad alongside and it was perfection.

*a little note on what I did with chicken tenders. I put in a bowl and added a little olive oil ( just to give a light glaze to chicken) and kosher salt and freshly ground pepper–mixed around and heated up on a grill pan. If no grill pan any pan will do. I cooked chicken till just done because it’s going back in pan and into oven for more cooking. (but it was fully cooked)

Maple Dijonaisse Baked Salmon

Yes that’s right I used Maple Syrup, Dijon Mustard and Mayonnaise in this recipe. Baked at a low temp for the first 20 minutes then a little higher for the last 5 minutes. It was delicious and perfectly cooked and melt in your mouth kind of goodness. Sweet and Savory served over rice with a vegetable or green salad. We love Cilantro so used it here but if you hate it just omit it.

Kick up your weeknight meal game with this recipe or save it for guests.

This is what I did for the two of us and I had a piece left over for lunch the next day which tasted wonderful cold.

Ingredients:

1 lb. skin on Salmon Filet — I used 1 large piece ( see photo) ask the fish store to cut it from the center so all the same cooking time, otherwise the end pieces may get more well done.

12 sprigs of fresh cilantro if you’re using

2 Tablespoons Pure Maple Syrup

2 Tablespoons Dijon Mustard

1 Tablespoon Mayonnaise — I use regular mayo not sure if this will work with fat free but low fat should be fine

Kosher Salt and Freshly Ground Black Pepper

Directions:

Remove salmon from refrigerator and let it sit out for a bit so it’s not ice cold–

Heat oven to 325 degrees

I grabbed the bunch of cilantro sprigs( about 12 sprigs) by their stems and sliced off the leaves, then I cut the stems crosswise and sliced stems into small pieces and saved the leaves for garnish

Transfer cut stems to a small bowl and stir in the maple syrup, dijon and mayo — mix well

Spray a baking sheet with cooking spray and place salmon on baking sheet and sprinkle with Salt and Pepper skin side down. Slather the sauce over the top of Salmon.

I cooked Salmon at 325 degrees for the first 20 mins . Then I raised the heat to 350 degrees for the last 5 minutes.

Bake until a paring knife slides into the center with only a little resistance. It should be pink but not raw. Salmon does continue cooking for a little bit once it’s removed from oven . Be careful not to over cook. All ovens differ a bit so you may want to check on it.

Top with fresh cilantro leaves and you can squeeze a little lemon on it as well.

Perfection on a plate for dinner and lunch the next day.

Couscous and Butternut Squash Salad with Kale or Arugula –Perfect Autumn Salad

Today is the first day of Fall and this salad is a perfect way to usher in the new season. This salad would really be delicious anytime of the year and if you added a protein it would make a delicious dinner salad.  It is just perfection on a plate. Beautiful to look at and delicious to eat. Fairly Healthy and you can keep it vegan without any dairy or add cheese for a delicious vegetarian salad .  It takes a bit of prep work but you can prep a few hours ahead and be done with it prior to the meal which is always a good thing in my book.

I prepped butternut squash and couscous and used baby arugula this time. I dressed the salad and let it sit , Kale is better when it’s soft and broken down so if you’re using Kale I suggest chopping it.  I love Kale but don’t want to feel like I’m eating my front lawn. It is delicious with kale or arugula or really any greens you prefer.

If you like a heavier dressed salad I would definitely double up the salad dressing. Or just pour a little over it and leave extra for individual dressing.

This is what I did. Enjoy and Happy Fall.

Ingredients:

1 lb . butternut squash – 1 package of pre-cut squash and then I cut into small 1/2 inch cubes

2 Tablespoons olive oil

Kosher Salt and Freshly Ground Black Pepper – to taste

1 cup dry Pearl Couscous , cook in water according to package directions

app. 2 cups chopped Kale Leaves or Arugula is also a great choice if you’re not a kale fan or really 2 cups of any kind of greens you like.

1/3-1/2  cup dried cherries–you can use craisins, raisins, cranberries whatever dried fruit you like -if you like less use 1/3 cup I tend to use more

1/3-1/2  cup chopped walnuts–same as above and you can obviously omit if you don’t like or use chopped pecans or other nuts

*app. 2 oz. crumbled goat or feta cheese if you’d like– I like the creaminess that goat cheese delivers so I use it over feta in this but use whichever you prefer

Orange Vinaigrette Dressing:

2 Tbsp. Apple Cider Vinegar

2 Tbsp. Extra Virgin Olive Oil

2 Tbsp. Freshly-Squeezed Orange Juice –this is a must

pinch of salt and black pepper, to taste

Directions:

To make the salad:

Pre-heat oven to 425 degrees and cut butternut squash into 1/2 inch cubes.

Spread the butternut squash out in an even layer on a baking sheet that’s been sprayed with cooking spray add 2 Tbsp. Olive Oil to squash to coat, sprinkle a little kosher salt and freshly ground black pepper to the squash .  Bake for 15 minutes then flip squash over (as best you can) Bake for an additional 10-15 minutes or until the squash is tender and slightly browned around the edges. Remove from oven and transfer back to the large mixing bowl. Depending on your oven the squash could take a little longer to cook, you just want it soft enough that it’s cooked through and a little browned up

Couscous: buy pearled Israeli Couscous –available everywhere Bring 1 1/4 cups water to a boil add 1 cup Couscous a sprinkle of salt and return to a boil . Reduce heat and simmer covered till tender about 15 minutes.

To make the vinaigrette:

Whisk all ingredients, (orange juice, olive oil, apple cider vinegar and pinch of salt and pepper to taste. I used all of the vinaigrette and it was very lightly dressed and rather tasty. If you prefer more dressing on the side , double the recipe.

Add cooked couscous, kale, cherries, walnuts, goat cheese* and vinaigrette,  toss to combine. Taste for Salt and Pepper after all combined.img_2936img_2933img_2929img_2928

Serve Warm, or refrigerate and this will keep for app. 3 days in fridge.

It’s a very light salad dressing so the kale absorbs it and it will keep nicely in fridge.

Sheet Pan Cashew Chicken

This is one of those perfect sheet pan meals easy to assemble and delicious to eat. Although I usually make this recipe on the stove-top I decided to experiment with it in the oven and all on one pan. Since I used white meat chicken breasts I cooked for about 13 minutes because you want to make sure not to dry out the chicken which is pretty easy to do. You can use dark meat chicken — thighs ( skinless and boneless ) if you prefer . I may use them next time out. Just make sure you spray the sheet pan with cooking spray and really spray or you’ll have a hell of a time cleaning that pan. It’s very tasty served over any rice you’d like or no rice , I used brown rice this time.

I have to say this is a perfect any-night meal.

Ingredients:

1/2 cup Soy Sauce

6 Tablespoons Honey

2 Tablespoons rice wine vinegar

2 Tablespoons toasted sesame oil

3 minced garlic cloves

2 teaspoons freshly grated ginger

2 Bell Peppers cut into chunks ( see pic) I used a Red and an Orange but you can use whatever colors you like

1 Red Onion, cut into chunks ( see pic)

2 boneless, skinless chicken breasts, cut into 1 inch chunks ( use thick breasts) or use boneless skinless thighs –thighs will definitely be less dry

1 cup cashews — I used roasted unsalted cashews don’t use salted ones you can also use raw unsalted cashews

Chopped fresh scallions and sesame seeds for topping — you can toast the sesame seeds in oven for about 7 minutes if you’d like or in a toaster oven — totally optional

*Rice — optional — any rice you like

Directions:

Pre-heat the oven to 425 degrees

In a bowl , whisk together the soy sauce, honey, vinegar, sesame oil , garlic and ginger

Place the peppers and onions on sprayed rimmed baking sheet and pour 1/2 the sauce over it and mix it well.

Roast in the oven for 15 minutes.

Place the chicken in a bowl with the remainder of the marinade.

After the first 15 minutes, remove baking sheet from the oven , move vegetables around so there is room for chicken , add the chicken and the cashews.

Roast until the chicken is cooked through– 12-15 minutes depending on the size of your chicken.

Toss everything together on the sheet before serving.

Serve over rice and sprinkle with scallions and sesame seeds.

Cauliflower, Orzo and Feta Salad

IMG_0858

Completed Salad

IMG_0854

Before I added the spinach

This is one of my most favorite salads of all time. The flavors meld together beautifully to make a most delicious salad. I highly recommend this salad if you’re just looking for something new to make for brunch, lunch or even dinner! I got this recipe from Chrissy Teigen’s Cookbook Cravings a few years back and it has gone into constant rotation ever since. Perfect for dinner, brunch or lunch anytime of the year.

I made cauliflower and orzo in the morning and put together ingredients as they cooled down. The cooling off of orzo and cauliflower was the only time-consuming event in making this recipe. You can refrigerate salad once cooled down, but I would bring it to room temperature prior to serving.

If you want to add a protein like chicken this would make a most perfect dinner salad. Or just eat it veggie style! Nothing bad here!

Ingredients:

Cauliflower and Orzo Prep

1 head cauliflower broken into small florets, any color cauliflower will do and purple would be beautiful if you can find it

4 Tablespoons olive oil

3 minced cloves of fresh garlic

1 teaspoon kosher salt

1/2 teaspoon freshly ground black pepper

1 cup orzo pasta

Dressing and the rest of the salad

3 Tablespoons olive oil

3 Tablespoons fresh lemon juice

1 teaspoon honey

1 teaspoon Dijon mustard

1/2 teaspoon kosher salt

1/2 teaspoon freshly ground black pepper

1/4 cup thinly sliced red onion

1 cup crumbled feta cheese

2/3 cup dried cherries

4 cups baby spinach

Directions:

Preheat the oven to 400 degrees.

In a bowl toss the cauliflower with the 3 tablespoons of olive oil, the fresh garlic, the salt and pepper. Spread on a rimmed baking sheet and roast until softened and the edges of cauliflower start to brown up. ( not burned) I did it for 25 minutes. Set cauliflower aside and let it completely cool down.

Cook orzo according to box directions, I cooked for a minute less so it would be more al dente ( just a bit undercooked ) Drain in a colander, rinse under cold water, drain well and while draining toss in the remaining 1 tablespoon olive oil right in the colander.

In a big bowl, whisk together 3 tablespoons of olive oil, lemon juice, honey, mustard, salt and pepper.

I allowed about an hour for complete cool down of cauliflower and orzo and added to bowl with dressing along with onion , feta, and cherries . Toss well until completely coated with dressing. Throw in the spinach and toss again till spinach is incorporated. Taste for Salt and Pepper and adjust seasonings to your liking. I added a sprinkle of black  pepper but no more salt.

Enjoy — this was totally delicious.

Baked French Toast — all time best for Yom Kippur Break Fast

DSCN4275

DSCN4288

DSCN4283

DSCN4274

DSCN4270

DSCN4302

DSCN4294I posted this recipe back in October 2011 for Yom Kippur break fast and every Break Fast it is on the table, it’s practically a law in our family now! It is truly one of the best French toast recipes I’ve ever made.  I include it every year since my friend Ilene Stern gave it to me. I never have a single piece left. Delicious and decadent, perfect brunch and breakfast food. I almost always include it in my Mother’s Day Brunch as well. Once you’ve made this recipe there is no turning back  your whole family will love it and you’ll have to make it every time.

The only downside is that you must prepare and refrigerate the night before without cooking it, you cannot cook this dish till you’re ready to eat it, the bottom will get hard like a caramel candy would. So cook right before you’re going to serve. Enjoy!

*recipe as is should serve 6- 8 if you have more people make 2 trays!

Yom Kippur begins in the evening of Wednesday, September 15 at Sundown and ends in the evening of Thursday, September 16th

Ingredients:

1 cup packed light brown sugar

1 stick unsalted butter

2 tbsp. corn syrup ( I use Karo Original light corn syrup)

5 eggs (room temperature please)

1 1/2 cups milk ( you can use low-fat, I use Skim Plus)

1 tbsp. vanilla

1 package of sliced cinnamon bread. ( Pepperidge Farm is fine) if you can get thick slices it’s great , but the thin kind will work just double stack them it will be fine) You probably will use 12 slices of bread per tray. You will have 6 stacks of 2 slices each, 12 slices total, or 6 thick slices of cinnamon bread. If you can’t find just cinnamon bread use raisin cinnamon bread it’s easier to find .

Directions:

Melt butter, add brown sugar and corn syrup and combine well. Spray a 9×13 baking dish, Pyrex works well here. Pour butter mixture into baking dish and arrange bread slices flat in the mixture ( you will double stack the thin sliced bread) Unless the bread is 1″thick you will be doubling the standard sliced bread. Squeeze the bread to fit–it should hold 12 slices ( 6 double stacks), 3 on each side of a 9×13 baking dish.

In a blender mix the eggs, milk and vanilla and pour over the bread slices, covering them completely. Cover and refrigerate overnight. The bread will absorb all the liquid by the morning, so if you need to travel with it will be fine.

Uncover and bake in a preheated 350 degree oven for 30 minutes. Once it’s out of the oven you can dust with powdered sugar, but not necessary. Serve right from the baking dish.

*if you let this sit out too long before serving, the bottom may get hard like a praline candy. It never ever lasts long enough for this to happen at my table.

Easy Fast to all .

Follow me on Instagram @cookingwithcandi

My Farewell to Nora Ephron: her Tzimmes

Nora Ephron was a wonderful writer and filmmaker. When she died,  her recipes were passed around  at her memorial service. This one was printed in the NY Times and I held on to it so I would be able to pay some small homage to her. Since Rosh Hashanah is almost here, I thought it appropriate to post this recipe, which is a traditional Jewish dish of stewed fruits and vegetables. The funny part about this recipe is that, in it, Nora states that it is “delicious with a pork roast”. You have to laugh at her delicious sense of humor. I will miss her work and so this is my homage to her–the woman and the artist. I will think of her with fondness when I prepare this dish.

Happy Healthy New Year to all!

*original post was back in 2012 when she passed

Ingredients:

5 carrots cut in various shapes

3 peeled yams cut into pieces

2 cups butternut squash cut up

1 cup dried apricots

1 cup pitted prunes

1/4 cup raisins

2 cups beef stock

3 tbsp. butter or margarine

1/3 cup brown or white sugar or marmalade

1 tbsp. cornstarch

Directions:

In a small pot bring the beef stock to a boil with the butter.

Add the carrots and boil for about 5 minutes till tender but not overcooked. Remove with a slotted spoon to a bowl. Add 3 peeled yams, and boil for about 5 – 7 minutes till tender but not overcooked. Remove to bowl with carrots. Add butternut squash and boil until tender but not overcooked. Remove to bowl. Add a cup of dried apricots and cook 5 minutes, remove, and then do the same with the prunes. Add some raisins for a minute or two. Then boil down the broth that’s left, adding about 1/3 cup sugar, white or brown; or if you prefer 1/3 cup marmalade. When mixture is reduced by about half, remove about 1/2 cup to a measuring cup. Whisk 1 tbsp. cornstarch into it, then add broth to the pot, and whisk until thickened. Put all the vegetables and fruit into a large, pretty casserole dish, and pour the broth over it. Before serving, reheat at 400 degrees for about 15 minutes.

* I printed this directly off of her recipe from the NY Times